As someone who uses a few iOS devices around the house, I’ve become fond of visiting sites and seeing a little banner that lets me know that a native app is available for the web app I’m using.  This concept was introduced in iOS 6 and called “Smart App Banners” in the developer documentation.  You may have seen them as well

Smart App Banner example

I wanted to provide the same affordance for Windows Store apps and recalled there are already two ways to integrate the web app browsing experience with the native app in the Windows Store:

In iOS, this is implemented a bit natively in mobile Safari, not through any additional JavaScript files/functions.  As with any random idea I have, I always set out to search if it has been done before (often it already has).  I couldn’t find something like this specifically for Windows Store apps, however I did find an implementation for pre-iOS6 browsers as well as Android.  It was from Arnold Daniels and hosted on GitHub, so what’s a guy to do?  Fork it!

And that’s what I did: https://github.com/timheuer/jquery.smartbanner

With a few more conditional checks, if you put this in your web app/site now you’ll get it automatically linked to your Windows Store app if you have the correct meta tags.  For the implementation for Windows Store apps I’ve made some assumptions about the meta tags used.  The following would get you a good experience:

   1: <html>
   2:   <head>
   3:     <title>Hulu Plus</title>
   4:     <meta name="author" content="Hulu LLC"/>
   5:     <meta name="msApplication-ID" content="App" />
   6:     <meta name="msApplication-PackageFamilyName" content="HuluLLC.HuluPlus_fphbd361v8tya" />
   7:     <link rel="stylesheet" href="jquery.smartbanner.css" type="text/css" media="screen"/>
   8:     <meta name="msapplication-TileImage" content="http://wscont1.apps.microsoft.com/winstore/1x/c8ac8bab-d412-4981-8f31-2d163815afe4/Icon.6809.png" />
   9:   </head>
  10:   <body>
  11:         <script src="http://ajax.googleapis.com/ajax/libs/jquery/1.8/jquery.min.js"></script>
   1:  
   2:         <script src="jquery.smartbanner.js">
   1: </script>
   2:         <script type="text/javascript">
   3:             $(function () { $.smartbanner() })
   4:         
</script>
  12:   </body>
  13: </html>

If you have the combination of linking your app using the msApplication-ID and msApplication-PackageFamilyName values and the pinned sites high fidelity msApplication-TileImage value to deliver the combined experience.  If you have all these, then the banner “just works” for you.

NOTE: Because the Microsoft documentation mixes msApplication and msapplication (note the casing on the “A”), you should use the capitalization (which is more consistent in the documentation) for ensuring it all works smoothly. 

Now some may use a different pinned site TileImage than that of what they may use for the app tile, however this can also be overridden in the options:

   1: $(function () { $.smartbanner({ icon:'http://some/url/to/tile/image.png' }) })

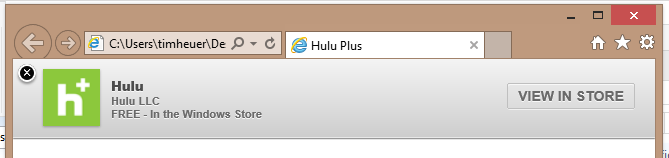
When done the web app/site would display a dismissable banner (using Hulu as an example here) on a machine running Windows 8:

Hulu smart app banner example

So adding one reference, 2 files and an initialization and you’ll help give your app a bit more promotional flare for those viewing in browsers other than the ‘modern’ IE view.  As you can see the screenshot above is from the desktop version which doesn’t take advantage of the other msApplication-** attribute usage in desktop mode.  The one thing it doesn’t do that the iOS system-level banner does is detect if the app is installed and change “view” to “open” however there isn’t a mechanism to easily detect if the app is installed using JavaScript from a web app.

NOTE: While the ‘View in Store’ button works in IE, Safari and Firefox it does not work in Chrome.  I’m not sure what any timeframe it would be for Chrome to support the store launch protocol.

Anyhow, I thought this might be a useful addition to app developers web apps that have a Windows Store app counterpart (and perhaps already have an iOS and Androi counterpart as well).  I’ve submitted a pull request to the project I forked from, but you can get it from my GitHub repository for jquery.smartbanner.

Hope this helps!

So you got that shiny new Surface device today?  I’m sure you spent the first few hours just opening it up, setting your personal experiences to your desire, re-installing and discovering new apps.

But you are a developer and now you want to see how your app looks on this great device…Here are some tips to get you quickly started.

Setting up the tools

One thing to keep in mind is that Surface is NOT a full ‘desktop’ machine and runs on an ARM processor.  This means to that you cannot install Visual Studio directly on the Surface RT device.  You will need to still ensure that you have a full development environment set up.  But the first thing you will need is to get the remote developer tools for Visual Studio *for your target remote device* architecture.  For Surface RT, this is the ARM tools.

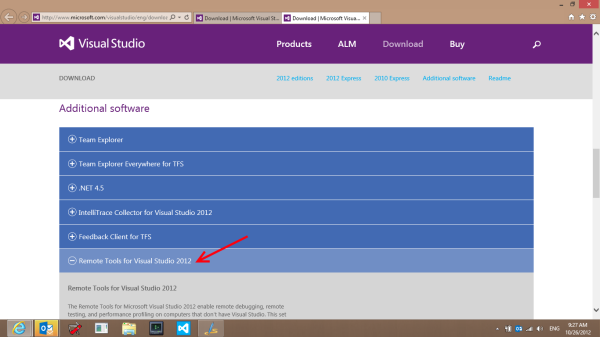
You can get them here: Microsoft Visual Studio Downloads.  Scroll down a bit and look in the “Additional Software” section.  Grab the Remote Tools for Visual Studio 2012 section. 

Remote tools for VS download

You can do this either from the desktop browser on the Surface or from your own desktop and download the remote tools for ARM to a USB key.

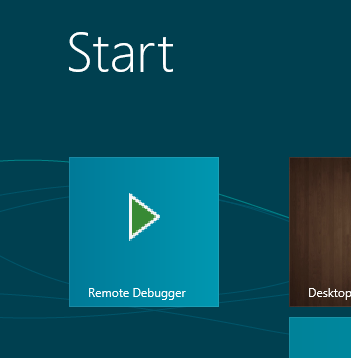
On your device, install the remote tools for ARM.  No other Visual Studio installation is required here.  Just run the installer.  When completed you should have a tile on your screen for the tools:

Remote Debugger tile

Now you can get started with your remote debug session!

Configuring the Remote Debugger

After install go ahead and launch the Remote Debugger on your device.  You’ll be presented with (maybe after some firewall questions you need to authorize) the remote debugger now running and in default mode:

Remote Debugger launched

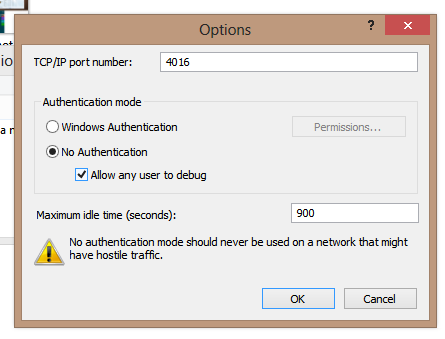
By default, it is set up secure.  This means that in order to attach a remote session you’d need to ensure permissions are correct, etc.  Now since your ARM device isn’t likely on the same domain/workgroup as your developer machine this may be tricky.  Personally, I turn off the authentication options to make my developer experience smoother.  Now of course, you shouldn’t leave your device in this state, but you can close the remote debugger when complete.  Here is the config that I use on my remote debugger:

Remote Debugger config

This allows me to just launch the app on the remote machine without having to use any special authentication tricks since the machine isn’t on my domain, etc.  My remote environment is now set up and ready for me to launch an app and start debugging!

Launching an App on the remote debugger

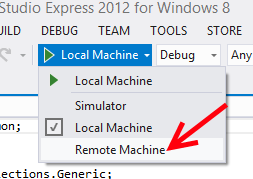
Now that your remote device is configured and listening, you want to start your app and debug remotely.  Once you have your app in Visual Studio you’ll want to change your launch target to “Remote Device” in the IDE.  This is in the toolbar or in the project properties.  For a C# application it looks like this:

Select Remote Machine target

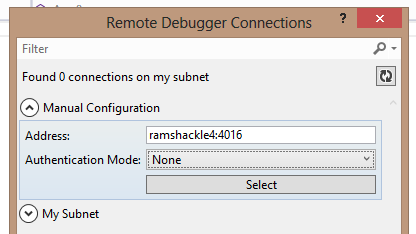
Once you launch that you’ll be able to select your device.  Now if you are on your home network, with no domains and all on the same subnet, you may just be able to discover your device in the remote debugger connections window.  However you can also just specify the machine name.  Be sure to match the authentication method in this window with what you chose when you set up the remote debugger…in my case “none.”

Remote Debugger connections window

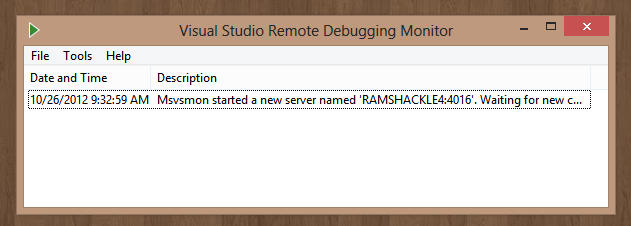
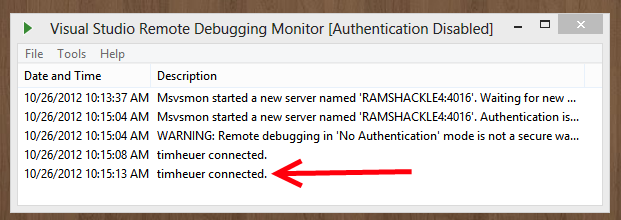
Now that the configuration is there (and selected), when I run (F5) the application it will attempt to deploy it on the remote device.  When you run you’ll notice the remote debugger will show the connections:

Remote debugger connected window

And in your developer workstation you’ll be able to set breakpoints, investigate watch parameters, etc.  All the same stuff you normally do is still available to you.

Summary

Now that you have a Surface (or other Windows RT device) running on an ARM processor, this remote debugging toolset/workflow will be important to you.  The great thing is that once it is set up and you understand the flow, it is very simple and seamless to use.  This presents a great opportunity for you to debug and profile your apps on Windows RT to see any areas that you might be able to optimize for the target device.  And all you need is Visual Studio Express for Windows 8 (free) and the Remote Debugger tools for Visual Studio 2012 (free)

Hope this helps!

In some of our internal discussion lists there was some questions about how to host certain content for their application.  Most of the discussion came up from apps needing a privacy policy (Rule 4.1 from the Windows Store App Certification Requirements).  Some folks had apps they just developed, but no “site” or service they were using.  But they needed to host a privacy policy.  Lots of thoughts were floated around and I suggested Azure Free Web Sites as an option.  I originally suggested it as a simple way you could just have a URL to a privacy policy, but…duh, you could easily use it as a very quick marketing site for your app.

Creating a web site in Windows Azure

If you didn’t know, Windows Azure allows you to create a free web site!  It is very quick and simple to set up once you have your Azure account set up.  After doing that go to the portal and choose to create a new Web Site.  I recommend picking from the gallery and choosing WordPress.  There is such a vast ecosystem around WordPress as a CMS system that it is simple to use and set up. 

NOTE: Of course you can use others, even a static web site using the TFS/Git deploy feature even.  Do whatever you want.  I just think WordPress is great and allows you to scale your site features without writing code, etc.

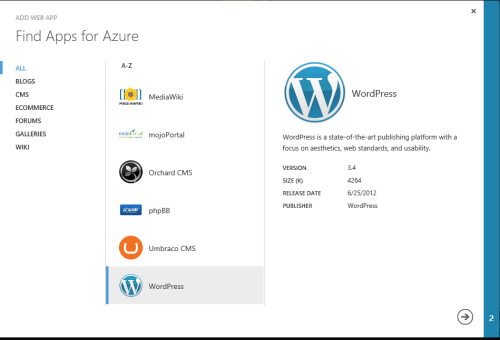
Choose to create a site from the gallery:

Azure Find Apps image

This will walk you through a wizard to pick some names and options.  It is pretty self explanatory.  Once completed you will see your site provisioned in the portal.

Azure web sites image

Just click that link and you will be taken to your site…which for WordPress will be the initial setup page to choose your login.

Choosing a WordPress Theme

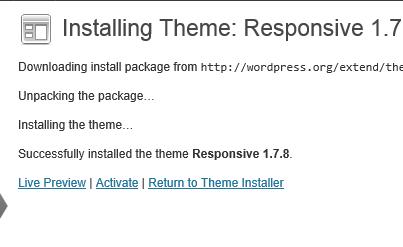
Once in the WordPress admin site, choose the Appearance option on the left, then the Themes sub-menu.  Once there, go to the Install Themes tab to pick a theme from the gallery.  Optionally you can grab a premium theme from various sites.  There is one called “Responsive” (search for that term) that is in the built-in gallery, free, and actually serves the basic needs well.  We’ll choose that one:

Responsive theme install image

After you pick it you’ll want to Activate it as the current theme.  Now let’s do some simple configuration.

Configure the WordPress site

In order to serve the goal of making this more of a marketing site and to host our privacy policy we don’t need commenting on pages.  Additionally we want “nice” URLs for our site.  Let’s start with a few simple tweaks.

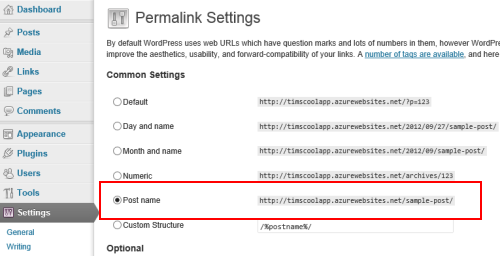
First (in the WordPress admin site) go to Settings->Permalinks.  Choose the “Post name” option.

WordPress permalink settings image

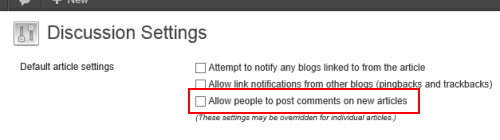
Next go to Settings->Discussions.  In the top uncheck the “Allow people to post comments on new articles” in the top:

WordPress discussion settings image

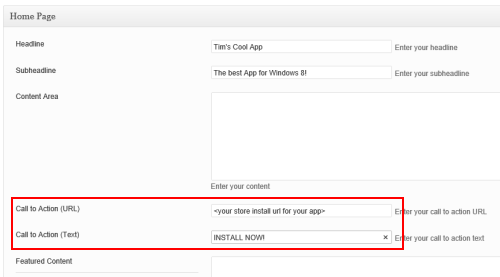
This will prevent commenting on content.  Next using the Responsive theme we can configure the home page.  Go to the Appearance->Theme Options section.  You’ll see a “Home Page” option for the Responsive theme.  You can set the main text, tagline and two other options.  This gives you the chance to set the URL for your app that is provided from the Windows Store. 

Here are some posts to help you find URLs for your app: Linking your apps on the web and Connect your web site to your store app.

Here is an example:

Responsive theme home page config image

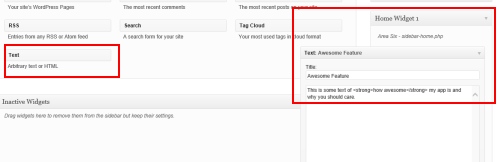
Now go to Appearance->Widgets to modify some information on the home page for the 3 widget areas.  These could be simple things like a quick blurb about what the app is, maybe some top features, or whatever.  In the admin widget area you’ll see Home Page Widget 1,2,3.  Simply add the “Text” widget to these and you can add the title/text for this:

Home page widget image

You can also remove the theme logo to provide your own logo in the Appearance->Header section to provide your own image.  You can also specify a custom image on the main “hero” section of the home page instead of the default image and specify that.  Once all these quick tweaks are done, your home page is done.  Visit the site to see the quick changes.

Now let’s add our privacy policy so we have a permanent place for our privacy details.

Add a Privacy Policy page

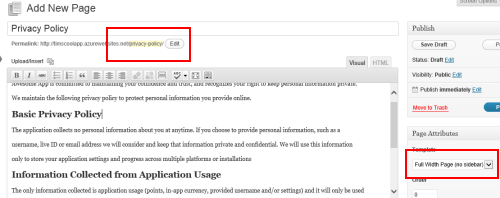
From the WordPress admin site, go to Pages->Add Page.  Name it “Privacy Policy” and then type in your privacy policy text.  You can modify the text using HTML formatting to fit your needs.  Make sure to use the “Full Width Page” template so that it shows the entire page.  Notice the URL for the permalink.  I recommend keeping it simple with “privacy” or “privacy-policy” as the name (which should be default):

Privacy page editing image

Once you Publish the page, your site will now have a link to “Privacy Policy” on the home page and you can use that in your site, for your certification process and other areas you may need it.

You can now provide a link within your app to your privacy policy as well.  Andy has a simple method of adding it to the Settings charm and simply linking to your online site now.  You can visit the site to confirm it looks as you wish:

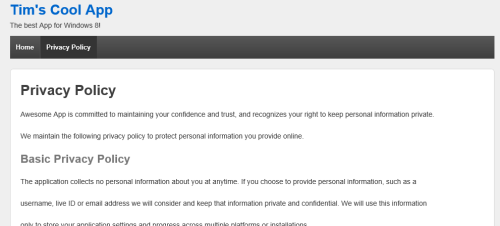
Privacy page image

Done!  You can see this example at http://timscoolapp.azurewebsites.net

Profit!

Now you have a free site on Azure to host marketing your app.  Of course this helps those getting over the hump with providing a nice place for a simple privacy page, but also enables you to have a way to provide other pages for your app.  You could provide more detail on features, have a form to collect feature requests, whatever.  WordPress is very flexible and the same process you used to create the privacy page can be used for other full-page content.  Or you can explore what WordPress has to offer you.  Again, there are many different ways you can do this and even within WordPress other themes you could choose.  However I think the Responsive one is a simple one to get started with as a base.

You may want to not have “azurewebsites.net” as your site URL as well.  If you wanted you can migrate to a shared instance (not free) and have custom domain name resolution on your Azure site as well.

Hope this helps!

I was helping a friend today doing some over-the-shoulder code review and suggestions for his Windows app he’s writing for the store.  In doing this I asked a question about how to perform a certain action.  He indicated that he put those functions in the AppBar and was it not obvious I was supposed to use them.  I looked at the AppBar again and found out why I wasn’t drawn to them.  First, the labels he used weren’t descriptive to me and relied too much on me looking at the actual icon.  Second, however, is that when I hovered over them I received no visual feedback I was expecting and immediately thought they were just disabled (the color was slightly gray as well which probably didn’t help this).

I mentioned these to him and noted he should use the AppBarButtonStyle base definition that comes in the Visual Studio templates as a guide and just set the appropriate content.  He proceeded to let me know that he received the vector data from Syncfusion’s Metro Studio product.  We then began to examine the vector data.  Metro Studio is doing probably too much than it needs to for AppBar button definitions.  To be fair, it serves a goal to get Windows UI style icons for the developers in XAML form.  This is great!  However, if my intention is to use them for AppBar buttons, then it is doing too much.  It led me down a path to see how easy it was to use vector data with the default AppBarButtonStyle definition.  Turns out it wasn’t as simple as I thought.  Let me first explain the core issue then walk through a step on how to do this with vector data.

Fill versus Foreground

The main culprit is Fill vs. Foreground.  The default AppBarButtonStyle has the different visual states for setting the correct default/inverted colors for your icon within the ellipse.  These visual states however set these colors based on changing the Foreground property of the ContentPresenter.  When your content is text – as is the case with the default styles that are commented out – this works fine.  However the Path element in XAML understands Fill and Foreground doesn’t really apply.  So while the vector data could be represented in the icon location, it wasn’t working on the different states because the Foreground value changing had no effect!

Let’s see how we can accomplish this…

Step 1: Get your vector data

I mentioned that we discovered this using Syncfusion’s Metro Studio, but this is one way where you can get vector-based artwork for XAML.  Another is http://xamlproject.com which is similar in how it does things.  Both will give you vector data based on a selected icon.

NOTE: The one thing I don’t like about The XAML Project site is the sizer doesn’t tell me what size I’m using.  Metro Studio gave me the option to set a specific size.

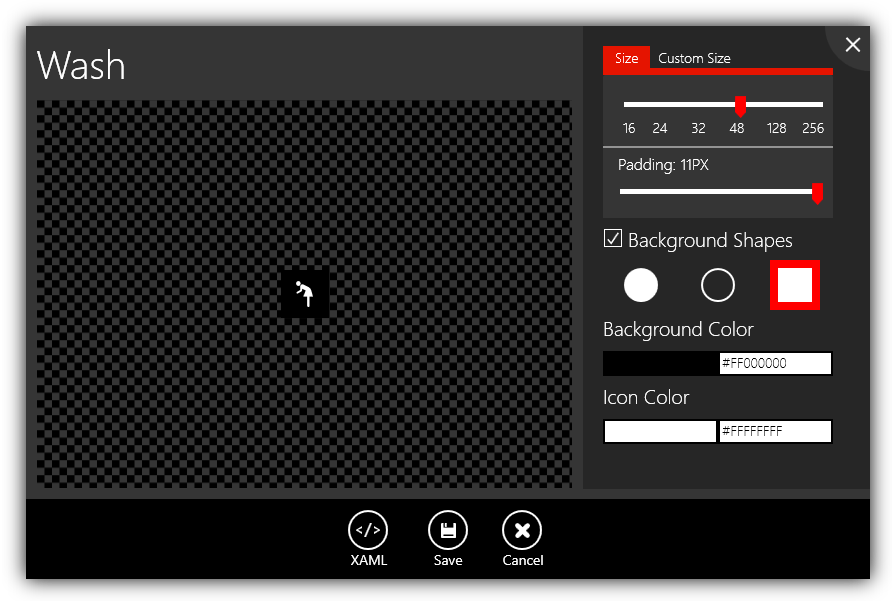
When we launch Metro Studio we can search for different items based on keywords.  Since the Segoe UI Symbol font includes a ton of these for us (all of which are represented in a commented-out style definition in StandardStyles.xaml you can just uncomment and use) I will pick an obscure one called “wash” from Metro Studio.  When I select to edit it I’m presented with a default UI to modify the data:

Metro Studio user interface

Now notice how it gives me options for background shapes, etc.?  For an AppBar button you do not these shapes so you can uncheck that option.  Secondarily the ideal size is 20px with no padding.  The colors (background color and icon color) don’t really matter here as we aren’t going to use them to get the default AppBar button style.  My final options look like this:

Metro Studio user interface

Notice I unchecked the Background Shapes option, chose Custom Size and entered 20 with 0 padding.

Now what I do is click the XAML button and am presented with the full definition.  You don’t need it all.  Just copy only the path Data to your clipboard or wherever you can get it later.

Metro Studio path data export

Now that we have our vector data we need to put it in our button.

Step 2: Creating the path button definition

Because of the Fill versus Foreground issue we can’t just simply use the AppBarButtonStyle as the button style and just set our vector data.  We will not receive the correct state visuals when it is used.  So we first need to re-define a base that we can use.  Since I may use other vector data in the future, I’ll encapsulate this in a new base style I’ll call PathBasedAppBarButtonStyle.  This will allow me to remap Foreground to my Fill property to achieve the desired outcome.  The resulting style is this:

   1: <Style x:Key="PathBasedAppBarButtonStyle" BasedOn="{StaticResource AppBarButtonStyle}" TargetType="ButtonBase">
   2:     <Setter Property="ContentTemplate">
   3:         <Setter.Value>
   4:             <DataTemplate>
   5:                 <Path Width="20" Height="20" 
   6:             Stretch="Uniform" 
   7:             Fill="{Binding Path=Foreground, RelativeSource={RelativeSource Mode=TemplatedParent}}" 
   8:             Data="{Binding Path=Content, RelativeSource={RelativeSource Mode=TemplatedParent}}"/>
   9:             </DataTemplate>
  10:         </Setter.Value>
  11:     </Setter>
  12: </Style>

Notice that for Fill and Data I’m using Binding with the RelativeSource being the TemplatedParent…the actual Button.  This allows me to essentially get at those properties that will be set and put them in my Path element that makes up the container for the vector data.

Step 3: Setting our custom vector data

Using the exported definition from my “wash” icon above, I can now use the style in my AppBar resulting in something like this:

   1: <Page.BottomAppBar>
   2:     <AppBar IsOpen="True">
   3:         <Button Style="{StaticResource PathBasedAppBarButtonStyle}" 
   4:                 AutomationProperties.Name="Wash" AutomationProperties.AutomationId="WashAppBarButton"
   5:                 Content="M9.6803506,4.8474294C10.209365 ... 3.5652149,0z" />
   6:     </AppBar>
   7: </Page.BottomAppBar>

Please note that I trimmed the Path data so as not to take up so much space for your reading.  I set my Button to use the base style, then set my label (via AutomationProperties.Name) and the Content is the exported vector data from the tool.

NOTE: AutomationProperties.Name is used here in the base AppBarButtonStyle to enable us to expose the Content property as the icon and still have a label.  By using this property you also get accessibility for free in using these styles for this particular instance.  Screen readers will read out the name you set when using this.

The resulting visual is correct in the AppBar UI guidelines:

Wash AppBar Icon displayed

Now when my users mouse-hover or press this button the correct visuals and state changes will happen.

Summary

The default AppBarButtonStyle base definition provided from the Visual Studio templates is optimized for the 150+ styles provided in StandardStyles.xaml and font-based vector data.  For most, this is likely more than enough to use the same icons that are used throughout the operating system to give a consistent feel.  If you find one in the 150+ styles provided you should use that.  However if there is something entirely custom or not available in those, you can use your own vector data to provide your AppBar icon.  Using fonts and vectors make it easy to scale up to the different resources without having to provide different images if you used that method.  Defining a new base for vector data isn’t difficult and provides us the flexibility when we need it!

Hope this helps!

In the late nights when I have time to work on Callisto (my Windows 8 XAML toolkit), I often am making changes that I really wish I could either pair with someone on or at a minimum solicit some feedback.  Primarily single-person open source projects are lonely :-).

Last night was no different.  I had a user of Callisto having a problem with a specific code path.  While my testing of the fix was fine, I didn’t want to rush it without him understanding the simple fix.  I had no good way of showing him a combined diff to comment on at the time.  My problem was, what I thought, simple: how do I quickly share a diff from a GitHub project without requiring them to have a fork?

I set out to the best place to have an argument, Twitter.  I asked the same question and got a lot of different responses, but almost all of them pointing to what appears to be the typical git flow in this matter is to use pull requests for code reviews and sharing potential updates.  This really frustrated me as I thought it was unnatural to the goal I was trying to accomplish.  Lots of folks told me this was the way to do it and that I was thinking about it wrong.  To them I say this is broken.  I didn’t want to pollute pull requests to be a mix of legitimate pull requests to “in-flight” code changes that shouldn’t be even considered for merge yet.  I simply wanted a quick, light-weight way to share a diff graph.

Paul Betts (as he has always awesomely helped with my GitHub questions) pointed me to the thing I was ultimately looking for:

   1: git diff > current.diff

This gave me the output that I needed and Gist understands color coding for this data so I just needed to post it there.  Good thing is that GitHub has an API that is relatively simple to understand.  Since I’ve been using poshgit as my shell lately I set out to create a CmdLet for my flow.  I wanted one command that would grab the diff and post to a Gist and give me the URL.  I’ve never touched a line of PowerShell programming before and set out to start.

Honestly, it was painful to understand PowerShell for me in this simple task.  The PowerShell “IDE” is slow to help with any really good flow.  I wanted some VS experience to bootstrap me and I knew I didn’t want a full-on assembly approach.  A PowerShell script should do me just fine.  I scoured many sites online and started out with my script.  After a few hours of searching/trying I was almost there but still not successful.  I ended the night posting back to Twitter with a Gist of my attempt.

It was late, I went to bed.  As is how most things happen on the interwebs, I awoke to some pointers to where someone has already done most of the work!  Despite my searching I never found something that basically took me 90% there already.  This was in the form of PsGist.  Boom!  This is exactly what I needed.  I just needed to modify the input from a literal file to the source of the diff.  I spent an unnecessary hour fighting with an unauthorized error on the GitHub API due to some unexpected value being in the string captured after entering credentials, but after that was solved I was done.  I decided to merge this back to PsGist and submit a pull request for the new command.  A few minutes later and after a few questions/quick modification, it was merged.  I now have a simple/fast flow to quickly say “hey, here’s what I’m working on, what do you think?” to anyone without having to do any different branching that isn’t currently in my flow.

   1: New-DiffGist -Description "SettingsFlyout fix" -Public

After the module is imported the above command will perform a diff, and immediately post that to Gist and give you the URL (and optionally launch in browser if you use the –Launch param).  I know it may sound trivial, but it helps my flow and is the simple thing that I was looking for.  Thanks Ryan for the PsGist starting point (and for merging my new CmdLet)!

Hope this helps someone!