I wanted to believe, I really did.  It has been over a month since my first impressions of the Amazon Kindle Fire.  Over the holidays, I processed a return for my Kindle Fire.  When the Fire was announced I was intrigued and excited as I thought that Amazon had the real potential to make a great product and the customer base to capitalize on that potential.  For me, it just didn’t live up to the hype.  I’ll stress that last sentence…this is my opinion based on my experiences/desires.  As with anything in life, your mileage may vary.

So what went wrong?

I used the Fire a lot.  I watched videos on it daily (my evening ritual of getting caught up on TV) via Netflix and Hulu apps.  I rented about 10 movies via Amazon on the device.  For video, it was great.  For everything else, it was pretty much frustrating for me.  I’ve been able to isolate it to a few areas: apps, user experience, prejudice.

Apps

I downloaded the free daily app from the Amazon Android store daily…and ended up with a device full of sub-standard products mostly.  The Hulu app really was the only 3rd party one that I felt was designed for the Fire and did most things well.  Even then it had quirks, but mostly it was fine.  Netflix’s app is horrible, lagging, confusing and not enjoyable to use before you get to the playing content.  Most other apps just weren’t doing anything for me.

The lack of a Mail solution *provided by the device* for my mail configuration led to a decreased usage in the device to me.  The responsiveness in the games that I acquired was just not there as well.  Overall I felt the only “app” I was using was video playback.  Everything else wasn’t cutting it…even the Kindle reading app was just too bright for me for long periods of reading.

User Experience

Large area of failure here for me.  Here’s my list of areas that lacked polish and just failed:

  • Hardware home button – I’m realizing how important this really is.  My kids couldn’t figure out how to get back to the ‘start’ screen.  On the iPad, they know immediately.
  • Software ‘home bar’ (not sure what to call it) sometimes appeared, sometimes didn’t.
  • Touch responsiveness – I felt like I had to do gestures multiple times to get it to respond.  The first update was said to fix some of this, but it didn’t do anything noticeable for my use.
  • Touch feedback – I know this seems odd, but there were times I couldn’t tell if I had actually completed a touch interaction…visual state changes didn’t happen, etc.
  • Orientation changing – general inconsistency here in what was supported or not within the own set of experiences delivered by the Fire.  But the transition from one orientation to another was jarring, like a snap rather than a smooth transition.
  • Apps experience – no consistency.  I’m not looking for lets-make-every-app-the-same consistency, but as a user there was know real reliability in controls usage, visuals, responsiveness, action expectations, etc.  This is the good/bad of the Android platform – ultimate freedom but at the price of confusion and quality sometimes.
  • Application lifetime – the management of the state of an application was horrible for an end-user.  The parts of Android really showed through here.  I would occasionally get “not responding” windows in an application or when trying to start one.  These types of things do not pass the mother-in-law sniff test for me.

These were some of the things that continually frustrated me.  There were other nits, but not always in my face. 

Prejudice

Aside from any technical reasons the biggest factor for my return is prejudice.  Don’t get me wrong, I love Amazon.  I’m a Prime member, and only get my purchased digital media from them (i.e., video rentals and MP3).  They have great service offerings and catalog of goods.  These are all the reasons I thought they could execute well out-of-the-gate with the Fire.

However, I also have an iPad.

Make no mistake about it: if you use an iPad for the same amount of time you use a Kindle Fire, you will likely share the same experience that the iPad just is an all-around better product currently.  Now the media (and users like myself) are the ones drawing the comparisons of the Fire to an iPad.  Amazon itself hasn’t done any comparisons side-by-side or even remotely close.  They have never marketed (to my knowledge) the Fire as an iPad competitor.  But that doesn’t matter…because consumers rule the world and we have already drawn that conclusion.  Bottom line is that if you are making a touch device I can travel with that has media and a store where I can get application and content – you’re competing with the iPad.

Since I already am an iPad user I could not erase the experience that I have with my iPad when using the Fire.  All my user experience annoyances around touch are because it is just better on the iPad.  If I didn’t have an iPad, maybe my perception would be hugely different.  But since I have one, my prejudice is set and the comparison bar as well.

Holiday gift taste test

When I arrived to the in-laws for the holidays they mentioned they were getting my wife’s ~80yr old (*very* active) grandmother a Kindle Fire because that is what she wanted.  I shirked a bit (and probably commented too much) at the idea and told them I didn’t think this was a good idea.  GG (as we call her since she has 12 great-grandchildren) is not technically savvy and has never had anything remotely considered “new tech” in her life.  I knew that it would fall on me to be the resident Nick Burns and trainer for the holiday week.  And the time did come where I had to do that.  It went something like this *before* we started configuring her Fire…

Me: GG, why do you want a Fire?
GG: I want to get ‘with the times’ and this seems to be a hot item.
Me: Do you have an Amazon account or have ever bought anything on Amazon?
GG: No, never.  Can’t I put books on it?
Me: Yes, but where do you plan on getting those books?
GG: Can’t I get them anywhere?
Me: No, you’ll be buying them through Amazon.

NOTE: I didn’t want to explain that technically you could put other publications on there as I knew that would be an action never accomplished.

GG: You mean I can’t get something from Barnes and Noble and put it on my Fire?
Me: No.  But why would you, Amazon has a massive content library.
GG: Well, that seems monopolistic.  What about movies?
Me: Yep, you can get movies, but through Amazon.
Me: Most of the time anything you put on there you will be buying from Amazon

This point seemed to have been lost on GG when desiring this device.  Regardless we proceeded with the setup.  Now since the device was purchased from the mother-in-law, when powered on it was attached to her account and we had to set up a new account for GG.  This was going to be fun, I thought.

The first step was to create an Amazon account since she didn’t have one.  The first screen on the Fire to do this asks for 4 simple bits of information: email, username, password, password confirmation.  This was the first introduction GG had to a software keyboard and it did not go well.  The first mistake made was to “press” the keyboard and I had to educate that click, press, push are no longer useful but rather tap, swipe, tap+hold are the new ways she needed to think.  This took some training as she continually hit wrong keys, held the key too long which produced duplicates, etc.  I am not sure if it was her bifocals or what but GG was continually ‘off by 1’ on the keyboard and we had many times to The password field was the hardest because it obfuscated the letter after typing it, providing minimal visual time to see if what was typed was correct.  Now I timed this exercise myself so I could see how long this really took.  With no exaggeration the time to complete this screen was about 30 minutes.  The password/re-enter password took up most of that time.  The next screen was address information…to which I offered to enter this data for her :-).  After that was credit card data.

GG: Why do they need my credit card?
Me: How do you plan on buying anything, money order?

In seriousness, this pointed to a generational gap of this concept of stored account information for one-click purchasing that is available on things like Amazon, Apple, anywhere.

We moved on to a review of the Fire and notable me mentioning that the user guide itself was a Kindle book.  This did not please GG as she was used to a manual.  Since she is a Scrabble lover and other folks in the house were playing Words with Friends, we downloaded that app, set her up an account, and taught her how to play that.  Again, the touch interaction here was painful to watch.

My bottom line for sharing this anecdote is that I don’t think the Fire is an every-generation device.  Contrast that to the iPad, where I think she would have had a much better on-boarding experience.  I left GG alone for the day with her device and the next day she shared her frustration that things didn’t seem to work and it was hard to use the touch keyboard and understand what to do.  Now I can easily (and will) chalk this up to a generational thing and a first-time ‘device’ user in GG.  However, it pointed to a fact to me that the Fire is only for a class of folks who are familiar with computers in a more-than-one-time-usage manner.

Summary

I will stress that again, for me, the Kindle Fire was a bust.  I still faithfully have my own Kindle reader which I will still hail as the ultimate in reading devices (and think that is what GG should exchange her Fire for).  The Fire, in current form, however is a bust in my opinion.  I think Amazon *can* get this right if they put some muscle behind it and tighten up the Android edges that show and concentrate a little more on experience refinement.  I absolutely loved the size of the device (hoping Apple takes note) and think that in a few versions they might get it right.

But for now, the Kindle Fire has been returned…and with a great customer service policy, my money fully refunded, satisfaction guaranteed.

Lately I’ve been doing a lot of re-paving of machines and I never had my favorite tools on them, nor did I want to spend the time to re-install a set of tools that I knew I would blow away each day anyway.  Mostly my daily builds have been to do some scenario validation and is quite repetitive.  However there are times where a stable build combination comes along that I keep for a while to work on customer apps or sample development.  When these times happen I find myself needing my helpful little utilities more frequently.

Recently I’ve been trying to learn Git, a version control system that has been gaining popularity over the past few years and is quite cool and agile.  I am generally a huge fan of GUI tools because I feel that they are more in line with how I use other parts of the operating system/tools.  When exploring Git, however, I wasn’t a fan of having to re-install any of the tools over and over and do configuration, etc.  That’s when I discovered portable Git.  It immediately made me realize how dumb I’ve been all this time across machines and renewed my love for portable tools.

What is a portable tool? 

Quite simply it is a tool, regardless of size, that can run with no other dependencies than those that it comes with in the directory or executable.  No requirement of “oh you must have Foo framework 1.0.2.123 installed to use this” as the portable tools completely operate on their own.  Now some are single, small executables.  Others are full-blown programs that bring some serious runtime environments with them.  But both don’t require anything to pre-exist and can run without installation.

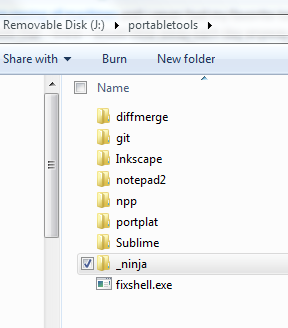
I took one of my 8GB USB drives (Costco was having a sale – 3 8GB sticks for $24!!) and started loading up my favorites.  Here’s what it ended up like:

portable tools directory

Now I use other tools on a more stable basis and when Windows 8 goes into more stable releases, I’ll probably lock to on-the-metal installs for those.  I also don’t require any huge amount of tools all the time, but like my favorites.  So what are those directories?

  • DiffMerge – a great, simple-but-visual tool to help do file or directory diff checking and merging if desired.  Some like WinDiff a lot, but I’ve been liking DiffMerge lately.
  • Git – as mentioned above, this is the portable Git tools which provides a bash or command prompt environment.
  • Inkscape – a vector-based graphics tool
  • Notepad2 – my absolute favorite simple text editor
  • Notepad++ (npp in the above image) – another great text editor.  Why two you ask?  The one thing I like about Notepad++ is that I can open up multiple files at a time and do find/replaces across multiple files.  I don’t always do that, but it is a time saver when I need it.
  • Sublime Text – yet another text editor.  When looking for cool portable tools I found this one.  I’m not sure I’ll use it given Notepad2/++ but since it is in the picture, I thought I’d explain it.  Some say it is the TextMate for Windows.
  • “portplat” – more on this in a bit.
  • _ninja – I wish I could tell…but, well can’t

This USB is now extremely helpful to me on a regular basis.  After loading up a new machine I have instant access to tiny little things that just make me more familiar and immediately productive.

NOTE: There are a few more that I use more infrequently but I think I’ll add to my USB key like reflector-type tools.

In writing this post I wanted more…a lot more and started looking around.  Then I found PortableApps.com!  I felt like a complete idiot when I discovered this because I thought I was so cool to seek out portable tools and here was this site who already aggregated them for me and went above that and made it easy to acquire them!

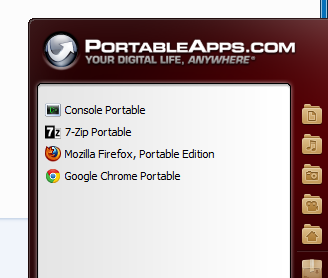
What they do is provide a “Portable Apps Platform” that serves as basically a mini-launcher for a set of portable tools.  In addition to my folders above, here’s what my USB key now allows me to have as well:

Portable Apps Platform

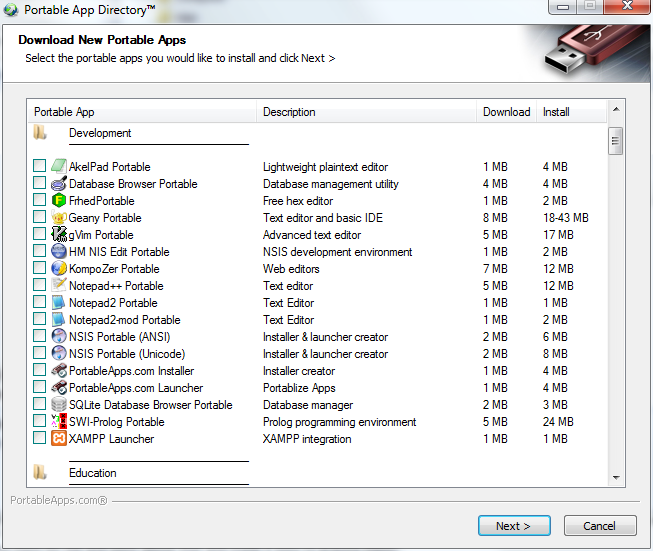
Now I should note that my existing tools (with the exception of diffmerge and git) are all available through this Portable Apps Platform tool setup.  I was already set up in my ways so I figured no need to change what I already had.  The Portable Apps Platform tool has a directory of a ton of apps:

Portable App Directory

Notice the scrollbar in that image above?  There is lots of stuff here.  Most I would never need, but nonetheless it is there…even portable games!

So now I have versions of some browsers on my USB and two of my other favorite tools I didn’t even know were portable: 7-zip and Console2.  The great thing as well is that any configuration you make for these portable tools travel as well…so my customizations for my Console2 environment are on the USB drive and I don’t have to set up my fonts/colors each time!

Within each tool there are likely customizations that you may want.  For example, I like having the “Open With…” settings on my context menu for Notepad2 and Notepad++ for convenience.  On my USB key I keep a setup.bat file with any special configurations for each tool that I want (that may either not be kept in the portable environment or may be machine-specific like the context menu).  I quickly run that and am ready to use my tools how I’m familiar with them. 

Some tools also have config files built in to their environments, like Git.  I was sick of continually typing git config –global user.name “Tim Heuer” and other config each time I set that up.  Luckily a few questions on Twitter and Paul Betts was able to point me to the obvious.  So now I have a customized .gitconfig file on my USB key and whenever I use the bash environment my settings are already there!

So what’s missing?

I’m feeing liberated with these tools lately that now I’m frustrated I can’t get everything in an install-free environment! 

Please don’t rant about Mac, Linux, whatever OS environment lets me do that.  I’m on Windows and it doesn’t for everything.  Yes…the registry lives…I deal with it.

There are a few things I wish that were portable that would complete me.

  • Visual Studio – ah, someday maybe, someday.
  • Paint.NET – While Inkscape is awesome, it isn’t as familiar with me as Photoshop-esque tools.  Paint.NET is the closest to that and would be awesome to always have around.
  • Fiddler – nuf said.
  • Silverlight Spy – extremely cool tool

It’s not a long list, but these are some regular tools that I wish were portable. 

So there you have it.  If you haven’t discovered a portable set of tools, you should get out a USB key and load some up.  Who knows when you’ll find it handy!

One of the features introduced with Silverlight 4 was the out-of-browser feature, enabling you to create an application that can be installed, run offline, automatically updated, etc.  As a part of that feature, some of the major code signing certificate vendors (for Authenticode certs) provided our team with test certificates so that we could go through the same process as a developer would to acquire the cert and apply it to an app…and, of course, validate it works.

During that time some of those vendors had promotional codes for the first year for Silverlight developers, providing reduced-rate (but not reduced quality) code-signing certificates for their apps.  Still during this time there were a lot that questioned why some providers were still expensive and didn’t value “the little guy.”  By that I mean that there are a lot of smaller firms or independent personal developers.  The thought of dropping a few hundred dollars on a cert is sometimes tough.

Last week a representative contacted me about their offerings as a premier partner of one of those providers.  Certs4less.com is now offering Thawte code-signing certificates for individual developers.  They are doing this at a price of $99 per year (less for multi-year). 

NOTE: As a part of this, like before with SL4, Certs4Less graciously offered a promotional cert for me to validate the end-to-end process so that I could speak accurately about it.  I do not use any of these certs provided by these companies for testing purpose toward any production application and they are for testing purposes only.  Besides, I’ve not found the time to write production code for apps lately ;-).  I am not getting paid for this post, nor am I getting another promo code for personal use myself.  I am simply providing what I think is valuable information and get no compensation from Thawte or Certs4Less.

I went through the process of obtaining this cert from Certs4Less.com and it produced exactly what you’d expect, a valid Authenticode code-signing certificate I can use for my Silverlight and Windows 8 application packages!  I shared a few points of feedback with the contact there and will enumerate them here for you as well (as well as some tips)

Your ‘Common Name’

Think about this one pretty good when you buy a cert.  This has a two-fold purpose why I mention this.  First, it is what your customers will see.  Do you want them to see an app signed by a name that isn’t recognizable or doesn’t make sense…of course not.  Additionally this is the name that will be verified.  So if you claim you work for Fizbin Enterprises, but that doesn’t actually exist…you’ll have issues during verification.

One year, 2 or more

One thing you should know about code-signing certificates is that once they expire, the keys change during renewal.  In some cases this can cause issues for your app (ClickOnce).  For this reason I personally recommend getting the longest you can afford.  Most likely this will be a wise investment and you’ll have piece of mind.

Apply on the computer you will receive it

One thing we as developers don’t do well is read directions.  One of the instructions you’ll see is to be sure that you do the cert request process from the same machine you plan on picking up the cert from!  Seriously, this is critical if you use the browser process because of the private key.  If you don’t…you’ll be screwed and out some cash.  Plan ahead and don’t do this while on vacation on your laptop that you repave weekly.

Verification Process

This is an area where I think I had the most negative feedback.  These verification steps are a bit old.  I understand they have their reasons, but in this digital age the fact that I had to find a notary was…well, just inconvenient.  This Certs4Less/Thawte process required me to do this.  The ‘form’ they emailed me really wasn’t a form…just an email with text broken out with ‘==========================’ before each section.  So when I brought in my printed out GMail ‘form’ to the Notary he looked at me like I was an idiot.  The verification form was nothing formal looking at all and I had to have 3 different people look at it before they finally just said ‘okay’ and signed it.

The thing that was most troublesome in this process was it was a distractor.  I had to actually print stuff out, find a passport, go to a bank, wait in line…you know, real people stuff.  But still, it felt annoying in this modern age.

Some of my other process with other vendors have been a lot more streamlined and I think this can/should improve.

Acquiring the certificate

Most of the time this is a quick process.  Remember when I mentioned that developers don’t read instructions?  Yeah, I’m no different.  The final email I got indicating my cert had instructions that I didn’t read that talked about making sure I had intermediate certificates installed first.  Without this I got ambiguous errors when trying to retrieve my certificate.  Be sure to read any verification instructions in detail to provide a good experience.

Back up/export your certificate

I don’t know about you but I’d probably use my cert in automated build processes, keep it on a share (perhaps a dropbox/Live/git location) so that I don’t have to only use my one machine to sign an app.  One thing I highly recommend is after the key is installed is to use the certmgr.msc tool and export the certificate.  When doing this be sure to export the all the key data as well as cert chain so that your resulting PFX file is portable.  Then you can use it in your build process for Silverlight as described here in my previous blog post about that feature.

Summary

I want to thank Certs4Less for reaching out to the independent developer and providing a valuable product at an ‘independent developer’ price level.  I appreciate them also reaching out to allow me to test the process to verify it is fairly painless and the result is what I expected.

Code-signing certificates are very valuable in many ways and I believe every developer should have one for their personal projects as well as their large ones.

Hope this helps!

Silverlight 5 is finally released!  Congratulations to the team for getting through some of the toughest parts of finishing a product and validating with customers.  It’s been a pretty crazy year for the Silverlight team and this is a really good release for the product bringing some solid features to the platform for folks to leverage in building their apps.

In addition to the platform having a release, I was really pleased to see an update to the Silverlight Toolkit, which has been one of the most popular things almost every Silverlight developer/application uses.  If you didn’t know where to get things, here’s some links for you:

Rather than enumerate all the good features that were finished from the RC/Beta, you should head on over to listen/watch Pete Brown’s presentation on the Silverlight 5 release overview.  He also has a post about the release enumerating in short form (with links to tutorials for some of the key features) on his blog.

What I think is really cool is also the amount of effort put into the Silverlight Toolkit for this release.  The one large thing of note is the extensions to enhance your 3D development experience in Silverlight 5.  David Catuhe has a post outlining in great detail some of the 3D extensions included in the toolkit.  You should really go check out his post.  Scrolling to the bottom I was really surprised/impressed to see a set of 3D samples included to help you understand how to use this feature:

  • Bloom – uses the Content Pipeline and post-processing effects
  • CustomModelEffect
  • Generated geometry – how 3D models generated by code
  • Particles – c’mon, who doesn’t like a particle generator!
  • Platformer - while not 3D it appears, it is a complete game with levels
  • 3D Animation
  • Skinning – shows skinning a character using the content pipeline

I mean, wow, great stuff David! 

I hope you all enjoy the release of Silverlight 5 and kudos to the team for getting it out the door.  Go download the bits and start building awesome stuff.

It seems like a daily question I’ve been answering lately when working on internal email discussion groups and folks report an issue, my initial response is: what build combination are you working on? 

As a part of my job, I like to ensure the fastest resolution (or awareness depending on how you look at it) to issues that affect our product.  This involves staying on top of ‘latest bits’ as we call them.  Every morning I come in and install the latest Windows build as well as the latest Visual Studio build.  We have an automated Hyper-V environment that makes it easy to get the initial Windows builds up and going and then I selectively apply VS on top of that.

So if it sounds so simple, why do I ask that question to people that ask?  Allow me to show you a few diagrams.

The above is a *snapshot* of just a few of the branches that affect the tools area that I work on.  This is not representative of the entire branching structure, which is huge. 

NOTE: This diagram is automatically created for you from Team Foundation Server…you select the branches of interest and it visualizes for you.  There is also an awesome feature to track changes which I’ll note below.

The red box items make up the different teams working to bring together the holistic view of some of the core developer experiences.  Since they aren’t *just* working on my stuff, nobody can live in a single branch together in harmony.  You can see that the spread of varying levels of branches required to get something working is pretty broad.  And merge (we call them RI/FI) processes are on different schedules and managed to reduce conflicts as much as possible.  The above is just one piece of the puzzle – the developer tools.  Windows has a similar ancestry view we have to deal with:

The red boxes here are basically other Windows teams that we need stuff from to get our product working as well.  These RI/FI process go through many, many checks and if any regressions, they don’t allow merging, which can cause issues if you are waiting on a fix to come to your branch!

So the answer to whether something should work at any given time during development milestones has different answers depending on where you got your bits from.  I’ve personally resorted to hosting a page on our team wiki with the title Tim’s Guide to Finding a Build Combination™.  I’ve also added a few helpful scripts to get any missing pieces aligned for builds.  So now I’ve got my daily build routine down to a science.

Occasionally there are times where a fix is completed and I look back at my tracking bugs.  Sometimes you’ll get a team that just fixes things and you aren’t given a chance to test out private bits, or whatever…so you have to go hunt down where the fix is at and when it will come to you.  In most source control systems there is a good mechanism for viewing/following a changeset.  In TFS I think they’ve nailed the feature to do this in two ways of visualization.  You can “track changeset” and choose a timeline view or branch view…it is awesome for pinpointing just where a fix is working the way through the source depots.  Here is a view of a bug using the branching view.  Green shows which branches has the fix (changeset):

Here is another bug using the timeline view showing me when the fix made it to certain branches:

For me, this has been invaluable to really identify when/where things are and determine a predictable path for resolution on issues as they converge.

Managing a process to get a Good Daily Build™ is not always easy when you need pieces coming from two different organizations which are very large and working in many, many branched source depots.  But staying on top of things so you can quickly help your customers/partners move forward progress is a very rewarding experience.  My daily routine has helped me stay on top of the core issues at hand and determine a daily quality on the mainstream scenarios as our customers see them, which isn’t always caught with test automation or unit tests all the time (but yes, we have those too).

Well, a new build just came out…time to update my wiki!