One of the new features to Silverlight 3 is the ability to add multi-touch capabilities to your application.  When I posed the question on Twitter, I got some responses of ideas people would use this for.  Honestly most of them could be accomplished with mouse events today and X/Y calculations.  These would be the touch applications that are pretty singular.  But I did get some multi-touch ideas that I think I’ll try to explore.  First though, let’s look at the basics of what Silverlight provides for multi-touch application development.

Hardware

Hopefully I’m stating the obvious here, but your hardware has to support multi-touch.  And I’m not talking about that fake kind.  I’m talking about hardware that announces the WM_TOUCH messages to Windows.  If you (or your customers) aren’t going to be having multi-touch hardware, then writing against this API isn’t going to help!  I’m currently using the HP TouchSmart TX2 laptop running Windows 7.  I find this to be a good machine and fairly cheap-ish with regard to how laptops are these days and with the features it provides.

The Event

The first thing to understand is how to tap into the touch events from the hardware to Silverlight.  Understanding this at the beginning of your application development can be a critical step.  The key reason for this is unlike other input events (i.e., MouseLeftButtonDown, etc.) which can be added to individual UIElements in an application, the touch event is an application-wide event. 

There is one primary event: FrameReported.  This event is what gets fired when the hardware sends the touch events to the runtime.  The Touch class is a static class for the sole reason of this FrameReported API.  To wire it up in your application you can use code like this:

   1: Touch.FrameReported += new TouchFrameEventHandler(Touch_FrameReported);

And now you have to write your event handler.

The Event Handler Arguments

Once the runtime receives a touch message, the FrameReported event fires (and will do so several times…see later here).  The arguments you get that you primarily need to concern yourself in most circumstances are the GetPrimaryTouchPoint and GetTouchPoints.

The primary touch point could be thought of as the first touch message/point that the runtime received in a current sequence.  So if your application is using single gesture touch behaviors, this is likely what you’d use.  Otherwise GetTouchPoints is going to give you all the registered touch points from the hardware reported to the runtime.

For me understanding the Move event is critical.  If you take a look and add the data to my diagnostic app below for Move, you’ll see that even simply touching your finger in one place fires constant Move commands.

What you get in a TouchPoint

Both the primary and the collection of touch points listed above will return the TouchPoint object, which contains valuable information.  Namely it is going to give you Postition, which is a point relative to the offset you provided in the GetTouchPoint call (or absolute if you pass in null).

You also get the Action of the touch.  There are three actions: Down, Move and Up.  It is important to understand the firing sequence here.  Assume a given TouchPoint, it will first report Down, then it will continue to report Move until the touch is removed, at which point Up will occur.  The key piece in the middle is Move.  This action is firing even if you aren’t moving any element.  It is essentially reporting that you have a TouchPoint that is in Down state (i.e., touched).  Move can be helpful if you are needing to move things along with the updated position of the element.

You also get the TouchDevice which contains some helpful information.  Provided via the TouchDevice is an Id value, which is a unique id provided by the operating system for the device which reported the TouchPoint.  Also provided is DirectlyOver which is the topmost UIElement the position is over at the time the touch was produced.

What about my mouse events?

Ah, good point!  In the TouchFrameEventArgs you have a method you can call which is SuspendMousePromotionUntilTouchUp.  You would want to use this if you knew *for sure* that the end user had multi-touch hardware.  This would prevent the mouse event promotion for the given touch point.  This method can only be called if the Action is Down for the TouchPoint.  Once the TouchPoints all report Up, then normal mouse event promotion would resume.

Putting it all together

For these basics, I decided just to create a quick diagnostic application that would show the registering of the TouchPoint elements, as well as identifying the primary touch point.  My application has registered the FrameReported event handler and then I’ve added some logic:

   1: public MainPage()
   2: {
   3:     InitializeComponent();
   4:     Touch.FrameReported += new TouchFrameEventHandler(Touch_FrameReported);
   5: }
   6:  
   7: void Touch_FrameReported(object sender, TouchFrameEventArgs e)
   8: {
   9:     foreach (TouchPoint tp in e.GetTouchPoints(this.Positions))
  10:     {
  11:         if (tp.Action == TouchAction.Down)
  12:         {
  13:             // do something
  14:         }
  15:     }
  16: }

The end result is that when the user touches that application surface, we add the TouchPoint to an ObservableCollection that is bound to a DataGrid to show the points currently registered and by which device.  When the user removes the touch action, they go away.

Obviously it is hard to demonstrate touch capabilities in a screenshot and it really does it no justice.  I’m going to do my best attempt here to show you a picture-in-picture view of the application running and me interacting with it via Touch.  You’ll need Silverlight to view this demonstration.

Summary

There you have it.  The basics of multi-touch in Silverlight 3.  It’s fairly simple to understand the core mechanics of the API.  What gets tricky is interacting with your application beyond just showing the points :-).  In a future post I’ll show an application that makes use of this multi-touch feature in understanding where the touch occurred in my given application and how you can find the element that was touched (even though it’s an application-wide event).  If you aren’t subscribed, please consider subscribing to my blog for regular updates for Silverlight information.

Feel free to spelunk this diagnostic app code:  MultiTouch_CS.zip (C#) or MultiTouch_VB.zip (Visual Basic).

Hope this helps!
I got enough feedback and suggestions that I figured it would be better just to put the code up on CodePlex rather than package zips on my blog :-).  Here it is: FloatableWindow project.  The latest build I have is up there which incorporates some feedback that I’ve received.

UPDATE: If you like this idea VOTE FOR IT in the Silverlight Toolkit!

Basically the ShowDialog() API operates the same way that ChildWindow.Show() does today.  No changes there, popup is used.  But when you just want some simple MDI type windows, use Show() which will not use Popup but rather add the elements as children to your root visual.  Now the key here is defining that root.  Before you show the window you’d want to do something like this:

   1: FloatableWindow fw = new FloatableWindow();
   2: fw.Width = 200;
   3: fw.Height = 200;
   4: fw.Title = "Foobar";
   5: fw.ParentLayoutRoot = this.LayoutRoot;
   6: fw.VerticalOffset = 200;
   7: fw.HorizontalOffset = 100;
   8: fw.Show();

Notice line #5 where I specify a Panel element to add it to?  That would be required.  An ArgumentNullException is thrown if it is not provided.

Thanks for the great feedback and encouragement on this refactoring.  I hope that putting it on CodePlex provides a better home for evolution and tracking issues (I know there is an animation issue now with non-modal).

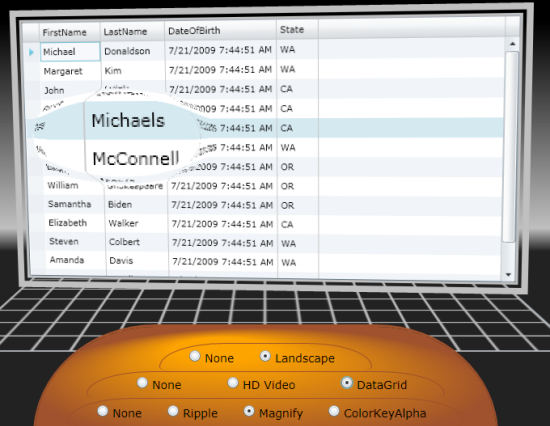
I’ve received a few emails about updated code for the Scott Guthrie MIX09 keynote demo referred to as “bouncing plane” Silverlight demo.  A screenshot of this demo is seen here to refresh your memory:

Bouncing plane Silverlight demo

There really isn’t anything ‘new’ about this demo code for SL3, other than being recompiled.  Perhaps the only real change is to accommodate the new requirement that pixel shaders are resources of the project.  You’ll see the Effect1.cs code file where the constructor code for the shaders uses:

   1: pixelShader = new PixelShader();
   2: pixelShader.UriSource = new Uri("/BouncingPlane;component/ShaderBytecode/Ripple.fx.ps", UriKind.Relative);

If you are writing shaders, I’d refer you to my post talking which has some Visual Studio code snippets and item templates so you can say Add New Item…Silverlight Pixel Shader and get the appropriate stub code already there for you!

Here’s the Visual Studio project for Silverlight 3 for the bouncing plane demonstration: BouncingPlane_SL3.zip.

UPDATE: Hosting a demo of it (minus the video, so you'll get an error if you choose video) here: Bouncing Plane Silverlight Demo.

As we’ve noted before, Visual Studio 2008 doesn’t have multi-targeting support for Silverlight development.  Generally speaking what this means is that if you install the Silverlight 3 tools, you have a Silverlight 3 development environment with VS2008.  True multi-targeting for Silverlight in the IDE will come in Visual Studio 2010 (you can see how that works in this post).

NOTE: Visual Studio 2010 beta 1 (current version available at the time of this writing) does not fully support Silverlight 3 *release version* (also referred to ‘RTM’ or ‘RTW’) development.  There are a few things missing in VS10 beta 1 for full support for SL3 RTW and .NET RIA Services development.  This support will come in later beta builds of VS10 – and no, I have no idea when Visual Studio will be planning on releasing additional beta builds.

But people still want to know how they can build SL2 apps using a single VS2008 machine, no virtual images and without VS2010.  There is a way to do this, but please allow me to set some major caveats.  We must first make sure that what I’m saying here is still that VS2008 does not support multi-targeting IDE development with Silverlight 2 and Silverlight 3.  What I’m also saying is that VS2008 IDE and MSBuild are two different experiences.  MSBuild could care less about an IDE and it just does what it is instructed to do…so let’s instruct it to build Silverlight 2 code, shall we?

Assumptions – please read

Let’s assume this scenario: you are working on SL3 apps so you need the SL3 tools.  Great – install them.  But you also need to either a) support an SL2 application and/or b) for some reason you want to start a new project in Silverlight classic…err, I mean…Silverlight 2.  Okay, let’s proceed with these assumptions and that you already have VS2008 and SL3 dev tools installed.

Step 1: Install the Silverlight 2 SDK

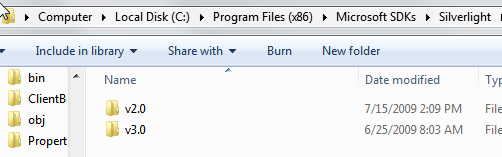
Go grab the Silverlight 2 SDK.  This is different than the Silverlight 2 Tools for Visual Studio.  Don’t install those…you’ll be made at me for no reason if you do.  Again, install the Silverlight 2 SDK.  Once you’ve done that, if you look at your %ProgramFiles%\Microsoft SDKs\Silverlight directory you will see both SDKs installed:

SDK directory with both Silverlight SDKs

Step 2: Create a new project or open your existing Silverlight 2 application

If you are creating a new application and are targeting Silverlight 2 and not taking advantage of all the great new features in Silverlight 3, then create a new Silverlight application.  Obviously (or hopefully so) you cannot choose the Navigation or RIA Services templates…you’ll have to choose the basic Silverlight 2 Application template.  If you are working on an existing SL2 application, open that project.  In this case, VS will convert the project up to an SL3 project.  This is fine for now.

At this point you have your application open in VS and it is basically a SL3 application project.  If you hit F5 at this point, it would build as an SL3 application.

Step 3: Make a copy of the .csproj or .vbproj file

Go to your project’s directory in explorer (fastest way to do this is right-click on the project in Solution Explorer and choose Open Folder in Windows Explorer which is second to the last option by default.  Once in Explorer, make a copy of the .**proj file (either .csproj for C# or .vbproj for Visual Basic).  Name it whatever you want, maybe something like <projectname>-SL2.csproj.

Open that file in notepad or other plain text editor.  You’ll see a line that looks like this (for a default project this is about line 84 – and note the CSharp.Targets will be different if you are using VB):

   1: <Import Project="$(MSBuildExtensionsPath32)\Microsoft\Silverlight\v3.0\Microsoft.Silverlight.CSharp.targets" />

Notice the “v3.0” in the build path?  Alter that only in your copied **proj file to this: (again, noting the difference between CSharp and VB):

   1: <Import Project="$(MSBuildExtensionsPath32)\Microsoft\Silverlight\v2.0\Microsoft.Silverlight.CSharp.targets" />

Basically change the “v3.0” to “v2.0” in that Import node.  This tells the build system to use the SL2 SDK that you installed in Step 1.

Step 4: Modify your build events in VS

At this point, if you still hit F5 you’d be running a SL3 application.  This is still because a) you aren’t opening the altered **proj file we just created in Step 3 and b) you have SL3 tools installed for VS.  What we need to do is instruct Visual Studio to perform an additional build command for your project.

Right-click on the project and select the project properties.  Then from here choose the Build Events tab.  If you really want only a v2 build of your app, then in your post-build event you can enter this (obviously changing to the file name you created in Step 3:

   1: $(MSBuildBinPath)\MSBuild "$(ProjectDir)SilverlightApplication1_2-SL2.csproj"

And when you F5 you’ll end up with a Silverlight 2 XAP.  Go ahead and look at the generated AppManifest.xaml file…it will show you RuntimeVersion=”2.0.31005.0” in the file.

What just happened?

Basically when you F5 in Visual Studio in projects, you are initiating build commands.  Sometimes you’ll see that it just uses csc.exe, but basically these are all build commands in the system.  What we’re doing in Step 4 is telling Visual Studio: When you’re done with that, go ahead and execute this additional build command for me, kthxbye.  Some may look at this and ask if 2 builds are happening.  The answer is YES.  Issuing a build command in VS does its normal process and then we are OVERWRITING THE OUTPUT with our second build.

NOTE: If someone has a better way to tell VS don’t do your normal build but do this instead please post in the comments…I’m not a VS build system pro.

You are definitely overwriting your SL3 compiled bits with the new ones.

Can I build both SL2 and SL3 from the same base?

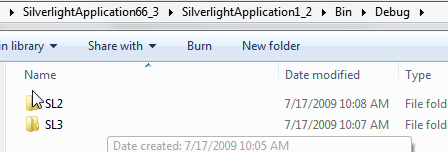
Sure.  You’ll have to modify the OutputPath setting for your projects so they don’t overwrite each other.  I’m sure if you are asking this question you have a good reason for it as SL2 apps are compatible running under the SL3 runtime without needing to recompile.  I modified my VS IDE app on the Build tab (in the Properties dialog) to put the output in an SL3 folder.  I then modified the OutputPath setting in my file from Step 3 to a folder called SL2.  Now when I build in VS I get both binaries/XAPs created:

post build directories

So I can do what I want with the XAPs now.

So, what’s the catch?  Isn’t this multi-targeting?

Big catches…and NO, this isn’t multi-targeting for VS2008 (at least what we define it for Visual Studio).  Here’s the catches I’ve found:

Your IDE is still a Silverlight 3 IDE environment.  What I mean by this is that VS is doing nothing to prevent you from writing Silverlight 3 code.  Intellisense will be targeted at the SL3 SDK you have installed.  This means if you aren’t paying attention and don’t know what APIs aren’t available in SL2, you can get into trouble VERY fast.  In this event, if you do add code that is SL3 specific your SL2 SDK MSBuild will error out and report back in VS.  Here’s an example of where I added some element-to-element binding in my XAML and VS reports the error for the post-build event (as reported in the Errors output window):

   1: Error    2    The property 'ElementName' does not exist on the type 'Binding' in the XML namespace 'http://schemas.microsoft.com/winfx/2006/xaml/presentation'.    C:\Users\timheuer\Documents\Visual Studio 2008\Projects\SilverlightApplication66_3\SilverlightApplication1_2\MainPage.xaml    10    61    SilverlightApplication1_2
   2: Error    3    The command "C:\Windows\Microsoft.NET\Framework\v3.5\MSBuild "C:\Users\timheuer\Documents\Visual Studio 2008\Projects\SilverlightApplication66_3\SilverlightApplication1_2\SilverlightApplication1_2-SL2.csproj"" exited with code 1.    SilverlightApplication1_2

My SL3 build will still complete fine, remember the SL2 is a post-build event.

The other thing is copying files to an associated web project.  In my steps above, the XAP that would get copied to the ClientBin directory of the web app was the SL3 version.  Honestly I didn’t take the time to worry about that and I know that you could get more creative with your build command to change that…but I wanted to be clear about the output of my steps outlined here.

Assembly references will be another issue.  Remember, VS is doing nothing to prevent you from doing things SL3-specific.  So the assembly reference list you see will include SL3-specific binaries.  Also when you add references in VS, it alters the **proj file.  So each time this happens you’d have to manually edit your copied file to make sure the references are there and are the correct ones for the SL2 SDK.  This can get messy very fast.

What if I just want to continue doing Silverlight 2 development, but view SL3 sites?

Well, then I need to come over there and talk to you about the aweseomeness of Silverlight 3!  But if you must, let me let you know what is going on here.

Short answer: don’t install the SL3 tools.  But again, you’re crazy right?  Silverlight 3 is awesome!

Longer answer…

The Silverlight 2 Tools installer now installs the Silverlight 3 developer runtime, but still installs the SL2 SDK.  Confusing huh?  Bottom line is that in this configuration you can develop SL2 apps in the IDE (with SL2 Intellisense, assembly references, etc) but still be able to view SL3 sites out on the Internet.  How is this possible?  Because the SL2 tools are using the build commands and VS hooks for SL2 SDK (look at the project file and you’ll see it is like above in Step 3).

If you have SL2 tools already installed but don’t have SL3 yet…you cannot install the end-user SL3 runtime on top of a developer runtime (i.e., you cannot ‘upgrade’ a developer runtime to a non-developer runtime).  So you’ll want to install the SL3 developer runtime on top of your SL2 environment in this situation.

Summary

I do not by any means consider this guidance from the Silverlight team.  This is, in fact, a hack.  It’s unsupported, might not work for your situation and as Scott Hanselman says, it may hurt baby kittens.  This information is merely here to really prove a point that you can use MSBuild to build Silverlight 2 applications with the Silverlight 2 SDK.  That’s really the end output here.  The rest is hackery to get VS to do things with that build.  I firmly recommend you develop using Silverlight 3 anyway!

Use at your own risk.  If there are other MSBuild professionals out there that have better methods than post-build events, please comment – again, I’m not a pro in that area, so this was my first pass at testing this out based on questions I got from the community.

Hope this helps and don’t blame me for any injured baby animals.


This work is licensed under a Creative Commons Attribution By license.

One of the new features I mentioned in my What’s new/changed post on Silverlight 3 is the fact that any application developer can take advantage of the cached assembly functionality provided by Silverlight.  Let me show you how and start with the current situation.

Current Situation with Silverlight assembly references

If you are building a Silverlight application, chances are you are referencing assemblies either from the SDK, Silverlight Toolkit or other great Silverlight third party controls/frameworks.  When you Add Reference to these controls/frameworks, their assembly is copied to your application and packaged up in your XAP.  For some situations this is fine and you have no reason to care at all…it just works.  When you look at the AppManifest.xml file for your application you’ll notice the AssemblyPart nodes for each referenced assembly not in the core – and these are in your packaged XAP file.  Take a look at my sample application which has a reference to a simple 3rd party assembly: TimHeuer.SimpleFunctions.dll:

   1: <Deployment xmlns="http://schemas.microsoft.com/client/2007/deployment" 
   2:     xmlns:x="http://schemas.microsoft.com/winfx/2006/xaml" EntryPointAssembly="SilverlightApplication1" 
   3:     EntryPointType="SilverlightApplication1.App" RuntimeVersion="3.0.40624.0">
   4:   <Deployment.Parts>
   5:     <AssemblyPart x:Name="SilverlightApplication1" Source="SilverlightApplication1.dll" />
   6:     <AssemblyPart x:Name="TimHeuer.SimpleFunctions" Source="TimHeuer.SimpleFunctions.dll" />
   7:   </Deployment.Parts>
   8: </Deployment>

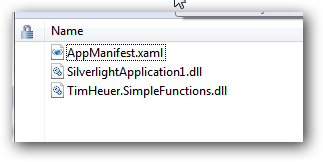
You can see that my custom assembly is included in the manifest as a separate AssemblyPart entry.  Looking at the XAP package contents you’ll also see it there:

Current XAP package

This is how we’ve been building Silverlight applications since Silverlight classic…um…I mean, Silverlight 2.  All of this will still work and if you do nothing, then no worries.

Introducing Application Library Caching (or External Assembly Parts)

In Silverlight 3 beta we introduced this feature to reduce the initial XAP package size of your application by providing external assembly parts for certain Microsoft components and controls.  In beta, it was a feature only reserved for Microsoft-delivered assemblies.  Now that we’ve released, we’ve opened this feature to any developer wishing to take advantage of it. 

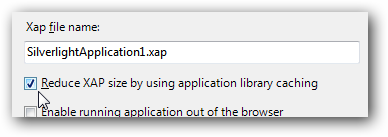
What does it do?  Let’s take a look at perhaps a common referenced assembly: DataGrid.  When you add this assembly to your application, your XAP package will increase in size because it is not a part of the core (mine went from 4K to 204K because DataGrid also brings some other assemblies with it).  In Visual Studio, take a look at the properties dialog for your Silverlight application and you’ll notice a new checkbox:

VS Settings reduce XAP size

By clicking this checkbox you are telling Visual Studio to make sure that any assembly that offers this feature, to not package it in your XAP but to reference it as an external assembly part.  The result is two-fold: your manifest changes and your XAP no longer includes this assembly.  Take a look at what happened to my sample application’s AppManifest.xml when I enabled that feature:

   1: <Deployment --attributes removed for formatting only-->
   2:   <Deployment.Parts>
   3:     <AssemblyPart x:Name="SilverlightApplication1" Source="SilverlightApplication1.dll" />
   4:   </Deployment.Parts>
   5:   <Deployment.ExternalParts>
   6:     <ExtensionPart Source="TimHeuer.SimpleFunctions.zip" />
   7:   </Deployment.ExternalParts>
   8: </Deployment>

Notice the new node ExternalParts?  There’s no reference to my TimHeuer.SimpleFunctions.dll but there is one to a TimHeuer.SimpleFunctions.zip file as an ExtensionPart.  This is because my assembly has chosen to opt-in to enabling this feature if the developer wants to use it in their application deployment.  My XAP file also reduced from 6K to 4K in size (note: in my DataGrid example you’d see a reduction of approximately 200K).  Using this feature, when users visit your web application, the application and package are downloaded.  These files are added to the browser cache so they can be used on subsequent requests.

How is this accomplished?

So what’s going on here?  It’s actually quite simple and there are two ways you can do it as an assembly author (well, really one way, but two methods of how to provide your assembly deployment).  First, you have to make sure that your assembly has a strong-name key.  This is probably good practice anyways for your development team.  This gives you a public key token which you’ll need for this feature.

The next thing you have to do is provide the external part manifest for your assembly.  This is a simple XML file that does not have to be included *in* your assembly, but needs to exist in the same physical place as your assembly (i.e., right next to it in the file system).  This file must also be named <AssemblyFileName>.extmap.xml.  As an example in my sample, my custom assembly is TimHeuer.SimpleFunctions.dll and my file will be TimHeuer.SimpleFunctions.extmap.xml.  The contents of the file is simple and here is mine for this sample:

   1: <?xml version="1.0"?>
   2: <manifest xmlns:xsi="http://www.w3.org/2001/XMLSchema-instance"
   3:           xmlns:xsd="http://www.w3.org/2001/XMLSchema">
   4:  
   5:     <assembly>
   6:         <name>TimHeuer.SimpleFunctions</name>
   7:         <version>1.0.0.0</version>
   8:         <publickeytoken>f265933def965411</publickeytoken>
   9:         <relpath>TimHeuer.SimpleFunctions.dll</relpath>
  10:         <extension downloadUri="TimHeuer.SimpleFunctions.zip" />
  11:     </assembly>
  12:  
  13:  
  14: </manifest>

Taking a look at this manifest, let me point out some important things.  The obvios of the assembly short name and version are there.  The publickeytoken node must be there as well.

NOTE: How do you obtain your public key token from a signed assembly?  Man I wish there was a tool in VS (plugin maybe) that made this simple.  But just get to the Visual Studio command prompt and execute: sn.exe –T <path-to-assembly>

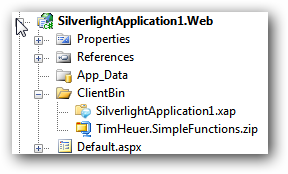
Notice the next two nodes: relpath and extension.  The relpath node is the name of your assembly file.  The extension node indicates where to get the package for the assembly part.  Here’s where it might help to explain the options.  First, the endpoint to the extension part will be a ZIP file.  Within that file can exist your assemblies.  Take a look at the downloadUri attribute.  This tells the Silverlight application where it is going to get the zip file.  If you just specify a file name like the above two things will happen.  Your external part will be packaged into the ZIP file name you provide here and then that zip will be deployed alongside your XAP file (not in, but alongside it like in the ClientBin directory).  This means that wherever your XAP is, so does this ZIP need to reside.  After compiling your application you’d see it in your web applications folders like my sample here:

Alongside deployment

You can, however, provide a URI to the file.  Let’s look at a modification of the above:

   1: <?xml version="1.0"?>
   2: <manifest xmlns:xsi="http://www.w3.org/2001/XMLSchema-instance"
   3:           xmlns:xsd="http://www.w3.org/2001/XMLSchema">
   4:     <assembly>
   5:         <name>TimHeuer.SimpleFunctions</name>
   6:         <version>1.0.0.0</version>
   7:         <publickeytoken>f265933def965411</publickeytoken>
   8:         <relpath>TimHeuer.SimpleFunctions.dll</relpath>
   9:         <extension downloadUri="http://timheuer.com/asmcache/1.0/TimHeuer.SimpleFunctions.zip" />
  10:     </assembly>
  11: </manifest>

Notice the different downloadUri attribute.  This is a unique URI that must be accessible by the Silverlight application (i.e., don’t put an Intranet URI here if you are using this feature on those bigger web tubes).  The resulting AppManifest.xml now looks like this:

   1: <Deployment --removed attributes for readibility-->
   2:   <Deployment.Parts>
   3:     <AssemblyPart x:Name="SilverlightApplication1" Source="SilverlightApplication1.dll" />
   4:   </Deployment.Parts>
   5:   <Deployment.ExternalParts>
   6:     <ExtensionPart Source="http://timheuer.com/asmcache/TimHeuer.SimpleFunctions.zip" />
   7:   </Deployment.ExternalParts>
   8: </Deployment>

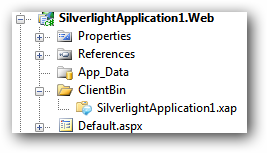
And notice my project no longer has a local ZIP file in the ClientBin alongside my XAP:

Project explorer

This now tells Silverlight that it will need to get this assembly extension from this remote location.  This operation is done asynchronously by the runtime and you don’t have to add any additional code to request it.  Basically if your downloadUri is a file name, the build system packages the assembly into a zip file and deploys it alongside your XAP file.  If the attribute is an absolute URI, you are then responsible for providing the ZIP yourself and will need to ensure it is packaged and in that URI location point.

Why would you use this?

You may be asking yourself why or when you’d want to use this feature.  After all, in the end, the assembly will still be downloaded.  So whether or not it is in your initial XAP or later in a ZIP assembly request, the bits will still get to the end-user.  So why?

I can think of two initial scenarios where you’d want to consider this.  If you are a component vendor and want to provide a location for your consumers to get your bits, you could do this.  This may help manage a central location of known versions and enables the application developer to get the bits from the source rather than have to deploy them to their servers.  The second scenario I can think of is one of enterprise common assemblies.  If your team develops common components that all applications should use, then you can provide a central location to deliver these from and ensure people are using the correct bits/versions.

Things to look out for

As with any new feature, I’m sure you may be skeptical…and perhaps somewhat confused (if so, I apologize).  One of the obvious things to look out for in this feature is that if you rely on those referenced assemblies and you aren’t packaging them in your XAP or aren’t deploying them from your own servers, you are depending on that remote location to deliver them.  The natural concerns about latency, uptime, firewalls, etc. come into play here so be sure to understand your architecture choices correctly.

If you are using an absolute URI for the downloadURI attribute, there are two things you should consider.  First, if it is going to be delivered from a different domain than the XAP file, then a valid cross-domain policy file must exist at the domain serving the assembly package (zip).  Second, treat the absolute URI as a unique identifier.  Version should be unique as well.  Consider a URI naming scheme along the lines perhaps of something like this:

   1: http://timheuer.com/asmcache/1.0/TimHeuer.SimpleFunctions.zip

This way each version of the assembly library cache is unique.

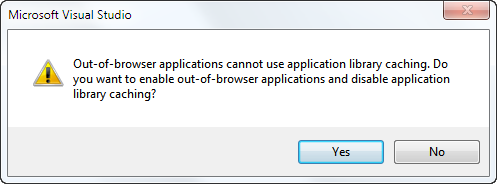
If you have checked that “reduce XAP size…” checkbox and then try to also check the out-of-browser settings, you’ll be greeted with:

Warning with out-of-browser and assembly cache settings

Unfortunately right now the assembly caching feature is not available in out-of-browser experiences.

Summary

The assembly caching feature is a cool feature to be able to take advantage of when your architecture makes sense to leverage it.  It isn’t going to be for everyone, but that’s what makes it great – it is an opt-in feature for you as the assembly developer as well as the consumer.  With a few simple steps you can take your Silverlight assembly and prepare it for use on this feature as described above.  What do you think of assembly caching?


This work is licensed under a Creative Commons Attribution By license.