I got an email the other day about if there was a way to pass an object between the navigation pages in Silverlight 3.  The scenario was that the developer wanted to use the same data, but represent it visually in different ways.

Silverlight 3 introduces a new navigation framework in the runtime making it easier to navigate to different areas of an application and assist in ‘deep linking’ concepts for applications.  More resources:

At first my reaction was “no, we don’t allow that easily” but then I thought about it a bit and played around with a sample in the context of this developer’s use case.  Right now, the way you can quickly pass chunks of data to another page is via query string mechanisms.  So in my code I can say:

   1: myFrame.Navigate(new Uri("/foo.xaml?customerId=1234", UriKind.Relative));

And then in the navigated page something like:

   1: string customerId = this.NavigationContext.QueryString["customerid"];

This works fine for string/simple data.  In fact I could probably serialize a simple type and send it this way as well…but I don’t think that was the desired intent of this developer.  But if you think about the concept of the Frame, then you can start thinking about DataBinding techniques and how we can use the Frame as our container.  Allow me to think out loud…

Let’s use the default Silverlight Navigation Application template in the Silverlight 3 Tools for Visual Studio.  This will give us enough stub to work with.  If you look at MainPage.xaml you’ll see that the page has one Frame element in it:

   1: <navigation:Frame x:Name="Frame" Source="/Views/HomePage.xaml"
   2:       HorizontalContentAlignment="Stretch"
   3:       VerticalContentAlignment="Stretch"
   4:       Padding="15,10,15,10"
   5:       Background="White"/>

This is the core element that is going to receive navigation commands and change its content based on those commands.  Now in the Loaded event handler of MainPage, let’s grab some data.  I’m using a simple class here that just iterates a Person type (mainly so I can include it in the sample easily).  My Loaded event handler now looks like this:

   1: void MainPage_Loaded(object sender, RoutedEventArgs e)
   2: {
   3:     People p = new People();
   4:     List<Person> peeps = p.GetPeople();
   5:  
   6:     this.Frame.DataContext = peeps;
   7: }

So you can see that I’m now setting the DataContext of the Frame element to my List<Person>.  So now let’s crack open some of the other pages.  Again, remember the scenario: same data, different views.  Open the Views/HomePage.xaml and let’s show a view of just a simple list of names.  I added a ListBox and just displayed the FullName property of my data:

   1: <StackPanel> 
   2:     <TextBlock Text="Name List" Style="{StaticResource HeaderTextStyle}"/>
   3:     <StackPanel Style="{StaticResource ContentTextPanelStyle}">
   4:         <ListBox x:Name="PeopleList" DisplayMemberPath="FullName" 
   5:             ItemsSource="{Binding}" />
   6:     </StackPanel>
   7: </StackPanel>

Notice that there is going to be no code here in the source file for HomePage.xaml.cs – we are using the {Binding} property for the ItemsSource…essentially trickling down the DataContext from the Frame.  Remember, that HomePage.xaml is essentially a child control of the Frame so it is aware of the DataContext.  Now let’s go into AboutPage.xaml for our more detailed view, showing a DataGrid of all the elements of the data:

   1: <StackPanel>
   2:     <TextBlock Text="Detail" Style="{StaticResource HeaderTextStyle}"/>
   3:     <TextBlock Text="Detail list of members with gender." 
   4:             Style="{StaticResource ContentTextStyle}"/>
   5:     <data:DataGrid ItemsSource="{Binding}"/>
   6: </StackPanel>

Again, no code here to retrieve the data or wire it up – using {Binding} to the DataContext again.  So now with one data fetch and binding to our navigation context (Frame) we can re-use that same object across different views and the result shows us different levels of detail.

View 1: simple listView 2: detail list

So at least that is one thought of how to share the information.  What do you think?  Obviously it will not work in all scenarios, but also remember you can have more than one navigation frame in your application too!  Here’s the sample code for these thoughts: SilverlightApplication32.zip

Hope this helps!
here is some csharp code:


<UserControl.Resources>
<ResourceDictionary x:Key="Collection" >
<ResourceDictionary.MergedDictionaries>
<ResourceDictionary x:Name="dict" Source="/Resources.xaml" />
</ResourceDictionary.MergedDictionaries>
</ResourceDictionary>
</UserControl.Resources>
public static T Load<T>(this string xaml) where T : UIElement
{
T child = null;

Canvas c = XamlReader.Load("<Canvas xmlns:sj='clr-namespace:Slidentity;assembly=Slidentity' "
+ "xmlns='http://schemas.microsoft.com/winfx/2006/xaml/presentation' "
+ "xmlns:x='http://schemas.microsoft.com/winfx/2006/xaml'>"
+ xaml + "</Canvas>") as Canvas;

child = c.Children[0] as T;
c.Children.Remove(child);

return child;
}
dfad

In a few weeks I’ll be making the journey with Corrina and Arturo from ‘the states’ to Auckland, New Zealand for the WEB09 conference.  I’m honored to be joining some great folks like Ryan Stewart, Dan Rubin, Jarred Bishop and more.  I’m looking forward to learning a lot from this conference and having discussions about user experience and RIA development.

The team at WEB09 released an introductory video for the conference and I must say, someone put a lot of effort into this video: WEB09 Intro Video

I’m very much looking forward to my time at WEB09 and the time in New Zealand in general (I’ve never been, so if you have some advice, please share).  Hopefully some of you will be there and we can meet in person and chat about Silverlight! See you in a few weeks!


This work is licensed under a Creative Commons Attribution By license.

I’ve made no hiding the fact that my blog is build on Subtext and that I’m very happy with it right now.  Lately though my wife has been blogging more (that’s another story) and she also started her own business.  Being curious about all the WordPress love, I decided to start checking it out.

Thankfully, the Web Platform Installer helped me get started on WordPress without any troubles at all and I was up and running on my Windows server (I didn’t want to start another hosting account anywhere).  I have to say, I really like what WordPress has done, especially with the extensibility points and the administration options. 

That being said, I started looking at the various plugins available and was curious about anything for Silverlight…to be able to easily put Silverlight content within a post like other plugins have enabled.  Sure, it isn’t a difficult task to begin with, but sometimes different hosts/tools make it difficult for us to add <object> type content.  After some searching in the WordPress plugin library, I found one that was built back in the Silverlight 2 beta days.  The link to the author was no longer valid so I decided to create one using that as a base.

NOTE: I totally failed my Internet duties to look via any search for one…I kept my searching to the official plugin directory.  Apologies to Peter Loebel for not recognizing he also did some work, but admittedly it was also during the beta days.  I’ve credited both Peter and Juergen Oberngruberin my readme.txt for the plugin as contributors.

So after a few minutes, I was able to get it working and created the Silverlight for WordPress plugin.  It’s simple and you basically can input into your post data:

   1: [silverlight: <app>, <width>, <height>, <initParams>, <minVer>]

Where:

  • app is the URI to your Silverlight application (XAP)
  • width/height should be obvious
  • initParams will map to the initParams of your application
  • minVer maps to the minRuntimeVersion required for your app

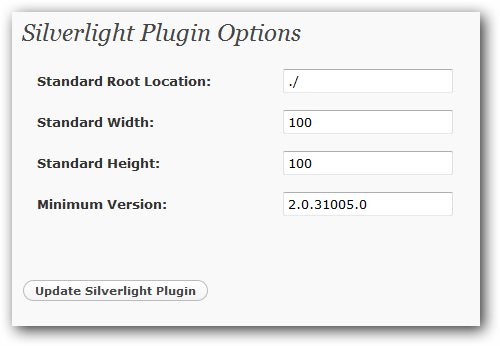
The only parameter required is <app> and all others are optional and have defaults which you can change via the plugin settings:

Silverlight for WordPress default settings

I’ve applied yesterday to put the plugin in the official WordPress plugin directory, but haven’t heard back yet and they don’t really have any SLA.  I’m hoping to get it in soon, because they have a good discovery model for updates, etc. and authors can install in one click.  For now, I’m also going to maintain a link to the current version with release notes on my site here: Silverlight for WordPress.

UPDATE: Silverlight for WordPress is now available in the plugins directory…just search on Silverlight.

Like I said, it’s simple (and perhaps dumb to some), but I look to your input.  Hopefully some WordPress authors may be able to use it.  I know my wife’s new photography site will :-).

Hope this helps!


This work is licensed under a Creative Commons Attribution By license.

After looking at the options available for WordPress plugins for Silverlight, I found one that was outdated and the author’s URL looked to be broken.  So I adapted/updated the plugin to work again.

I’ve now provided the Silverlight Plugin for WordPress for an easy way to host Silverlight applications within your WordPress content.  You can get the plugin via the WordPress plugin directory by searching on Silverlight or clicking here.

Once downloaded, unzip the contents in your /wp-content/plugins directory.  You’ll then be able to activate the plugin and start working with it.  Adding content is as simple as adding this text to your post:

[silverlight: myapp.xap]

And you will have your content in your post.  You can optionally specify the width, height and minimum Silverlight version required.

Version 1.0.3 (31 MAR 2009) includes:

  • Ability to add local/absolute Silverlight applications (XAP)
  • Optionally set width/height/minRuntimeVersion of the Silverlight host plugin
  • Optionally provide initParams to the plugin

Silverlight Media Player (new 2010!)

I also have a Silverlight Media Player for WordPress which is built on top of the Silverlight Media Framework.  It is also as simple as tagging content and supports any Silverlight-supported video type, including IIS Smooth Streaming:

[sl-media: http://mysite.com/myhomemovie.mp4]

You can find this and the installation/configuration details page in the WordPress plugin directory as well!

Please leave a comment for things you’d like to see or bugs you find!


This work is licensed under a Creative Commons Attribution By license.