Now that the Silverlight 2 Video Player is available from Codeplex, I wanted to make it a template for Expression Encoder. I’ll attempt to articulate the steps below. It’s actually pretty trivial. In fact in the current incarnation, you have to throw some extra stuff in there you may not need :-).
Step 1 – Creating the template folder
While I’ve covered this in previous posts and this is also well documented in the Encoder SDK documentation.
First you’ll navigate to C:\Program Files\Microsoft Expression\Encoder 2\Templates\en and you’ll see the existing template folders. The folders do not represent the name of the template in the Encoder UI, so don’t worry about that. Create a folder here. I called mine SL2VideoPlayer.
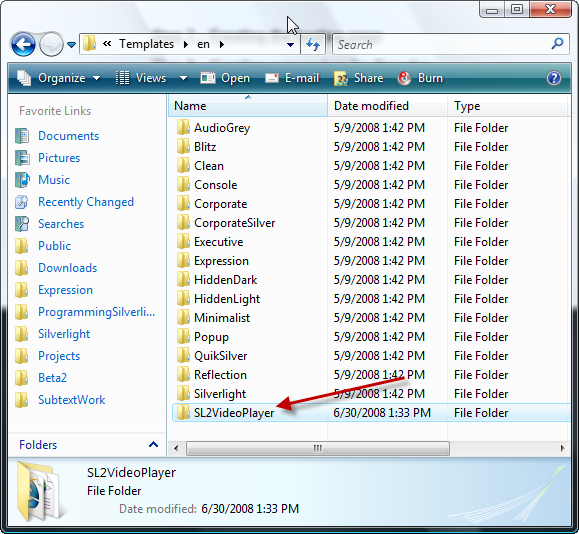
Step 2 – Creating the hosting page
Go into that folder and we’ll start creating some files here. We’ll need the XAP from our media player (in my case VideoPlayer.xap) and simply place it in here. We’ll also want to put a snapshot of our player here. You can really name it to be anything, but I’m a fan of consistency and other templates call it preview.jpg so I stuck with that. I recommend a proportionate image size. You’ll notice the other templates don’t have this image anymore in Encoder 2. That’s because their preview actually renders the player in Silverlight. I’ll be honest here and tell you I haven’t messed around enough to know how to enable that, but my static preview image works and I’m sticking with that as it serves its purpose.
The main file we’ll need here is a hosting page. I’ve called mine default.html again for consistency. It is here where we have the magic happen. In fact this step bleeds into the next 2 steps. For now, you’ll want to create your hosting page that will host the Silverlight player. This can be basic or elaborate…just create one. In the next step we’ll make it wake up.
For me I just took the test page format provided to me by Visual Studio 2008 and the Silverlight project template.
Step 3 – Creating parameters for Encoder
Having a static page is nice, but doesn’t really help Encoder understand what we mean. To our hosting page let’s add some parameters. Encoder’s build process understands a certain set of parameters that are helpful for us. It isn’t the intention of this post to emit them all to you, that’s what the SDK is for, but I’ll point out some key ones. Let’s take a look at the ‘header’ of our hosting page:
1: <!-- <$@ Options LaunchPage="true"$> -->
2: <!-- <$@ Options Name="Silverlight 2 Video Player"$> -->
3: <!-- <$@ Options TemplatePreviewImage="preview.JPG"$> -->
These are the first 3 lines of my default.html page. They should be pretty self explanatory. You can see now where the Encoder UI gets the template name from. The next few lines immediately after this are interesting. Here’s what my template looks like (after the first 3 lines above):
1: <!-- <$@ Parameter Name="AutoPlay" Caption="Automatically start video when cued" Tooltip="Select to begin playback when video is loaded" Type="System.Boolean" Default="False" $> -->
2: <!-- <$@ Parameter Name="EnableCaptions" Caption="Allow closed captions to show" Tooltip="Select to allow closed caption text over video during playback"Type="System.Boolean" Default="False" $> -->
3: <!-- <$@ Parameter Name="Muted" Caption="Mute player on start" Tooltip="Select to begin playback in a muted state" Type="System.Boolean" Default="False" $> -->
4: <!-- <$@ Parameter Name="MediaMarkers" Caption="Enable Media Marker Animations" Tooltip="Select to enable animations to appear when media markers are found" Type="System.Boolean" Default="False" $> -->
5: <!-- <$@ Parameter Name="ScaleMode" Caption="Stretch Mode" Tooltip="Change the way the template is displayed on the page" Type="System.Enum" EnumValues="Profile Size=1,Stretch=2" Default="Profile Size" $> -->
Okay, these may need a bit more understanding. Let’s dissect one of them a bit as the all are of type parameter. First the Name – this is what will be known to your code later (in step 4) so this is really an internal name…not visible to the user. The second attribute, Caption, will be seen to your user and should be descriptive, but concise. Tooltip is, well, a tooltip…and if you don’t know what that is, maybe you shouldn’t be customizing templates? Type is the data type of your parameter…these are standard .NET types like System.String, System.Boolean, etc. The final attribute, Default, is exactly what it sounds like – providing a default value for the parameter. At this point you may be asking yourself: How is the user providing input to these values? and that would be a great question.
You see, when you add parameters to your template they show up as advanced options to the template. Let’s look at Encoder 2 after we’ve selected our template. Notice the template name and then the expander decorator:
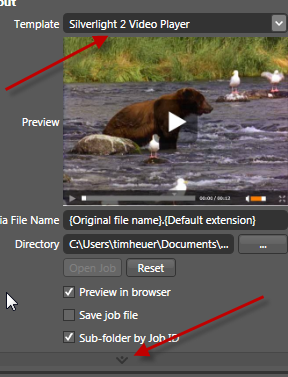
If you expand these advanced properties you’ll see your parameters. Here’s my setup for the SL2VideoPlayer template:
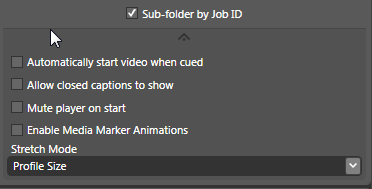
Pretty cool, huh? You can totally provide your users of your template the option to provide input parameters. Now my params are pretty obvious but you could probably think of some other creative uses. But we didn’t have to do anything to get some of this free UI goodness! Now we have our template selectable and our users can provide certain parameters…let’s see how we can use them.
Step 4 – Reading the parameters in the template
We’ve got the input parameters, how do we use them? Well for my input parameters, these directly translate to initParams for my Silverlight application. However regardless there are some other things you can get other than parameters. Again, I’ll defer to the full Encoder SDK, but since you are encoding a file, I’m guessing at least the output of that file is an important attribute you’ll want to be aware of. Again, let’s take a look at other code in my default.html template where I use code to get at these parameters:
1: <object data="data:application/x-silverlight," type="application/x-silverlight-2-b2"
2: <$ if (TemplateParameter.ScaleMode == "1") { $>width="<$=PublishedItems[0].MediaItem.VideoSize.Width$>"
3: height="<$=PublishedItems[0].MediaItem.VideoSize.Height$>"<$}else{$>width="100%" height="100%"<$}$>>
4: <param name="source" value="VideoPlayer.xap"/>
5: <param name="onerror" value="onSilverlightError" />
6: <param name="background" value="white" />
7: <param name="initParams" value="autostart=<$=TemplateParameter.AutoPlay$>,muted=<$=TemplateParameter.Muted$>,
8: captions=<$=TemplateParameter.EnableCaptions$>,markers=<$=TemplateParameter.MediaMarkers$>,
9: m=<$=PublishedItems[0].OutputFileName$>" />
10: <a href="http://go.microsoft.com/fwlink/?LinkID=115261" style="text-decoration: none;">
11: <img src="http://go.microsoft.com/fwlink/?LinkId=108181" alt="Get Microsoft Silverlight" style="border-style: none"/>
12: </a>
13: </object>
See some familiar code here? the “<$>” decoration is instructing the Encoder build process that this is code to be executed. What kind of code? .NET baby. My example is very, very simple here and in fact I’m just extracting attributes. The SDK has examples of more advanced techniques should you need them.
You can see the use of TemplateParameter that enables me to get at the parameter configuration options that we’ve provided to the user. I just retrieve them, can inspect them, etc. Some of them I’m just passing in the parameter, others I’m acting upon.
The one thing that you’ll want to familiarize yourself with is the PublishedItems model. This represents the Encoder job activities. You can see that my reference actually uses an index of 0. This is because Encoder supports encoding multiple files at once and your output could contain more than one file. This could be helpful in creating a template that uses multiple media sources and you are creating a visual playlist feature. For me, I’m just using one, so I grab the first item. I can then reflect on properties of that published item such as name, video size of the media, etc. A very helpful and powerful little scripting-looking language that can be leveraged to really customize your template.
Using this code we now have our default.html file that in the end will be complete and have all our HTML provided for us. I should note that the attributes in the header of the page will not be emitted.
Step 5 – Additional File(s)
What is really cool is that the process looks at other files in your template to see if they need to be acted upon as well. So if you have javascript or other files that might need to be dynamic based on output, you can use the same coding methods as above in other files – it doesn’t all have to live in default.html at all!
Step 6 – Prepare the template for Silverlight Streaming
At this point our template will work. We can import a video media asset, choose our template and click Encode. After encoding the start page will launch with our options passed in and render. But what about the next step? What if I wanted to upload to Silverlight Streaming Services to host my media and application. Well, I know that there is already a plugin that allows a quick upload for this – the SLSPlugin. How can we tap into this? I thought that I’d be able to just click publish and it would work, but that isn’t the case.
First the plugin expects at least one XAML file to exist…and we have a XAP. So trick one, create foo.xaml with nothing in it and put it in the template folder. Done.
Second, it expects a manifest.xml file to exist. This is because the plugin is packaging our template assets into a ZIP that Silverlight Streaming understands for multiple assets. This requires a manifest definition file that is a part of that ZIP. So I create a manifest.xml file and put it in my template directory. Remember step 5? In my manifest I have it with some code as well:
1: <SilverlightApp>
2: <source>VideoPlayer.xap</source>
3: <version>2.0</version>
4: <name><$=PublishedItems[0].MediaItem.Name$></name>
5: <$if (TemplateParameter.ScaleMode == "1") {$>
6: <width><$=PublishedItems[0].MediaItem.VideoSize.Width$></width>
7: <height><$=PublishedItems[0].MediaItem.VideoSize.Height$></height>
8: <$}$>
9: </SilverlightApp>
So my manfiest is dynamically generated based on the output as well. This file is created as a part of the encode process and is not a part of the default.html file…so you can see an example of separate files being able to access the parameters as well as the PublishedItems collection as well. Now that the file is created it can get packaged into the app!
However, with my implementation of SL2 Video Player I run into a snag. You see the default.html page is great and we can use it and it supplies all of our needs because we are using initParams. However SLS doesn’t use our hosting page. It generates it’s own HTML hosting page and creates the Silverlight object using createObject. This is fine except for one thing: it doesn’t currently support initParams. Yes I know createObject does, but SLS hasn’t built in the support to use those yet. So alas, my final step here for my particular use is broken :-(. I’m working with the SLS guys to implement initParams support much easier. I’d love to see it a part of the manfiest options so I could have:
1: <SilverlightApp>
2: <source>VideoPlayer.xap</source>
3: <initParams>m=foo.wmv,captions=true</initParams>
4: </SilverlightApp>
And then the solution would be complete and life would be glorious. We’ll let you know when that happens.
Summary
In brief summary hopefully this let’s you see some of the options you have for still being able to use Silverlight 2 in your Encoder 2 workflow. The SDK provides a way for us to get integrated into the encoding pipeline and do our customizations. It’s simple to do and will only get better. You can download my complete template example here. Please note that this was based on an earlier build of the SL2 Video Player. The project has been progressing and you can get the latest version of the player at the Codeplex project site.
 As such I never expected to be down there, I never wired for anything beyond the one port for the wireless access point. I had a cabling guy stop by last night to talk with me about my options. I didn’t like the 15-20 drywall hole option too much and said I’d think about it. I remembered seeing something about ethernet over power lines. I did some research and found the HomePlug Alliance which provided some good general information for me. Enough to convince me that it wasn’t something I should just disregard as an option. Today I went to Fry’s Electronics to peruse my options. There were many. From manufacturers I didn’t know to those that you recognize: Netgear, D-Link, Linksys, etc. I didn’t really seek out any advice in the beginning on what would be best, so I fell into the marketing scheme – bigger numbers is better right? So I bypassed the 14MBPS, skipped over the 85MBPS, and opted for the 200MPBS (I couldn’t find any higher). I purchased the Netgear Powerline HD Network Kit. It was on sale as well which made it more attractive (picked it up for $110). I was skeptical but figured I had nothing to lose. $110 or hundreds more in cabling and drywall repair jobs. The kit comes with two adapters. Plug one into an outlet, connect it to your router and plug the other where you need ethernet connectivity. I did just that.
 Two Silverlight presentations were given. One by