Accessing Amazon S3 with Silverlight
I ran into an interesting situation last week…the desire to access some of my Amazon S3 services from within a Silverlight application.
Amazon Simple Storage Solution (S3) is a pay service provided Amazon for object storage ‘in the cloud.’ Although there is no UI tool provided by Amazon to navigate your account in S3, a SOAP and REST API are available for developers to integrate S3 information into their applications or other uses. You can view more information about Amazon S3 on their site.
What is S3?
Since S3 is a pretty flexible service, it can be used for many different things including storing “objects” like serialized representations of a type or something. A lot of applications these days are using cloud storage to store their application objects like this. For me, I use it as a file server in the cloud. Mostly it is there to host my images on this site as well as downloads and such. Because there is no user interface I collaborated with Aaron to make the S3 Browser for Live Writer so that I could access my files for when I need them in posting content.
Accessing content from S3 also has different meanings, even with regard to Silverlight. For example, if you wanted to simply set an Image source to a hosted image on S3, you could easily do that using the URL provided by S3 to the object. Since Silverlight allows media assets to be sourced from anywhere, this is not a problem.
The Problem
The problem comes when you want to download content in otherways, such as maybe a file stored there, a serialized object, or access their services in a Silverlight application. Why is this a problem? Well because S3 does not expose any cross-domain policy files in their implementation. RIA platforms like Silverlight require a policy file from the providing service to exist in order to make cross-domain calls from the platform.
You can read more about Silverlight’s cross-domain policy information here:
So how can we accomplish this?
The S3 Service APIs
Amazon exposes two service APIs: SOAP and REST. Because of the requirements around using their REST service and providing an Authorization header, we are unable to use that in Silverlight at this time since Authorization is a restricted header we cannot modify at this time. So we can use their SOAP service. This is fine for Silverlight because Amazon provides a WSDL for us to generate a proxy with. The defined endpoint in the WSDL for the service is https://s3.amazonaws.com/soap. This is important so remember this. Let’s move on.
Buckets to the rescue!
S3 uses a concept they call buckets to store information in containers. I’m not going to into a lot of detail explaining this concept so if you want to learn more, read their documentation. Basically a bucket is global unique to the service (not to your account)…so there can only exist one “timheuer” bucket across the service, name them accordingly :-). All data you push to S3 must be in a bucket. When you create a bucket, you can also access content in that bucket using a domain shortcut system. For example when you create a bucket called “timheuer” and put a file in there called foo.txt, it has the URI of http://timheuer.s3.amazonaws.com/foo.txt. Notice the alias that is happening here. We can now use this method to solve some of our issues. How? Well the “/soap” key will be available at any bucket endpoint!
Because of this aliasing, we can use this mechanism to ‘trick’ the endpoint of our service to respond to the policy file request…so let’s review how we’ll do this.
Step 1: Create the bucket
There are different ways you could do this. You could simply put a bucket called “foo” and use that, or you can completely alias a domain name. I’m choosing to completely alias a domain name. Here’s how I did it. First I created a bucket called timheueraws.timheuer.com – yes that full name. That’s a valid bucket name and you’ll see why I did the full one in a moment.
Step 2: Alias the domain
If you have control over your DNS, this is easy, if you don’t, you may want to use the simple bucket aliasing. But I went into my DNS (I use dnsmadeeasy.com btw, and it rocks, you should use it too). I added a CNAME record to my domain (timheuer.com):
1: CNAME timheueraws timheueraws.timheuer.com.s3.amazonaws.com. 86400 What does this mean? Well any request to timheueraws.timheuer.com will essentially be made at timheueraws.timheuer.com.s3.amazonaws.com. The last parameter is the TTL (time-to-live).
UPDATE: For security reasons you should actually stick with using only a bucket name and not a CNAME'd bucket. This will enable you to use the SSL certificate from Amazon and make secure calls. For example a bucket names "foo" could use https://foo.s3.amazonaws.com/soap as the endpoint. This is highly adviseable.
Step 3: Create the clientaccesspolicy.xml file
Create the policy file and upload it to your bucket you created in step 1. Be sure to set the access control list to allow ‘Everyone’ read permissions on it or you’ll have a problem even getting to it.
Creating the Silverlight application
Create a new Silverlight application using Visual Studio 2008. You can get all the tools you need by visiting the Getting Started section of the Silverlight community site. Once created let’s point out the key aspects of the application.
Create the Amazon service reference
In your Silverlight application, add a service reference. The easiest way to do this by right-clicking on the Silverlight project in VS2008 and choosing Add Service Reference. Then in the address area, specify the Amazon S3 WSDL location:
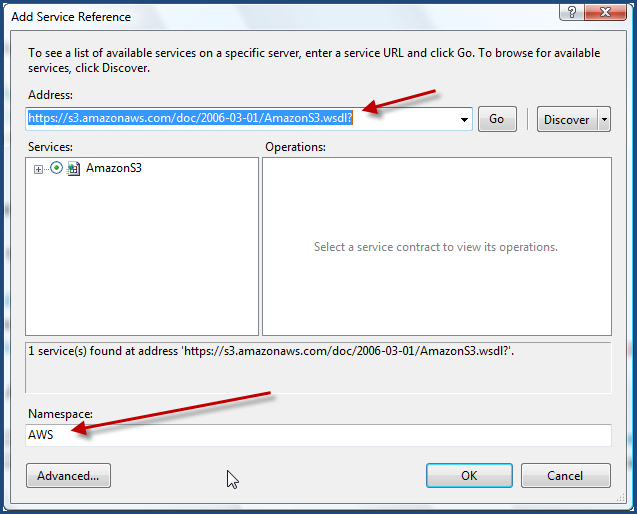
This will create the necessary proxy class code for us as well as a ServiceReferences.clientconfig file.
Write your Amazon code
Now for this simple purposes, let’s just list out all the buckets for our account. There is an API method called “ListAllMyBuckets” that we’ll use. Now Amazon requires a Signature element with every API call – it is essentially the authentication scheme. The Signature is a hash of the request plus your Amazon secret key (something you should never share). This can be confusing to some, so with the perusing of various code libraries on the Amazon doc areas, I came up with a simplified S3Helper to be able to do this Signature generation for us.
1: public class S3Helper
2: { 3: private const string AWS_ISO_FORMAT = "yyyy-MM-ddTHH:mm:ss.fffZ";
4: private const string AWS_ACTION = "AmazonS3";
5: 6: public static DateTime GetDatestamp()
7: { 8: DateTime dteCurrentDateTime; 9: DateTime dteFriendlyDateTime; 10: dteCurrentDateTime = DateTime.Now; 11: dteFriendlyDateTime = new DateTime(dteCurrentDateTime.Year,
12: dteCurrentDateTime.Month, dteCurrentDateTime.Day, 13: dteCurrentDateTime.Hour, dteCurrentDateTime.Minute, 14: dteCurrentDateTime.Second, 15: dteCurrentDateTime.Millisecond, DateTimeKind.Local); 16: return dteFriendlyDateTime;
17: } 18: 19: public static string GetIsoTimestamp(DateTime timeStamp)
20: { 21: string sISOtimeStamp;
22: sISOtimeStamp = timeStamp.ToUniversalTime().ToString(AWS_ISO_FORMAT, System.Globalization.CultureInfo.InvariantCulture); 23: return sISOtimeStamp;
24: } 25: 26: public static string GenerateSignature(string secret, string S3Operation, DateTime timeStamp)
27: { 28: Encoding ae = new UTF8Encoding();
29: HMACSHA1 signature = new HMACSHA1(ae.GetBytes(secret));
30: string rawSignature = AWS_ACTION + S3Operation + GetIsoTimestamp(timeStamp);
31: string encodedSignature = Convert.ToBase64String(signature.ComputeHash(ae.GetBytes(rawSignature.ToCharArray())));
32: 33: return encodedSignature;
34: } 35: } This will abstract that goop for us.
Let’s assume we have a ListBox in our Page.xaml file that we’re going to populate with our bucket names. Mine looks like this:
1: <ListBox x:Name="BucketList">
2: <ListBox.ItemTemplate>
3: <DataTemplate>
4: <TextBlock Text="{Binding Name}" />
5: </DataTemplate>
6: </ListBox.ItemTemplate>
7: </ListBox>
So let’s just add a simple method to our Loaded event handler calling our ListAllMyBuckets method. Remember, everything in Silverlight with regard to services is asynchronous, so we’re actually going to call ListAllMyBucketsAsync from our generated code. We’ll need a completed event handler where we will put our binding code. Here’s my complete code for both of these:
1: void Page_Loaded(object sender, RoutedEventArgs e)
2: { 3: DateTime timeStamp = S3Helper.GetDatestamp(); 4: 5: s3 = new AWS.AmazonS3Client();
6: 7: s3.ListAllMyBucketsCompleted += new EventHandler<AWS.ListAllMyBucketsCompletedEventArgs>(s3_ListAllMyBucketsCompleted);
8: s3.ListAllMyBucketsAsync(AWS_AWS_ID, timeStamp, S3Helper.GenerateSignature(AWS_SECRET_KEY, "ListAllMyBuckets", timeStamp));
9: } 10: 11: void s3_ListAllMyBucketsCompleted(object sender, AWS.ListAllMyBucketsCompletedEventArgs e)
12: { 13: if (e.Error == null)
14: { 15: AWS.ListAllMyBucketsResult res = e.Result; 16: AWS.ListAllMyBucketsEntry[] buckets = res.Buckets; 17: BucketList.ItemsSource = buckets; 18: } 19: } The AWS_AWS_ID and AWS_SECRET_KEY are constants in my application that represent my access key and secret for my S3 account. You’ll notice that in this snippet above the “s3” object isn’t typed – that is because I have a global that defines it (you can see it all in the code download).
So now if we run this application, we should expect to see our bucket list populated in our ListBox, right? Wrong. We get a few exceptions. First, we get an error because we can’t find the cross-domain policy file. Ah yes, remember we’re still using the Amazon SOAP endpoint. We need to change that.
Changing the Amazon endpoint
You may notice that the SOAP endpoint for S3 is an https:// scheme. We won’t be able to use that using this method because of our aliasing and the fact that the SSL certificate wouldn’t match our alias. So we need to change our endpoint. There are two ways we can do this.
We can change this in code and alter our code by creating a new BasicHttpBinding and EndpointAddress and passing them into the constructor of new AWS.AmazonS3Client(). But that would be putting our configuration in code. Remember that when we added the service reference we were provided with a ServiceReferences.clientconfig file. Open that up and check it out. It provides all the configuration information for the endpoint. Now we could just change a few things. I decided to create a new <binding> node for my use rather than alter the others. I called it “CustomAWS” and copied from the existing one that was there. Now because the default endpoint for S3 is a secure transport and we cannot use that, we have to change the <security> node to mode=”None” so that we can use our custom endpoint URI.
The second thing we do is in the <client> node change the address attribute and the bindingConfiguration attribute (to match new new config we just created). Mine now looks like this in entirety:
1: <configuration>
2: <system.serviceModel>
3: <bindings>
4: <basicHttpBinding>
5: <binding name="AmazonS3SoapBinding" maxBufferSize="65536" maxReceivedMessageSize="65536">
6: <security mode="Transport" />
7: </binding>
8: <binding name="AmazonS3SoapBinding1" maxBufferSize="65536" maxReceivedMessageSize="65536">
9: <security mode="None" />
10: </binding>
11: <binding name="CustomAWS" maxBufferSize="65536" maxReceivedMessageSize="65536">
12: <security mode="None" />
13: </binding>
14: </basicHttpBinding>
15: </bindings>
16: <client>
17: <endpoint address="http://timheueraws.timheuer.com/soap" binding="basicHttpBinding"
18: bindingConfiguration="CustomAWS" contract="Amz.AWS.AmazonS3"
19: name="AmazonS3" />
20: </client>
21: </system.serviceModel>
22: </configuration>
Now when we run the application it will work and if we sniff the traffic we’ll see that the first request is to our clientaccesspolicy.xml file that enables us to continue with the /soap requests:
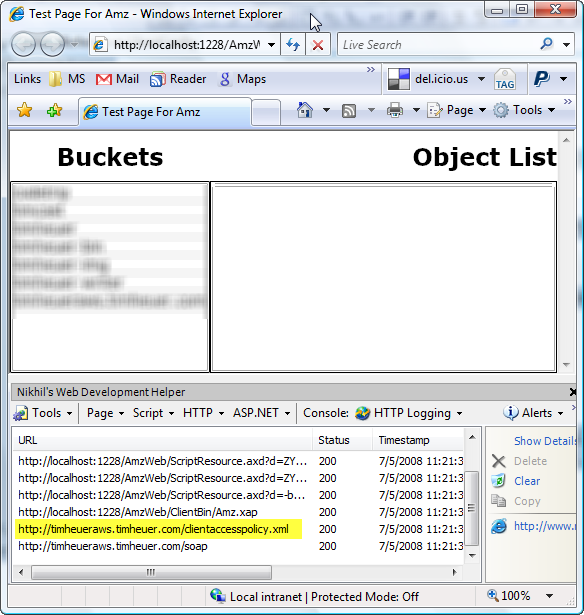
Now we can see a list of our buckets and after wiring up some other code so that when we click on the bucket, we’ll see a list of all the objects, bound to a DataGrid (details blurred for privacy) :

Summary
Sweet, we’re done! We’ve now been able to provide our own clientaccesspolicy.xml file in a place where it didn’t exist before and be able to call the service. We can now use other methods perhaps to create a new bucket, put objects in buckets, etc.
So in order to do this, we’ve:
- Created an alias to an bucket in our S3 account
- Uploaded a clientaccesspolicy.xml file to that bucket
- Changed the endpoint configuration in our service reference
- Called the services!
I’ve included all the files for the above solution in the download file. You’ll have to provide your own access key/secret of course as well as specify the endpoint address in the ServiceReferences.clientconfig file.
Hope this helps! Please read Part 2 of this post.
Please enjoy some of these other recent posts...