Silverlight Toolkit for Windows Phone 7
Well, the official Windows Phone Developer Tools are out! Go get them. (warning likely some caching issues..direct installer here.)
The awesome Silverlight toolkit team is at it again, this time for Windows Phone 7. The team is releasing a series of controls/libraries to help WP7 developers fill some gaps and simply make things easier and more consistent. The initial set includes the following:
- ContextMenu control
- DatePicker and TimePicker controls
- ToggleSwitch control
- GestureHelper library
- WrapPanel control
These controls are available for download including the source code. Here’s a quick synopsis of them for you to enjoy. Note that the “toolkit” prefix on the controls is declared in the app as:
1: xmlns:toolkit="clr-namespace:Microsoft.Phone.Controls;assembly=Microsoft.Phone.Controls.Toolkit"
2: xmlns:toolkitPrimitives="clr-namespace:Microsoft.Phone.Controls.Primitives;assembly=Microsoft.Phone.Controls.Toolkit"
after adding a reference to the Microsoft.Phone.Controls.Toolkit assembly.
ContextMenu
In WP7 there is a notion of a context menu, where when the user holds down an item (tap and hold) it pops up a menu in-line with some options. This is used in areas like the application list, where if you tap and hold an application you get the option to pin it to the start menu, uninstall, etc. For the toolkit control this is implemented as a ContextMenu service. For example, if I wanted to enable a context menu on my canvas I would use this markup:
1: <Canvas HorizontalAlignment="Left" VerticalAlignment="Top" Width="345" Height="91" Margin="0,50,0,0">
2: <toolkit:ContextMenuService.ContextMenu>
3: <toolkit:ContextMenu>
4: <toolkit:MenuItem Header="pin to start menu" Click="OnMenuClicked" Tag="START_MENU" />
5: <toolkit:MenuItem Header="delete" Click="OnMenuClicked" Tag="DELETE" />
6: <toolkit:MenuItem Header="share" Click="OnMenuClicked" Tag="SHARE" />
7: </toolkit:ContextMenu>
8: </toolkit:ContextMenuService.ContextMenu>
9: <Rectangle Fill="#FFF4F4F5" Height="91" Stroke="Black" Width="345"/>
10: <TextBlock TextWrapping="Wrap" Text="Tap and Hold (zoom)" Foreground="Black" Canvas.Left="71" Canvas.Top="27"/>
11: </Canvas>
And the result would look like:

There is an option to disable ‘zoom’ of the context menu, which follows the UI consistency of the device itself and is the default. Additionally you could implement the actual command using ICommand on the particular item.
DatePicker and TimePicker
These are two controls I’ve seen attempted to create to mimic the actual device controls in the WP7 OS itself. Some implementations have been better than others. Here the UI is matched with the semantics of the device. When using the control, it will automatically provide you with a TextBox input and when the user selects it, the picker will display. The markup is very simple:
1: <toolkit:DatePicker />
to produce the user experience when the user clicks on the input area:

While shown above is the DatePicker, the TimePicker operates in similar fashion.
For the pickers you may notice that in my screenshot above I have the checkmark and the “x” icons in the ApplicationBar. If you didn’t read the code comments in the toolkit you likely have “x” icon placeholders and are wondering why. The toolkit provides the necessary icons for these, but you have to bring them into your application. Once installed, look for them in the SDK folder and then add them using this well-known path:
![]()
Once you have the PNG files there, be sure to mark them as Content so they are included correctly and then you should be good!
ToggleSwitch
If you notice areas in WP7 that have simple on/off settings you may want to provide a consistent look in your application. The ToggleSwitch control does just that, providing not only the actual ToggleButton, but also the area for label/etc. This area could be templated as well so if you needed more than just a single text heading listing. The code:
1: <toolkit:ToggleSwitch Header="my setting name" Height="118" Margin="0,0,-24,-34" Width="480"/>
and the resulting UI:

GestureHelper
Wish you had a library that made it easier to know when a ‘flick’ or ‘pinch’ gesture happened? Enter GestureHelper. Using this on elements like this:
1: <Image x:Name="GesturedImage" Source="dividbyzero.jpg" HorizontalAlignment="Center" VerticalAlignment="Center" Width="450"
2: RenderTransformOrigin="0.5,0.5">
3: <Image.RenderTransform>
4: <ScaleTransform x:Name="ImageScaling" ScaleX="1" ScaleY="1" />
5: </Image.RenderTransform>
6: <toolkit:GestureService.GestureListener>
7: <toolkit:GestureListener PinchDelta="OnPinchDelta" />
8: </toolkit:GestureService.GestureListener>
9: </Image>
enables you to respond to these events when they happen and react accordingly:
1: private void OnPinchDelta(object sender, PinchGestureEventArgs e)
2: { 3: ImageScaling.ScaleX = e.DistanceRatio; 4: ImageScaling.ScaleY = e.DistanceRatio; 5: } Very helpful library!! NOTE: the above sample is actually not goot ‘pinch’ scaling for an image, but merely here to demonstrate a quick point.
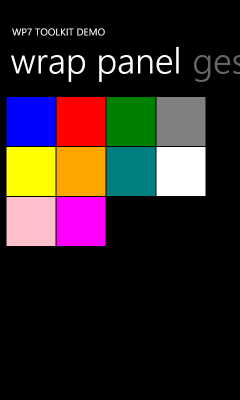
WrapPanel
The WrapPanel has been specifically ported for WP7. Using the similar syntax:
1: <toolkit:WrapPanel Orientation="Horizontal">
2: <Rectangle Fill="Blue" Width="100" Height="100" Stroke="Black" />
3: <Rectangle Fill="Red" Width="100" Height="100" Stroke="Black" />
4: <Rectangle Fill="Green" Width="100" Height="100" Stroke="Black" />
5: <Rectangle Fill="Gray" Width="100" Height="100" Stroke="Black" />
6: <Rectangle Fill="Yellow" Width="100" Height="100" Stroke="Black" />
7: <Rectangle Fill="Orange" Width="100" Height="100" Stroke="Black" />
8: <Rectangle Fill="Teal" Width="100" Height="100" Stroke="Black" />
9: <Rectangle Fill="White" Width="100" Height="100" Stroke="Black" />
10: <Rectangle Fill="Pink" Width="100" Height="100" Stroke="Black" />
11: <Rectangle Fill="Magenta" Width="100" Height="100" Stroke="Black" />
12: </toolkit:WrapPanel>
would produce the elements within the WrapPanel to be placed accordingly for you:

This will be helpful especially in areas of displaying items in storage locations (i.e., pictures, album art) I think.
Summary
These controls are being made available for you to freely consume in your applications. Go to the Silverlight Toolkit site right now and download the Silverlight for Windows Phone Toolkit and begin incorporating them into your applications today. Be sure to leave feedback on the Codeplex site with any issues you may find with your scenarios.
Be sure to visit the Silverlight Toolkit site for the bits and also ensure you subscribe to Jeff Wilcox and David Anson’s blogs for what likely will follow more detailed and useful information about the toolkit items!
Hope this helps!
Please enjoy some of these other recent posts...