| Comments

Frankly I’m going to be honest and say I’m not sure why it took us so long to add this capability to TextBlock, especially given that the support in Callisto provided via DynamicTextBlock was originally done in Silverlight 2. O_O. Well, Robby can rest well now knowing that we no longer have to depend on his contributions to Callisto.

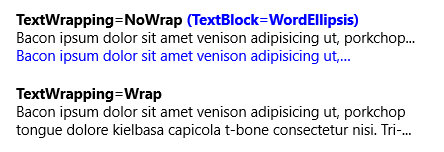
DynamicTextBlock sample image

Example of use DynamicTextBlock on bottom

Here’s the quick migration tip.

Change back to TextBlock

The DynamicTextBlock served one purpose, to provide trimming at the character level rather than the word level. The implementation of DynamicTextBlock was done using a ContentControl which, frankly, was probably too heavy handed for the usage here. However since TextBlock is sealed this was necessary. The usage for having this was simple:

<callisto:DynamicTextBlock Text="Some long text here" TextWrapping="NoWrap" />

And changing this to provide platform-supported trimming is simple as well:

<TextBlock Text="Some long text here" TextTrimming="CharacterEllipsis" />

Yep, that’s it.

Summary

This migration should be quick and painless. Using the platform’s TextBlock will allow you to benefit from the new typography settings provided in Windows 8.1 (like TextTrimming=”Clip” as well) in conjunction with this as well as better global text support. I’m thankful we were able to add this into the platform finally.

Hope this helps!

| Comments

As a part of my promise from my previous post talking about migrating to new Windows 8.1 controls instead of some Callisto ones, I’ll talk about how to leverage the new SettingsFlyout control provided by the framework.

SettingsFlyout example image

Without a doubt one of the two most popular Callisto controls is the SettingsFlyout. This is a marquee experience for Windows Store apps to provide the “charm” area for managing settings for your application. This control provides the animations, near pixel-perfect UI and behavior for handling the software keyboard movement. Like everything in Callisto, it is simple but powerful and popular. This post is to help you migrate to the platform-provided control if you are currently using the Callisto SettingsFlyout.

API Differences

In the Windows 8.1 implementation there are a few subtle differences that I will call out before walking through an example. I will not be talking about inherited API properties in general (that are provided from the base ContentControl derivation) but rather the specific differences in mappings to how you would have been using Callisto. You should read this table as Callisto API==old, Windows 8.1 API==new and what you should use.

Callisto APIWindows 8.1 APIComments
ContentBackgroundBrushBackgroundContentBackground brush was a temporary workaround to an initial poor implementation in the Callisto template
ContentForegroundBrushForegroundSame as above
FlyoutWidthWidthThe new UI guidelines don’t specify hard widths for ‘narrow’ or ‘wide’ but recommend a maximum of 500px width. Here you can set your value.
HeaderBrushHeaderBackgroundNaming difference, they do the same thing
HeaderTextTitleNaming difference, they do the same thing…this is the title of the settings area
ColorContrastConverterHeaderForegroundAllows you to specify the foreground color for the title text. In Callisto, this was automatically interpreted for you based on the background color and determined to be light/dark based on a contrast calculation
HostPopupN/Anot needed
IsOpenShow/ShowIndependent/HideMethods for showing/hiding the SettingsFlyout. If ShowIndependent is used it interacts with the back button differently.
SmallLogoImageSourceIconSourceYou can still use AppManifestHelper from Callisto to get this for you
BackClickedBackClickSame functionality

Changing your code – an example

Now that we have a basic overview of the differences I’ll show you how you were likely using this in your app.

NOTE: Perhaps one of Callisto’s biggest feedback was that these flyout-based controls couldn’t be used well in markup. This was due to some design decisions made really early in Callisto development. You may use the new SettingsFlyout differently, but I’ll be pointing out here how to port code with minimal impact, which would still be no markup.

I’ll use the Callisto test app as the example here. When you wanted to have a settings experience you would use the SettingsPane series of APIs to create a SettingsCommand and then do what you want in your code. This is how the Callisto test app does it (this code is in the CommandsRequested event handler):

SettingsCommand cmd = new SettingsCommand("sample", "Sample Custom Setting", (x) =>
{
    // create a new instance of the flyout
    Callisto.Controls.SettingsFlyout settings = new Callisto.Controls.SettingsFlyout();
 
    // set the desired width.  If you leave this out, you will get Narrow (346px)
    settings.FlyoutWidth = (Callisto.Controls.SettingsFlyout.SettingsFlyoutWidth)Enum.Parse(typeof(Callisto.Controls.SettingsFlyout.SettingsFlyoutWidth), settingswidth.SelectionBoxItem.ToString());
    
    // if using Callisto's AppManifestHelper you can grab the element from some member var you held it in
    settings.HeaderBrush = new SolidColorBrush(App.VisualElements.BackgroundColor);
    settings.HeaderText = string.Format("{0} Custom Settings", App.VisualElements.DisplayName);
 
    // provide some logo (preferrably the smallogo the app uses)
    BitmapImage bmp = new BitmapImage(App.VisualElements.SmallLogoUri);
    settings.SmallLogoImageSource = bmp;
 
    // set the content for the flyout
    settings.Content = new SettingsContent();
 
    // open it
    settings.IsOpen = true;
});
 
args.Request.ApplicationCommands.Add(cmd);

Please note that “SettingsContent” class here is a UserControl with some example content.

Fairly simple and the IsOpen would show the settings experience when the user clicked the setting (in this case “AppName Custom Settings”). Now lets look at the modifications you would change using the Windows 8.1 API:

SettingsCommand cmd = new SettingsCommand("sample2", "Sample 2", (x) =>
{
    Windows.UI.Xaml.Controls.SettingsFlyout settings = new Windows.UI.Xaml.Controls.SettingsFlyout();
    settings.Width = 500;
    settings.HeaderBackground = new SolidColorBrush(App.VisualElements.BackgroundColor);
    settings.HeaderForeground = new SolidColorBrush(Colors.Black);
    settings.Title = string.Format("{0} Custom 2", App.VisualElements.DisplayName);
    settings.IconSource = new BitmapImage(Windows.ApplicationModel.Package.Current.Logo);
    settings.Content = new SettingsContent();
    settings.Show();
});
 
args.Request.ApplicationCommands.Add(cmd);

As you can see this is pretty dang close to the same. If you had special “back” logic you could wire-up the BackClick event handler and do what you need to do. Otherwise Back will be handled to you to show the SettingsPane again (or none at all if ShowIndependent was used).

The SettingsFlyout does the same “light dismiss” functionality as Callisto and the rest of the operating system, this is all handled for you.

Callisto’s AppSettings Manager

One of the great feelings in Open Source is when people contribute to your projects in meaningful ways. That was the case when Scott Dorman added a helper class to automatically register SettingsFlyout controls in App.xaml through a static method. We called this AppSettings and had an AddCommand method. For Callisto for Windows 8.1 support I added two new overloads to that method to account for the change from FlyoutWidth (enum) to Width (double). This is the only change and the internal functions remain the same and do the correct wire-up with the SettingsPane/Commands. Here is the old:

AppSettings.Current.AddCommand<SettingsContent>("App Registered", Callisto.Controls.SettingsFlyout.SettingsFlyoutWidth.Wide);

And the change for using the Windows 8.1 platform control:

AppSettings.Current.AddCommand<SettingsContent>("App Registered 2", 500);

Again the SettingsContent class here is my UserControl that represents my content. That’s it and a small change helps keep this really helpful class around!

Summary

Again this was an extremely widely used control in Callisto and as you can see there are only a few subtle changes to your code to use the Windows-supported control. In doing so you get better support for orientation/rotation/software keyboard handling/accessibility and performance. The SettingsFlyout in Windows 8.1 can actually be used as a UserControl itself (and should). The Application Settings SDK Sample shows this in Scenario 3 on how to use the new control in this manner.

I hope this helps you to migrate to the new control!

| Comments

As I spent time last week updating my Callisto library for Windows 8.1 I realized it was a long time between the last release.  Well, I’ve finally updated it for Windows 8.1 release which is now available.  This is a major, yet minor release…allow me to explain.

Windows 8 Support

As of the Callisto 1.4.0 release, Windows 8 support ends.  Support in the non-commercial Open Source world is a bit of a funny term as the support has always been provided by myself and Morten.  I wrestled for a few days trying to keep a source code base, NuGet packages and Extension SDKs in sync with minimal impact.  After that exercise I realized this was just not going to be worth it.  Windows 8.1 developer platform has way more to offer and I just want to move forward.  I’ve locked the Windows 8 release at 1.3.1 (last one) and kept archives of the NuGet/Extension SDK bits on my GitHub project.  The latest code and packages are for Windows 8.1 only.  If you are working on a Windows 8 app and see a notification of a NuGet/SDK update, you should NOT update to 1.4.0.  The tools should block you here, but in case it doesn’t you will be broken in some cases.  I realize this may be an inconvenience to some, but I just couldn’t justify the extra support time for me in this regard.

Windows 8.1 version – first release

So what’s new in the Windows 8.1 version of Callisto?  Well, to be honest, not much.  This primarily is a release to get it on the platform, produce supported bits for Windows 8.1 and .NET Framework 4.5.1 for apps moving forward.  There actually are no new controls in this release but it does bring some minor updates.

Morten was able to check-in our first iteration of Designer support for the controls.  You’ll see all custom properties represented in property panes, have a better drag-and-drop experience, and be able to re-template using Edit Template.  I’ll have a principle moving forward that new controls should have this as the minimum bar for designer support.  Unni has been a tremendous help in motivating Callisto to do this as well as rapid-response help in working through some kinks.  The designer support is only provided in the Extension SDK installation as designer metadata and toolbox usage is not supported in NuGet.

As a new feature in Windows 8.1, XAML now compiles to XAML Binary Format (XBF).  XBF brings performance gains to startup of your application.  As a result of this I’ve prioritized your apps’ performance over developer convenience in some areas.  What this means is that the SDKs ship the XBF version of the toolkit’s generic.xaml.  This gets packaged in your application and helps app startup performance.  For NuGet, what this means is that you don’t get “Edit Template” support in Visual Studio.  If you are using the NuGet package and want to re-template one of the controls, you’d need to grab the template from source and copy it into your project.  This may be an inconvenience but few people re-template Callisto controls and the performance benefits of XBF are prioritized here.  There may be a time in Visual Studio’s release where they will support generating the XBF from the NuGet package, but that is not currently supported.  For the Extension SDK version, I ship the design-time generic.xaml for the control so this is not a problem…and you still get the XBF benefits when your package is built.

In addition to this designer goodness and basic platform support, the 1.4.0 release deprecates a few controls.

WHAT?!

Yes, as a part of Windows 8.1, new controls were provided in the base XAML platform and Callisto versions aren’t necessary.  The list of deprecated Callisto controls include:

  • Flyout – now provided in Windows.UI.Xaml.Controls.Flyout
  • Menu – now provided in Windows.UI.Xaml.Controls.MenuFlyout
  • SettingsFlyout – now provided in Windows.UI.Xaml.Controls.SettingsFlyout
  • DynamicTextBlock – now provided by the TextTrimming=”CharacterEllipsis” in Windows 8.1
  • WatermarkTextBox – now provided by the PlaceholderText property provided in Windows 8.1 on input controls

It is a sad day when some of your most-used and proud controls aren’t used anymore, but this is a good thing for developers.  The XAML team worked hard to address the feedback and close the gap in these areas.  As a part of this, some of the planned work around Date/Time pickers was stopped as those are also now provided in Windows 8.1 (and global calendars supported!).  The bugs that exist in the deprecated controls won’t be addressed.

How do I migrate from the Callisto deprecated controls?

Great question!  In a follow-up series of blog posts I’ll show how to migrate off of these Callisto controls to the included ones for Windows 8.1.  Please subscribe to this blog or follow me on Twitter for notification of when I send out the migration articles.  Here are the migration guides for the deprecated controls:

Please help me and others by posting comments if you find more migration gotchas that people should know about!

What is Callisto’s future then Tim?

It is bright.  I love development and I love helping people.  In my view there are still some compelling needs that I see app developers having that are higher level than what the platform provides.  I’ll be still driving forward with Pivot and DataGrid (under testing right now) as well as looking at some other interesting helpers to existing controls by way of some clever attached properties.  If you have suggestions, please log a suggestion on the GitHub site for consideration!

I have a lot of fun doing community/Open Source development and will continue to do so.  I hope this post helps understand the Callisto roadmap!

| Comments

I’ve seen some reports and received some emails on email groups that I’m a part of around Windows 8 and Google Chrome browser and how touch is not working.  In fact I was initially confused about this myself because it was working fine for me on my machine (Lenovo x230t) but other people were insistent that it wasn’t working.  Then I asked what machine they were on.

Almost exclusively everyone was on a “high DPI” machine (or had high DPI settings in their display).  If you have a Surface Pro, for example, you are using a high DPI machine.  I installed Chrome on my Surface Pro and indeed saw the problem there.  After some digging it appears to be that Google Chrome is not yet a high DPI-aware desktop application (at least of this writing which was using version 30.0.1599.66 m – phew that was a mouthful of a version number).

Look at this screenshot.  This is from my Surface Pro with no changes.  I’m tapping on the 2nd image in the news highlights (indicated by the touch square indicator) but notice where the target is actually clicking – on the date “October 4” where the context menu is located:

Chrome missed touch target

I asked around the office and received one workaround, which I received, but also found a better one.  Here are both of them for you to consider.

Workaround 1: run in compatibility mode

This involves you getting to the properties of the chrome.exe program and viewing the compatibility tab.  In there you can check the option to disable DPI scaling:

Chrome compatibility setting

I didn’t like this option because immediately after restarting Chrome the display was crisp but “tiny” to see for my aging eyes.  You can see here is the msn.com site before/after this compatibility setting:

Chrome msn.com before

msn.com on Google Chrome with no compat setting

Chrome msn.com compat set

msn.com on Google Chrome with the compat setting enabled

After this setting the hit-targets are fine and work but the content is small (although admittedly more of it is viewable, but that is too small for me).  To mitigate this you can use Chrome’s zoom feature to zoom to 150% to match most closely the high DPI scaling that automatically happens.

Chrome zoom settings

But there has to be a better way…and is (in my opinion).

Workaround 2: set the Chrome flag for HighDPI Support

I learned that Chrome has “flags” that you can set to experiment with certain settings or override other default/automatic settings.  From the address bar, type “chrome://flags” and you’ll see a page of options.  Scroll near the end and you’ll see a “HighDPI Support Windows” setting which is set to Automatic. 

Chrome HighDPI Flag setting

Force this to Enable and re-launch Chrome.  Boom you are working again.  Simpler fix and gets you scaling on your device as well.  Now some of Chrome’s chrome (menus, etc.) aren’t as crisp still but the main content area doesn’t confuse hit-targeting of your touch interaction because of the scale.

The good part is that it appears that the Chrome team is aware of this and a Chrome bug is logged (Chromium Bug 271222: When using the global Windows UI scaling feature, touchscreen touches are off by the set scale).

I don’t use Chrome on a regular basis (nothing against it, just don’t need it) but do get sad when friends have problems so I like to try to help out.  Hopefully if you are in this case with your touchscreen and Google Chrome this will get you fixed up.

Hope this helps!

| Comments

A few weeks ago I had the great pleasure of being in front of you, our developer customers (and friends) at the Microsoft BUILD conference. (I never know how to write “build” in a sentence and refuse to use the “//” in front of it.) These are things that I LOVE doing and wish I could do it more. I had the privilege of introducing an overview of what was new in the XAML UI framework for Windows 8.1. All the sessions are recorded so please go view mine and review it how you think so they might invite me back!

In my session I gave some preview of some of the great new XAML tooling that is introduced for developer productivity in Visual Studio 2013 which, as of this writing, is currently in preview form and available for download. My colleague Unni followed my session with one specifically about XAML tooling enhancements with a whirlwind tour of all the new features. Please go check out his session: What’s New in Blend and Visual Studio for XAML Developers for the complete details.

One of the things I showed was the introduction of Visual Studio (VS) code snippets for the XAML editor. This was one of the customer requests for a while for the XAML editor and is now available in the VS 2013 preview! In my presentation I showed a common task that I do which is to have many elements and wrap them in a StackPanel. I’ve gotten lazy and wanted a quick ‘refactor’ way to do this and now I can! A few have emailed me asking where the snippet I used was as nothing was working in the preview for them. As of this writing, the functionality was in the preview, however no default XAML code snippets are provided. I’ve responded to a few on an MSDN forum thread offering to share my snippets and someone suggested I post more details, so here it is!

Anatomy of a Code Snippet

Code Snippets in VS are basically XML files that sit in a special location (one of two locations, global or user). These code snippets can apply to many things including languages (C#, VB, etc.) as well as ‘markup’ languages (CSS and now XAML). You can read more in-depth data about VS Code Snippets here. The basics that I think you want to know are the two main types of snippets: Expansion and SurroundWith.

An Expansion snippet is one that you invoke and it gives you placeholders for stuff to fill out. My most widely used one is ‘foreach’ in C#. You start typing foreach, then hit tab-tab and you are presented with a template, more or less, to complete. A SurroundWith snippet is one that surrounds (duh!) the selected content in the editor surface with your template. An example of this is the #region snippet which puts the begin/end region tags around selected code. It is important to note that these can be used exclusively or together. That is to say I can have a SurroundWith snippet that is also an Expansion. In fact, the #region one is a good example: it surrounds the selected code and also gives you a field to complete for the region name. The Code Snippet structure is the same for most languages with the difference being that in the Code node of the snippet definition it defines which language it applies to for the editors.

NOTE: Creating Code Snippets is a very manual process. At the time of this writing there was no really great tool to “extract” a chunk of code and turn it into a code snippet. There are a few attempts out there, but most have been abandoned and not all working.

Once you have these XML files (.snippet files for VS), you place them in well-known locations or can use the Code Snippets manager in VS (more on that later).

XAML Code Snippets

As noted above the XAML code snippets are the same structure as the C# snippets with the difference being the Language attribute on the Code node in the definition. In my demo I used a StackPanel SurroundWith snippet with the following definition:

<?xml version="1.0" encoding="utf-8"?>
<CodeSnippet Format="1.0.0" xmlns="http://schemas.microsoft.com/VisualStudio/2005/CodeSnippet">
  <Header>
    <SnippetTypes>
      <SnippetType>SurroundsWith</SnippetType>
    </SnippetTypes>
    <Title>Vertical StackPanel</Title>
    <Author>Tim Heuer</Author>
    <Description>XAML snippet for surrounding content in a vertical StackPanel</Description>
    <HelpUrl>
    </HelpUrl>
    <Shortcut>vsp</Shortcut>
  </Header>
  <Snippet>
    <Code Language="XAML"><![CDATA[<StackPanel>$selected$$end$</StackPanel>]]></Code>
  </Snippet>
</CodeSnippet>

Notice the <Code> element and how it has the Language=”XAML”? That is the only difference between this and a C# one. There are keywords for certain things like selected (which is a marker for selected content) and end (which is where you want the cursor to be at the completion of the snippet) that you can use and are in the documentation. Here is another example of an Expansion XAML snippet for an AppBarButton:

<?xml version="1.0" encoding="utf-8" ?>
<CodeSnippets  xmlns="http://schemas.microsoft.com/VisualStudio/2005/CodeSnippet">
    <CodeSnippet Format="1.0.0">
        <Header>
            <Title>AppBarButton</Title>
            <Shortcut>abb</Shortcut>
            <Description>Code snippet for XAML AppBarButton</Description>
            <Author>Tim Heuer</Author>
            <SnippetTypes>
                <SnippetType>Expansion</SnippetType>
            </SnippetTypes>
        </Header>
        <Snippet>
            <Declarations>
                <Literal>
                    <ID>icon</ID>
                    <ToolTip>The Icon value to use for the visual</ToolTip>
                    <Default>Emoji</Default>
                </Literal>
                <Literal>
                    <ID>label</ID>
                    <ToolTip>The text label for the button</ToolTip>
                    <Default>My Label</Default>
                </Literal>
                <Literal>
                    <ID>uniqueid</ID>
                    <ToolTip>The unique ID for the button</ToolTip>
                    <Default>MyAppBarButton</Default>
                </Literal>
            </Declarations>
            <Code Language="XAML"><![CDATA[<AppBarButton x:Uid="$uniqueid$" x:Name="$uniqueid$" Label="$label$" Icon="$icon$" />$end$]]>
            </Code>
        </Snippet>
    </CodeSnippet>
</CodeSnippets>

As you can see they are pretty simple to use!

Adding Code Snippets to VS

There are two ways to distribute snippets: as raw .snippet files or with an installer. You can send someone a .snippet file and they can use the Code Snippets Manager tool to import it into their environment. This is a per-user method. From VS you would use the Tools menu and choose the Code Snippets manager:

<pic>

From here you would navigate to the XAML folder, then choose Import and select your .snippet files. These would then import them into your local profile (Documents\Visual Studio 2013\Code Snippets) and be ready for immediate use. Another way is through an installer. Now up until VS 2013 there was the VSI installer (as documented here on MSDN) which has since been eclipsed by the VSIX extensibility method. Right now there doesn’t appear to be much documentation on this method, but you *can* distribute code snippets via the VSIX installer. VSIX is basically a ZIP file format with a manifest and content. For this purpose the manifest describes the targets and the package definition for the VSPackage we are installing, which is in this case a folder of snippets. This is a little tricky method to get VSIX to use as an installer for snippets, but works. I won’t detail out the entire process here, but leave you with a few screenshots and you can download the file and look at the contents to see how it works…again it is a regular ZIP file so just rename and explore.

Contents of VSIX:

Contents of VSIX package

Installer dialog:

VSIX installer dialog

Once installed your VSIX-deployed snippets show up in the Extension Manager:

Extension manager listing

And there you have it! A simple way to distribute your code snippets. This VSIX can be put on VS gallery as well so that you can update it there and anyone who installed it can get updates from within VS itself!

To actually use the code snippets, from within the XAML editor use the shortcuts CTRL+K,S (for surround snippets):

Surround code snippet

or CTRL+K,X (for expansion snippets):

Expansion snippet

Expansion snippet completed

Summary

Code snippets can be a powerful productivity tool for VS. You probably use them daily (like foreach) and maybe didn’t even realize it! Now that this concept is extended to XAML there are some great opportunities to increase your markup productivity by encapsulating some things that you do often into a XAML code snippet. Right now the VS gallery doesn’t support uploading the method for VSIX that I have described so you can download my VSIX for some code snippets examples here for now.

Hope this helps!