| Comments

I was spelunking around playing with Silverlight in Windows Phone 7 and specifically the CameraCaptureTask.  The “tasks” are APIs that allow you to interact with phone-specific functionality like the camera, picture picker, phone dialer, etc.  A whole list of the available tasks in the Microsoft.Phone.Tasks namespace can be found in the developer documentation.

I was basically creating a simple application that would allow you to choose (PhotoChooserTask) or take a picture (CameraCaptureTask) and then display the picture (and later post it online or something).  Here was my basic XAML structure:

   1: <Grid x:Name="LayoutRoot" Background="Transparent">
   2:     <Grid.RowDefinitions>
   3:         <RowDefinition Height="Auto"/>
   4:         <RowDefinition Height="*"/>
   5:     </Grid.RowDefinitions>
   6:  
   7:     <!--TitlePanel contains the name of the application and page title-->
   8:     <StackPanel x:Name="TitlePanel" Grid.Row="0" Margin="12,17,0,28">
   9:         <TextBlock x:Name="ApplicationTitle" Text="PICTURE POSTER" Style="{StaticResource PhoneTextNormalStyle}"/>
  10:         <TextBlock x:Name="PageTitle" Text="take and post" Margin="9,-7,0,0" Style="{StaticResource PhoneTextTitle1Style}"/>
  11:     </StackPanel>
  12:  
  13:     <!--ContentPanel - place additional content here-->
  14:     <Grid x:Name="ContentPanel" Grid.Row="1" Margin="12,0,12,0">
  15:         <Image Margin="8,8,8,159" x:Name="ChosenPicture" />
  16:         <Button Click="OnPostClicked" x:Name="PostPic" Content="POST" HorizontalAlignment="Right" VerticalAlignment="Bottom" Margin="0,0,8,47" Width="199"/>
  17:         <TextBlock x:Name="PostedUri" TextWrapping="Wrap" VerticalAlignment="Bottom" Margin="8,0,8,20"/></Grid>
  18: </Grid>
  19:  
  20: <!--Sample code showing usage of ApplicationBar-->
  21: <phone:PhoneApplicationPage.ApplicationBar>
  22:     <shell:ApplicationBar IsVisible="True" IsMenuEnabled="True">
  23:         <shell:ApplicationBar.MenuItems>
  24:             <shell:ApplicationBarMenuItem Text="take picture" Click="OnMenuTakeClicked"/>
  25:             <shell:ApplicationBarMenuItem Text="choose picture" Click="OnMenuChooseClicked"/>
  26:             <shell:ApplicationBarMenuItem Text="save picture" Click="OnSavePictureClicked" />
  27:         </shell:ApplicationBar.MenuItems>
  28:     </shell:ApplicationBar>
  29: </phone:PhoneApplicationPage.ApplicationBar>

And the initial code to trigger the task from a MenuItem:

   1: private void OnMenuTakeClicked(object sender, EventArgs e)
   2: {
   3:     CameraCaptureTask cam = new CameraCaptureTask();
   4:     cam.Completed += new EventHandler<PhotoResult>(OnCameraCaptureCompleted);
   5:     cam.Show();
   6: }
   7:  
   8: private void OnMenuChooseClicked(object sender, EventArgs e)
   9: {
  10:     PhotoChooserTask pix = new PhotoChooserTask();
  11:     pix.Completed += new EventHandler<PhotoResult>(OnCameraCaptureCompleted);
  12:     pix.ShowCamera = true;
  13:     pix.Show();
  14: }

As you can see it is pretty simple and brings up the OS-standard camera and/or photo chooser. 

NOTE: if you use the PhotoChooserTask you can also initiate taking a new picture from that task as well.

After the picture is chosen (from a new pic or from a picker) I put the item in the Image control in my XAML:

   1: void OnCameraCaptureCompleted(object sender, PhotoResult e)
   2: {
   3:     capturedImage = e.ChosenPhoto; // this is a member variable to store the last chosen pic
   4:  
   5:     BitmapImage bmp = new BitmapImage();
   6:     bmp.SetSource(e.ChosenPhoto);
   7:  
   8:     ChosenPicture.Source = bmp;
   9: }

During this, however, I found that no matter how I held the phone when I took the picture (portrait or landscape), the API always assumed landscape.  I tried looking at some of the device orientation data, but it wasn’t providing the right information at the time I needed it.  It turns out after some internal discussions that others were seeing this as well.  On the device I have (Samsung) the picture snapshot button is in a natural place if you were to hold it landscape.  However, in my current experience with my mobile devices (Android and iPhone) I actually take more pictures in portrait mode.

After some discussion with folks internally, one of our test leads for WP7 reminded everyone that the phone does provide the EXIF information for each picture taken.  One of the attributes of EXIF is orientation (or rotation).  Now all we needed was a method to read the EXIF data in .NET…enter ExifLib.  This is a cool Code Project article and source code download that does a great job providing a simple EXIF reading experience.

The ExifLib as it stood wouldn’t work with the Stream that is provided as a result of the CameraCaptureTask, so a slight modification (or in my case I just created an override) to the function was needed for the library.  Here’s the additional override I added:

   1: public static JpegInfo ReadJpeg(Stream FileStream, string FileName)
   2: {
   3:     DateTime now = DateTime.Now;
   4:     ExifReader reader = new ExifReader(FileStream);
   5:     reader.info.FileSize = (int)FileStream.Length;
   6:     reader.info.FileName = string.Format("{0}.jpg", FileName);
   7:     reader.info.LoadTime = (TimeSpan)(DateTime.Now - now);
   8:     return reader.info;
   9: }

Now with that in place, I could accomplish taking my picture and read the EXIF data and apply the appropriate transform based on the orientation data.  The first thing I had to do was to create a RotateTransform on my Image element as well as set the RenderTransformOrigin on the Image element:

   1: <Image Margin="8,8,8,159" x:Name="ChosenPicture" RenderTransformOrigin="0.5,0.5">
   2:     <Image.RenderTransform>
   3:         <RotateTransform x:Name="ImageRotate" />
   4:     </Image.RenderTransform>
   5: </Image>

Now in code in my completed handler for the task I modified it to look at the EXIF orientation data and apply the correct rotation to show the image:

   1: void OnCameraCaptureCompleted(object sender, PhotoResult e)
   2: {
   3:     capturedImage = e.ChosenPhoto;
   4:  
   5:     BitmapImage bmp = new BitmapImage();
   6:     bmp.SetSource(e.ChosenPhoto);
   7:  
   8:     ChosenPicture.Source = bmp;
   9:  
  10:     // figure out the orientation from EXIF data
  11:     e.ChosenPhoto.Position = 0;
  12:     JpegInfo info = ExifReader.ReadJpeg(e.ChosenPhoto, e.OriginalFileName);
  13:     PostedUri.Text = info.Orientation.ToString();
  14:  
  15:     switch (info.Orientation)
  16:     {
  17:         case ExifOrientation.TopLeft:
  18:         case ExifOrientation.Undefined:
  19:             ImageRotate.Angle = 0d;
  20:             break;
  21:         case ExifOrientation.TopRight:
  22:             ImageRotate.Angle = 90d;
  23:             break;
  24:         case ExifOrientation.BottomRight:
  25:             ImageRotate.Angle = 180d;
  26:             break;
  27:         case ExifOrientation.BottomLeft:
  28:             ImageRotate.Angle = 270d;
  29:             break;
  30:     }
  31: }

Now I’ve got my flexibility in my application and don’t have to worry about the orientation. 

Now of course this only helps for the display of the information.  If you were to use the libraries to save the image you’d still have the issue of an incorrect orientation on the picture.  Again, iterating with our test team internally (thanks Stefan!!!) here’s a modified view of the world.

First, instead of rotating the Image element, let’s just rotate the actual Pixels themselves:

   1: void OnCameraCaptureCompleted(object sender, PhotoResult e)
   2: {
   3:     // figure out the orientation from EXIF data
   4:     e.ChosenPhoto.Position = 0;
   5:     JpegInfo info = ExifReader.ReadJpeg(e.ChosenPhoto, e.OriginalFileName);
   6:  
   7:     _width = info.Width;
   8:     _height = info.Height;
   9:     _orientation = info.Orientation;
  10:  
  11:     PostedUri.Text = info.Orientation.ToString();
  12:  
  13:     switch (info.Orientation)
  14:     {
  15:         case ExifOrientation.TopLeft:
  16:         case ExifOrientation.Undefined:
  17:             _angle = 0;
  18:             break;
  19:         case ExifOrientation.TopRight:
  20:             _angle = 90;
  21:             break;
  22:         case ExifOrientation.BottomRight:
  23:             _angle = 180;
  24:             break;
  25:         case ExifOrientation.BottomLeft:
  26:             _angle = 270;
  27:             break;
  28:     }
  29:  
  30:     if (_angle > 0d)
  31:     {
  32:         capturedImage = RotateStream(e.ChosenPhoto, _angle);
  33:     }
  34:     else
  35:     {
  36:         capturedImage = e.ChosenPhoto;
  37:     }
  38:  
  39:     BitmapImage bmp = new BitmapImage();
  40:     bmp.SetSource(capturedImage);
  41:  
  42:     ChosenPicture.Source = bmp;           
  43: }
  44:  
  45: private Stream RotateStream(Stream stream, int angle)
  46: {
  47:     stream.Position = 0;
  48:     if (angle % 90 != 0 || angle < 0) throw new ArgumentException();
  49:     if (angle % 360 == 0) return stream;
  50:  
  51:     BitmapImage bitmap = new BitmapImage();
  52:     bitmap.SetSource(stream);
  53:     WriteableBitmap wbSource = new WriteableBitmap(bitmap);
  54:  
  55:     WriteableBitmap wbTarget = null;
  56:     if (angle % 180 == 0)
  57:     {
  58:         wbTarget = new WriteableBitmap(wbSource.PixelWidth, wbSource.PixelHeight);
  59:     }
  60:     else
  61:     {
  62:         wbTarget = new WriteableBitmap(wbSource.PixelHeight, wbSource.PixelWidth);
  63:     }
  64:  
  65:     for (int x = 0; x < wbSource.PixelWidth; x++)
  66:     {
  67:         for (int y = 0; y < wbSource.PixelHeight; y++)
  68:         {
  69:             switch (angle % 360)
  70:             {
  71:                 case 90:
  72:                     wbTarget.Pixels[(wbSource.PixelHeight - y - 1) + x * wbTarget.PixelWidth] = wbSource.Pixels[x + y * wbSource.PixelWidth];
  73:                     break;
  74:                 case 180:
  75:                     wbTarget.Pixels[(wbSource.PixelWidth - x - 1) + (wbSource.PixelHeight - y - 1) * wbSource.PixelWidth] = wbSource.Pixels[x + y * wbSource.PixelWidth];
  76:                     break;
  77:                 case 270:
  78:                     wbTarget.Pixels[y + (wbSource.PixelWidth - x - 1) * wbTarget.PixelWidth] = wbSource.Pixels[x + y * wbSource.PixelWidth];
  79:                     break;
  80:             }
  81:         }
  82:     }
  83:     MemoryStream targetStream = new MemoryStream();
  84:     wbTarget.SaveJpeg(targetStream, wbTarget.PixelWidth, wbTarget.PixelHeight, 0, 100);
  85:     return targetStream;
  86: }

Notice here that OnCameraCaptureCompleted is different in that we first check the orientation and if needed rotate the pixels using the newly introduced RotateStream method.  The resulting stream is what we actually set on our Image element and no need for RotateTransform at this point.  I can then even have a menu item save the picture to the media library on the device:

   1: private void OnSavePictureClicked(object sender, EventArgs e)
   2: {
   3:     if (capturedImage != null)
   4:     {
   5:         capturedImage.Seek(0, 0); // necessary to initiate the stream correctly before save
   6:  
   7:         MediaLibrary ml = new MediaLibrary();
   8:         try
   9:         {
  10:             Picture p = ml.SavePicture(Guid.NewGuid().ToString(), capturedImage);
  11:             PostedUri.Text += ":" + p.Name;
  12:         }
  13:         catch (Exception ex)
  14:         {
  15:             PostedUri.Text = ex.Message;
  16:         }
  17:     }
  18: }

The MediaLibrary is a part of Microsoft.Xna.Framework.Media and provides the easy functionality of saving to the device.  And upon sync (or sharing) my image is what I expected when I took the picture using the CameraCaptureTask.

Here is my final project sample (lots of debug code in there, but you should get the point): WindowsPhoneApplication63.zip (requires the Windows Phone Developer Tools)

Hope this helps!

| Comments

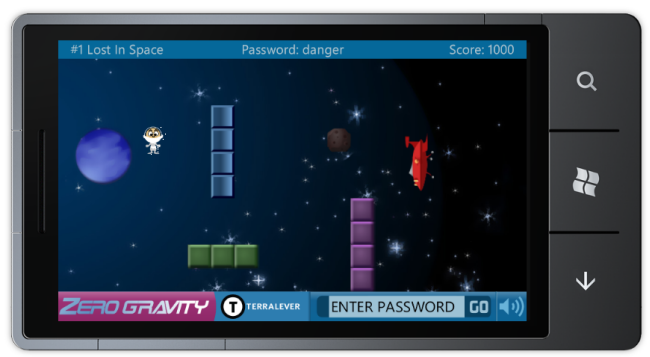
Lt. Bennett in Zero GravityThree years ago I wrote about one of the first full-featured casual games built in Silverlight (at the time Silverlight 1.1) which we called Zero Gravity.  It was a game featuring Lt. Bennett a character who was lost in space and your job was to navigate him through simple puzzle boards back to his space ship.  It is a fun little game that can keep you busy for a while and even get you frustrated on some of the harder mazes. 

The project was done in concert with Terralever, an agency who has great experience in building great online casual experiences for some of the top brands in the world.  It was really fun to come up with various concepts on a casual game proof of concept in the VERY early days of Silverlight (they actually created the first Silverlight 1.0 game that was published to Miniclip.com and as well another Silverlight 2 game that was published as well).  Those early days of Silverlight were tough when you didn’t have a lot of the infrastructure we do now with the core runtime.  There is no multi-player Halo-style shooting or 3D here, and is representative of what was available at the time. 

Two weeks ago I reached out to Terralever and mentioned that we kind of let that project get stale (my fault) as we both wanted to release the source code but it never turned up as a priority for me (sorry about that).  In that discussion, they had some cycles to spare and their lead developer, Ryan Plemons, released the source code for Zero Gravity, updated for use in current Silverlight.  But not only that, he also ported the code to Silverlight for Windows Phone!!!  I love this gem of a statement from Ryan:

“I for one was very shocked that the transition went as smoothly as it did.”

Ryan has a blog post where he goes into some detail about the port, where there were things he needed to change (and got some benefit) like using the XNA sound libraries and the GestureHelper library from the Silverlight Toolkit.

Zero Gravity on Windows Phone 7

Now before you start pointing out all the obvious things that “shouldn’t be in the phone version” we’ll concede that there are some things that don’t match what a mobile experience should be.  The part of this exercise was to see how easy it would be to port something Silverlight 2/3 wholesale and still run.  I think it’s pretty cool to see a huge amount of codebase running as-is.  The introduction of the sound/gesture APIs weren’t required, but just added benefit to trimming some areas of code.

Congratulations and THANK YOU to Ryan and Terralever for doing this effort and publishing the source code for both projects.  Read more:

    Hope this helps!

This work is licensed under a Creative Commons Attribution By license.

| Comments

On the heels of the Windows Phone Developer Tools and Silverlight for Windows Phone Toolkit releases I saw a lot of exhaling going on in the hallways today.  Apparently Jeff saved his largest one for an avalanche of knowledge on Twitter in the late afternoon.  Jeff Wilcox is a developer on the Silverlight team and has been working on the Silverlight for Windows Phone initiative as well as the toolkit released today.  He was headed out on vacation but decided to throw out some words of wisdom for Windows Phone developers working in Silverlight.  Here’s some of those nuggets – I wanted to capture them before he left because who knows how long they’ll stay in Twitter.  It reads like a true guide to developing great apps on Windows Phone…

  • Panorama looks nice, but Pivot will offer faster start time.
  • You can also set a Background image to a Pivot. You won't get the parallax effect, but it is another option.
  • Be aware of how many pano and pivot items you do have. Memory expands quick when you have a lot of views and images!
  • Even if you have a 30k compressed JPEG image, at runtime that becomes an uncompressed surface that may take several MBs of memory
  • Pivot and Panorama can have UI element headers and titles, too, but you'll need to apply your own styling (fonts and sizes)
  • Beware that UI elements larger than 2000x2000 pixels that are bitmap cached clip on Windows Phone 7. We know it isn't perfect, but beware k?
  • Setting SelectedIndex before the items are set on a Pivot causes an exception. Wrap in a try/catch or wait for loaded (sorry!)
  • A slideshow app in 5 minutes: Pivot with null Header and Title and item headers. Beware memory use though.
  • A lot of people try building 'wizard' screens with panorama & pivot control. Please don't do this! Thx, the "UX gods"
  • Layout is a killer. But like death, you eventually have to pay it for everything.
  • So consider delay loading controls and screens. A Panorama with a billion items will take forever to load due to layout.
  • If you're not using PerformanceProgressBar, I'll send @JustinAngel after you ProgressBar for Windows Phone 7
  • If your app rocks and starts really quick *on a device* consider not using a splash screen
  • It's true. Your 6-core machine running the wp7 emulator is NOT indicative of device (single core!) performance. Beware!
  • We've talked perf before... Content over Resources for images means fast startup time http://bit.ly/9DhVbd
  • If you're using Panorama, a Resource background will load immediately compared to Content
  • Remember that for ingestion to the marketplace, your apps need to consume under 90MB of memory
  • However on devices with > 256MB, its cool to use more *in those cases
  • long deviceTotalMemory = (long)DeviceExtendedProperties.GetValue("DeviceTotalMemory");
  • long applicationCurrentMemoryUsage = (long)DeviceExtendedProperties.GetValue("ApplicationCurrentMemoryUsage");
  • long applicationPeakMemoryUsage = (long)DeviceExtendedProperties.GetValue("ApplicationPeakMemoryUsage")
  • Your compositor thread should rock out around 60fps all the time please. #wp7dev perf counters: http://bit.ly/busJIi
  • If your UI thread gets pegged, your compositor thread will suffer... remember your BackgroundWorker kids!
  • Unfortunately the "Analytics" type from desktop Silverlight is not on the phone today, so you can't measure CPU in a regular app
  • Having a single DispatcherTimer in your app can affect your battery life regardless of interval. Chose wisely
  • You can set the Foreground property on Pivot to set the title and header text color
  • Using a map control inside a Panorama or Pivot is not recommended for a number of UX and technical reasons. Navigate to a subpage.
  • Please use text styles and never hardcode sizes or default fonts.
  • The panorama/pivot items expect most their contents to have a 12px margin left/right for UX reasons. The default styles have this.
  • So if you have something in a pano/pivot item with 0 margin & padding, your UX will be funky
  • Fill rate is super important. Keep it under 2.5 please
  • What is fill rate? 1.00 means one screen of pixels being rendered every frame.
  • Check your apps for extra, un-needed background colors on pages, controls, etc.. They impact perf.
  • That sexy "tilt" effect? Use Peter's behavior http://bit.ly/90Z1yR and/or check out the MSDN docs
  • DataTemplates with a bunch of StackPanels and Grids? Try to simplify to a Grid with the right col/rows instead for perf wins.
  • Unit testing in a quick and dirty way is possible on the Windows Phone thx to the sl unit test fx. http://bit.ly/a0DWah
  • Only use Dispatcher.BeginInvoke when you must. Look at SmartDispatcher (ps old code sry) http://bit.ly/axHh36
  • For a "wide" Panorama item, set the item's Orientation to "Horizontal"
  • Play with the cache and redraw vis. settings to see what's being cached in your app http://bit.ly/busJIi
  • Things in a list/scroll viewer are often automatically bitmap cached by Silverlight for Windows Phone runtime
  • If you have a progress bar with IsIndeterminate="True" in your app, even if its hidden those storyboards are costly! Set to False!
  • We did work on Windows Phone 7 to move more networking to the background thread - hope it helps
  • When a Panorama loads, all its items go through a render pass. For pivot, it is done incrementally for neighboring items.
  • When making web requests, see if the service lets you scope down the fields that are returned for quicker perf (and JSON over XML!)
  • If you navigate to a subpage, the old page will stick around - so complex pano/pivot pgs stay in memory unless you're proactive
  • The "app deployment tool" installed with the dev tools lets you run others apps in emulator/device without needing source
  • We optimize for loading some things from isolated storage. Images from an isostore stream may load faster than a MemoryStream
  • If your source files have "Black" or "White", you might be doing it wrong. PhoneForegroundBrush, PhoneBackgroundBrush instead!
  • If your control's dep. property has a change handler, animating that prop. will always happen on the UI thread (no gpu accel.)
  • Animating Opacity on a CacheMode="BitmapCache" element = compositor thread (GPU!)
  • In the RTM tools, scroll viewers all have the "bounce" effect automatically
  • If you ignore the phone's theme (and go all light bg, like the mail app), your scrollbarsmust be retemplated or you won't see them!
  • Although data binding is not evil, an observable col. with a complex data temp. and 200k items is evil.
  • The web browser control won't let you NavigateToString until it has loaded.
  • If you have an app with a lot of different web browser controls, think about consolidating to one, so it only has to load once.
  • Panorama is designed to be a starting place. Think whitespace. Not tons of data
  • Free performance win: when you use Panorama the way the UX guidelines recommend, it is faster! http://bit.ly/9zTxtU
  • Those theme xamls for #wp7? Yeah they are in %ProgramFiles%\Microsoft SDKs\Windows Phone\v7.0\Design\
  • Resist the urge to Panorama every app.  It is a sweet UX thing when used right…but not just because.
  • Resist the urge to iPhone gradient your apps. Think outside the box! Also it avoids color banding...

So as you can see, he sort of knows what he’s talking about :-).  Go subscribe to his blog and follow him on Twitter.  Other helpful links:

Thanks Jeff for sharing your awesomeness!

Hope this helps!

| Comments

Well, the official Windows Phone Developer Tools are out!  Go get them. (warning likely some caching issues..direct installer here.)

The awesome Silverlight toolkit team is at it again, this time for Windows Phone 7.  The team is releasing a series of controls/libraries to help WP7 developers fill some gaps and simply make things easier and more consistent.  The initial set includes the following:

These controls are available for download including the source code.  Here’s a quick synopsis of them for you to enjoy.  Note that the “toolkit” prefix on the controls is declared in the app as:

   1: xmlns:toolkit="clr-namespace:Microsoft.Phone.Controls;assembly=Microsoft.Phone.Controls.Toolkit" 
   2: xmlns:toolkitPrimitives="clr-namespace:Microsoft.Phone.Controls.Primitives;assembly=Microsoft.Phone.Controls.Toolkit"

after adding a reference to the Microsoft.Phone.Controls.Toolkit assembly.

ContextMenu

In WP7 there is a notion of a context menu, where when the user holds down an item (tap and hold) it pops up a menu in-line with some options.  This is used in areas like the application list, where if you tap and hold an application you get the option to pin it to the start menu, uninstall, etc.  For the toolkit control this is implemented as a ContextMenu service.  For example, if I wanted to enable a context menu on my canvas I would use this markup:

   1: <Canvas HorizontalAlignment="Left" VerticalAlignment="Top" Width="345" Height="91" Margin="0,50,0,0">
   2:     <toolkit:ContextMenuService.ContextMenu>
   3:         <toolkit:ContextMenu>
   4:             <toolkit:MenuItem Header="pin to start menu" Click="OnMenuClicked" Tag="START_MENU" />
   5:             <toolkit:MenuItem Header="delete" Click="OnMenuClicked" Tag="DELETE" />
   6:             <toolkit:MenuItem Header="share" Click="OnMenuClicked" Tag="SHARE" />
   7:         </toolkit:ContextMenu>
   8:     </toolkit:ContextMenuService.ContextMenu>
   9:     <Rectangle Fill="#FFF4F4F5" Height="91" Stroke="Black" Width="345"/>
  10:     <TextBlock TextWrapping="Wrap" Text="Tap and Hold (zoom)" Foreground="Black" Canvas.Left="71" Canvas.Top="27"/>
  11: </Canvas>

And the result would look like:

ContextMenu control

There is an option to disable ‘zoom’ of the context menu, which follows the UI consistency of the device itself and is the default.  Additionally you could implement the actual command using ICommand on the particular item.

DatePicker and TimePicker

These are two controls I’ve seen attempted to create to mimic the actual device controls in the WP7 OS itself.  Some implementations have been better than others.  Here the UI is matched with the semantics of the device.  When using the control, it will automatically provide you with a TextBox input and when the user selects it, the picker will display.  The markup is very simple:

   1: <toolkit:DatePicker />

to produce the user experience when the user clicks on the input area:

WP7 Toolkit pickers

While shown above is the DatePicker, the TimePicker operates in similar fashion.

For the pickers you may notice that in my screenshot above I have the checkmark and the “x” icons in the ApplicationBar.  If you didn’t read the code comments in the toolkit you likely have “x” icon placeholders and are wondering why.  The toolkit provides the necessary icons for these, but you have to bring them into your application.  Once installed, look for them in the SDK folder and then add them using this well-known path:

WP7 toolkit icon layout

Once you have the PNG files there, be sure to mark them as Content so they are included correctly and then you should be good!

ToggleSwitch

If you notice areas in WP7 that have simple on/off settings you may want to provide a consistent look in your application.  The ToggleSwitch control does just that, providing not only the actual ToggleButton, but also the area for label/etc.  This area could be templated as well so if you needed more than just a single text heading listing.  The code:

   1: <toolkit:ToggleSwitch Header="my setting name" Height="118" Margin="0,0,-24,-34" Width="480"/>

and the resulting UI:

ToggleSwitch control

GestureHelper

Wish you had a library that made it easier to know when a ‘flick’ or ‘pinch’ gesture happened?  Enter GestureHelper.  Using this on elements like this:

   1: <Image x:Name="GesturedImage" Source="dividbyzero.jpg" HorizontalAlignment="Center" VerticalAlignment="Center" Width="450" 
   2:     RenderTransformOrigin="0.5,0.5">
   3:     <Image.RenderTransform>
   4:         <ScaleTransform x:Name="ImageScaling" ScaleX="1" ScaleY="1" />
   5:     </Image.RenderTransform>
   6:     <toolkit:GestureService.GestureListener>
   7:         <toolkit:GestureListener PinchDelta="OnPinchDelta" />
   8:     </toolkit:GestureService.GestureListener>
   9: </Image>

enables you to respond to these events when they happen and react accordingly:

   1: private void OnPinchDelta(object sender, PinchGestureEventArgs e)
   2: {
   3:     ImageScaling.ScaleX = e.DistanceRatio;
   4:     ImageScaling.ScaleY = e.DistanceRatio;
   5: }

Very helpful library!!  NOTE: the above sample is actually not goot ‘pinch’ scaling for an image, but merely here to demonstrate a quick point.

WrapPanel

The WrapPanel has been specifically ported for WP7.  Using the similar syntax:

   1: <toolkit:WrapPanel Orientation="Horizontal">
   2:     <Rectangle Fill="Blue" Width="100" Height="100" Stroke="Black" />
   3:     <Rectangle Fill="Red" Width="100" Height="100" Stroke="Black" />
   4:     <Rectangle Fill="Green" Width="100" Height="100" Stroke="Black" />
   5:     <Rectangle Fill="Gray" Width="100" Height="100" Stroke="Black" />
   6:     <Rectangle Fill="Yellow" Width="100" Height="100" Stroke="Black" />
   7:     <Rectangle Fill="Orange" Width="100" Height="100" Stroke="Black" />
   8:     <Rectangle Fill="Teal" Width="100" Height="100" Stroke="Black" />
   9:     <Rectangle Fill="White" Width="100" Height="100" Stroke="Black" />
  10:     <Rectangle Fill="Pink" Width="100" Height="100" Stroke="Black" />
  11:     <Rectangle Fill="Magenta" Width="100" Height="100" Stroke="Black" />
  12: </toolkit:WrapPanel>

would produce the elements within the WrapPanel to be placed accordingly for you:

WP7 Toolkit WrapPanel

This will be helpful especially in areas of displaying items in storage locations (i.e., pictures, album art) I think.

Summary

These controls are being made available for you to freely consume in your applications.  Go to the Silverlight Toolkit site right now and download the Silverlight for Windows Phone Toolkit and begin incorporating them into your applications today.  Be sure to leave feedback on the Codeplex site with any issues you may find with your scenarios.

Be sure to visit the Silverlight Toolkit site for the bits and also ensure you subscribe to Jeff Wilcox and David Anson’s blogs for what likely will follow more detailed and useful information about the toolkit items!

Hope this helps!

| Comments

Seesmic logoToday, Seesmic more broadly launched Seesmic Desktop, a refreshed platform for interacting with various social media outlets like Twitter, Facebook, Google Buzz, etc.  Seesmic has been one of the leaders in this space providing client applications on various platforms across web, desktop and mobile and providing us with unified views of our interaction with others online.

You may have remembered seeing Loic on stage at MIX last year demonstrating their first preview of this updated platform and inviting developers to be a part of extending the shell.  That’s right…their platform is extensible!  A great application that I can also modify to my needs?  Double rainbow…what does it mean!?

I went to the evening social session at MIX to hear about how they would be enabling developers to extend the platform.  In introducing the concept of plugins, it was made clear that the Seesmic Desktop Platform (SDP) would be leveraging the Managed Extensibility Framework (MEF) that was to be included as a part of Silverlight.  Seesmic would define MEF contracts that as long as developers adhered to them (and of course implemented any required interfaces for actual functionality) then the plugin would be able to extend the platform.  The most grandiose idea can be simply stated as if you don’t like how Twitter is represented in Seesmic, fine…change it.  Of course, I suspect most people will be just fine with their implementation and choose to extend in other areas as I’ve done.

Seesmic Desktop 2

Admittedly I’ve got a vested interest in being excited about SDP…after all it is built using Silverlight.  However, I’m also very much into being a part of my online connected network via Twitter.  Prior to SDP I did not use Tweetdeck or some of the other popular multi-column ones…but was a user of Twhirl.  I loved the simplicity that it provided but did desire for slightly more.  I never got into Tweetdeck and honestly I don’t know why…it just never stuck to me in how I interacted online.  The thought of customizing my own experience, however, is what intrigued me to SDP.

I immediately got started writing some plugins, starting with something that I use often, a translator for reading messages incoming that aren’t in my native English.  Some may scoff, but when you monitor a lot of different things online, this becomes important as I don’t want to ignore things that might be interesting.  I chose to use Microsoft Translator services and in a few hours had my first rough draft plugin completed.  It was very rough (mostly because I desired a lot of things from Seesmic).  I showed Marco my warez and started to give feedback on what I think the platform needed for this specific use case as well as to make my life easier. 

Since then the platform has significantly evolved to accommodate most developers needs.  Seesmic has been very responsive on the developer forums for the platform to needs and questions.  Getting started writing a plugin couldn’t be easier for a Silverlight developer, but I’ve tried to make it even simpler (as I was sick of doing the same tasks myself).  I created some templates that you can download from the Visual Studio gallery that will help get you started.  Once installed you’ll see a nice new project template in Visual Studio:

Seesmic project template

This will stub out the initial shell you will need (you’ll still need to add the correct references to the SDP SDK).  From there you can add item templates for the base plugin type or other types: posting actions, timeline items, etc.  Here’s what my templates provide:

Seesmic item templates

These should give you some good jumpstart code to provide some of the necessary plumbing that would be required.  This is NOT a substitute from understanding the platform!  You need to read the docs and understand the interaction of the API with the platform to be successful.

TIP: When you add references to the Seesmic SDK assemblies, change their Copy Local attribute (in properties) to false so you don’t end up shipping them with your plugin.  Since they are already a part of the platform there is no reason to ship them with your plugin (and this makes your plugin size smaller).

To me, I think the easiest plugins to create are those that implement a URL shortener, posting action or a timeline processor.  These are the areas which would allow for very fast customization.  The account providers is likely the most time consuming as you could imagine as you are interacting with authentication schemes, etc. 

I’ve created a few initial plugins that you might be interested in and you can download them here.  I’m really excited about this platform and the fact that I can extend it to make my interaction with things I care about uniquely my own.  Install Seesmic Desktop today and start developing using the SDK!