| Comments

Here’s how it started…

Lisa (my wife) [shouting from office into the kitchen]: Tim, what’s this Amazon charge for $193?
Me [thinking what I may have purchased and not remembered]: Um, don’t know…let me look.

I then logged into my Amazon account to see what order I may have forgotten.  Surely I didn’t order $200 worth of MP3…that’s ridiculous.  Sure enough nothing was there.  Immediately I’m thinking fraud.  I start freaking out, getting mad, figuring out my revenge scheme on the scammer, etc.

Then it hit me: Amazon Web Services account.

The Culprit

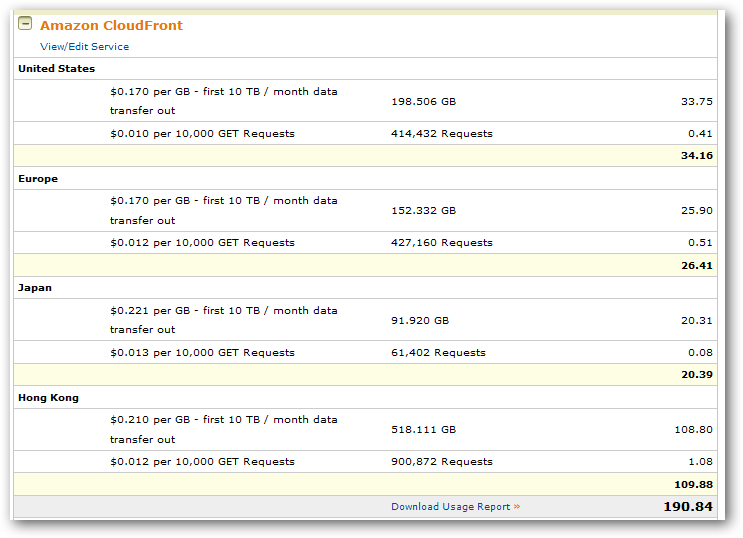
Sure enough I logged in and my January 2010 billing account was $193 and change.  Yikes.  Well, I could let the (what has been averaging) $30 or so charge slide under the family CFO radar for a while…but this $193 charge…the chief auditor herself caught that one.

So I panicked.  I needed to figure out where/what the spike was.  I logged into the Amazon Web Services management console (I only use the S3/CloudFront storage in their services right no) to see what was going on.  I see ‘Usage Reports’ and click.  I’m met with essentially a bunch of useless data really.  No offense to Amazon, but really the usage reports weren’t really helpful at all.  First, they gave me a Resource ID which I thought would represent the URI I was looking for.  Nope, Resource ID == Bucket.  And they didn’t even put the bucket name in the report!

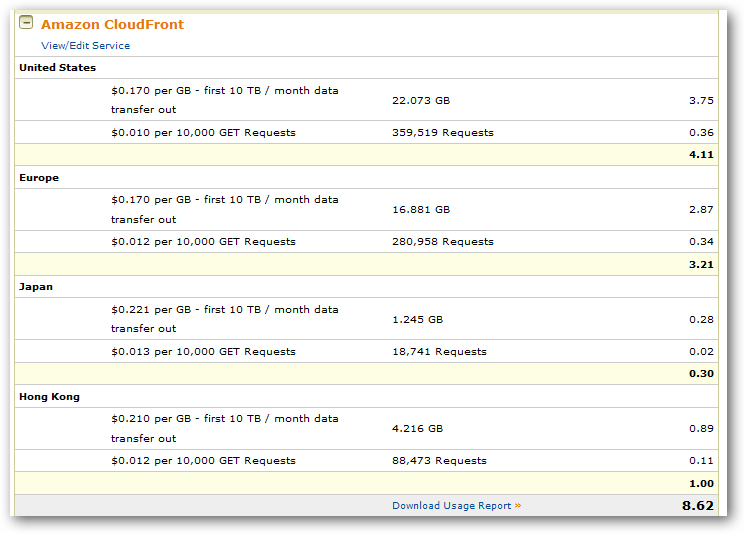
For some perspective, here’s essentially what I’m used to – here’s my December 2009 billing statement details:

December 2009 S3 CloudFront Billing

Anyhow, after some hunting it was obvious that I wasn’t going to figure out what bucket objects/unique URIs were causing my spike.  This was primarily because I didn’t have logging turned on at all on my buckets.  I had in the past but really didn’t think I needed it so I turned it off.

I was wrong – go now and enable logging.

While I was searching for a solution to understand my traffic, I was curious for where my traffic was.  Like I said, I’d been averaging (actually *peaking*) at about a $30 charge for the S3 hosting.

NOTE: I use S3 for all my image/screenshot/sample code file hosting.  I’ve invested in S3 for a long time and built my blogging workflow around it with building tools like S3 Browser for Windows Live Writer.

What was interesting was my most usage of my CloudFront data was coming from Hong Kong.  Compare to above the December 2009 billing to this January 2010 billing:

January 2010 Blling Statement

Yeah, that was my reaction too.  I went from roughly 40GB of transfer bandwidth to over 960GB in one month.  I suspected I knew what happened, but needed to confirm before I changed things. 

Implementing Logging for Statistics

The problem was that I didn’t have logging enabled and I was pretty much stuck.  I needed to get some data from the logs before being for sure.  I quickly found S3Stat and it appears to be the de-facto reporting for Amazon S3 log files.  I signed up for the free trial and generated a new access key to give them.

NOTE: They have a ‘manual’ option which means a lot more work.  I simply generated a NEW S3 access key for this specific purpose.  That way I didn’t have to give them my golden key I’ve been using in other places and can shut this off at any time without issue to my other workflows.

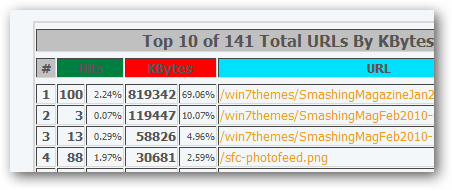
24 hours later, I had some reports.  Wicked cool reports.  Here’s a list of what I’m currently looking at:

  • Total hits, total files, total kbytes
  • Hits/files per hour/day
  • Hourly stats
  • Top 30 URIs
  • Top URIs by kbytes used
  • Top referrers (find out who’s using your bits without you knowing)
  • User agents
    Here’s a quick snapshot of one:
    S3Stat sample report image

Wow…honestly…THIS is what I was expecting when I see “usage” data reports.  S3Stat is awesome and you should use that now.  Yes, I’m buttering up to them…but they have a great tool here for $5/month if you are a heavy Amazon S3/CloudFront user.  Amazon frankly should just buy them and integrate this into their management console.  You can see other examples of their report outputs on their site at http://www.s3stat.com

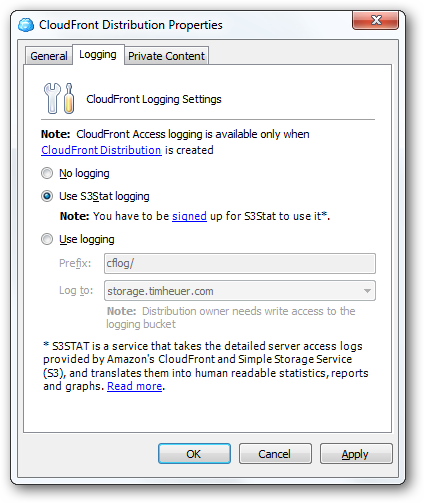
What I also found out is that the tool I use for my desktop usage of S3/CloudFront (outside of my blogger workfow and S3Browser) has S3Stat integration built in!  I use CloudBerry’s S3 Explorer Pro for managing my S3 content.  It’s awesome and you should look at it.  When I look at the logging features in CloudBerry I see this:

CloudBerry S3Stat dialog

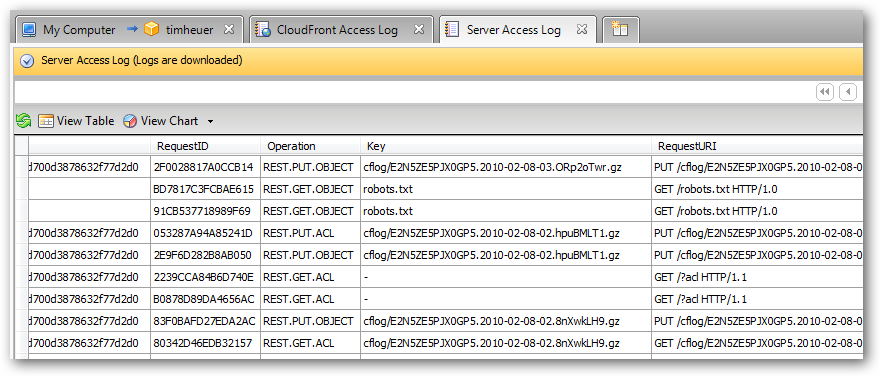
And after enabling the logging, within CloudBerry I can view the log data within the tool:

CloudBerry view logging

Summary

Wow, this is incredibly helpful and insightful data.  I now know who/how/when my cloud storage data is being used in various ways I can see the data.  S3Stat immediately showed me incredible value within less than 24 hours of enabling it.  I know can confirm the culprit of the burst of usage and plan accordingly.

Now, to be clear I’m not complaining about the cost of cloud storage.  That has been clear to me from the beginning.  Nothing is hidden and I’m not an idiot for not understanding it.  What I did not account for was the popularity of some files…and then the ones that just happened to be the largest.  I could not have personally thought I’d see a 920GB spike in one month of usage…but now I know…and have to alter some plans. 

Hopefully this is helpful for some who are just exploring cloud storage solutions/services.  Make sure you have instrumentation and logging capabilities turned on so you can identify and tune your situations.  For me, S3Stat and CloudBerry are winners for my personal usages.  If you are an Amazon S3 customer, I recommend looking at S3Stat and turning on logging immediately!


| Comments

A developer asked me this question and while a simple answer, I thought it would be a good quick tip to share for those who may be in similar situations.

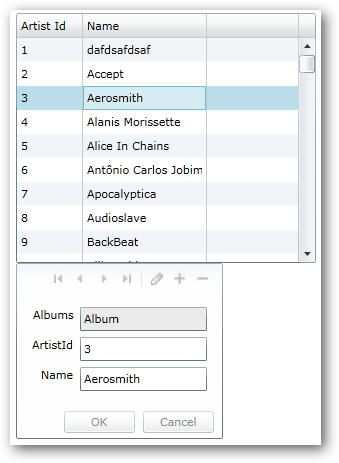
The scenario is the classic master-details scenario where perhaps you have a grid of data and when a user selects the row, the details are enabled in a form (or perhaps the child of the element) for editing.  Maybe something like this:

Master-details Typical view

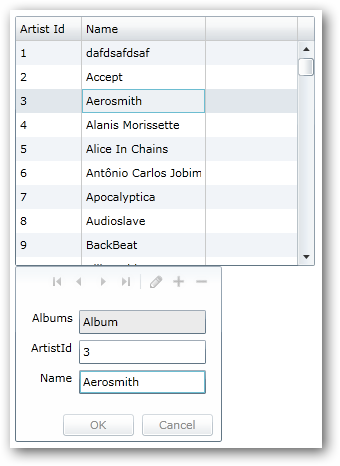
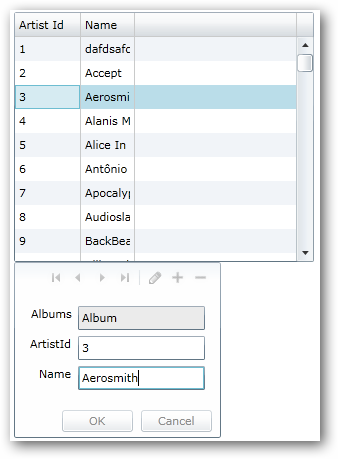
See you can see the row clearly selected (note: this is using the default DataGrid styling).  But watch what happens when you go to the form to edit:

Focus change on selected row

Notice the focus now on the TextBox in the form, and the row, while still ‘selected’ is much more subtle in which row is selected.  The uninformed eye might miss which one.  For some scenarios this might be important.  Some might even think the row isn’t selected anymore since the visual state changed.

In fact it still *IS* selected and the only thing that changed *IS* the visual state…literally.  Since Silverlight has the concept of the VisualStateManager, that is what we are seeing in action here.  So you want to change that to make your desired UI as expected…having the row retain it’s selected look even when the user is editing.  This is simple.

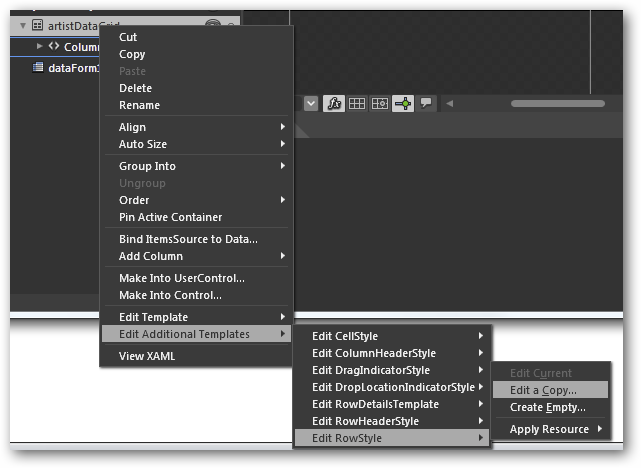
Using Expression Blend, you can select the DataGrid element and then choose Edit Additional Templates to find the RowStyle template to edit a copy of:

Expression Blend edit template

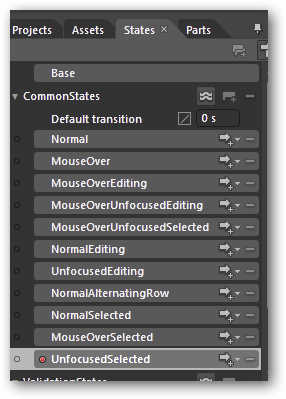
Once you have this, click the States tab in the tool and you’ll see the various visual states that a DataGridRow can have.  Notice the NormalSelected and UnfocusedSelected states:

Visual States for DataGridRow

You would modify the Fill.Color property of the UnfocusedSelected state to accomplish the desired change.  In this example, I just used the same color as the default grid for illustration.  The end result is what the user may be expecting more.  Notice the focus is on the TextBox in the form still, but the row still has a prominent selected color view:

Fixed focus visual UI

A simple edit, but a helpful UI change to give your users more indication of what they are doing.  Of course I’m just using the default styles of the DataGrid here, but you could use your own styles as well.  Hope this helps!

Here is my style XAML as I completed the task above: StaySelectedStyle.txt


| Comments

it’s that time again…beginning of a new month!  That means that Smashing Magazine has released their monthly wallpaper pictures again.

Smashing Magazine February 2010 Wallpaper

As you could expect, February entries are full of a lot of Valentine type stuff.  Here are your February Windows 7 Theme Packs for the wallpapers though…including all images (note: some ‘without calendar’ images are not provided by the authors) unfiltered.

UPDATE PLEASE READ (4-Feb):

There is an issue with the .themepack file for some reason.  Although I’m using the prescribed mechanism for creating these it is not functioning as easily as the January one.  I’ve got some folks on the Windows team looking into it, but no resolution yet.  In the interim, you can extract the .themepack file using 7-Zip (a free and great utility) and then double-click on the .theme file where you extracted it.  This should trigger the installation of the theme.

For details on these and to see past ones, visit the Smashing Magazine Windows 7 Theme information for the specifications I used for the theme pack as well as previous themes.  Want to participate and submit yours?  Join in!


| Comments

I’m working on a little sample application for music management in Silverlight using WCF RIA Services and some other new Silverlight 4 features.  One thing that I wanted to add to the application was the ability to drag an audio file and either lookup the data and/or add a new album/artist/song to the library automatically.

Audio formats have a ‘tag’ format known as ID3.  It’s a format used for audio file metadata that is used in Windows Media Player, iTunes, and various hardware devices as well.  Over the years there has been an evolution of this format, with the older ID3v1 format basically taking up a header space with fixed character spaces for various things like Album, Artist, Title, Year, Track.  Over time though the ID3v2 format has been adapted more as it is more flexible for things like album art, and longer titles, etc.  There are various implementations of ID3 libraries for .NET that developers can choose from.  All of these implementations don’t take into account Silverlight unfortunately.

Silverlight can only reference Silverlight-compatible libraries.  Most of these libraries were targeted for the full .NET Framework and thus I can’t binary reference them.  Luckily most of them (except one) are Open Source so I could tinker.  I took the step of simply copying the files to a Silverlight project and recompiling.  This did not work 100% in a single task.  Most of the libraries had some form of Serialization attributes/constructors and almost all used some form of ASCII encoding for various string manipulation of byte arrays.

I settled on TagLib# as the library that was the easiest to modify for me.  I had to make the same changes I mentioned above to this library as well.  I created a new Silverlight 4 class library and compiled it as such.  One thing that TagLib# didn’t have was a stream input implementation.  Most of the libraries, in fact, assumed a local file path.  Luckily the library was written using a generic ‘File’ interface, so I just had to create my own StreamFileAbstraction.  I chose to do this within my project rather than the base library.  It was easy since the LocalFileAbstraction actually perfomed an Open on the file as it’s first task and set some public variables.  My abstraction basically just hands the stream already and ready to go.

Now, using the Silverlight 4 drop target feature, I created just a simple test harness to test my theory.  My XAML basically is this (pretty rudimentary just to test my theory):

   1: <Grid x:Name="LayoutRoot" Background="White">
   2:         <StackPanel>
   3:             <Border x:Name="DropZone" Width="700" Height="300" Background="Silver" CornerRadius="8" AllowDrop="True" Drop="DropZone_Drop">
   4:                 <TextBlock TextWrapping="Wrap" Text="drop here" FontSize="64" HorizontalAlignment="Center" VerticalAlignment="Center" Foreground="Gray"/>
   5:             </Border>
   6:             <Grid Height="255" Width="700">
   7:                 <Grid.ColumnDefinitions>
   8:                     <ColumnDefinition Width="111"/>
   9:                     <ColumnDefinition Width="*"/>
  10:                 </Grid.ColumnDefinitions>
  11:                 <Grid.RowDefinitions>
  12:                     <RowDefinition Height="Auto"/>
  13:                     <RowDefinition Height="Auto"/>
  14:                     <RowDefinition Height="Auto"/>
  15:                     <RowDefinition Height="Auto" />
  16:                     <RowDefinition Height="50*" />
  17:                 </Grid.RowDefinitions>
  18:                 <dataInput:Label Content="Artist" HorizontalAlignment="Right" VerticalAlignment="Top" FontWeight="Bold" Margin="4" />
  19:                 <dataInput:Label Content="Album" Grid.Row="1" HorizontalAlignment="Right" VerticalAlignment="Top" FontWeight="Bold" Margin="4" />
  20:                 <dataInput:Label Content="Title" Grid.Row="2" HorizontalAlignment="Right" VerticalAlignment="Top" FontWeight="Bold" Margin="4" />
  21:                 <dataInput:Label Grid.Column="1" HorizontalAlignment="Left" Name="Artist" Margin="4" />
  22:                 <dataInput:Label Grid.Column="1" Grid.Row="1" HorizontalAlignment="Left" Name="Album" Margin="4" />
  23:                 <dataInput:Label Grid.Column="1" Grid.Row="2" HorizontalAlignment="Left" VerticalAlignment="Top" Name="Title" Margin="4" />
  24:                 <Image Grid.Column="1" Grid.Row="4" Height="118" HorizontalAlignment="Left" Margin="4,2,0,0" Name="AlbumArt" Stretch="Fill" VerticalAlignment="Top" Width="118" />
  25:             </Grid>
  26:         </StackPanel>
  27:     </Grid>

Notice on the Border the AllowDrop=”True” attribute.  This tells Silverlight that the element can be used as a drop target (for a file from the file system).  The rendered UI looks like this:

Sample MP3 test UI

You may also notice the Drop attribute on the Border element that maps to the event handler DropZone_Drop.  This event handler basically gives us an event argument that represents the dropped objects on the surface (yes you can drop more than one).  The initial stub of this function looks like this:

   1: private void DropZone_Drop(object sender, DragEventArgs e)
   2: {
   3:     IDataObject drop = e.Data as IDataObject;
   4:  
   5:     object data = drop.GetData(DataFormats.FileDrop);
   6:  
   7:     FileInfo[] files = data as FileInfo[];
   8:  
   9:     FileInfo file = files[0];
  10: }

I’m being a little verbose in the code to show each of the steps.  As you can see you get a FileInfo array and can pull items out of that.  For my sample I’m just assuming one item was dropped.  In the next steps I just need to get the Stream from the file and use my library.  Here is the full function (with a quick check to make sure it is a supported audio file):

   1: private void DropZone_Drop(object sender, DragEventArgs e)
   2: {
   3:     IDataObject drop = e.Data as IDataObject;
   4:  
   5:     object data = drop.GetData(DataFormats.FileDrop);
   6:  
   7:     FileInfo[] files = data as FileInfo[];
   8:  
   9:     FileInfo file = files[0];
  10:  
  11:     if (file.Extension.ToLower() != ".mp3" && file.Extension.ToLower() != ".wma")
  12:     {
  13:         MessageBox.Show("Must be an MP3 file");
  14:     }
  15:     else
  16:     {
  17:         Stream fileStream = file.OpenRead();
  18:  
  19:         TagLib.File.IFileAbstraction fileAbstraction = new StreamFileAbstraction(fileStream, file.Name);
  20:  
  21:         TagLib.File tagFile = TagLib.File.Create(fileAbstraction);
  22:  
  23:         if (tagFile.Tag.TagTypes.HasFlag(TagLib.TagTypes.Id3v2))
  24:         {
  25:             Artist.Content = tagFile.Tag.FirstAlbumArtist;
  26:             Album.Content = string.IsNullOrEmpty(tagFile.Tag.Album) ? "NO ALBUM NAME" : tagFile.Tag.Album;
  27:             Title.Content = tagFile.Tag.Title;
  28:             if (tagFile.Tag.Pictures.Length > 0)
  29:             {
  30:                 IPicture pic = tagFile.Tag.Pictures[0];
  31:                 MemoryStream img = new MemoryStream(pic.Data.Data);
  32:                 BitmapImage bmp = new BitmapImage();
  33:                 bmp.SetSource(img);
  34:  
  35:                 AlbumArt.Source = bmp;
  36:             }
  37:         }
  38:         else
  39:         {
  40:             MessageBox.Show("no id3v2 tag");
  41:         }
  42:     }

Once all the pieces are together you drag an audio file on the drop surface and the items will populate.  Here’s a quick video showing how it all works together.

Get Microsoft Silverlight

So this is just a start – and I’ve got only the tag reading working…didn’t bother looking at the other parts of the library so I know it isn’t fully ported for Silverlight.

What do you think?  Found a better implementation of ID3 tag reading?


| Comments

As noted in a previous update post on my Foxit PDF Previewer for Outlook and Vista/Windows 7, there is an issue in the Office 2010 64-bit Beta (specifically Outlook) for executing 32-bit preview handlers on 64-bit Outlook.  I’ve got an update for those temporarily.

First, I can confirm that the issue is fixed in the later builds of Outlook 2010, so this fix is indeed only temporary.

Thanks to some assistance that Leo Davidson provided, I was able to provide a work around for my previewer that I’ve been able to confirm “works for me” on my installation of Outlook 64-bit on Windows 7 64-bit edition.

WARNING: This temporary fix involves messing with your registry.  You should do this with caution.  While I’ve done it successfully and tested fine, don’t hold me responsible if you computer catches on fire or neighbor pet animals die by doing this.  You should backup your registry before applying this to be safe.  Again, that said, it’s minor, only updates my application area settings and shouldn’t interfere with your settings.

The fix involves massaging some registry settings.  I’ve provided the registry settings in a file you can download here: FoxitPreviewerTempFix.zip.  There are two (2) registry files here.  Even though they are labeled 32-bit and 64-bit, they both need to be merged for this fix to work.  You should be able to double-click the .reg file and it will merge it auotomatically.  Additionally you can start regedit.exe and use the Import option (this is what I do).

Once complete, and assuming you have my previewer installed, then PDF preview attachment with my handler for Outlook 64-bit should be fixed for you.  Again, the requirement first here is that you have my Foxit PDF Previewer installed FIRST.

Please leave comments if this solved your issue.  This is ONLY for Outlook 2010 64-bit.  This is not necessary if you are running Outlook 2010 (32-bit), even if you are on Windows 64-bit.  That’s a lot of ‘bit’ talk I know.

Hope this helps! (and thanks Leo!)