| Comments

When Silverlight 3 launched, we also published several additional application themes for the navigation and business application (for .NET RIA Services) templates.  I just uploaded two more themes from one of our designers, Corrina, to the Expression Gallery.  There are versions for both navigation application template as well as the .NET RIA Services business application template.

Mediterranean Sun (RIA Services):

Mediterranean Sun theme image

Seeing Sound (RIA Services):

Seeing Sound theme image

Additionally, several fixes were made to the existing templates that some users reported.  I also added .NET RIA Services templates for those that were missing based on requests (Retro, Skyline, Subdued).

I noticed also that others have been uploading themes, behaviors and other goodness to the Expression Gallery, so be sure to check it out!

| Comments

I have the pleasure of being invited to participate in two Silverlight events coming up soon (one very soon).  These are a part of a “firestarter” event that is intended to get you familiar with certain technologies, in this case Silverlight, rather quickly and gain a better understanding for the overall platform offerings.  I’m excited to have been invited to participate in both the Atlanta and Seattle events.

Silverlight Firestarter Atlanta

The first one will be in Atlanta, Georgia on 22-August!  It’s been quite some time since I’ve been to Atlanta and I’m very happy to be going to hang out with Silverlight developers there.

Atlanta Silverlight firestarter logo

The agenda looks to be a good one if you are in the area.  It is a free event to attend and will be hosted at the Microsoft office in Alpharetta.  Apparently it is already booked full for registration.  You can find out more information about the plans, location, and schedule at the minisite.  Be sure to check out the Bios section to see the star studded experts that will be there!  Wildermuth said that he’d take me to the largest aquarium…I’m hoping that’s not a ploy to get me eaten by some giant whale shark or something.  I’ll settle for BBQ if we can’t make it to the aquarium Shawn!

Silverlight Firestarter Seattle

Well, technically Redmond, but who’s counting :-).  This event on 17-September will be held at the conference center on the Microsoft campus.  Registration is required, so make sure you register now if you plan on attending.

Seattle Silverlight firestarter logo

This is a pretty packed agenda with some great folks, including Scott Guthrie, Brad Abrams, Adam Kinney, Justin Angel and Karl Shifflett.  I’m honored that Scott would open up for me ;-).  Seriously though, this looks like it will be a good time!  Adam posted his vision on how the day will go.  I better start working on those loads!  Again, registration is required, so make sure you go do that now.

Hope to see you at one of these!

| Comments

One of the features that a lot of developers seem to enjoy is the out-of-browser feature in Silverlight.  This is the feature that allows you to take your Silverlight application and run it like a desktop application (without some of the trust levels right now).  If you aren’t familiar with the feature, take a moment and familiarize yourself with it…here’s some info:

Now that you have some basis of understanding, allow me to share a thought I’ve had.  I’m seeing a few people wanting to force the out-of-browser (OOB) experience.  That is to say, they want their application to be only run in OOB mode. 

NOTE: If you feel you want this, you should understand the limitations in OOB mode.  Namely the HTML bridge features and certain network implications might affect your applications depending on your needs.

Honestly I am not sure I entirely see the value in that (forcing it), so if you have one, please enlighten me (maybe gaming I suppose).  After all, IsolatedStorage is shared between OOB and in-browser Silverlight applications from the same source.  But I digress. 

The Problem

One thing that I’ve seen is folks asking for a method on how they can force the OOB mode in their app.  One of the security features of OOB is that the Install action must be user initiated.  This means it must be from the end-user action…not automated.  So you can’t just send a URL to someone and have it suddenly install the application OOB.  So how would you go about this?

A Solution

Easy, I think.  Here’s the pattern that I think might work.  I’ll note that this is just my opinion of a solution…not the defacto in all situations.  By all means please consider your own scenario needs before blindly adopting.  That being said, I think it might be helpful to explore.  This solution involves leveraging the OOB APIs available to the developer and creating some different views in your application.

Step 1: Create some views

What you’ll need here really is two views (for lack of a better term at this point – if you want to call them controls, that is fine too) in addition to your main application.  I’ve called one Installer and the other Installed.  The purpose of Installer is that this will be the view shown when a user does not have the application installed OOB.  The purpose of Installed is that it will be the view shown when a user does have the OOB application installed *and* is attempting to view the application in-browser.  The third “view,” your application, is what will be rendered when the user views the OOB application.  Put Installer and Installed wherever you’d like in your app.  I created a folder called Views and stuck them there. 

For Installer, you’ll want to put some UI in here for the Installer “badge.”  I highly recommend putting some time into this using Expression Blend to make it all look great and perhaps add any visual states you may want.  Remember, this is your user’s first impression.  This is still a Silverlight application, so go nuts with styling and using controls.  But you don’t need to make these the same size as your application.  For my example, my OOB application is 800x600, but my Installer app is only 300x162.  This Installer control/view will contain your actual install logic.  So somewhere here you need to have a button or something that the user can initiate as an action that you can call the Install method.  A button is easiest and easy to style.  In the Click event all you have to do (in simplest form, of course you’d want to add some error handling) is add the API call to install:

   1: Application.Current.Install();

For Installed, you’ll do the same thing, except make the UI/UX for the experience of letting someone know they already have it installed.  This could be something as simple as a text message, or complete instructions, etc., whatever.  You decide.

When you are done with this step you should have two XAML UserControls: Installer.xaml and Installed.xaml both for their specific purpose.

Step 2: Wire up the application startup logic

What I’ve chosen to do is take control of the App_Startup logic to determine the state.  I felt it would be better here based on the scenario I’m trying to accomplish rather than to load a default UserControl and have to do some funky app logic to swap out the RootVisual.  What I’ve chosen to do is to check the state of the trigger to run and follow some logic:

  • If the app is installed and the user is running in-browser: Show Installed
  • If the app is not installed and the user running in-browser: Show Installer
  • Else: Show App

The logic finds the correct state in a simple if…elseif…else statement and decides which RootVisual to show.  Here’s the complete code:

   1: private void Application_Startup(object sender, StartupEventArgs e)
   2: {
   3:     if ((App.Current.InstallState == InstallState.Installed) && (!App.Current.IsRunningOutOfBrowser))
   4:     {
   5:         this.RootVisual = new Installed();
   6:     }
   7:     else if (!App.Current.IsRunningOutOfBrowser)
   8:     {
   9:         this.RootVisual = new Installer();
  10:     }
  11:     else
  12:     {
  13:         this.RootVisual = new MainPage();
  14:     }
  15: }

Simple, isn’t it?  You can see that the “app” that gets run is the correct starting point given the state.

Step 3: Configure your OOB settings

Visual Studio 2008 adds a dialog feature for you to easily generate the OOB settings.  You can read more about that here and see some screenshots: Silverlight Out-of-browser Settings Dialog.  Once you’ve done this, when you compile your application it enables it for OOB install capabilities.

Step 4: Deploy

That’s really it.  Of course the harder part is your own application :-), but that’s for you to figure out, not me.  In the end you could then embed your application somewhere within a web page.  It will show your Installer if the user doesn’t have it, or remind them it’s already installed if they do.  Here’s a working example based on this pattern (Silverlight 3 required to run this application):

This is just a stub example app, no working functionality in the main application.  The purpose is just to show this pattern.  As you can see, when the application runs, it runs at the desired 800x600 application width that I want for my actual application, game, whatever.  All this while I minimize the impact visually to show the messages of the Installer and the Installed controls.

Summary

This is just a sample pattern that you may want to implement if the need (or desire) is there to force your applications to be run OOB.  Again, OOB in general should be understood before blindly going in and assuming 100% of what you have will run in this mode.  But if it will and this is something you want, you may consider using this pattern to make a smaller visual impact on the installer and providing the end user with a better user experience to get it installed.  Or at least it was an experiment for me.

Hope this helps!

| Comments

I was messing around with a new internal application the other day and made a wise crack about some of the features out in the open.  And by wise-crack, I mean ‘feedback in the nicest way possible’ of course.  On one of my suggestions someone pointed out a RTFM moment that the feature was actually in there but had a dependency.  The feature I was requesting was “toast” notifications.

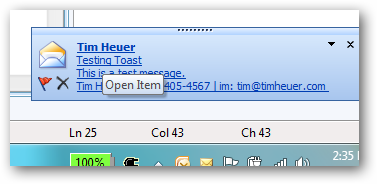
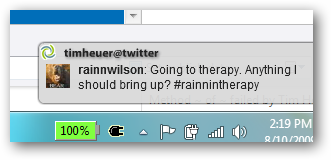
What is “toast”?  Aside from a delicious breakfast treat, it’s a term that most people refer to those little notification windows that popup from applications in the Windows system tray.  Sometimes annoying, mostly useful (depending on how many notifications you get of course). 

examples of “toast” notifications

If you are a Windows programmer, there are APIs you can directly tap into to trigger these things in the standard notification bubbles provided by Windows.  If you are a web programmer though, it would be a challenge to bubble up a message to the native client from a web page with ease.  You could if you wanted though, as Windows provides a standard method for any application to opt-in to using.

OSX users have the same feature (global notification system), but I’m assuming it isn’t easy to use, which is why Growl exists.  It is an application itself that allows a developer to send a notification message to it.  It is user configurable (meaning I, the user, define what my notifications look like and when), but serves as a platform for OSX app developers to leverage and provide the user with a consistent notification platform.  Growl is not a part of OSX though and still requires to be there.

Back to my internal app feedback.  This application made use of something I wasn’t aware of – Growl for Windows.  It’s basically a Windows port of the Growl framework.  Interesting I thought.  I wondered why this application developer of our internal app didn’t just use the native Windows notification system, but I digress.  I started looking around and saw that they have it enabled for web applications to use it.  Cool!  Of course the dependency is still required (i.e., it must be installed), but if it is there, you can use it!  Now, there are others that emulate this type of thing like jQuery Growl for web applications.  These frameworks, however, show notifications in your application and not in your operating system.  So if your web app was minimized you wouldn’t see the notification.

I got curious and saw they had a Javascript library to use…hmmm…Silverlight notifications.  So I busted out a quick sample application for Silverlight that provides notifications through the Growl framework.  Here’s a quick video of my efforts with me explaining a bit:

So what you have is multiple parts.  First, it will only work if Growl for Windows is installed, so if you want to play around, install it.  Second there is the Growl.js library of the framework.  This would be in your web application hosting your Silverlight app.  That’s really all you need.  Now you can expose some Javascript functions to call the library.  I created a generic one called NotifyGrowl which takes a title and content.  This is very generic and uses a single notification type.  Growl let’s you configure notification types to segment your messages a bit and allow your user to customize them like a different UI for error types versus warning types.

It’s pretty cool and interesting to play around with.  Now for the things I don’t like…

Flash – It feels just a little dumb to be using a Flash component in a Silverlight application.  In fact that’s what is happening here.  The JavaScript API for the framework, really is a JavaScript API to a Flash application.  When you initialize the Growl API in JavaScript, you are creating a SWF dynamically that you are then communicating to in later calls.  It works, and works well, but it just feels wonky.

HTML Bridging – Hence the name of JavaScript implies that you’re using some HTML bridge activity to call from Silverlight into the API.  While this is incredibly easy (you can learn how to do this here: <>), it will only work in-browser at the moment.  I think the real power of notifications could be in the out-of-browser applications.  Unfortunately, the HTML bridge isn’t available in OOB right now.

Dependency – This is obvious.  While it is cool, it relies on Growl for Windows being installed.  Are you going to ask your users to install two things?

Not common Growl – The API I played around with wouldn’t trigger Growl on OSX.  That kinda sucks.  I thought it would which is why I started messing around.  I figured you’d be able to write to an API that both platforms subscribe to, but it isn’t the case.

The Growl for Windows project does have a .NET library, so why would I use the JavaScript/Flash one?  Well, the Growl system relies on socket communication so in theory, Silverlight should be able to use it.  Right now, however, Silverlight has restricted port ranges for socket communication.  Those port ranges don’t fall in line with the current accepted range for Growl messages.  In theory (and I’ve asked the developer about this) you should be able to forward messages back/forth.  An experiment for another time perhaps.  Right now the developers of Growl for Windows operate using the Growl Notification Transport Protocol (GNTP) but the Mac/OSX version of Growl does not yet.  Apparently the Mac/OSX developers have pledged to work on this. 

It was a fun experiment to play around with and see how a Silverlight/browser application could provide OS-wide notifications if a framework existed.

What do you think…would you like a “toast” navigation API in the Silverlight runtime for you to use?  What features would you expect that feature to have?

| Comments

I was talking with a good friend the other day about some feedback about DataForm.  It’s great to get raw and honest feedback…that’s where you improve more than ‘it sucks’ type feedback.  One of the use cases he felt would be common with the Silverlight DataForm control (available in the Silverlight Toolkit) was the concept of confirming the delete action.  I agreed as well that confirming permanent delete actions is a common line-of-business application pattern.  It got me thinking about some things…

The Problem

DataForm is a great control.  I love it.  It will benefit many developers in the simplest applications quickly as well as some in the most complex applications with some additional configuration.  For the purposes of this demonstration, I’ll talk about the simplest scenario.  DataForm has build in controls for navigating a bound data set, as well as adding and deleting new items.  It is the deleting I’d like to concentrate on here. 

When DeleteItem is called on DataForm (via the built-in toolbar or via your own methods), it deletes the current item.  After all, that’s what you told it to do!  The problem is that the delete is fast and there is no easy “undo” method. 

The Helper

Luckily, DataForm provides a method interceptor for us: DeletingItem.  This event fires when DeleteItem is called and tells you: Hey, I’m about to delete the current item.  If you want to do anything about that, now is the time.  So there you have it…you can prevent the delete because there is a CancelEventArgs parameter passed in to cancel the remaining event.  So what would you do in DeletingItem?

Solution 1: Go modal

One thing you can do is leverage a modal dialog.  This would block the event until a modal dialog response is provided for you to investigate.  Here’s an example of what you might do in DeletingItem:

   1: private void PeopleBrowser_DeletingItem(object sender, System.ComponentModel.CancelEventArgs e)
   2: {
   3:     if (MessageBox.Show("Are you sure you want to delete this item?\nThis cannot be undone", "Delete Item", MessageBoxButton.OKCancel) == MessageBoxResult.Cancel)
   4:     {
   5:         e.Cancel = true;
   6:     }
   7: }

So what’s the problem with this one?  Nothing really.  The dialog would show, giving your user a chance to react and block the delete call until an OK is received (it cancels the event if Cancel is clicked).  But let’s look what it generates from a user experience standpoint:

confirm delete with MessageBox

Hmm, maybe there is a problem.  First, it says OK or Cancel…not really a “Yes or No” response the user is really looking for.  Second, using MessageBox will focus the dialog in the center of your window and not center of parent (or calling control).  These two things make it less ideal in my opinion.  The major positive here is twofold: it works and it’s truly modal (thus blocking the call to delete).

Solution 2: Pimp your dialog, but also your code

Silverlight is all about improving the user experience right?  Changing things around and differentiating the RIA?  So let’s use that mantra to think what we could do here.  Silverlight 3 provides a new control, ChildWindow that you could use in this instance.  It provides a modal-like experience to the end user (blocking other UI components) and gives them a focused area to provide a response.

NOTE: I’ve refactored ChildWindow into something I call “FloatableWindow” for MDI or other type interfaces.  I’ve provided my code for you to use on the .  I’ve also added a work item on the Silverlight Toolkit so if you like the idea, please vote on it!

The challenge with ChildWindow is that while it exhibits all the UI experience of a modal dialog, behind the scenes it is asynchronous.  This means that if you put a Show() call to a ChildWindow in your code, that your next line of code will run as well.

NOTE: If you think this should be changed, consider voting on the Silverlight Toolkit project for this item: ChildWindow – make it modal.

We can, however, still be creative.  Let’s explore an idea here.  We know that we have the DeletingItem event we can still tap into, so we can trigger our implemented ChildWindow like this:

   1: private void PeopleBrowser_DeletingItem(object sender, System.ComponentModel.CancelEventArgs e)
   2: {
   3:     ConfirmDialog cd = new ConfirmDialog();
   4:     cd.Show();
   5: }

The problem is that unless we cancel the event, the delete will still happen (and you can see it happen from behind the ChildWindow even…frustrating!  The ChildWindow.DialogResult is essentially worthless to us right now.  Let’s think creatively though.  What I did was create a member variable called _delete and set it to false.  This tells the DeletingItem event whether or not it really should delete.  It sounds dumb, I know, but work with me.

Now when we call DeletingItem, we check to see if we really should delete or not (really we check to see if we should cancel the event).  If we are still in “false” mode, then we shouldn’t delete but should show our confirmation window and cancel the DeletingItem event.  That’s great, but we still need to get the user response from the window!  We then need to tap into the ChildWindow.Closed event and get the DialogResult from there.  In the Closed event we can see if they confirmed the delete.  If they cancelled the delete, we do nothing further.  If they said “Yes” then we need to change our _delete variable and call DeleteItem on our DataForm again.  Now our DeletingItem handler knows we can successfully continue.

Sound fuzzy?  Sound like a hack?  Maybe so, but it works.  This gives us the opportunity to create a customized user experience for the confirmation.  Now I’m a crappy designer, but to make the point clear to differntiate from simple MessageBox, my ChildWindow has a flashing background and blurs the DataForm.  Yeah, it’s obnoxious, but that is the point for this demonstration!  Here’s the complete code for this solution:

   1: private bool _delete = false;
   2:  
   3: private void PeopleBrowser_DeletingItem(object sender, System.ComponentModel.CancelEventArgs e)
   4: {
   5:     if (!_delete)
   6:     {
   7:         Person p = PeopleBrowser.CurrentItem as Person;
   8:         ConfirmDialog cd = new ConfirmDialog();
   9:         cd.Closed += new EventHandler(cd_Closed);
  10:         cd.Title = string.Format("Delete {0} {1}?", p.FirstName, p.LastName);
  11:         BlurEffect b = new BlurEffect();
  12:         b.Radius = 10;
  13:         PeopleBrowser.Effect = b;
  14:         cd.Show();
  15:         e.Cancel = true;
  16:     }
  17:     else
  18:     {
  19:         _delete = false;
  20:     }
  21: }
  22:  
  23: void cd_Closed(object sender, EventArgs e)
  24: {
  25:     PeopleBrowser.Effect = null;
  26:     ConfirmDialog cd = sender as ConfirmDialog;
  27:     if (cd.DialogResult == true)
  28:     {
  29:         _delete = true;
  30:         PeopleBrowser.DeleteItem();
  31:     }
  32: }

You can try this out yourself here (requires Siliverlight 3): Sample confirm delete with DataForm.  Go ahead, I’ll wait. 

Obnoxious isn’t it :-).  Of course using Expression Blend to customize your own is highly recommended!

Summary

While there is no true modal dialog in Silverlight other than MessageBox (which isn’t XAML-customizable), these are two options that provide you with the opportunity to confirm your delete action within DataForm.  Hopefully these are helpful to get you to think at least and if someone has better implementations, please share them!  You can download the complete code for this sample here: ConfirmDeleteDataForm.zip

Hope this helps!