Like most things in life, this all started with someone’s message on Twitter.

You can code-sign a NuGet Package?  I don’t know why I didn’t know that other than I figured I had no idea that I should care or have even given a second thought to it.  But Phil’s article and subsequent discussion on Twitter made me just realize I should take a look at the flow.  After all more sage wisdom from Phil kicked me over the edge:

You’re right Phil, and how can you argue with that forehead…so let’s do this. 

What is NuGet? NuGet is a package management system that was primarily developed for .NET developers and has now become a de-facto package/release mechanism for that ecosystem.  What npm is to Node.js developers, NuGet is to .NET developers.  More info at https://www.nuget.org

I’ve got a little library for helping .NET developers be more productive with creating Alexa apps, Alexa.NET.  When I started this project I used to just have this on my local box and would build things using Visual Studio and manually upload the NuGet package.  Then people made fun of me.  And I ate my sorrows in boxes of Moon Pies.  Luckily I work with a bunch of talented folks and helped me see the light in DevOps and helped me establish a CI/CD pipeline using Azure DevOps.  Since then I’ve got my library building, a release approval flow, automated packaging/publishing to the NuGet servers.  I simply just check-in code and a new version is released.  Perfect.  Now I just want to add code-signing to the package.  Naturally I do what every professional developer does and Google’d went to read the docs about code signing NuGet packages.  Luckily there is some pretty good documentation on Signing NuGet Packages

The first thing you need is a code-signing certificate.  There are many providers of these and different prices so pick your preferred provider.  I chose to use DigiCert for this one but have used other providers in the past.  The process for getting a code-signing cert is a bit more than just an average SSL certificate so be sure to follow the steps carefully.  Once you have that in place, export the DER and PFX versions as you will need both of these for this process.  Your provider should provide instructions on how to do this for you.

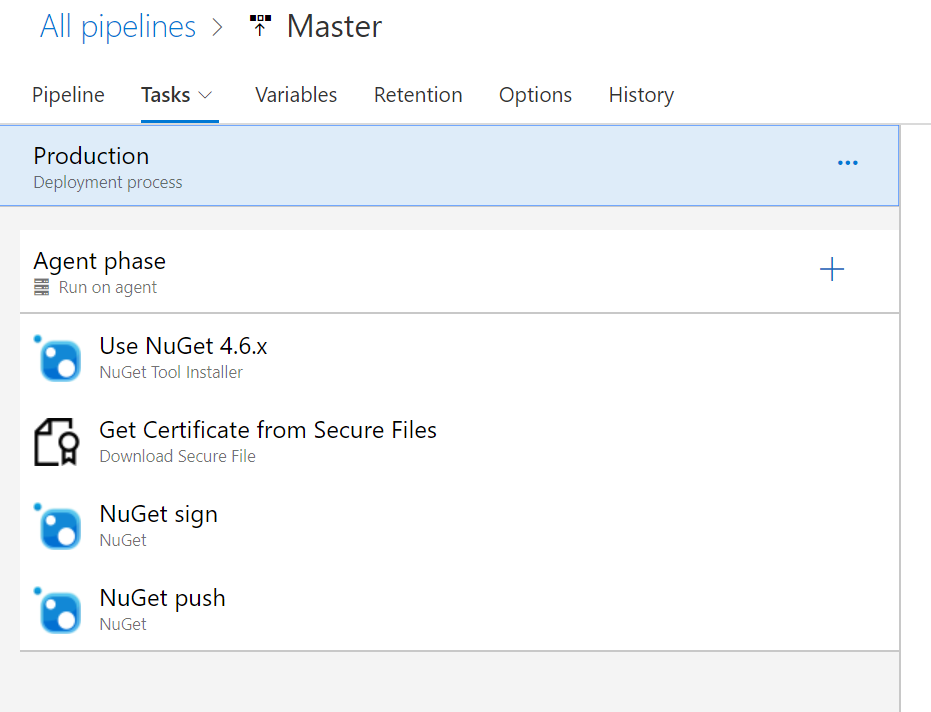
Next up was to modify my Azure DevOps Pipeline.  I do my NuGet activity in a Release pipeline after a successful build and an approval step to actually complete the deployment.  My simple release pipeline looks like this:

Screenshot of Azure DevOps NuGet Push definition

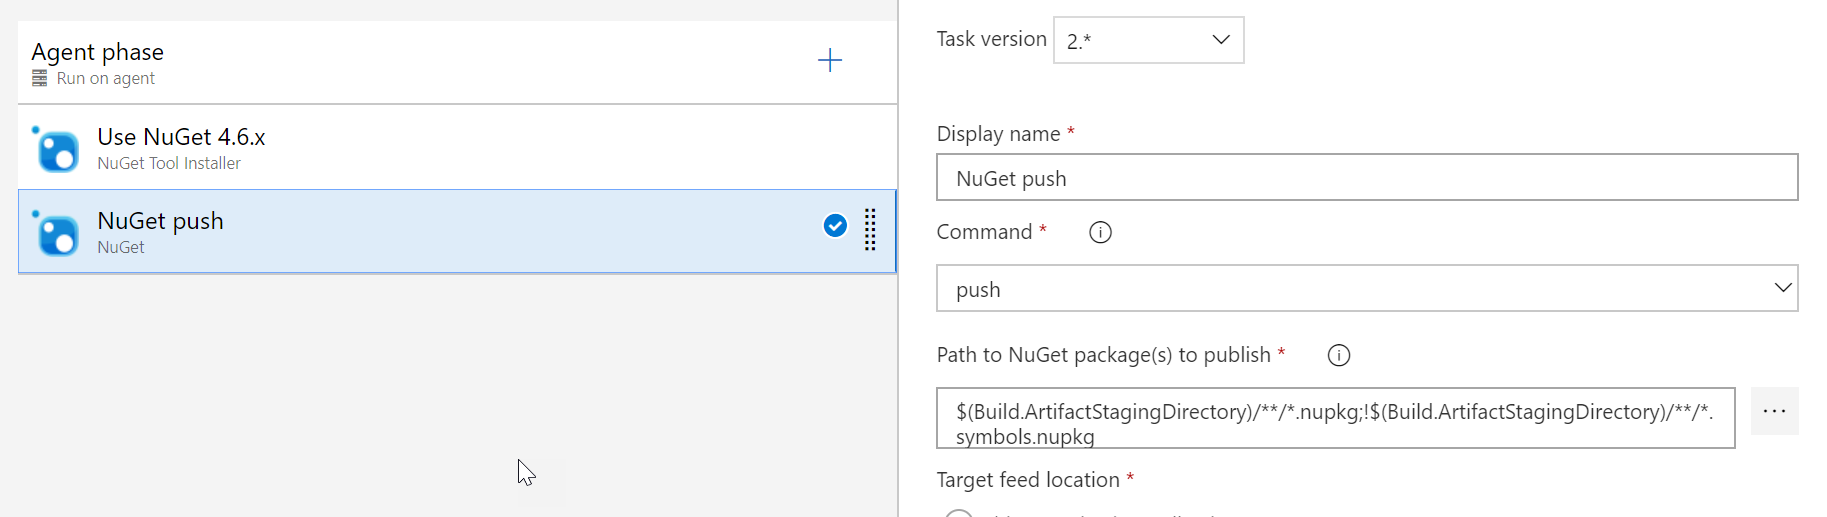
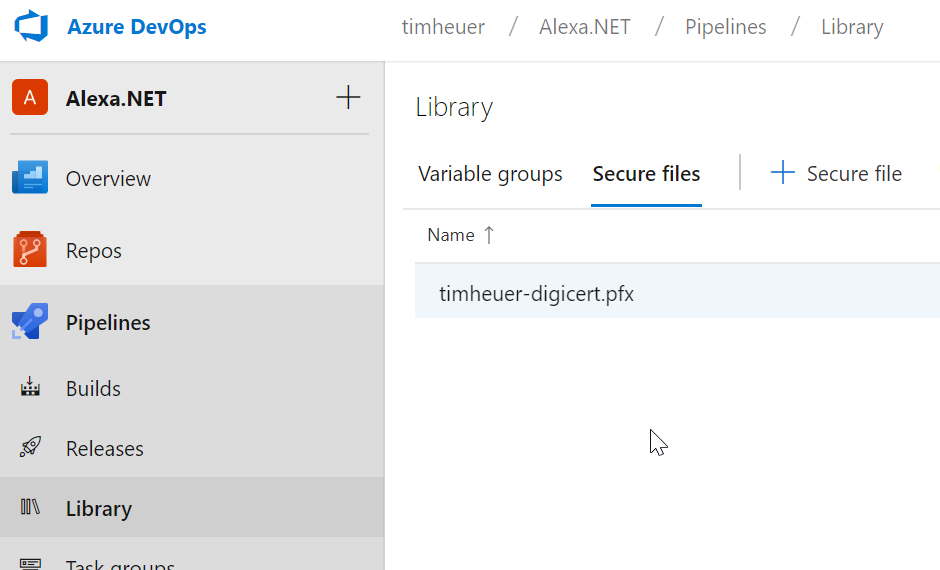
The signing is provided by the NuGet CLI and so I just needed to add another task to this flow right?  I added another one in and was going to just choose the ‘sign’ command as the configured option.  Well, the ‘sign’ command isn’t a selectable option in the task.  There is a request to make this one of the default options for the Azure Pipeline Task right now but it isn’t in there yet.  So for this we will use the ‘custom’ option which allows us to pass in any command and args.  The docs already told me the commands that I would need: a certificate file being the minimum I would have to have.  Hmm, how am I going to have a certificate file in my CD pipeline?!  As it turns out there is a secure file storage in Azure Pipelines I can use! This allows me to upload a file that I can later reference in a pipeline using an argument.  Remember that PFX file we exported?  In your DevOps project under Pipelines there is a ‘Library’ menu option.  Going there takes you to where you can upload files and I uploaded my PFX file there:

Screenshot of Azure DevOps Library

The next thing I need to do is also provide my password for that exported PFX file (you did export it with a password right!).  To do this I made use of variable groups in Azure DevOps, created a group called CertificateValues and added my name/value pair there, marking the value as a secret.  As a variable group I can ‘link’ this group to any build/release definition without explicitly having the variable in those definitions.  This is super handy to share across definitions.  You can now link to an Azure KeyVault for secrets (more to come on that in a part 2 blog post here).  I’ve got my code signing cert (PFX) and my certificate password stored securely.  With these two things now I’m ready to continue on my definition.

Now how will I get the file from the secure storage?!  As I read in the docs, there is a Download Secure File task that I can add to my pipeline.  The configuration asks me what file to use and then in the Reference Name of the Output Variables area I give it a name I can use, in this case ‘Certificate’:

Screenshot of Azure DevOps Download Secure File

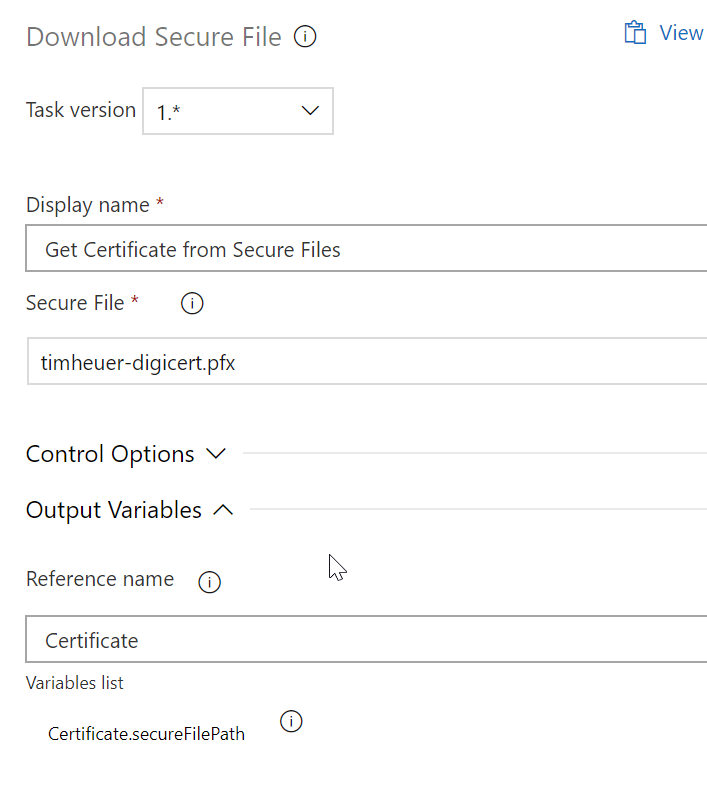
This variable name allows me to use it later in my definitions as $(Certificate.secureFilePath) so I don’t have to fiddle around guessing where it downloaded to on the agent machine.  Now that we have that figured out, let’s move back to the signing task…remember that ‘custom’ one we talked about earlier.  In the custom task I specify in the Command and Arguments section the full command + arguments I need according to the docs.  My full definition looks like this:

sign $(System.ArtifactsDirectory)\$(Release.PrimaryArtifactSourceAlias)\drop\*.nupkg 
    -CertificatePath $(Certificate.secureFilePath) 
    -CertificatePassword $(CertificatePassword)  
    -Timestamper http://timestamp.digicert.com

To explain a bit I’m using some pre-defined variables System.ArtifactsDirectory and Release.PrimaryArtifactSourceAlias to help build the path to where the drop folder is on the agent machine.  The others are from the secure files (Certificate.secureFilePath) and variable group (CertificatePassword) previously defined.  These translate to real values in the build (the secret is masked in the logs as shown below) and complete the task. 

Screenshot of Azure DevOps release definition

Here was my log output from today in fact:

2019-04-04T19:10:44.4785575Z ##[debug]exec tool: C:\hostedtoolcache\windows\NuGet\4.6.4\x64\nuget.exe
2019-04-04T19:10:44.4785807Z ##[debug]arguments:
2019-04-04T19:10:44.4786015Z ##[debug]   sign
2019-04-04T19:10:44.4786248Z ##[debug]   D:\a\r1\a\_Alexa.NET-master\drop\*.nupkg
2019-04-04T19:10:44.4786476Z ##[debug]   -CertificatePath
2019-04-04T19:10:44.4786687Z ##[debug]   D:\a\_temp\timheuer-digicert.pfx
2019-04-04T19:10:44.4786916Z ##[debug]   -CertificatePassword
2019-04-04T19:10:44.4787190Z ##[debug]   ***
2019-04-04T19:10:44.4787449Z ##[debug]   -Timestamper
2019-04-04T19:10:44.4787968Z ##[debug]   http://timestamp.digicert.com
2019-04-04T19:10:44.4789380Z ##[debug]   -NonInteractive
2019-04-04T19:10:44.4789939Z [command]C:\hostedtoolcache\windows\NuGet\4.6.4\x64\nuget.exe sign D:\a\r1\a\_Alexa.NET-master\drop\*.nupkg -CertificatePath D:\a\_temp\timheuer-digicert.pfx -CertificatePassword *** -Timestamper http://timestamp.digicert.com -NonInteractive
2019-04-04T19:10:52.6357013Z 
2019-04-04T19:10:52.6357916Z 
2019-04-04T19:10:52.6358659Z Signing package(s) with certificate:
<snip to remove cert data>
2019-04-04T19:10:52.6360408Z Valid from: 4/4/2019 12:00:00 AM to 4/7/2020 12:00:00 PM
2019-04-04T19:10:52.6360664Z 
2019-04-04T19:10:52.6360936Z Timestamping package(s) with:
2019-04-04T19:10:52.6361268Z http://timestamp.digicert.com
2019-04-04T19:10:52.6361576Z Package(s) signed successfully.

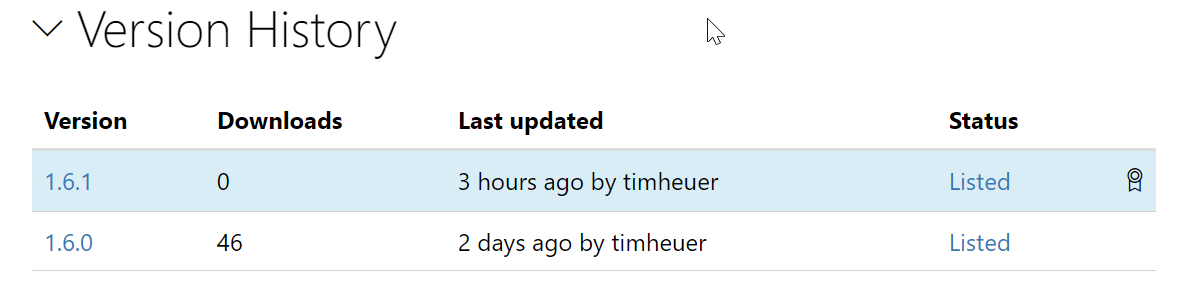
Done!  Some simple added tasks and reading a few docs to get me having a signed NuGet package.  Now re-reading the docs on signed packages I have to upload my certificate to my NuGet profile to get it to be recognized.  This time I only need to provide the DER export.  Once provided and my package is published, I get a little badge next to the listing showing me that this is a signed package:

Screenshot of NuGet version history listing

This was a good exercise in helping me learn a few extra steps in Azure DevOps working with files and custom task variables.  Immediately as I was doing this, my friend Oren Novotny couldn’t help but chastise me for this approach. 

So stay tuned for a secondary approach using Azure KeyVault completely to complete this without having to upload a certificate file.

Last week, the Microsoft Build team announced the dates of the conference as well as announced that there is a Call for Speakers.  Yes, that’s right, the premier MIcrosoft-provided developer event is asking the public to be a part of the show!

I was pretty excited about this as one who has been involved in the Professional Developer’s Conference (PDC), the previous name for this conference, and Build for the past number of years.  I shared on Twitter to get excited too!

After that I got a few questions about the process.  I should be clear that I don’t own the process, have no influence over your submission, probably don’t even have a say in the selection of sessions, but generally want to see people try and get excited about the conference and sharing your passion to others on a broader scale opportunity than usual.  A few on my team have discussed some of this topic of ‘what’ should people submit as well.  I’ll try to change your mind and share my opinion and some thoughts from some colleagues.

First and foremost: TELL A STORY!

I’ve been too guilty myself of being the one to share just all the ‘stuff’ my team did over time.  Sometimes these can be fun sharing all the hard work the team put in to releasing a product.  These ‘lap around my features’ sessions work well for presenters, but I’ve learned over time may not be the best for the audience.  When all I’m doing is telling you about a cool tech feature I’m doing a disservice to your time and the product capabilities usually.  I should be telling you how to solve a problem, how to innovate in your project/process, or how to make you more productive.  To do this I need to think of you, dear reader/attendee, and not me/my team/my product.  So to me, this is the best advice I can give you…put yourself in an attendee perspective and think about what you can share that will help them get to their ‘next,’ whatever that may be.

Some thoughts on how to do this…

  • How does your title read?  Is it “New network settings for Azure Virtual Machines” or could it be “Be smart and secure your cloud networks” – both probably end up showing a similar tech aspect, but the second focuses more on the problem, putting yourself in the audience shoes.  Think of titles as the problem question.  And hey, I often give advice as well to ‘think clickbait’ – some people hate that but it puts you in a mindset to entice the reader/user.  “Migrating your APIs to serverless infrastructure will save you time and money, I’ll prove it!"
  • Brief but specific abstract.  Your abstract shouldn’t be full of buzzwords and non-sentences.  If it reads like an analyst brochure, re-think it.  Start with leading off your title.  Someone is reading the abstract because the title grabbed them.  Get more practical in the first 1-2 sentences.  Keep it brief between there explaining what you’ll show, then end with what THEY will get out of it.  Some call this a ‘call to action’ but think about it in those terms like When you leave you’ll know how to save time deploying your containers to the cloud and have more time for code!
  • Think of the audience.  I said this already but sincerely think of them.  Most of the time I’ve seen conference sessions think of the speaker.  *I* want to show you something.  *I* know better than you so listen to me.  Flip that.  Put yourself in the other seat and tell them how you are going to help them.  If you tell me you’re going to help me in my job in a way that entices me in your language, you’re speaking to me…I’m relating more.  I may not know I need to figure out my container clusters in a specific node configuration…but I do know that I have a problem managing my apps at scale, for example.

These aspects speak both to the inevitable session but also to the Call for Speakers selection team.  The Build team (and other conferences) will receive lots of submissions.  Your title will be the first thing that needs to grab attention.  Then your first 2 sentences.  Telling a story through those helps be unique and specific to help someone learn and not come across as you wanting to ‘tell them stuff.’  Niall Merrigan has a good post about the process that he has been a part of that touches on some of these.  It’s a helpful read from a different perspective.  And different perspectives matter!  So another pro-tip…run your idea by a few that might be your target audience.  That will help!

So with all that said, good luck and submit an idea.  We’ve already got a LOT of submissions.  I have no idea how many will be chosen from the public group, but force the team to be in a hard place to choose the best and maybe expand the number of them…submit well thought out sessions!  Best of luck to you and I look forward to seeing you at Build 2019!

I hope this helps!

This was the first time in a long time (I think maybe 10+ years) that I didn’t go to TechEd…err, I mean Ignite :-).  Was I sad to miss seeing old friends and hearing about TwoWay binding woes?  Sure.  Did I miss Orlando in the summer…nope (I get, it’s an easy shot, but yeah no).  I watched from afar though and found some really great stuff for .NET developers on different spectrums.  Ignite is Microsoft’s opportunity to share what is happening in the tech now versus only focus on futures.  I think for .NET developers we long for the ‘vNext’ of everything, but there is a lot of great things happening NOW!  And if you are a .NET developer who has been tip-toeing into the cloud development area, Ignite was a great place to start learning.

Here’s a list of things that I found for .NET Developers from Ignite. 

If you watch no-other ones, make sure to review these two higher-level sessions:

Aside from these broader sessions, here’s a list that might be relevant to you, dear .NET developer:

Lots of great stuff and maybe I’m missing a few.  Be sure to check out all the stuff from Channel 9 as well where a broad set of topics were covered in-between sessions with experts that were there.  Great smaller nuggets of knowledge that you should check out…here they are: Channel 9 Live at Ignite.

Another huge thing announced at Ignite was Microsoft Learn!

logo for Microsoft Learn

Microsoft Learn is a new online way of learning a bunch of new technology.  Through guided learning paths you complete modules and earn points and achievements.  It’s been fun a bit to compete with some co-workers on who can achieve the most badges!  One of the great things also is that you don’t need much to get started.  For the Azure content you do all the tasks IN THE LESSON through the cloud shell environment and with a free sandbox (no sign-up, no credit card)!  Check it out and see how many achievements you can get this week.

Sorry I missed some of the ‘hallway’ sessions (which are the best), but I’ll be looking for you all at the next one!  What were your favorite sessions?

Hope this helps!

I’m presently working on posting my insight in moving a recent app of mine from an on-premise (colocated server) server to the Azure cloud.  My app is a pretty typical (and OLD) ASP.NET app with a SQL Server database backend.  There was some interesting things I learned in moving the web app portion to Azure App Service, but I’ll save that for a later post…this one is about Azure SQL Server.

My database was actually a SQLExpress database that has been humming along for a while.  It’s also an older schema and a typical relational database system.  The first step for me was to ensure I could move my data before I moved the site…I wanted a full move to a cloud platform.  There are a few ways of migrating databases to Azure as noted in this blog post Differentiating Microsoft’s Database Migration Tools and Services.  Recently one of our Cloud Developer Advocates, Scott Cate, demonstrated the newest full migration strategy, Data Migration Service (DMS), at the Azure Red Shirt Dev Tour.  Because this isn’t generally available I didn’t want to use it and as well my database didn’t warrant the need for managed instance features.  So I went with the Data Migration Assistant tool.

First was to get the tool and install it on my source server.  Because this is an on-prem server I just logged in remotely (RDP) as an admin.  You can choose to first run an assessment, but for me I went crazy and just wanted to migrate (don’t worry, that actually runs an assessment first as well):

After connecting to my SQL db instance I select the database I want to migrate.

NOTE: Use the “trust server certificate” checkbox when doing this migration from local db or you will see some failures in trying to connect to Azure.

After this I need to choose the destination and I can either select an already-created Azure SQL database or create one within my Azure subscription.  This link will launch instructions on how to create a new Azure SQL database on your subscription using the Azure Portal.  You will want to select your server size, etc. based on your needs.  There is some pricing guidance on the selections to help you understand your cost.  After this, return to the tool, enter the server you just created (or already had) and authenticate using your credentials for the server.  Then choose which database is the target for the migration:

Then the next step will show you the assessment and flag things that may need attention.  You need to examine these to assess whether they will be impactful to your app and either accept the script or not.  Once done you have 2 more steps: Deploy Schema and then (assuming that was successful) Migrate Data.  For me, this was rather quick and it was done.  I verified the data and was good to go!

Post-migration Tuning

After deploying the database and site I made sure that on the database I turned on the Automatic Tuning feature provided to me as a service for hosting in Azure:

And then I went away.  Immediately after a few days I returned to see some automatic tuning being done and analyzed.  Azure had analyzed my database under real conditions and made recommendations to actually alter the database to improve performance.  This is then automatically applied if Azure determines it will benefit my performance.  Here were the recommendations:

And notice the determination of impact for one of them:

You’ll see that Azure’s machine learning was smart enough to realize that one of the recommendations wasn’t going to improve (in fact it assessed it would actually regress a query) and decided not to apply the initial tuning recommendation.  Pretty awesome.  Taking a look at my performance profile of the database you can tell very quickly when these recommendations were applied:

This is awesome.  I’ve got some tuning still to go, but thankfully Azure did all the hard work of helping me identify the performance bottlenecks of my database, suggest and analyze some automatic tuning it could do, but also still give me all the data I need to further analyze troublesome queries.

You can learn more about this feature in a recent Channel 9 video talking about this:

It really is an amazing feature and combined with the easy migration, I’m really excited about moving this app to Azure App Service + Azure SQL!

Hope this helps! 

Well that was fun!  It was really exciting to share with the world what our team has been working on in designing and developing over the past few years with regard to Windows UI platform advancements.  Build 2017 was a culmination of a lot of efforts across the company in various areas, but for UI it was the introduction of our evolution of design, the Fluent Design System.  This represents a wave of UI innovations over time, with Build 2017 showing the first views of Wave 1.  There was a lot of great buzz about Fluent, but for a great introduction be sure to check out my colleague Paul Gusmorino’s session introducing the design system:

Of course as developers sometimes we wince at the word ‘design’ because we don’t have the skills, maybe don’t understand it, or want to ensure we can achieve it with maximum ROI of our own developer time!  We agree!  In defining the Fluent Design System, we ensured that a lot of these new innovations are ‘default’ in the platform.  Starting now with the Fall Creator’s Update Insider SDKs you can start seeing some of these appear in the common controls.  When you use the common controls as-is, you will get the best of Fluent incorporated into your app.  James Clarke joined Paul later to explain and demonstrate this in practice showing how the new (and some existing) common controls take this design system into account and help you get it by default:

In addition to what we are doing *now* we also wanted to share what is on the horizon.  I was able to join Ashish Shetty at Build and talk about what is new in XAML and Composition platform areas for developers.  We shared more of the ‘default’ that is exhibited in the common controls but also explained some of the ‘possible’ in the platform that you can achieve with great improvements to our animation system.  We also shared the vision for the future in this space around semantic animations and vector shape micro-animations.  Check out our session on this area:

We had so much to talk about that I wasn’t able to show the simplicity of enabling the pull-to-refresh pattern in the new controls area.  Not wanting you to feel ripped off, I recorded a quick demo of a few of the things we weren’t able to demo.  Take a look here at my impromptu demo insert for you!

There is a lot of great new things coming in the Windows UI platform area for UWP:

  • NavigationView
  • ParallaxView
  • RefreshContainer
  • SwipeContainer
  • TreeView
  • ColorPicker
  • RatingsControl
  • Improved text APIs: CharacterRecieved, CharacterCasing, IsTrimmed
  • Improved input APIs like PreviewInput
  • Implicit animations
  • Connected animations improvements for ListViewBase
  • Advanced color and HDR for Image
  • SVG support for Image
  • Keytips support for XAML
  • ContentDialog and MenuFlyout improvements
  • Context menu support everywhere
  • UI analysis and Edit-and-continue in Visual Studio
  • Narrator developer mode
  • and more!

It is so great to be a part of this latest release and continue to deliver value (hopefully) to you, our developer customer.  Please be sure to let us know how you are using these new improvements and the Fluent Design System.  Share your creations with us at @windowsui so we can share with others as well!

We also announced a vision for defining a common dialect for UI everywhere around XAML.  We call this XAML Standard and are drafting a v1 specification now.  We will want your input on this and have established an open process to encourage community collaboration.  Please join the conversation at http://aka.ms/xamlstandard.  This is at very early stages but with your help we will establish the right fundamentals first and evolve over time.  Getting the core right is critically important…you can’t unify on a set of control APIs if the foundation isn’t solid and makes sense.  In addition to this, .NET Standard 2.0 for UWP was announced as well and is a HUGE advancement for .NET developers writing apps for UWP.  Oh no big deal, just about 20K more APIs you have access to now.  Yowza.  Listen to Scott Hunter, Miguel and myself talk about these areas on Channel 9:

I’m excited to see the creativity unleased by our developer community.  Thanks for letting me be a small part of it!