A new Silverlight control - TabControl
| Comments- | Posted in
- silverlight
- wpf
- xaml
- ria
- controls
- tabcontrol
- tabitem
Silverlight 2 brings a suite of controls for designers and developers to leverage within their applications. With the Expression tools helping us to be able to skin these controls, also comes some new controls you may not have used yet as well as a new one introduced with the latest release of Silverlight 2.
Introducing TabControl.
UPDATE: Video walk-through is now live.
The TabControl is implemented in the System.Windows.Controls.Extended class library and not in the Silverlight core. To use it make a reference to the Extended assembly and it will be available to you. In Expression Blend you’ll see TabControl in the Custom Controls section of the Asset Library:

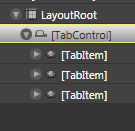
You’ll notice there is actually a TabControl and TabItem controls…to implement you’ll need them both. In Blend, you’ll have to drag a TabControl onto the design surface. Once you have it, double-click on the TabControl in the Objects and Timeline explorer so that it has a yellow ring around it:

Having the yellow border indicates that it is the actively selected element. Now if you go back to the asset library, change to a TabItem and double-click the TabItem, it will be added as a child of the TabControl. Do this several times to add as many TabItems you need:

The resulting XAML looks like this:
<ex:TabControl TabStripPlacement="Bottom" VerticalAlignment="Top"
               Width="231.148" Height="156.611" HorizontalAlignment="Left"
               x:Name="tabstrip1">
    <ex:TabItem Width="75" Height="20">
    </ex:TabItem>
    <ex:TabItem Width="75" Height="20" Header="Second">
    </ex:TabItem>
    <ex:TabItem Width="75" Height="20" Header="Third">
    </ex:TabItem>
</ex:TabControl>
You’ll notice the “ex” namespace with the TabControl. Yours may be different and likely “System_Windows_Controls“ if you followed the steps above. This is added automatically when you drag a control onto the surface from the asset library. The namespace is actually directed in the root node of the XAML and you can change it to whatever you’d like.
The TabControl has properties you can set on it just like any other control, but one that you might find important would be the TabStripPlacement property. This enables you to direct where the TabItems (tabs) actually get displayed: Top, Left, Right, or Bottom. This can be set in XAML and also controlled during runtime using the Dock enumeration.
Each TabItem also has two properties to set content: Header and Content. Header is where you would put the content for the tab itself and content direct the actual content within the TabItem. This can be set to literal string values, but they can also be set to other content. For example, if you want to set the content within the TabItem, you could do something like:
<ex:TabItem Width="75" Height="20" Header="Third">
    <StackPanel Orientation="Vertical">
        <TextBox x:Name="yourname" />
        <Button Content="Click me" Click="Button_Click" />
        <TextBlock x:Name="resulttext" />
    </StackPanel>
</ex:TabItem>
If you wanted to set alternate content as the Header you could likewise do that as well noting the TabItem.Header:
<ex:TabItem Width="75" Height="20">
    <ex:TabItem.Header>
        <Button Content="foo" />
    </ex:TabItem.Header>
    <Button Content="Click Me" Click="Button_Click_1"/>
</ex:TabItem>
Let us all welcome TabControl to the family. A simple yet probably widely used control is now available for you to think of marvelous uses :-). Remember, that TabControl (as well as the calendar and date picker controls) is located in the Extended control assembly and not the core. Here’s an example of a TabControl using some of the methods described above:

For a video demonstration of using TabControl, visit the Silverlight community learning section and stay updated as the video will be there shortly as well as other great videos on using Silverlight 2.
Hope this helps!
Please enjoy some of these other recent posts...
Comments