Using Encoder Templates in your Silverlight Application
- | Posted in
- silverlight
- expression
- xaml
- ria
- media
- encoder
- source
I received a comment regarding the new Expression Encoder SP1 Silverlight player templates and how they can be used within your own application. Right now the templates appear to stand on their own. That’s only because the output of an Encoder action will be an encoded file, the template you chose (XAP) and an HTML page to host the Silverlight player application.
But what if you already have an application and are trying to integrate media playback within it? How can you take advantage of the Encoder templates, but just drop them in your existing application? Let’s take a quick look.
Let’s say we have an existing application. For the sake of this post, let’s just show some primitive controls and display a Button and TextBox within some StackPanel layouts:
1: <UserControl
2: xmlns="http://schemas.microsoft.com/winfx/2006/xaml/presentation"
3: xmlns:x="http://schemas.microsoft.com/winfx/2006/xaml"
4: x:Class="ExPlayer.Page"
5: Width="640" Height="480"
6: >
7: 8: <Grid x:Name="LayoutRoot" Background="White">
9: <StackPanel Orientation="Horizontal">
10: <StackPanel Height="Auto" Width="309">
11: <Button Content="Button"/>
12: <TextBox Text="TextBox" TextWrapping="Wrap"/>
13: </StackPanel>
14: <StackPanel Height="Auto" Width="250" x:Name="MediaArea"/>
15: </StackPanel>
16: </Grid>
17: </UserControl>
Now we want to add a media player using the Encoder templates to our application in the StackPanel labeled MediaArea. First, we need to get the media player from the template as a control. Easy enough since the source code for the Expression Encoder Silverlight 2 templates are included. Browse to your install directory for Expression (usually C:\Program Files\Microsoft Expression\Encoder\Templates\en\) and pick the Silverlight 2 template you want to use. NOTE: This is only for Silverlight 2 templates, so be sure not to get frustrated at me :-) -- you’ve been forewarned. I’ll choose the SL2Standard template. Notice within that folder there is also a Source folder. Within there is an ExpressionPlayer folder and associated C# source code project. Open that project in Visual Studio 2008.
Now build the project. Done. You now have a control you can use. Here’s how we’ll do it.
Going back to our own application we need to add a reference to the ExpressionPlayer.dll and MediaPlayer.dll we just built. Go ahead and do that in your Silverlight application by choosing Add Reference and then pointing to the assembly location. Now we need to inform our XAML that we’ll be using this control. Of course if you add these controls to your Visual Studio 2008 toolbox you can drag-and-drop them onto the XAML code surface and it will append the xmlns attribute for you, or we can add it ourself:
1: <UserControl
2: xmlns="http://schemas.microsoft.com/winfx/2006/xaml/presentation"
3: xmlns:x="http://schemas.microsoft.com/winfx/2006/xaml"
4: x:Class="ExPlayer.Page"
5: Width="640" Height="480"
6: xmlns:expression="clr-namespace:ExpressionMediaPlayer;assembly=ExpressionPlayer"
7: xmlns:ExpressionMediaPlayer="clr-namespace:ExpressionMediaPlayer;assembly=MediaPlayer"
8: >
I’ve called my namespace “expression” and “ExpressionMediaPlayer” and you can see I’ve pointed (actually Visual Studio’s Intellisense did it all for me) the namespace to the assembly I just referenced. Now we can use the control. Here’s the XAML for adding it to my application and adding a media file that is in my applicaiton:
1: <UserControl
2: xmlns="http://schemas.microsoft.com/winfx/2006/xaml/presentation"
3: xmlns:x="http://schemas.microsoft.com/winfx/2006/xaml"
4: x:Class="ExPlayer.Page"
5: Width="640" Height="480"
6: xmlns:expression="clr-namespace:ExpressionMediaPlayer;assembly=ExpressionPlayer"
7: xmlns:ExpressionMediaPlayer="clr-namespace:ExpressionMediaPlayer;assembly=MediaPlayer"
8: >
9: 10: <Grid x:Name="LayoutRoot" Background="White">
11: <StackPanel Orientation="Horizontal">
12: <StackPanel Height="Auto" Width="309">
13: <Button Content="Button"/>
14: <TextBox Text="TextBox" TextWrapping="Wrap"/>
15: </StackPanel>
16: <StackPanel Height="Auto" Width="250" x:Name="MediaArea">
17: <expression:ExpressionPlayer Width="242" Height="177">
18: <expression:ExpressionPlayer.Playlist>
19: <ExpressionMediaPlayer:PlaylistItem MediaUrl="Lake.wmv"/>
20: </expression:ExpressionPlayer.Playlist>
21: </expression:ExpressionPlayer>
22: </StackPanel>
23: </StackPanel>
24: </Grid>
25: </UserControl>
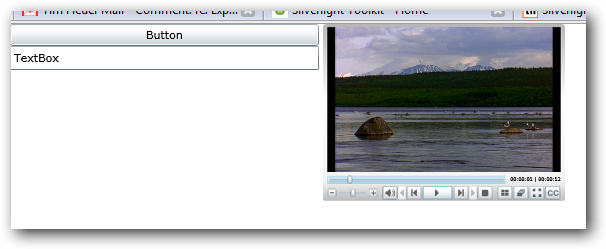
Of course you can interact with it via code as well, but getting the control in your app is easy once you know these steps. Now my application has a fully-functional media playback without me writing any code and being able to integrate it within my existing application. I might want to change the style of course to fit my application’s experience, but dropping in a few style attributes wouldn’t be that difficult…and I an always make that a part of the Encoder template as well! Here’s the “after” screenshot of it in play:

You get full functionality out of the player…with one exception. I’ve noticed that the fullscreen option doesn’t act the same as if the player was the only app. To be honest I haven’t looked at what it would take to do that,but remember that now the media player is a part of a bigger app and isn’t the application itself. So “fullscreen” mode is a part of the container Silverlight application and not just the media player…something to watch out for if you expected your embedded media player now to automatically have the same fullscreen functionality.
Please enjoy some of these other recent posts...