Deploying .NET Core 3 apps as self-contained
Yay! .NET Core 3.0 is now available! You now are migrating your apps and want to get it to your favorite cloud hosting solution. But they may not have it quite ready yet and you are still eager to deploy to production. No worries, we have a solution for you.
As our documentation explains on different deployment models we have for .NET Core apps (simplified);
- Framework-dependent (FDD): you are expecting the required framework to be where you are deploying…you are just deploying your code.
- Self-contained (SCD) : you are packaging the required libraries and runtimes needed for your code to run, not expecting any shared runtime on your endpoint.
- Framework-dependent executable (FDE): similar to FDD, but packaged as an executable, but expects a shared runtime to exist where you are deploying
Ideally your favorite cloud host provider will have your desired runtime available to you in their PaaS offerings. But we’ve already established you are eager and want to get your new app there sooner. No worries, then SCD is for you. So how do you do that? Here’s some helpful hints to get you going.
Producing the bits for SCD deployment is a part of the ‘publish’ pipeline to get the fully functional bits in all the right formats/places for you. Here’s how you get it going in a few different environments. First, though all of these require the understanding of runtime identifier values, or RID as we affectionately call it. RIDs identify the target platform where the app will run. You can see a list of all possible values in the RID catalog. Understanding your value is key first. For this, I’m going to deploy to Azure App Service for Linux and going to use linux-64 as my RID in all samples below. This would vary based on what/where you are deploying. I am also assuming in my samples that I’m executing these commands where they know the context of where my csproj file exists. You can, of course, specify the path to your project files explicitly.
dotnet CLI
From the dotnet CLI you would first want to build and then publish using the RID. Why build? Well, it’s valuable to ensure your building against the RID that you will publish. Catch any build errors in advance, ya know? So from the CLI:
dotnet build -r linux-x64
dotnet publish --self-contained -r linux-x64
The key here is the ‘-r’ and ‘--self-contained’ arguments. I’m using ‘-r’ but you can also use ‘--runtime’ for the long form. What this will produce (unless you specified a different output argument) is a folder with your RID and then the publish folder within that. So for me above in my project directory it would be in \bin\release\netcoreapp3.0\linux-x64\publish and everything in that \publish is what is needed for SCD.
Using the CLI is the basic you can do. Now it’s on your own to push the bits where they need to be, specify startup commands, etc. But better, you can use some tools that build on top of this CLI goodness.
Azure DevOps
Let’s first talk about DevOps. You should be using this. No let’s be real clear – USE CI/CD!!! “But I’m only myself as a developer!” So what, you should still use this. I’m a believer now and it is so simple to set up and you then just worry about committing your code and your DevOps flow/pipelines take care of build/test/publish/release for you…it’s awesome. With that out of the way, let’s show you how to do it in Azure DevOps.
Honestly, if you haven’t gotten the hang of CI/CD you really should spend the time in one day and get your project configured. Whether it is Azure DevOps, GitHub Actions, AppVeyor, Jenkins, whatever, you will be better off. Azure DevOps is basically free and you’ll be happier once you’ve got it done. You owe it to yourself. But don’t worry, I explain the other ways below too.
In your pipeline you would add the .NET Core task and configure it for publish (assuming you also have the build/test). This task basically calls the CLI so you put the same arguments as we just went through. Here is my task in part one:
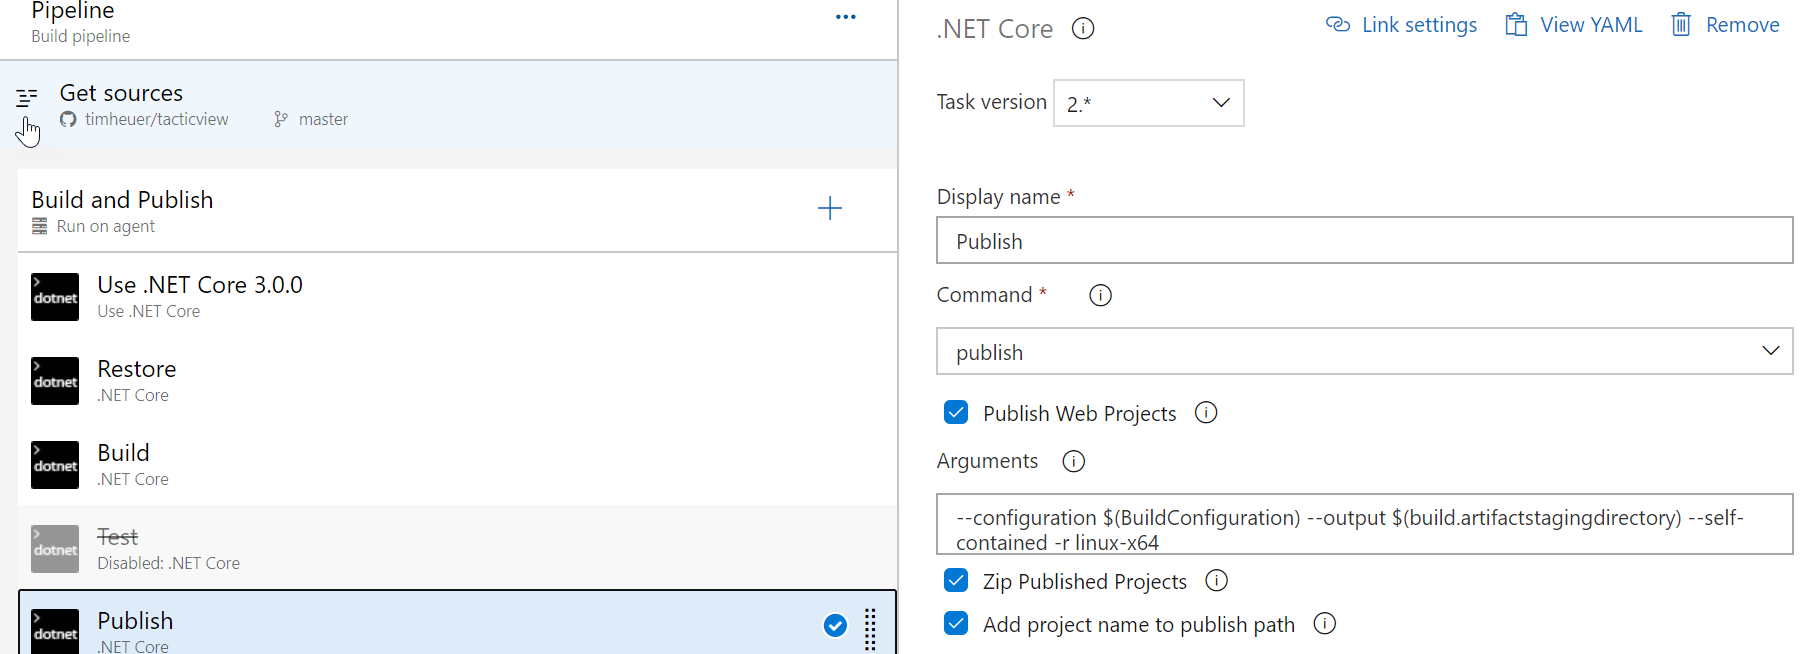
Observe the ‘Zip Published Projects’ – I enabled this because this is what will be used for Azure App Service deploy next.
SPECIAL NOTE: When using the ‘Use .NET Core’ task in Azure DevOps, I recommend using the major.minor.x pattern to specify the version, so in this case 3.0.x. This will ensure you get the latest patch updates for your specified major.minor version. For self-contained this is smart since you are bringing the platform runtime with you and not getting auto-updates from the platform.
Then you want to deploy it, and for me to Azure App Service, I add the Azure App Service Deploy task and configure it using my published bits from the previous step. Notice I’m still specifying the Runtime Stack value (even though at the time of this writing I need to use SCD) and specifying the startup command as the folder path to my app.

And that’s it…now when I commit a change, these pipelines run and build/publish/deploy my app to my cloud provider without me having to worry if they have the runtime available yet or not. You should be able to do this with Azure, AWS, wherever, and still use Azure DevOps to manage your workflow (or GitHub Actions).
Oh you’re a YAML person? Sorry about that…here’s basically what it looks like using Azure DevOps tasks:
steps:
    # task for publish CLI command
    - task: DotNetCoreCLI@2
    displayName: Publish
    inputs:
    command: publish
    publishWebProjects: True
    arguments: '--configuration $(BuildConfiguration) --output $(build.artifactstagingdirectory) --self-contained -r linux-x64'
    zipAfterPublish: True

    #task for deploy to Azure App Service
    - task: AzureRmWebAppDeployment@4
    displayName: 'Azure App Service Deploy: tacticview'
    inputs:
    azureSubscription: 'Azure-Microsoft'
    appType: webAppLinux
    WebAppName: tacticview
    deployToSlotOrASE: true
    ResourceGroupName: 'timheuer-linuxappsvc'
    SlotName: staging
    RuntimeStack: 'DOTNETCORE|3.0'
    StartupCommand: /home/site/wwwroot/TacticView
So there you have it for Azure DevOps!
GitHub Actions
For GitHub Actions, it is very similar to Azure DevOps using the CLI. Here’s the relevant snippet for those steps (minus the deploy part):
name: ASP.NET Core CI

    on: [push]

    jobs:
    build:

    runs-on: ubuntu-latest

    steps:
    - uses: actions/checkout@v1
    - name: Setup .NET Core
    uses: actions/setup-dotnet@v1
    with:
    dotnet-version: 2.2.108
    - name: Build with dotnet
    run: dotnet build --configuration Release
    - name: Publish with dotnet
    run: dotnet build --configuration Release -r linux-x64 --self-contained
You would them want to add the deploy pieces in GitHub Actions and you can follow along with that from Abel’s blog post.
Visual Studio
I STRONGLY recommend you adopt a full CI/CD workflow for all your projects. This has gotten so simple for most cases that it would be a shame not to do that. But we do also provide means in Visual Studio tools to publish as well. In your ASP.NET Core application if you right-click and choose Publish, you’ll see the options. You first create a publish profile which walks you through where you want to publish. I won’t show that part because it can be different depending on your selection. But once complete you’ll be presented with this view:
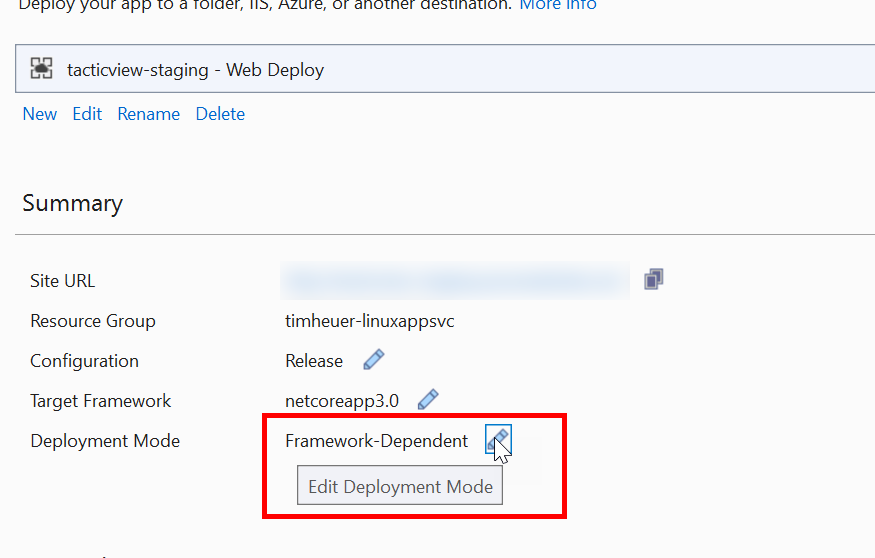
In that view you click on the area highlighted that is labeled Deployment Mode and will be presented with the dialog to change:
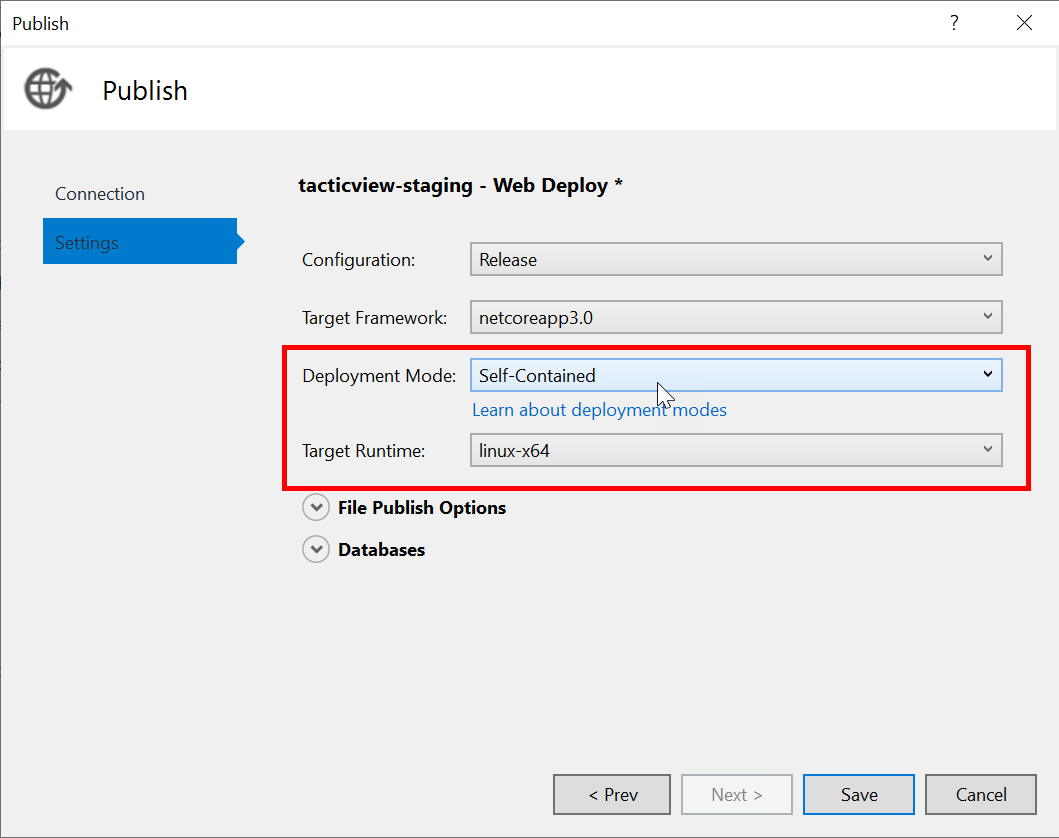
Once those two things are changed, then when you click Publish it will use the self-contained version of your app and push to whichever endpoint you chose. And you are done for Visual Studio.
VS Code
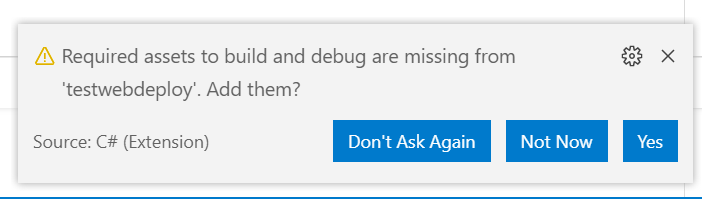
What about if you use Visual Studio Code, VS Code? With the latest release of the Azure App Service extension, .NET projects got better support for deploying to Azure App Service. The default flow for this is simpler and doesn’t assume you want to deploy using SCD, so you have to do a bit more setup. When you have a C# project in VS Code you should get prompted (and you should accept) the option to add assets to your project.
This adds a .vscode foler with a tasks.json file in it that looks like this:
{
    "version": "2.0.0",
    "tasks": [
    {
    "label": "build",
    "command": "dotnet",
    "type": "process",
    "args": [
    "build",
    "${workspaceFolder}/testwebdeploy.csproj",
    "/property:GenerateFullPaths=true",
    "/consoleloggerparameters:NoSummary"
    ],
    "problemMatcher": "$msCompile"
    },
    {
    "label": "publish",
    "command": "dotnet",
    "type": "process",
    "args": [
    "publish",
    "${workspaceFolder}/testwebdeploy.csproj",
    "/property:GenerateFullPaths=true",
    "/consoleloggerparameters:NoSummary"
    ],
    "problemMatcher": "$msCompile"
    },
    {
    "label": "watch",
    "command": "dotnet",
    "type": "process",
    "args": [
    "watch",
    "run",
    "${workspaceFolder}/testwebdeploy.csproj",
    "/property:GenerateFullPaths=true",
    "/consoleloggerparameters:NoSummary"
    ],
    "problemMatcher": "$msCompile"
    }
    ]
    }
Note lines 17-24 which show the CLI commands we’ve already been talking about here. So these you’d have to change to add arguments. For brevity I’m only showing the modified publish lines here to what you would need:
{
    "label": "publish",
    "command": "dotnet",
    "type": "process",
    "args": [
    "publish",
    "${workspaceFolder}",
    "--configuration",
    "Release",
    "/property:GenerateFullPaths=true",
    "/consoleloggerparameters:NoSummary",
    "--runtime",
    "linux-x64",
    "--output",
    "bin/release/netcoreapp3.0/publish",
    "--self-contained",
    ],
    "problemMatcher": "$msCompile",
    "dependsOn": "clean"
    }
But that’s not it. Remember when we talked about how the CLI publishes to a /netcoreapp3.0/<RID>/publish folder? You’ll need to know that for the Azure App Service deploy. Notice I added an explicit output argument here. Why? Well laziness for one. The App Service Extension when you deploy will also add a settings.json file in your .vscode folder that looks like this:
{
    "appService.preDeployTask": "publish",
    "appService.deploySubpath": "bin/Release/netcoreapp3.0/publish"
    }
Notice the appService.deploySubpath argument? Well I just didn’t want to change that to /linuxx64/publish. Either way, you could have changed the argument here or in tasks.json but the bottom line is they need to match paths so the extension knows what you want to publish! With these two complete, when you choose to publish using the extension you’ll be publishing a self-contained app to your provisioned Azure App Service instance.
I hope this helps get an idea of the different ways you can publish and how to use the SCD option. Realistically you don’t need to use this in cloud environments which support your framework version. In fact, as soon as they do support your version, go back in to your DevOps flow and remove the SCD argument and kick off a new release…no need to change code in your project or use your dev tools…another benefit of using DevOps – you can even do it from your phone!
Thanks for reading this far!
Please enjoy some of these other recent posts...