Deploy a Blazor WASM site to Azure Storage using GitHub Actions
I’ve been spending a lot of time looking at the GitHub Actions experience for .NET developers. Right now I’m still using Azure Pipelines for my project, Alexa.NET, in building, testing, and deploying to NuGet. As the tools and process for using DevOps tools for CI/CD have so vastly improved over the years, I’ve become a huge advocate for this being the means for your build/deploy steps…YES, even as a single developer or a smaller team. It simply really helps you get to a purer sense of preserving the ability for your code to live on, for others to accurately build it, and for you to have peace of mind that your code works as intended. I’m just such a huge fan now. That said, I still think there is a place for ‘right-click publish’ activities in inner-loop development. In fact, I use it regularly for a few internal apps I’ve written. For simple solutions that method works well, but I certainly don’t think I can right-click-publish a full solution to a Kubernetes environment though. I’m currently researching new tooling ways to help those ‘publish to CI/CD’ from Visual Studio (would love your opinions here) so I’ve been spending a lot more time in GitHub Actions. I decided to look at publishing a Blazor app to Azure Storage as a static site…here’s what I did.
Setting up the Storage endpoint
The first thing you need is an Azure Storage account. Don’t have an Azure account, no worries you can get a Free Azure account easily which includes up to 5GB of Azure Blob Storage free for the first 12 months. Worried about pricing afterwards? Well check out the storage pricing calculator and I’m sure you’ll see that even at 1TB storage it is cost-effective means of storage. But any rate, you need a storage account and here are the configuration you need.
First, you may already have one. As a developer do you create your infrastructure resources or are these provisioned for you by infra/devops roles in your company (leave comments)? Earlier this year at Build we enabled static website hosting in Azure Storage. You first create a Storage resource (ensuring you choose v2 which is the default, but that is the version that enables this feature). After you create your resource scroll on the left and you’ll see ‘Static website' section. Here’s what the configuration looks like and let me explain a few areas here:

All of this configuration is under the Static website area. First you obviously need to enable it…that’s just toggling the enabled/disabled capability. Enabling this now gets you two things: 2 endpoints (basically the URI to the website) and a specific blob contianer named $web where your static content needs to live. The endpoints default map to this blob container without having to add a container name to the root URI. Remember the resource group you’ve given to your storage instance here, you will need that later.
NOTE: You can later add CDN/custom domain to these endpoints, but I’m not covering those here.
The second thing you need is to set a default document and error page. The default document for your SPA is your root entry point, and for most frameworks I’ve seen this is indeed index.html. For Blazor WebAssembly (WASM) apps, this is also the default if you are using the template. So you set the default document as ‘index.html’ and move on. The error document path is another interesting one…you need to set this for SPA apps because right now the static website capability of Azure Storage does not account for custom routing rules. What this means is that storage will throw an HTTP 404 error message when you go to something like /somepage where it actually doesn’t exist but your SPA framework knows how to handle it. Until custom routing works on Azure Storage your error document becomes your route entry point. So for this set the error document path to also be index.html for Blazor WASM.
NOTE: Yes this isn’t ideal for routing. On top of that it still does show an HTTP 404 actual network message even though your route is being handled. Azure Storage team has heard this request…working on advocating for y’all.
That’s it. Now you have a storage endpoint with a blob container that you can begin putting your content in and browse to using your endpoint URI provided from the portal. For a simple tool to navigate your storage, I’ve been using Azure Storage Explorer and it is intuitive to me and works well to quickly navigate your storage account and containers (and supports multi-account!).
Setting up your Azure Service Principal credentials
The next thing you will need is a service principal credential. This will be used to authenticate with your Azure account to be able to use DevOps tools to work on your behalf in your account. It’s a simple process if you have a standard account. I say this only because I know there might be some configurations for environments where you yourself don’t have access to create service principals and may need someone to create one on your behalf, or also there might be credentials you can already use. Either way here is the process I used.
I used the Azure CLI so if you don’t have that installed go ahead and grab that and install it. This should now be in your PATH environment and using your favorite terminal you should be able to start executing commands. To start out, login to the CLI using `az login` – this will launch a browser for you to authenticate via your account and then issue the token in your environment so that for the remainder of your session you’ll be authenticated. After logging in successfully running `az account show` will emit what subscription you are using and you’ll need the subscription ID later so grab that and put it somewhere on your scratch notepad for later command usage.
NOTE: If you have more than one subscription and have not set a default subscription you should set that using the `az account set` command.
Now you can use the CLI to create a new service principal. To do that issue this command:
az ad sp create-for-rbac --name "myApp" --role contributor \
                            --scopes /subscriptions/{subscription-id}/resourceGroups/{resource-group} \
                            --sdk-auth
Note on line 2 here that you need to replace {subscription-id} with your own actual subscription id (the GUID) and {resource-group} with the resource group name where your storage account is located. On line 1 the “myApp” can be anything but I recommend making it meaningful as this is basically the account name of the principal. The output of this command is your service principal. The full JSON output. Save this off in a place for now as we’ll need that later to configure GitHub Actions properly. Great now to move on to the app!
Create your Blazor WASM app
I assume since you may be reading this far you aren’t new to Blazor and probably already have the tools. As of this writing, Blazor WASM is still in preview so you have to install the templates separately to acquire them to show up in `dotnet new` and in Visual Studio File…New Project. To do that from a terminal run:
dotnet new -i Microsoft.AspNetCore.Blazor.Templates::3.1.0-preview4.19579.2
Then you will be able to create a new project. I’m showing Visual Studio here and this is the WASM template:

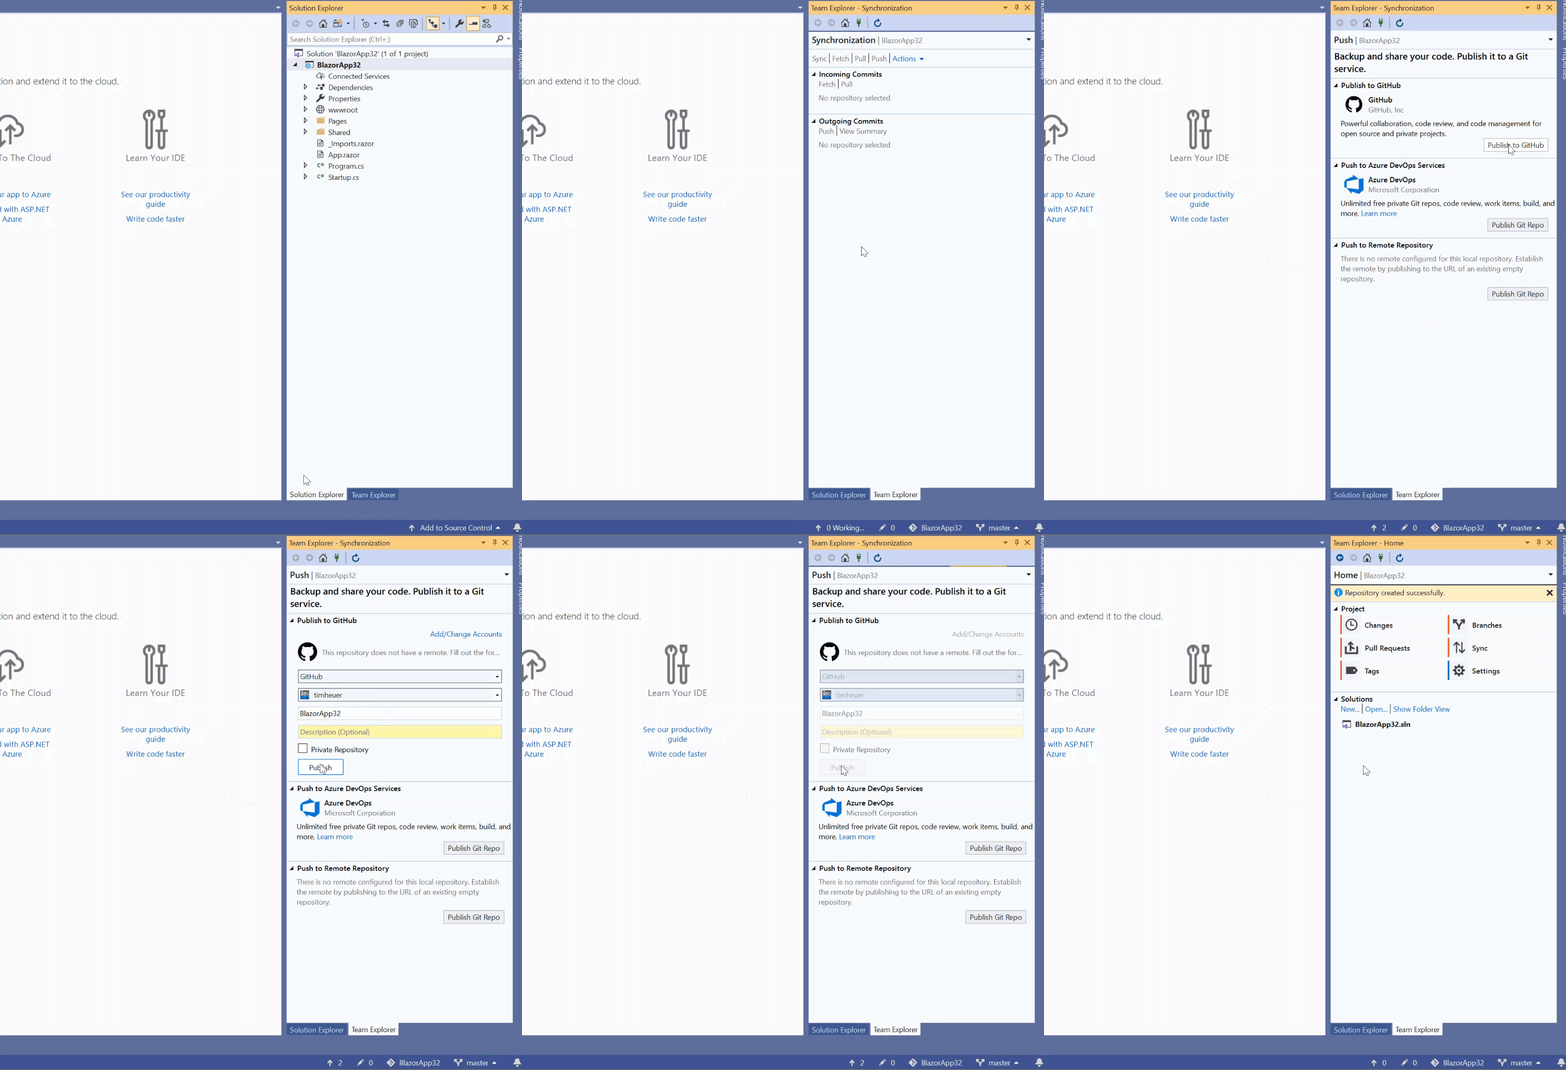
In the dialog here you will see Blazor WebAssembly App and that’s what you will use. Now you have a choice to have it ASP.NET Core hosted using that checkbox, which if you were going to do other things in ASP.NET maybe that’s what you want. For the purposes of this article we are talking about just having the WASM app and having a place to host it that isn’t a web server with other content…just hosting static content and using storage to do so…so we aren’t checking that box. The result will be a Blazor WASM app with no host. Now let’s add that to GitHub. If you are using Visual Studio 16.4+ you’ll be able to take advantage of an improved flow for pushing to GitHub. Once you have your project, in the lower right click ‘Add to Source Control’ choosing Git and then you’ll see the panel to choose GitHub and create/push a repo right away. You don’t have to go to GitHub site first and clone later…all in one step:

Great! Now we have our WASM project and we’ve created and pushed the current bits to a new GitHub repository. Now to create the workflow.
Setup the GitHub Action Workflow
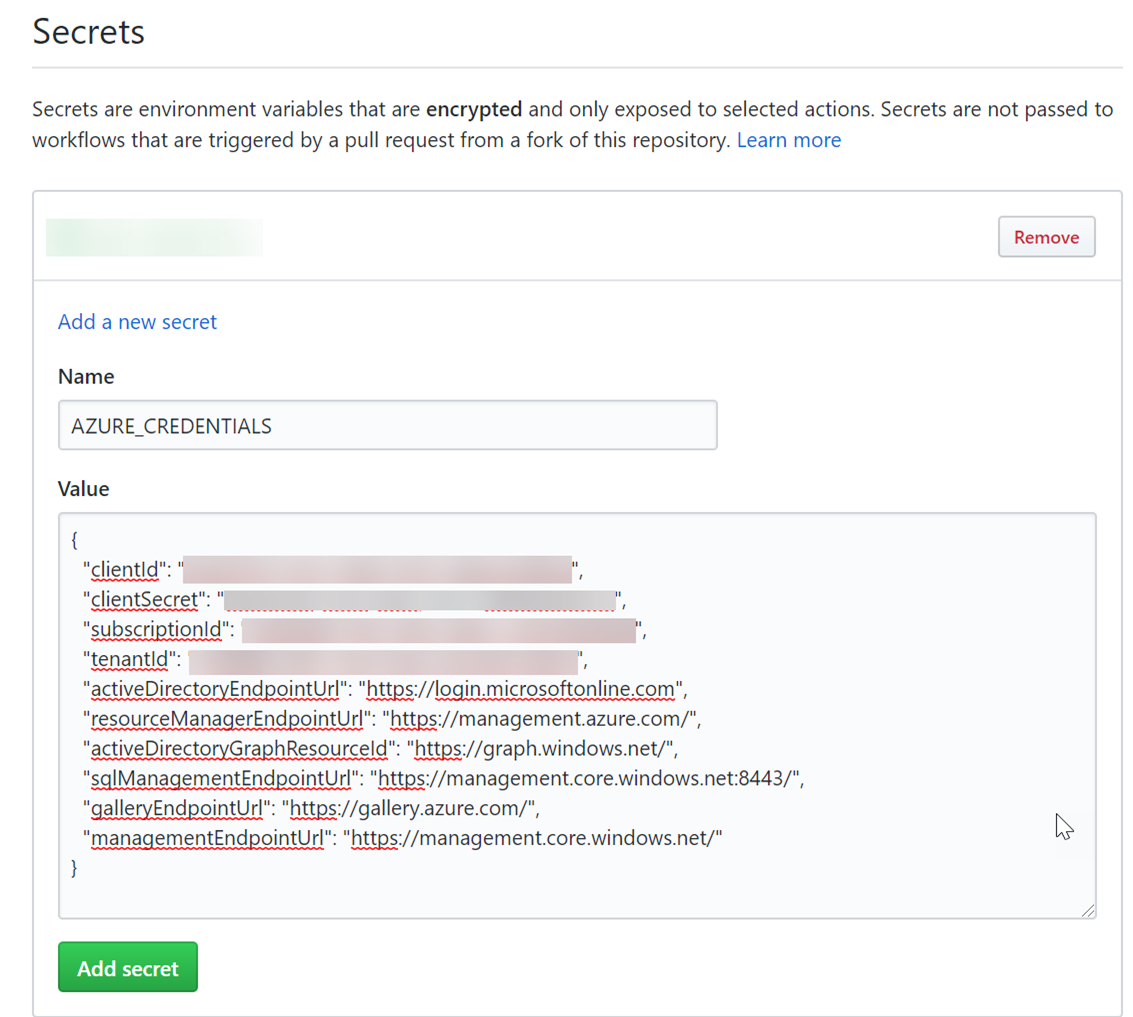
Now we’ve got an Azure Storage blob container, a service principal, a Blazor WASM project, and a GitHub repository…all set to configure the CI/CD flow now. First let’s put that service principal as a secret in our repository. In the settings of your repository navigate to the Secrets section and add a secret named AZURE_CREDENTIALS. The content of this is the full content of your service principal (the JSON blob) that we generated earlier:

This saves the secret for us to use in the workflow and reference as a variable. You can add more secrets here if you’d like if you wanted to add your resource storage account name as well (probably a good idea). Secrets are isolated to the original repository so no forks get the secrets at all. Now that we have these let’s create the workflow file.
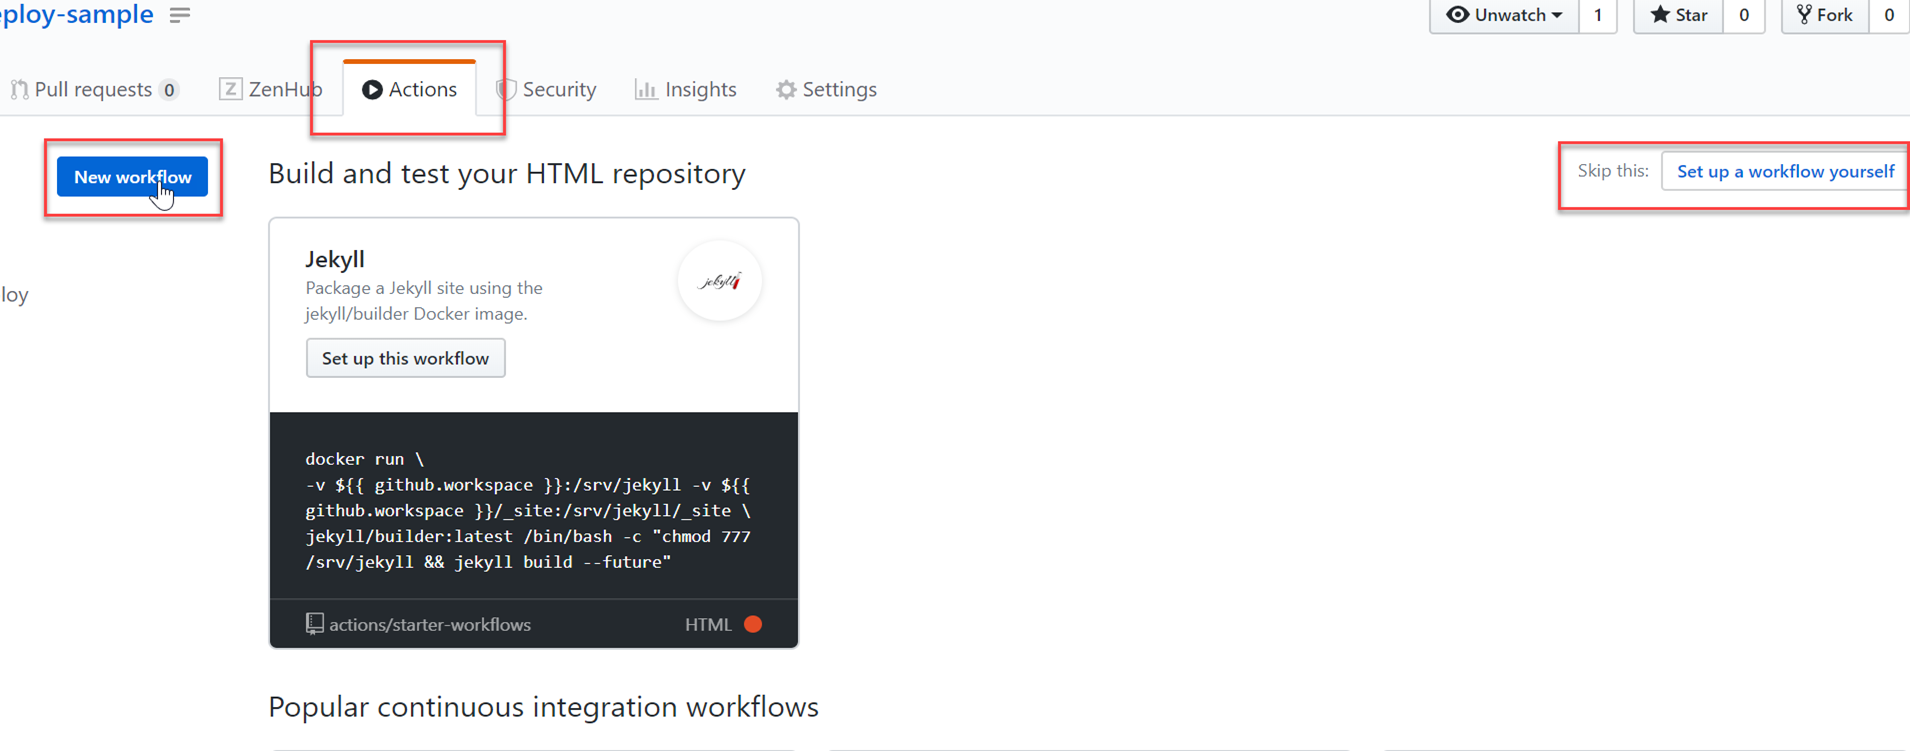
Today, Visual Studio isn’t too helpful in authoring the YAML files (would love your feedback here too!) but a GitHub Action is just a YAML file in a specific location in your repository: .github/workflows/azure-storage-deploy.yaml. The file name can be anything but putting it in this folder structure is what is required. You can start in the GitHub repo itself using the Actions tab and through the online editor get some level of completion assistance to help you navigate the YAML editing. Go to the Actions tab in your repository and create a new workflow. You’ll be offered a starter workflow based on what GitHub thinks your project is like. As of this writing it thinks Blazor apps are Jekyll workflows so you’ll need to expand and either find the .NET Core one or just start from a blank workflow yourself.

Four my workflow I want to build, publish and deploy my app. I’ve separated it into a build and deploy jobs. You can read all about the various aspects of GitHub Actions in their docs with regard to jobs and other syntax as I won’t try to expound upon that in this article. Here is my full YAML for the entire workflow with some key areas highlighted:
name: .NET Core Build and Deploy

on: [push]

env:
  AZURE_RESOURCE_GROUP: blazor-deployment-samples
  BLOB_STORAGE_ACCOUNT_NAME: timheuerblazorwasm

jobs:
  build:
    name: Build
    runs-on: ubuntu-latest
    steps:
    - uses: actions/checkout@v1
    - name: Setup .NET Core
      uses: actions/setup-dotnet@v1
      with:
        dotnet-version: 3.1.100

    - name: Build with dotnet
      run: dotnet build --configuration Release

    - name: Publish with dotnet
      run: dotnet publish --configuration Release

    - name: Publish artifacts
      uses: actions/upload-artifact@master
      with:
        name: webapp
        path: bin/Release/netstandard2.1/publish/BlazorApp27/dist

  deploy:
    needs: build
    name: Deploy
    runs-on: ubuntu-latest
    steps:

    # Download artifacts
    - name: Download artifacts
      uses: actions/download-artifact@master
      with:
        name: webapp

    # Authentication
    - name: Authenticate with Azure
      uses: azure/login@v1
      with:
        creds: ${{ secrets.AZURE_CREDENTIALS  }}

    # Deploy to storage using CLI
    - name: Deploy to storage using CLI
      uses: azure/CLI@v1
      with:
        azcliversion: latest
        inlineScript: |
          # show azure account being used
          az account show
          # az storage account upload
          az storage blob upload-batch --account-name ${{ env.BLOB_STORAGE_ACCOUNT_NAME }} -s webapp -d \$web
          # az set content type of wasm file until this is fixed by default from Azure Storage
          az storage blob update --account-name ${{ env.BLOB_STORAGE_ACCOUNT_NAME }} -c \$web -n _framework/wasm/mono.wasm --content-type application/wasm
So a few things going on here, let’s talk about them.
- Lines 5-7: these are ‘local’ environment variables I set up. The storage account name is NOT the blob container name but the actual storage account name. This ideally probably should be a Secret as mentioned above. Environment variables can be set here and then placeholders reference them later.
- Starting at line 9 is where the ‘build’ portion is here. We checkout the code, acquire the SDK and run the build and publish commands. On line 26-30 is a step where we put the publish output to a specific artifact location for later retrieval of steps. This is good practice.
- Lines 40-42 is where we are now in the ‘deploy’ step of our CD and we retrieve those artifacts we previously pushed and we set them as a name ‘webapp’ that the later will use in deployment
- Line 45 is where we are going to first authenticate to Azure using our service principal retrieved from the Secrets. The ‘secrets’ object is not something you have to define and is part of the workflow so you just add the property you want to retrieve
- Line 51 is where we start the deployment to Azure using the CLI commands and our param ‘webapp’ as the source. This is the CLI command for uploading batch to storage as described in the docs for `az storage blob upload-batch`
- Line 61 is an additional step that we need for .wasm files. I believe this to be a bug because there is logic in the CLI to correctly map the content-type but for some reason it is not working…so for now you need to set the content-type for .wasm to `application/wasm` or the Blazor app will not work
This is made possible through a series of actions: checkout, dotnetcore, azure…all brining their functionality we can draw on and configure. There are a bunch of Azure GitHub Actions we just released for specific tasks like deploying to App Service and such. These don’t require CLI commands but rather just provide parameters to configure. Because there is no Storage specific Action as of now, we can use the default CLI action to script what we want. It is an enabler in lieu of a more strongly-typed action. Now that we have this workflow YAML file complete we can commit and push to the repository. In doing that we now have a CI/CD action that will trigger on any push (because that’s how we configured it). We can see this action happening in my sample repo and you can see since we separate it in two jobs it will show them separately:

Summary
So now we have it complete end-to-end. And subsequent check-in will trigger the workflow and deploy the bits to my storage account and I can now use my Azure Storage account as a host for my static website built on Blazor WASM. This full YAML sample flow is available on my repo for this and you can examine it in more detail.
I would love to know how y’all are coming along using GitHub Actions with your .NET projects. Please comment below!
Please enjoy some of these other recent posts...