Different ways to host Blazor WebAssembly (Wasm)
Everyone! As a part of my responsibilities on the Visual Studio team for .NET tools I try to spend the time using our products in various different ways, learning what pitfalls customers may face and ways to solve them. I work a lot with Azure services and how to deploy apps and I’m a fan of GitHub Actions so I thought I’d share some of my latest experiments. This post will outline the various ways as of this writing you can host Blazor WebAssembly (Wasm) applications. We actually have some great documentation on this topic in the Standalone Deployment section of our docs but I wanted to take it a bit further and demonstrate the GitHub Actions deployment of those options to Azure using the Azure GitHub Actions.
Let’s get started!
If you don’t know what Blazor Wasm is then you should read a bit about What is Blazor on our docs. Blazor Wasm enables you to write your web application front-end using C# with .NET running in the browser. This is different than previous models that enabled you to write C# in the browser like Silverlight where a separate plug-in was required to enable this. With modern web standards and browser, WebAssembly has emerged as a standard to enable compilation of high-level languages for web deployment via browsers. Blazor enables you to use C# and create your web app from front-end to back-end using a single language and .NET. It’s great. When you create a Blazor Wasm project and publish the output you are essentially creating a static site with assets that can be deployed to various places as there is no hard server requirement (other than to be able to serve the content and mime types). Let’s explore these options…
ASP.NET Core-hosted
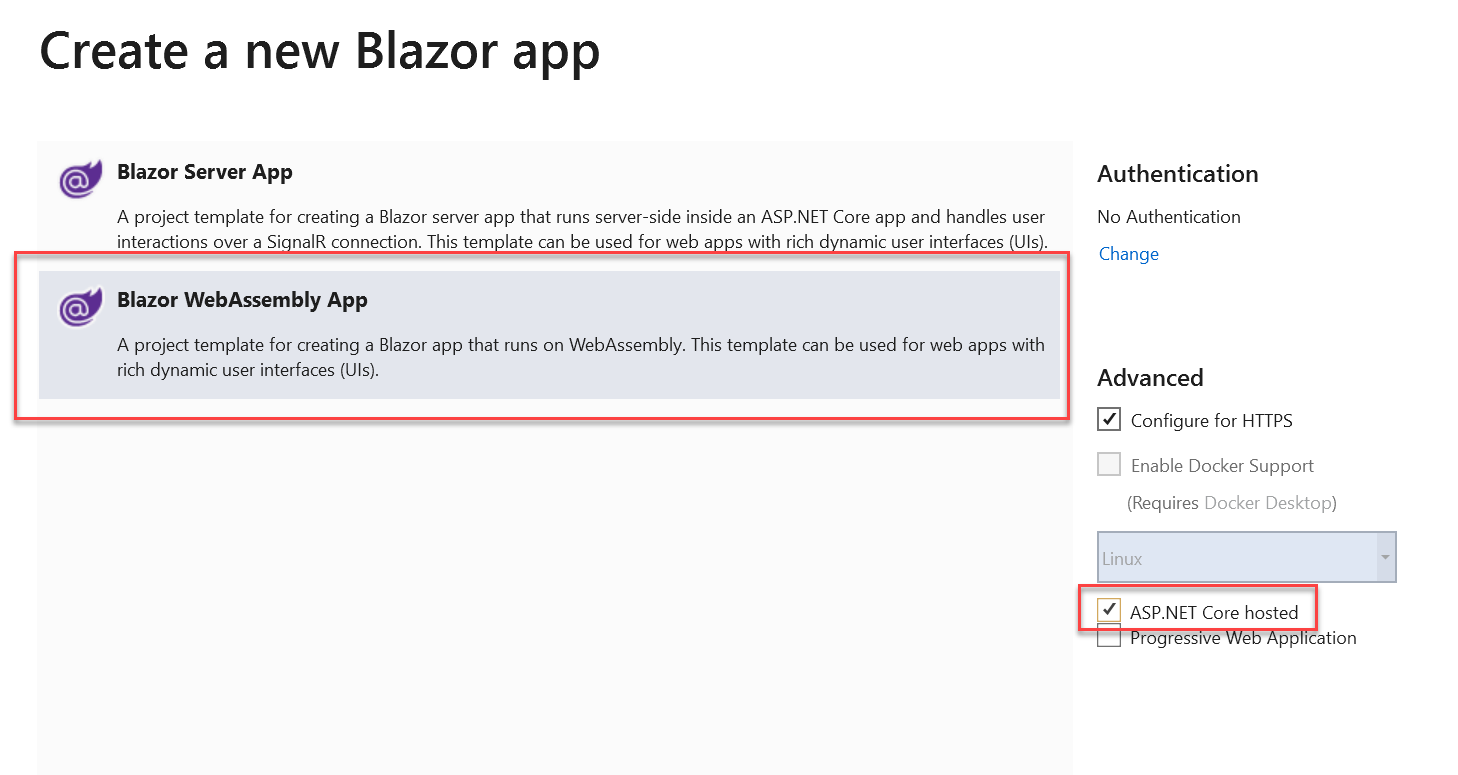
For sure the simplest way to host Blazor Wasm would be to also use ASP.NET Core web app to serve it. ASP.NET Core is cross-platform and can run pretty much anywhere. If you are likely using C# for all your development, this is likely the scenario you’d be using anyway and you can deploy your web app, which would container your Blazor Wasm assets as well to the same location (Linux, Windows, containers). When creating a Blazor Wasm site you can choose this option in Visual Studio by selecting these options:

or using the dotnet CLI using this method:
dotnet new blazorwasm --hosted -o YourProjectName
Both of these create a solution with a Blazor Wasm client app, ASP.NET Core Server app, and a shared (optional) library project for sharing code between the two (like models or things like that). This is an awesome option and your deployment method would follow the same method of deploying the ASP.NET Core app you’d already be using. I won’t focus on that here as it isn’t particularly unique. One advantage of using this method is ASP.NET Core already has middleware to properly serve the pre-compressed Brotli/gzip formats of your Blazor Wasm assets from the server, reducing the payload across the wire. You’ll see more of this in below options, but using ASP.NET Core does this automatically for you. You can deploy your app to Azure App Service or really anywhere else easily.
Benefits:
- You’re deploying a ‘solution’ of your full app in one place, using the same tech to host the front/back end code
- ASP.NET Core enables a set of middleware for you for Blazor routing and compression
Be Aware:
- Basically billing. Know that you would most likely host in an App Service or non-serverless (consumption) model. It’s not a negative, just an awareness.
Azure Storage
If you just have the Blazor Wasm site and are calling in to a set of web APIs, serverless functions, or whatever and you just want to host the Wasm app only then using Storage is an option. I actually already wrote about this previously in this blog post Deploy a Blazor Wasm Site to Azure Storage Using GitHub Actions so I won’t repeat it here…go over there and read that detail.
Example GitHub Action Deployment to Azure Storage: azure-deploy-storage.yml
Benefits:
- Consumption-based billing for storage. You aren’t paying for ‘on all the time’ compute
- Blob-storage managed (many different tools to see the content)
Be Aware:
- Routing: errors will need to be routed to index.html as well and even though they will be ‘successful’ routes, it will still be an HTTP 404 response code. This could be mitigated by adding Azure CDN in front of your storage and using more granular rewrite rules (but this is also an additional service)
- Pre-compressed assets won’t be served as there is no middleware/server to automatically detect and serve these files. Your app will be larger than it could be if serving the compressed brotli/gzip assets.
Azure App Service (Windows)
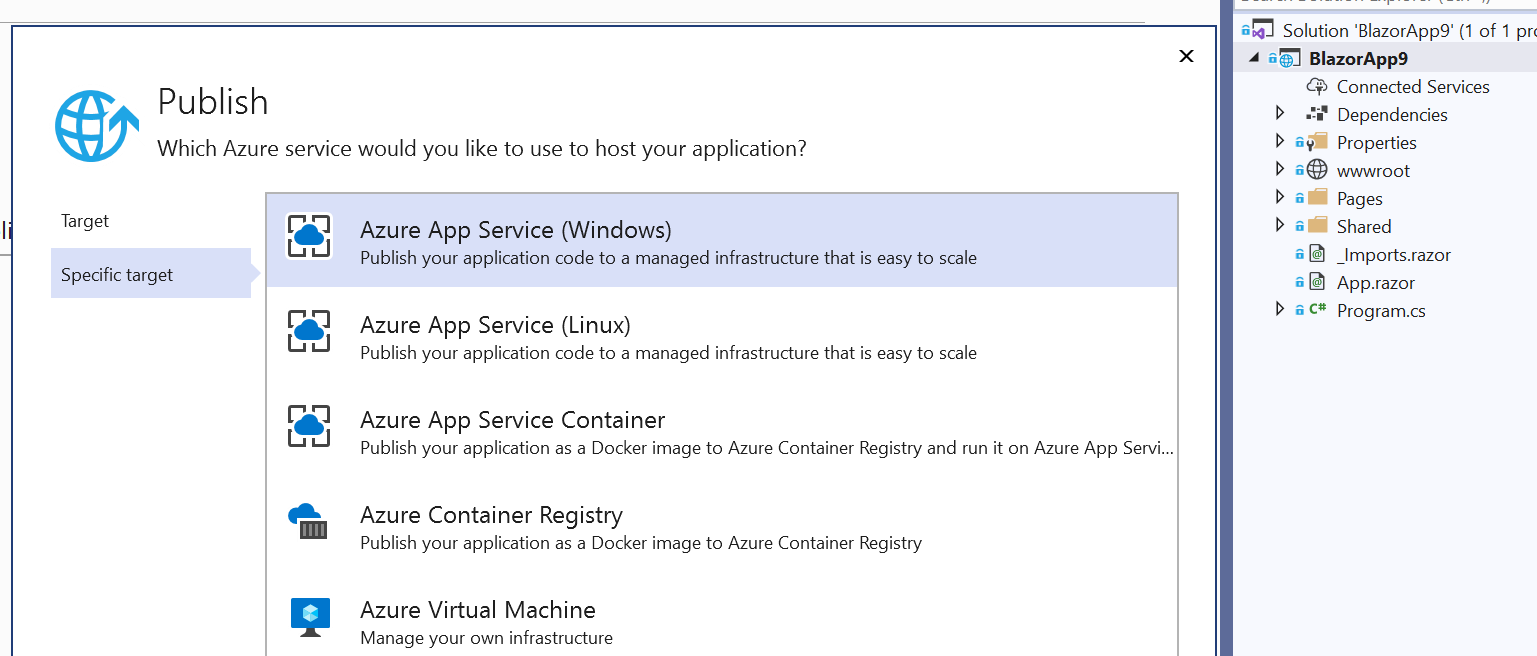
You can directly publish your Blazor Wasm client app to Azure App Service for Windows. When you publish a Blazor Wasm app, we provide a little web.config in the published output (unless you supply your own) and this contains some rewrite information for routing to index.html. Since App Service for Windows uses IIS when you publish this output this web.config is used and will help your app routing. You can also publish from Visual Studio using this method as well:
or using GitHub Actions easily using the Azure Actions. Without the ASP.NET Core host you will want to provide IIS with better hinting on the pre-compressed files as well. This is documented in our Brotli and Gzip documentation section and a sample web.config is also provided in this sample repo. This web.config in the root of your project (not in the wwwroot) will be used during publish instead of the pre-configured one we would provide if there was none.
Example GitHub Action Deployment to Azure App Service for Windows: azure-app-svc-windows-deploy.yml
Benefits:
- Easy deployment and default routing configuration provided in published output
- Managed PaaS
- Publish easily from Actions or Visual Studio
Be Aware:
- Really just understanding your billing choices for the App Service
Azure App Service (Linux w/Containers)
If you like containers, you can put your Blazor Wasm app in a container and deploy that where supported, including Azure App Service Containers! This enables you to encapsulate a little bit more in your own container image and also control the configuration of the server a bit more. For Linux, you’d be able to specify a specific OS image you want to host your app and even supply the configuration of that server. This is nice because we need to do a bit of that for some routing rules for the Wasm app. Here is an example of a Docker file that can be used to host a Blazor Wasm app:
FROM mcr.microsoft.com/dotnet/core/sdk:3.1 AS build-env
WORKDIR /app

COPY . ./
WORKDIR /app/
RUN dotnet publish -c Release

FROM nginx:1.18.0 AS build
WORKDIR /src
RUN apt-get update && apt-get install -y git wget build-essential libssl-dev libpcre3-dev zlib1g-dev
RUN CONFARGS=$(nginx -V 2>&1 | sed -n -e 's/^.*arguments: //p') \
    git clone https://github.com/google/ngx_brotli.git && \
    cd ngx_brotli && git submodule update --init && cd .. && \
    wget -nv http://nginx.org/download/nginx-1.18.0.tar.gz -O - | tar -xz && \
    cd nginx-1.18.0 && \
    ./configure --with-compat $CONFARGS --add-dynamic-module=../ngx_brotli

WORKDIR nginx-1.18.0
RUN    make modules

FROM nginx:1.18.0 as final

COPY --from=build /src/nginx-1.18.0/objs/ngx_http_brotli_filter_module.so /usr/lib/nginx/modules/
COPY --from=build /src/nginx-1.18.0/objs/ngx_http_brotli_static_module.so /usr/lib/nginx/modules/

WORKDIR /var/www/web
COPY --from=build-env /app/bin/Release/netstandard2.1/publish/wwwroot .
COPY nginx.conf /etc/nginx/nginx.conf
EXPOSE 80 443
In this configuration we’re using an image to first build/publish our Blazor Wasm app, then using the nginx:1.18.0 image as our base and building the nginx_brotli compression modules we want to use (lines 8-19,23-24). We want to supply some configuration information to the nginx server and we supply an nginx.conf file that looks like this:
load_module modules/ngx_http_brotli_filter_module.so;
load_module modules/ngx_http_brotli_static_module.so;
events { }
http {
    include mime.types;
    types {
        application/wasm wasm;
    }
    server {
        listen 80;
        index index.html;

        location / {
            root /var/www/web;
            try_files $uri $uri/ /index.html =404;
        }

        brotli_static on;
        brotli_types text/plain text/css application/javascript application/x-javascript text/xml application/xml application/xml+rss text/javascript image/x-icon image/vnd.microsoft.icon image/bmp image/svg+xml application/octet-stream application/wasm;
        gzip on;
        gzip_types      text/plain application/xml application/x-msdownload application/json application/wasm application/octet-stream;
        gzip_proxied    no-cache no-store private expired auth;
        gzip_min_length 1000;

    }
}
Now when we deploy the Docker image is composed, provided to Azure Container Registry and then deployed to App Service for us. In the above example, the first two lines are loading the modules we build in the Docker image previously.
Example GitHub Action Deployment to Azure App Service using Linux Container: azure-app-svc-linux-container.yml
Benefits:
- Containers are highly customizable, allowing you some portability and flexibility
- Easy deployment from Actions and Visual Studio (you can use the same publish mechanism in VS)
Be Aware
- Additional service here of using Azure Container Registry (or another registry to pull from)
- Understanding your billing plan for App Service
- Might need more configuration awareness to take advantage of pre-compressed assets (by default nginx requires an additional module for brotli and you’d have to rebuild it into nginx)
- NOTE: The example repo has a sample configuration which adds brotli compression support for nginx
Azure App Service (Linux)
Similarly to App Service for Windows you could also just use App Service for Linux to deploy your Wasm app. However there is a big known workaround you have to achieve right now in order to enable this method. Primarily this is because there is no default configuration or ability to use the web.config like you can for Windows. Because of this if you use the Visual Studio publish mechanism it will appear as if the publish fails. Once completed and you navigate to your app you’d get a screen that looks like the default “Welcome to App Service” page if no content is there. This is a bit of a false positive :-). Your content/app DOES get published using this mechanism, but since we pus the publish folder the App Service Linux configuration doesn’t have the right rewrite defaults to navigate to index.html. Because of this I’d recommend if Linux is your desired host, that you use containers to achieve this. However you CAN do this using GitHub Actions as you manipulate the content to push.
Example GitHub Action Deployment to Azure App Service Linux: azure-app-svc-linux-deploy.yml
Benefits:
- Managed PaaS
Be Aware:
- Cannot publish ideally from Visual Studio
- No pre-compressed assets will be served
- Understand your billing plan for App Service
Summary
Just like you have options with SPA frameworks or other static sites, for a Blazor Wasm client you have similar options as well. The unique aspects of pre-compressed assets provide some additional config you should be aware of if you aren’t using ASP.NET Core hosted solutions, but with a small bit of effort you can get it working fine.
All of the samples I have listed here are provided in this repository: timheuer/blazor-deploy-samples and would love to see any issues you may find. I hope this helps summarize the documentation we have on configuring options in Azure to support Blazor Wasm. What other tips might you have?
Stay tuned for more!
Please enjoy some of these other recent posts...
