Thanks for all the feedback on the TechEd North America DVD issues with viewing the content once Silverlight 2 released.  In trying to do a good job providing a good user experience to viewing the content easily, the TechEd team created a Silverlight 2 Beta 2 player for the TechEd Online site as well as the offline DVD content.

Obviously, when Silverlight 2 released and people installed the final version on their machines, the DVD Silverlight player stopped working and presented you with an “Install Silverlight” badge.  This was, of course, due to the use of Beta 2.  This doesn’t render the DVD set useless as the content is still there, but you just aren’t able to use the Silverlight player from the DVD.

The team has updated the player in the online version of the content already.  Unfortunately you can’t service burned DVDs (aside from burning new sets and sending them to the thousands of people, which isn’t efficient, cost effective or environmentally friendly), but we can help you understand the maze of content folders.  We’ve finalized the document that maps out where the content files are as well as providing you with a “content map” of the codes to the session descriptions and the speakers who delivered the sessions.  This list was made based on your feedback and the team tried to include as much information as they could to make it easy to discover.  You can download a PDF copy of this content map here: TechEd 2008 North America DVD content map.

I’ve also taken the liberty to make a quick Silverlight application to help you do some quick filtering of the data.  It’s uploaded into Silverlight Streaming so you can embed it into your site or as well into your Intranet if your employees or others in your organization are needing to navigate the DVD set as well.  You can select which conference (Developer or IT) and also type some filter in there that will search the speaker/title and filter it down.

In hindsight, choosing to burn a copy of a Beta 2 application to a distributable disc was not a good idea.  We admit that and apologize.  Hopefully you can see that the content is the king here and that is not lost or unusable.  Thanks for your patience while we created the content map based on your feedback!
My friend Gilbert Corrales has been working for a company called ArtinSoft who has a product Aggiorno.  They describe Aggiorno as:

Aggiorno is an automated HTML, XHTML, ASP.NET, PHP… expert that transforms Web site code into fully accessible, Web standards compliant, fast-loading dynamos. A few clicks will analyze your pages and perform any number of time-saving code Transformations that will improve the quality and reach of your Web sites. The best part? You don’t have to be a rocket scientist to use it. (source: http://aggiorno.com)

I’ve been messing around with it for a bit playing with the rules (which they call Aggiornings).  While at PDC a few others from the team were there showing what they can provide for IE8 developers.  I took the opportunity to give feedback on my experience to Gilbert and his team.  Hopefully some of my suggestions can be looked at to add even more value.  For now, two features helped me greatly.

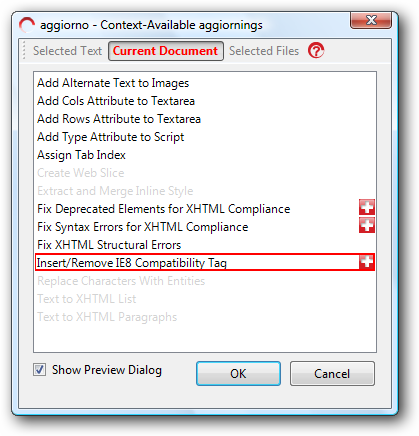
Aggiorno is provided as a stand-alone application or as a Visual Studio add-in.  I’m using the latter.  While in my web project I can load up the Aggiorno add-in and see what options are available to me…here’s what I see on my particular instance of a standard HTML page:

Notice how they have a simple rule to help you add the IE8 meta tag based on your needs to your content.  I used the XHTML rules and was surprised that my site passed most of them :-).  It provides a really good “diff” report of your content as it applies to the XHTML standards and how you can change certain things.

The next thing I wanted to do was to enable an IE Web Slice for my site for the most recent post.  Using the tool I selected the block that represented the first post and fired up Aggiorno:

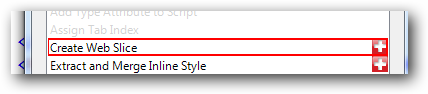
I used the Create Web Slice option which generated the markup I needed to add to my site.  It was quick.  Sure the markup itself is relatively easy from IE8, but this makes it easier and you don’t have to think.  Two clicks and I have a web slice – no typing :-).  Check it out if you are viewing my site in IE8, you should be able to either hover over the first post or notice the Web Slice icon light up on the toolbar of IE8 as well.  Adding it will add my site as a slice and when a new post comes in, it will alert you subtly (changes to bold).  You see a partial post (slice) and can click through to the main page.  I’m liking this feature of IE8 and hope to see more sites do this.

The web slice feature was one where I gave some feedback to the Aggiorno team in addition to enhanced support for sites that use templates (like blog engines).  Their team “gets it” which is good and they have some smart folks on the team.

Anyway, it was good to see Gilbert again at PDC and get a chance to work more with the product hands-on.  Check it out and view some quick start information on their site.

Apparently “soon” means “the next day” to the Encoder team :-).  On 28 OCT James Clarke told us all about the goodness that is coming to Encoder SP1 and noted it would be available “real soon.” Little did we know he had already clicked the publish process to the download servers. 

What are you waiting for, go start the download for Encoder SP1 and I’ll share my thoughts on some things here.

What’s in it?  I’ll pick my favorites: New Silverlight output templates, H.264/AAC support and IIS7 smooth streaming support.

H.264/AAC Device Encoding Support

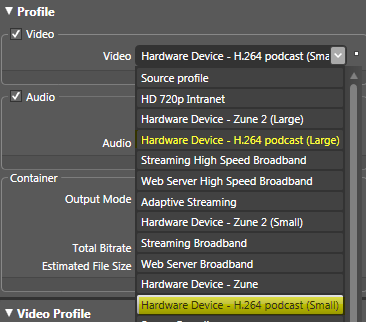
SP1 brings the promise made earlier of supporting encoding profiles for H.264 and AAC.  For now we’re supporting two device profiles: 320x240 for smaller flash-based devices and 640x480 for larger displays (output container is single MP4).  As previously note, Silverlight will continue to evolve the codec support in the runtime and you should expect to see broadening support in Encoder for that as well.

I think this is a nice added value to a “service pack” for Encoder (I like how service packs are starting to introduce new features in some of our products).  Hopefully you can integrate this into your encoding workflow as well as one of your outputs.

New Silverlight 2 Output Templates

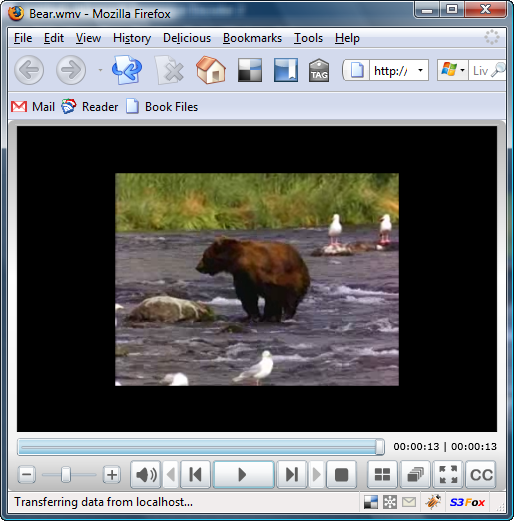
I personally know that this has been a desire of James and the team for a long time.  One of the things the team wanted to do was provide Silverlight 2 templates but also create a base that people can extend to their specific needs.  Here’s the new “Silverlight 2 Default” template:

It exhibits all the core features you’d expect in a media player base as well as things like closed captioning support and playlist support if needed.  As you can see the UI is also base.  The great thing is that the source for these templates is also provided.  The templates get dumped in the same location as the previous and in each new Silverlight 2 template you’ll also see a folder called “Source” that contains the source for that particular template.  If you look at the ExpressionPlayer folder in these templates you’ll see some of the base functionality that you may extend for your needs.

There are 6 new Silverlight 2 templates in all, with 2 audio-only ones for your podcast embedding in your blog and such.  The new output options provides a listing of the templates in the template directory separated by Silverlight 1 and 2 versions so you can quickly see them grouped by Silverlight version.  The preview window is still there and will provide you a preview of the template regardless of which version you select.  The advantage of using the Silverlight 2 templates is that you can quickly use the <object> instantiation methods and there is no dependent Javascript files associated.  The output of a typical encoding is: your media, default.html host page, and the XAP.  So if you want to swap out a different media player XAP based on an Encoder template, it is a cut/paste operation.  Take a look at the default.html page generated to see some of the initParam usage to drive the initialization of the media.

IIS7 Smooth Streaming Support

Additional support has been added to provide container output support for IIS7 smooth streaming, which provides a container for each bitrate to enable that adaptive streaming affect in delivering your media.  An example of this can be seen at the new SmoothHD.com site, which is using IIS7 smooth streaming and a delivery network provided by Akamai.  It’s some great video on good bandwidth, and even on non-high bandwidth you can see it scale quality as needed.

There are some additional enhancements that come with Encoder SP1 for your media so beyond these two features I’m highlighting here, you should definitely download the Encoder SP1 and take advantage of the features.  Hat tip to James and the Encoder team for this service pack and providing us improvements as well as new features!  Check out their team blog for a detailed post on all the new SP1 features.

UPDATED: See last paragraph about offline installation.

Sorry for the short post, this is more of a public service announcement.  When the Silverlight 2 runtime shipped, we shipped the Visual Studio tools along with it.  The tools download was labeled “RC1” and caused some confusion.  There were some reasons for this, but regardless it still targeted the Silverlight 2 release runtime.

Today we released the RTW (Releast To Web for those who are wondering what that means) of the tools.  There is no need to re-download the runtime or anything.  All you need to do is download the RTW bits, and run the installer, then be happy.

So go now and get the official RTW of Silverlight Tools.  Uninstall the previous version in your Control Panel (Add/Remove Programs) before installing this build.

There have been a few comments about installing the Silverlight Tools in either and “offline” mode (not connected to the Internet) or in environments with proxy servers, etc.  Let me try to explain some steps.  The first step in the tools installer is always to download the latest developer runtime for Silverlight.  This requires an Internet connection.  In environments where you might be behind a proxy we’ve seem this step fail as well.  To perform an installation of the tools in either of these situation, you can follow the steps I outlined in a previous post on Silverlight offline installation.  Even though the post is labeled RC0, the steps still apply.  This will help you install the tools.  Even if you already have the developer runtime installed, the tools installer will still attempt to download to ensure the latest is always downloaded.  I hope this helps!

Today at Microsoft PDC, Scott Guthrie demonstrated some of the new controls that have been provided as a part of the Silverlight Toolkit

The Silverlight Toolkit was what was previously named the Silverlight Control Pack in the press release when the runtime was released. 

This toolkit provides a set of controls and themes for Silverlight 2.  In this initial release, they are:

    • AutoCompleteBox
    • Chart
    • DockPanel
    • Label
    • Expander
    • TreeView
    • UpDown
    • ViewBox
    • WrapPanel
    • ImplicitStyleManager
    • Themes (6): ExpressionDark/Light, RanierOrange/Purple, ShinyBlue/Red

These controls are released as an initial version, with tests and available with Ms-Pl licensing on Codeplex.  Of particular interest to me is the Charting components.  Typically available at cost with other platforms, the Silverlight team is providing a base set of Charting controls with source for you to implement, customize and ship with your products.  What is great about this type of control is an implementation with data binding as well, especially with an ObservableCollection.  With this combination you can have a powerful real-time experience updating information without having to re-paint the entire chart or do any postbacks for the app as well.

Let’s take a quick simple sample of what I’m talking about.  To use any of the controls in the toolkit, simply add a reference to the assembly in your project and then use the xmlns declaration at the root of your implementation.  I’m going to use “toolkit” as mine like this:

   1: xmlns:chart="clr-namespace:Microsoft.Windows.Controls.DataVisualization.Charting;assembly=Microsoft.Windows.Controls.DataVisualization"

Then we can use the chart in our XAML along with some other code.  Here I have a Slider and a TextBlock as well showing the value of the Slider as you change it.  I’ve also added the chart series and provided some data binding syntax for the series data:

   1: <UserControl
   2:     xmlns="http://schemas.microsoft.com/winfx/2006/xaml/presentation"
   3:     xmlns:x="http://schemas.microsoft.com/winfx/2006/xaml"
   4:     x:Class="SLToolkitDemo.Page"
   5:     xmlns:chart="clr-namespace:Microsoft.Windows.Controls.DataVisualization.Charting;assembly=Microsoft.Windows.Controls.DataVisualization"
   6:     Width="800" Height="600">
   7:     <Grid x:Name="LayoutRoot" Background="White">
   8:         
   9:         <StackPanel Orientation="Vertical" Margin="15">
  10:             <TextBlock Text="Change Line Value"/>
  11:             <Slider x:Name="LineValueSlider" Value="12" Maximum="150" Minimum="0" />
  12:             <TextBlock x:Name="SliderValue" />
  13:             <chart:Chart Height="200" LegendTitle="Item" Title="My Simple Data-bound Chart" 
  14:                          x:Name="MyBarChart">
  15:                 <chart:Chart.Series>
  16:                     <chart:ColumnSeries x:Name="MySalesChartData" Title="Sales of Charts" 
  17:                                         ItemsSource="{Binding}"
  18:                          IndependentValueBinding="{Binding ChartType}"
  19:                          DependentValueBinding="{Binding ChartSaleCount}"/>
  20:                 </chart:Chart.Series>
  21:             </chart:Chart>
  22:             <chart:Chart Height="200" Title="My Simple Pie Chart" x:Name="MyPieChart">
  23:                 <chart:Chart.Series>
  24:                     <chart:PieSeries ItemsSource="{Binding}" 
  25:                                      IndependentValueBinding="{Binding ChartType}"
  26:                                      DependentValueBinding="{Binding ChartSaleCount}" />
  27:                 </chart:Chart.Series>
  28:             </chart:Chart>
  29:         </StackPanel>
  30:         
  31:     </Grid>
  32: </UserControl>

Now in my code I’ve hacked together some simulation of the ObservableCollection changing the value of the Line data to the value of the slider.  Because I implemented my class of Sale with INotifyPropertyChanged the default databinding of OneWay enables my target to be updated once any of my source (salesData) changes.  Here’s the full code:

   1: using System;
   2: using System.Windows;
   3: using System.Windows.Controls;
   4: using System.Windows.Documents;
   5: using System.Windows.Ink;
   6: using System.Windows.Input;
   7: using System.Windows.Media;
   8: using System.Windows.Media.Animation;
   9: using System.Windows.Shapes;
  10: using System.Collections.ObjectModel;
  11: using Microsoft.Windows.Controls.DataVisualization.Charting;
  12:  
  13: namespace SLToolkitDemo
  14: {
  15:     public partial class Page : UserControl
  16:     {
  17:         ObservableCollection<Sale> salesData;
  18:  
  19:         public Page()
  20:         {
  21:             // Required to initialize variables
  22:             InitializeComponent();
  23:             salesData = SalesData.GetData();
  24:             Loaded += new RoutedEventHandler(Page_Loaded);
  25:         }
  26:  
  27:         void Page_Loaded(object sender, RoutedEventArgs e)
  28:         {
  29:             ColumnSeries column = MyBarChart.Series[0] as ColumnSeries;
  30:             PieSeries pie = MyPieChart.Series[0] as PieSeries;
  31:             column.ItemsSource = salesData;
  32:             pie.ItemsSource = salesData;
  33:             LineValueSlider.ValueChanged += new RoutedPropertyChangedEventHandler<double>(LineValueSlider_ValueChanged);
  34:         }
  35:  
  36:         void LineValueSlider_ValueChanged(object sender, RoutedPropertyChangedEventArgs<double> e)
  37:         {
  38:             salesData[2].ChartSaleCount = Convert.ToInt32(e.NewValue);
  39:             SliderValue.Text = e.NewValue.ToString();
  40:         }
  41:     }
  42: }

And here is the SalesData.cs class:

   1: using System;
   2: using System.Net;
   3: using System.Windows;
   4: using System.Windows.Controls;
   5: using System.Windows.Documents;
   6: using System.Windows.Ink;
   7: using System.Windows.Input;
   8: using System.Windows.Media;
   9: using System.Windows.Media.Animation;
  10: using System.Windows.Shapes;
  11: using System.Collections.ObjectModel;
  12: using System.Collections.Generic;
  13: using System.ComponentModel;
  14:  
  15: namespace SLToolkitDemo
  16: {
  17:     public class SalesData
  18:     {
  19:         public static ObservableCollection<Sale> GetData()
  20:         {
  21:             ObservableCollection<Sale> sales = new ObservableCollection<Sale>();
  22:             
  23:             sales.Add(new Sale() { ChartSaleCount = 100, ChartType = "Bar" });
  24:             sales.Add(new Sale() { ChartSaleCount = 73, ChartType = "Pie" });
  25:             sales.Add(new Sale() { ChartSaleCount = 12, ChartType = "Line" });
  26:             sales.Add(new Sale() { ChartSaleCount = 24, ChartType = "Spline" });
  27:  
  28:             return sales;
  29:         }
  30:     }
  31:  
  32:     public class Sale : INotifyPropertyChanged
  33:     {
  34:         private int _count;
  35:         public string ChartType { get; set; }
  36:         public int ChartSaleCount
  37:         {
  38:             get { return _count; }
  39:             set
  40:             {
  41:                 _count = value;
  42:                 NotifyPropertyChanged("ChartSaleCount");
  43:             }
  44:         }
  45:  
  46:         #region INotifyPropertyChanged Members
  47:  
  48:         public event PropertyChangedEventHandler PropertyChanged;
  49:  
  50:         public void NotifyPropertyChanged(string propertyName)
  51:         {
  52:             if (PropertyChanged != null)
  53:             {
  54:                 PropertyChanged(this, new PropertyChangedEventArgs(propertyName));
  55:             }
  56:         }
  57:         #endregion
  58:     }
  59: }

The result of which is when I move the slider to perhaps simulate real-time data, I see the data binding change in the chart represented here:

As you can see I have two charts using the same ObservableCollection<T>, so changing the data, changes both of the charts without any extra effort. 

Charting along with some of the other controls brings this really, really nice addition to Silverlight 2.  I hope you find them valuable.  We’ll be using them in projects and digging deeper (especially in charting) on the Silverlight Community Site, so I hope you visit there.  You can download the actual sample project for this file as well right here: SLToolkitDemo.zip

If you liked this post, please consider subscribing to the feed for more like it.  Justin Angel is also a program manager for the toolkit that you should check out some depth posts from him on the controls as well.  You can visit the samples site here showing you a gallery of the controls in implementation.