Amazon just released into public beta their EC2 features of enabling Windows instances.  I’m a fan of Amazon’s services and the route they’ve been taking.  I use S3 a lot, even only if as a file storage for now.  I’ve written a plugin for Live Writer so that S3 is basically my repository for everything non-text on this site and others.  Of course, if S3 goes down (like it did hard a while back) I’m screwed.  Maybe something like Reserve Chute will help me in the future.

I’ve not messed with the EC2 side of their offering only because I didn’t have a need, quite frankly.  I’ve played around with the awesomeness that is Jumpbox and how easy you can get a Jumpbox appliance running and with EC2.  But that’s been just messing around.  After all, I’m a Windows guy in my comfort zone, so that’s where I prefer to stay.

Today I fired up my EC2 information, had Elasticfox installed and started to check out the Windows on Amazon stuff.  I see a lot of people will use Elasticfox as it is easy to use.  One thing I think Amazon needs to do, is provide more intuitive image naming for their manifests.  Here’s a screenshot of how “geeky” they are:
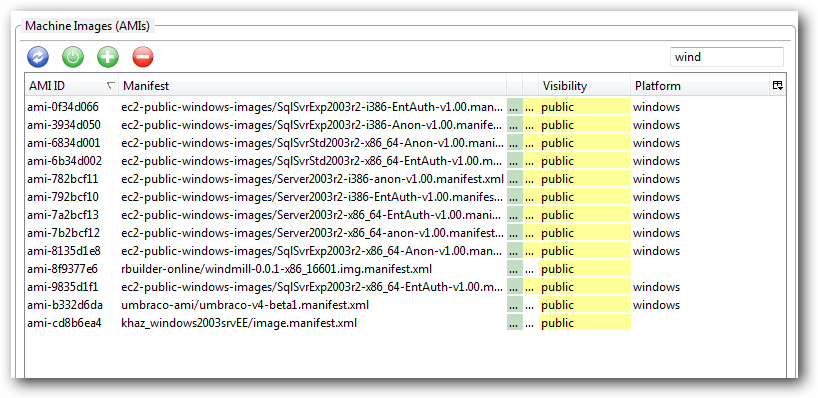
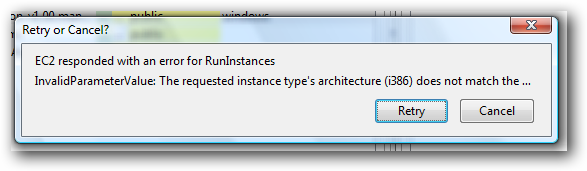
You could decipher them of course, but they should just use their “friendly” names as well for ease of finding them.  One thing I did notice is that when I tried to run a 64-bit instance (which I assume will be named x86_64 – which is odd that it is named x86 and 64) I get a weird error message that I can’t see the rest of:
Oh well, I moved on with the x86 configuration with SQL Server Express (2005 version). 

NOTE: Right now they only have Windows Server 2003 r2 and SQL Server 2005 versions, no 2008 versions of either.

I struggled a bit with getting the right sequence going, so here’s what I did in hopes of helping others.  Twitter came in handy so thanks for those who pointed me in the right direction.  I did all of these FIRST before starting an instance.

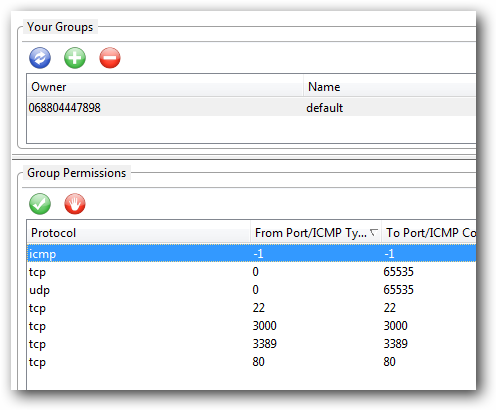
First, having an instance running is fine, but generally you actually want to configure stuff with it!  Windows users/developers know and love Remote Desktop Connection…which is available on Windows Server.  Obviously you’d initially want to use that to configure your box in EC2.  Step 1, however, is to ensure that your security group enables the port traffic on TCP/3389.  Elasticfox makes this easy, by going to the Security Groups tab and either modifying the default group or setting a specific one for your instance:
Once that is done, I created a KeyPair (again, using Elastifox).  You simply create the KeyPair using the KeyPair tab and giving it a name.  It will prompt you to save the .pem certificate file somewhere on your machine.  Ensure you keep that handy – you will need it.

Once that is done I located the instance I wanted to fire up and chose to create a new instance.  One important step is to ensure you select the KeyPair correctly before the instance starts spinning up:
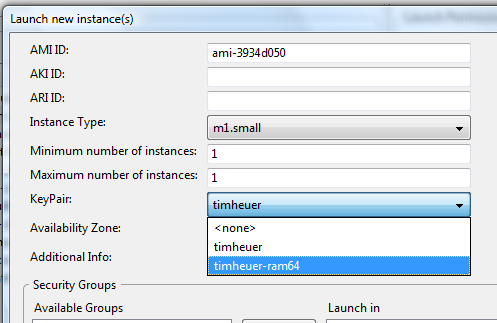
After that, I waited until Elasticfox told me that my instance was running.  Even though it indicated “running” I couldn’t connect to it right away.  My test showed that about 5-7 minutes after it turned into “running” mode that I could attempt to connect.

The first time you either attempt to connect or attempt to get the Administrator password, you’ll be prompted for that .pem file for certificate information…just browse to it and choose it.

When I attempted to connect using Elasticfox it gave me some weird errors and failed everytime…even though it gave me the Admin password and everything.  So I figured something was amiss and chose instead to fire up Remote Desktop Connection first and then paste the Public DNS address into there rather than have Elasticfox try to do some weird connection mojo for me.  Alas, it worked!  I was prompted by RDC about a certificate not matching (the certificate had the instance ID and not the public DNS name), but after accepting that, I was in.  I entered the Administrator password, and quickly changed it to something I could remember (they auto generate a rather cryptic one for you).

Wouldn’t you know it, it’s a Windows box :-).  I could configure IIS, added a hello world page and was able to browse to it over the public Internet.  Fantastic.  Your instance name gives you an indication of the IP address, so if you wanted to CNAME something you could do that.  As an example if your public DNS address is ec2-75-123-456-78.compute-1.amazonaws.com then your IP address is 75.123.456.78.  There is also the Elastic IP service which I don’t claim to know anything about, but you can associate with instances as well.

That was it, I was up and running.  To recap:

    1. Get Elasticfox – a Firefox plugin.
    2. Configure your Amazon Web Services credentials in the plugin
    3. Go to the security group tab and enable the TCP/3389 port traffic either in the default security group or your own custom security group that you’ll associate with your instance.
    4. Generate a KeyPair for your machine
    5. Use the Elasticfox filter and type in ‘windows’ to see the different options
    6. Choose your option and create a new instance, choosing the KeyPair and Security Group of your preference
    7. Wait about 5-7 minutes AFTER it says it is running
    8. Using Elasticfox, get the administrator password (right-click on the instance for that option)
    9. Using Elasticfox, get the Public DNS Address (right-click on the instance for that option)
    10. Launch Remote Desktop Connection and paste the Public DNS address
    11. Review the certificate warning and accept if all looks good
    12. Login with the administrator password, then change it so you remember what it is
    13. Configure away!

I think this makes EC2 more intriguing to me because I can spin up a fully-fledge dedicated(virtual) box right away (and if needed, scale it to more instances).  The thing that I found curious was the pricing model.  If you create what they call a “small” instance, with using SQL Express and no authentication rights (i.e., the ability to create Windows users), then you’re looking at about $90/month before any bandwidth and disk usage fees apply – that is only compute time.  Also, if you add SQL Server Standard to that, the price jumps significantly (in my calculation to about $600/month). 

NOTE: My EC2 instance registered itself as a Dual-core AMD, 2.7 ghz, 2GB RAM.

When I look at a place like ServerBeach, where I can get a dedicated machine for around $130-150/month (with 2 TB bandwidth and 160GB storage) and add SQL Standard for $275 (and I’m not sure if that is monthly or one-time)…which seems lower than my fees with EC2 before bandwidth.  Now granted, if I needed to spin up more instances I couldn’t (or not without significant cost and inflexibility) but for the “one server” guy scenario, the pricing has me a bit perplexed.  For the person who wants to move from shared hosting to dedicated/virtual this might be an option if no database or SQL Express (or other open source databases) work for you.

Regardless it is interesting.  It is usefuly for these cloud computing services to show up so you can spin up servers almost instantly, play around with scenarios, like perhaps some Silverlight cross-domain or SSL scenarios, and shut them down when needed.  As a developer, very handy.  I’m also looking forward to seeing if any rumors are true about next week at PDC.
In the early days of Silverlight 2, one of the included controls was the WatermarkedTextBox.  In Beta 2 the control was removed from the runtime for among other things, WPF compatibility.  The control source code was made available for people to look at as it was referenced in a few projects, namely ScottGu’s Digg sample application.  There was hinting about future plans but nothing concrete. 

Now that Silverlight 2 is released, the control is not there :-).  I’ve gotten enough requests about it that I wanted to provide some action for you.  First, let me say that there are no concrete plans for WatermarkedTextBox at this time that I have to share.  I’m not saying there isn’t plans, but just that none at a point to make any worthwhile announcements.  Perhaps something like this would show up in the Silverlight Toolkit, but at this time no plans have been defined.

Again, as I’ve received enough requests, I’ve modified the source code for WatermarkedTextBox for Silverlight 2 release and am making it available for you to consume.  The code has been updated for use in Silverlight 2 and also updated to reflect the default styling of the released controls (namely to match TextBox).

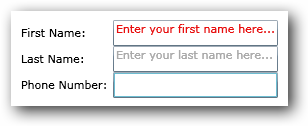
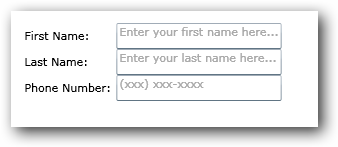
If you aren’t familiar with the concept, it’s basically a TextBox with a value you can set for some helper text if the value is not set.  Typically you use this when you want to provide “prompt” text for some input, as an example here:

As you can see the TextBox provides a '”faded” default text that isn’t the TextBox.Text property of the control, but rather the Watermark property of this control.  Once data is entered in the control, the watermark goes away.  As long as data is input the watermark isn’t displayed…if the value is empty, the watermark displays.  Simple enough.

The XAML for the above looks like this:

   1: <UserControl x:Class="WatermarkTester.Page"
   2:     xmlns="http://schemas.microsoft.com/winfx/2006/xaml/presentation" 
   3:     xmlns:x="http://schemas.microsoft.com/winfx/2006/xaml"
   4:     xmlns:local="clr-namespace:Microsoft.Windows.Controls;assembly=Microsoft.Windows.Controls.WatermarkedTextBox"
   5:     Height="300" Width="600" xmlns:vsm="clr-namespace:System.Windows;assembly=System.Windows">
   6:     <Grid x:Name="LayoutRoot" Background="White">
   7:         <StackPanel Orientation="Vertical">
   8:             <Grid Margin="15">
   9:                 <Grid.RowDefinitions>
  10:                     <RowDefinition Height="Auto" />
  11:                     <RowDefinition Height="Auto" />
  12:                     <RowDefinition Height="Auto" />
  13:                     <RowDefinition Height="Auto" />
  14:                 </Grid.RowDefinitions>
  15:                 <Grid.ColumnDefinitions>
  16:                     <ColumnDefinition Width="Auto" />
  17:                     <ColumnDefinition Width="Auto" />
  18:                 </Grid.ColumnDefinitions>
  19:                 <TextBlock Text="First Name:" Margin="5" Grid.Column="0" Grid.Row="0" />
  20:                 <local:WatermarkedTextBox Grid.Column="1" Grid.Row="0" Watermark="Enter your first name here..."/>
  21:                 <TextBlock Text="Last Name:" Margin="5" Grid.Column="0" Grid.Row="1" />
  22:                 <local:WatermarkedTextBox Grid.Column="1" Grid.Row="1" Watermark="Enter your last name here..." />
  23:                 <TextBlock Text="Phone Number:" Margin="5" Grid.Column="0" Grid.Row="2" />
  24:                 <local:WatermarkedTextBox Grid.Column="1" Grid.Row="2" Watermark="(xxx) xxx-xxxx" />
  25:             </Grid>
  26:         </StackPanel>
  27:     </Grid>
  28: </UserControl>

Note the xmlns:local declaration in the user control which references the binary.

The control is also Blend compatible if you want to change the style/control template so if you wanted to change the Watermark color or something like that you could easily do that with Blend:

So if you’ve been looking for this control, here you go.  You can download the bits here:

The source is available as Ms-Pl.  Hope this helps!

Last week I had the pleasure of talking with the crew from the Herding Code podcast.  Among the questions was one about the open source community and Silverlight.  There was mention about MVCContrib and how that community sprouted almost instantly with the ASP.NET MVC initial releases.  I let the Herding Code crew know that I believe there already is a vibrant open source community around Silverlight and pointed to things like DevExpress’ AgDataGrid control which is free and provides source.  I also mentioned a project that did start right away around Silverlight 2 initial releases: .  The project, started by Page Brooks, had a good start and keeps on rolling now as they just released a set of free open source Silverlight controls!

The team of Page Brooks, Rob Houweling, Koen Zwikstra, and Shawn Wildermuth have just released “Alpha 2” of the project which includes:

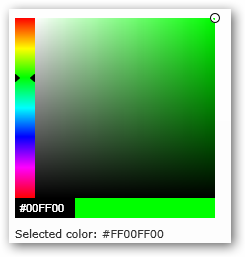
    • Color Picker
    • Gauge Control
    • Star Selector
    • Enhanced Metafile (EMF)
    • Cool Menu
    • Libraries: Zip, Byte utilities, String utilities, Simple text parser, Animation Tweening, Wheel Mouse listener

While the project code is hosted at Codeplex, the team also has a blog at SilverlightContrib.org which has a Live Demo page that will show you demonstrations about the controls:

Color Picker:

Cool Menu (OSX style):

Gauge samples:

The code is available with the Ms-Pl license which is very permissive, so go and grab these controls…and better yet…contribute back to the project!!!  There are more than just controls there as I mentioned there are libraries as well – check out the Live Demo for examples.  I haven’t checked to see their compatibility with the Blend designer, but that is something you can tweak with yourself as needed.

Congratulations to Page and the team for a great community resource and a great release.  I look forward to more great things!

With the release of Silverlight 2 many people faced the task of ensuring their applications/code written targeting Beta 2 was upgraded to release.  The team at the Silverlight community site was no different.  We’ve updated almost all the content so far, but I wanted to draw your attention to a few things.

Get Started – http://silverlight.net/GetStarted

As noted on this page for those getting started, there are links to Scott Guthrie’s 8 part example of building a Digg client in Silverlight (and then using that code for a WPF desktop application).  Scott has updated his code, so that if you download the code it will be Silverlight 2 release code.  The articles themselves, however, still contain some screenshots that if you are explicitly following along might have you scratching your head.  One example is the use of the WatermarkTextBox in the screenshots and may be wondering what happened to that.  Since that control is not a part of Silverlight 2 core controls (primarily because of WPF compatibility), it isn’t in Scott’s final download.  The code still works of course so rest assured it was updated.  (Note: if you want to look at the WatermarkTextBox code it is available here.)

Learning Resources – http://silverlight.net/Learn

We’ve updated all the code downloads to contain Silverlight 2 release code updates.  One important thing to note here is that the videos don’t get a refresh.  Over time this may change as we will add more media to enhance the resources, but there’s no search/replace in video yet to make that task a simple one and the team wants to concentrate on creating new content rather than spin cycles on minor updates.  One example of where there may be some differences in the information would be in the services video.  While the concepts still apply, the notes about ensuring the configuration are correct, updating web.config, etc. are bypassed if you use the Silverlight-enabled WCF Service template in Visual Studio when creating your WCF service.  It does all that work for you (web.config, binding information, etc.).  Of course the information isn’t negated at all, for if you chose the WCF Service template (which you still can), then the steps are still valid.  The end result for both is the same however in execution (that being you end up with a WCF service that Silverlight can consume).

We fully expect there may be some of these minor differences in the video and code, but wanted to make sure that when you download the code (in C# or Visual Basic) that you are able to run it.  Should we have made a mistake, missed one, whatever, please leave a note on the comments for that video and we will rectify it immediately.

Tutorials - http://silverlight.net/learn/tutorials.aspx

Jesse has also gone through the work to update the tutorials, which are more in-depth walk-throughs, for release code as well.  There are currently 7 of them there, and will have more coming.  Because these have accompanying article (written) content, both the code and the actual tutorial itself have been updated so they should be parity with the content and code.

Hands-on Labs - http://silverlight.net/learn/labs.aspx

Okay, an admission on my part here.  In my haste, this one slipped through the cracks.  While no code is provided for 3 of the labs (they are more self-led), the Margie’s Travel site does have code.  I’m in the process now of getting these updated.  The updates should all be minor and if you download these please understand that it should be simple for you to update.  Most of the time the step involves opening the project (using the new tools), re-referencing the System.Web.Silverlight.dll assembly (as most use the asp:Silverlight control), and recompiling the application.  Not having them in release code already is an inconvenience, but doesn’t diminish the lab themselves.  If you have questions before they get updated, please let me know and I’m happy to help.

Community Gallery - http://silverlight.net/community/communitygallery.aspx

As I previously noted for gallery sample owners, the community gallery would be purged of Beta 2 samples simply because they won’t work “as-is” with the release runtime.  For now we’ve kept a category up there for old Beta 2 samples but it will not be permanent.  A lot of people have already updated and/or submitted new gallery samples for the site.  If you have a sample you’d like to submit, please feel free to contribute.

It’s our goal to ensure that the Silverlight community site is your first stop for resources.  We’re aggregating a lot of information there and a log of community blogs so I’d encourage you to visit and subscribe.

One thing that I’m just as guilty as probably most of some of my peers is creating US-centric applications.  Forgetting to think globally for your users is something that I think happens too often.  We operate in our US-centric worlds and forget that sometimes even the simplest things can make a difference.

Take for instance, honoring your user’s culture settings (region/locale/whatever you want to call it).  Even if you have a US-based application for a US-company, how do you know that a user might not be of French origin and still perhaps like to view their operating system information in French settings, so they change their culture.

Luckily in some areas this is simple to do, and for Silverlight applications you can let the platform do some of the work for you.  I’ll take a simple example of currency settings.  A colleague of mine was asking about currency formatting in his Silverlight application with regard to data binding.  He sent me a note asking why his formatter didn’t work.  He asked me why:

   1: ConverterParameter={0:$##.00}

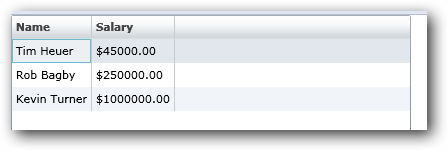
As it turns out, it was just something missing in his implementing of a custom converter in his application.  But I let him know that he should really use {0:c} and let the platform do the work.  Let’s look at a simple example of an employee and their salary.  If we data bind this information to a DataGrid using the above formatter here is what we might get:

Makes sense right, looks fine.  Now let’s change the regional settings on my machine to French (France):

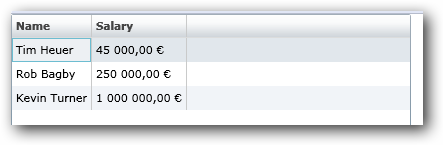
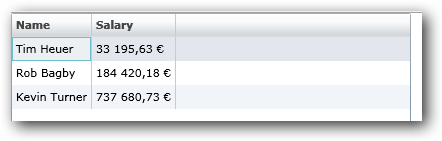
Hmm…what happened here.  Well the problem is we forced the format.  Let’s change the format parameter to {0:c} and keep French as our settings and see:

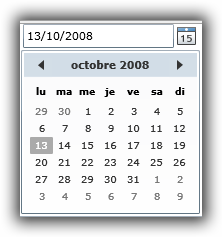
Ah, now that makes sense.  You see we can let our platform do the work and Silverlight is aware of how to use culture settings to honor currency, dates, etc. – here’s the default Calendar with French settings:

Now ideally in our sample with salaries above a literal visual translation probably isn’t accurate (by that I mean USD $1 is not the same as 1 Euro right now in translation.  We could add some custom logic though and get this output based on culture settings:

So be mindful of your applications and look for ways you can reliably and meaningfully add value to your global end users.  Don’t force a format unless you absolutely have to.