| Comments

So it appears we’ll be having a Professional Developer’s Conference after all this year.  Today we announced the PDC10.

Microsoft PDC10

Unlike previous ones in ‘conference cities’ this one will be held at the source of the information, on Microsoft’s campus in Redmond, Washington.  The price looks to be less than previous as well, so check out the details at the Microsoft PDC event site.

If you’ve never been to Redmond before, or if you have, allow me to give you some friendly advice.  If you think you might be coming, book a hotel room now.  Redmond isn’t a conference city like LA, Atlanta, New Orleans, etc.  That means there isn’t massive amounts of 50-floor hotels sprawling all over the place.  Here’s my tips (as a former frequent traveler TO Redmond) on where to stay.  This is my own personal advice based on experience.

NOTE: While some addresses may be in Bellevue, if you aren’t familiar with the area, know that Microsoft’s main campus in some areas spans the two cities (Bellevue/Redmond). 

Here’s some hotel options for you:

  • Homestead Suites – this is THE closest hotel to the main campus.  I’ve stayed here once.  And frankly I haven’t stayed since.  My experience is just one, but it wasn’t a positive one.  I know others who have stayed here with no issues though and enjoyed the stay.  These are suite-style rooms with a kitchenette usually and don’t have daily maid service.  It is relatively inexpensive though and good for a budget.  If you want to be CLOSE to main campus (i.e., you could walk to conference center), this is the place.  That being said, there is no night life :-).
  • Fairfield Inn, Courtyard by Mariott, Residence Inn Bellevue – these places are literally in the same parking lot.  It isn’t right on campus, but will be the next closest ones.  If you wanted to walk to campus you could, but it would be a healthy walk.  I almost always stay at either the Courtyard or the Fairfield.  They are clean, roomy, and have the amenities I desired.  I don’t think you can go wrong with any of these choices.  The Residence Inn provides rooms that are more suite-like for sharing with groups of folks.  These are all reasonably priced in the area.  Not a ton of nightlife around here either.
  • Redmond Mariott Town Center, Residence Inn Redmond – these are right next to each other as well and in the Redmond Town Center area – which is closer to downtown Redmond.  Town Center is like an outdoor retail mall/shopping center with restaurants, shopping, movie theater, etc.  It’s a good place if you need something around you.  Not everything is open always after hours, but better chances here walkable than other places.  This is not a walkable location to campus though.
  • Redmond Inn and Silver Cloud Inn – these are two other off-brand hotels that are in Redmond that a lot of business visitors use.  They are economical and generally no issues.  I’ve stayed at the Silver Cloud before and have had no issues with it.  The Redmond Inn is close to campus and you could walk if needed to.  These are more budget hotels.
  • The Heathman Hotel Kirkland – my favorite place to stay if you don’t mind not being in Redmond.  This place defines service.  Kirkland is a town just west of Redmond and would be a drive to campus (about 10 mins with no traffic).  The hotel is in downtown Kirkland which has a pretty decent local nightlife (weather permitting).  They have a courtesy driver that will take you places as needed (not sure if they will drive you daily to the conference center, but you might ask if you have a group).  It’s a modern, more contemporary hotel.  When my family comes to visit, if I don’t have room, I’m telling them to stay here.

There are others, of course, but I don’t have experience in them.  My guess is these will fill up fast.  Then you will be looking at downtown Bellevue (a drive) for a place or – worse – Seattle, which would not be ideal for a conference goer (but if you want nightlife, then stay in Seattle).  My guess is that the conference may be providing shuttles from certain hotels but I haven’t heard anything myself. UPDATE: I just heard no shuttles on this one, so my recommendation is pick close to campus or find a MSFT buddy who can pick you up :-).  Seattle metro area has great mass transit as well though!

I would recommend booking early if you want to be close to campus.  I’m sure these will sell out VERY quickly.  Redmond/Bellevue/Kirkland is a very diverse area with lots of multi-cultural eating locations and natural/organic food options as well (if you want Pho, check out Saigon City on Bel-Red Rd).

Hope this helps and see you at PDC10!


This work is licensed under a Creative Commons Attribution By license.

| Comments

Last week or so the PivotViewer control was released, which is from the Microsoft LiveLabs team.  It’s a Silverlight control that enables you to visualize data information in a DeepZoom type experience.  Be sure to check out the PivotViewer learning section for some initial information if you haven’t seen any demonstrations.

I received an email a few days back hoping for a more quick “how to” on using this control.  After all, it is a control for Silverlight and requires some implementation.  Honestly, I hadn’t even used it myself until I got that note.  I thought I’d jot down my notes in creating and consuming the simplest form of data and display using PivotViewer.  I say “simple” because you can get much more complex, but I wanted to simply show the quick steps.

Understand first that Pivot collections are a combinations of imagery and metadata that describe that imagery.  If you’ve ever seen the Hard Rock Memorabilia site that was done in early Silverlight days, this is the similar concept.

Step 1 – Get PivotViewer

The first thing you need to do is get the bits.  I’m going to assume you already have Visual Studio 2010 and Silverlight 4 Tools installed.  You can get the PivotViewer SDK at the PivotViewer learning section of the Silverlight community site.  Once you run the installer, the SDK will be installed to %ProgramFiles%\Microsoft SDKs\Silverlight\v4.0\PivotViewer\<RELEASE>.  There is a sample folder with source for an implementation as well if you want to look at it, but it has custom actions and things that you may not need.  My steps below are the “PivotViewer 101” steps to get a simple collection.  The sample provides more sample code to do other things with PivotViewer.

Step 2 – Get Pivot collection building tools

In order to use the control, you must have a Pivot collection source.  This is a specific data format in XML that the PivotViewer (and Pivot full client) use to understand the data.  The XML schema is documented here: PivotViewer Collection XML Schema.  As you can see it is fairly simple.  You could certainly build this by hand, but why would you when there are a few tools to help you!

There are 3 primary methods to create collection sources the way I see it: command-line, code library, and Excel.  The first two are most likely what any dynamic collection source will want to use.  These would be code-based approaches to looking at various types of data sources, appending metadata, and creating dynamically created collection sources or JIT-created ones as well.

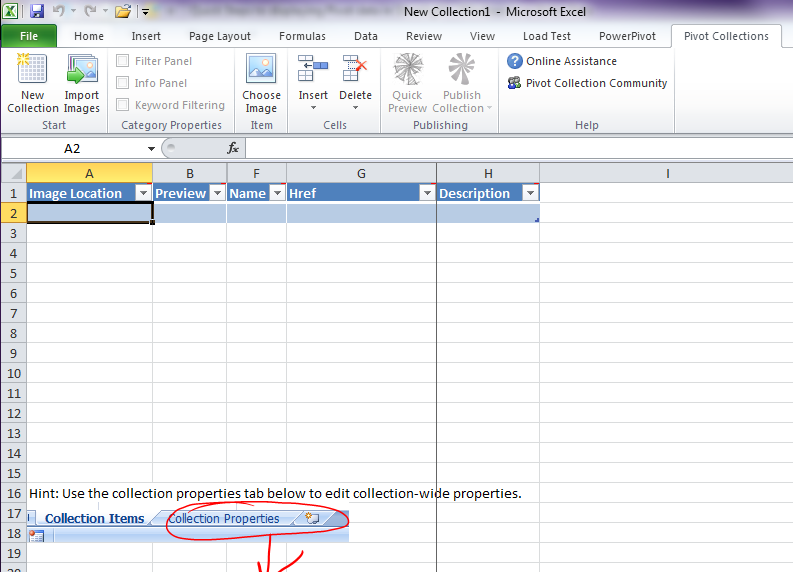
The latter, using Excel, is the simplest.  The LiveLabs team created an Excel add-in to create the collection data using a familiar interface without having to really wrestle with the collection schema.  Once installed you have a new tab in Excel:

Excel PivotViewer collection tool

When you click the New Collection button on this tab, you’ll get a simple spreadsheet to start building your collection source.

Step 3 – Begin to build your collection data

For my sample, I’m going to use Bing’s wallpaper images from their last “Bing’s Best” Windows 7 themes.  Having my Excel sheet opened and already clicking on the New Collection function, I can now use the Import Images function to do this in bulk.  Now I don’t have to do this.  In fact, I can do one-by-one using the Choose Image function and select individual items.

I then wanted to provide a category column to enable my user to filter based on categories.  I used the Insert Column feature and gave it the title of Category.  These columns translate to Facets and if you see the schema definition diagram you will see that those visually translate to filters in the control.

Building collection data

Add your data until you are satisfied that you have all your data and metadata represented in this spreadsheet.  I only added one column but you could add more.  I am now complete and can choose to Publish my collection.

The result of the Publish function is that it will produce a file (CXML) and a folder of your DeepZoom-sliced images.  Remember this location of your data.

Step 4 – Build a Silverlight application implementing PivotViewer

Assuming you have the SDK installed, start a new Silverlight project in Visual Studio.  After that here were my simple steps:

Add reference to System.Windows.Pivot – add a reference to this assembly as this is where the PivotViewer control resides.

In my MainPage.xaml I then add an XMLNS declaration for the namespace and implement the control:

   1: <UserControl x:Class="SilverlightApplication164.MainPage"
   2:     xmlns="http://schemas.microsoft.com/winfx/2006/xaml/presentation"
   3:     xmlns:x="http://schemas.microsoft.com/winfx/2006/xaml"
   4:     xmlns:d="http://schemas.microsoft.com/expression/blend/2008"
   5:     xmlns:mc="http://schemas.openxmlformats.org/markup-compatibility/2006"
   6:              xmlns:pivot="clr-namespace:System.Windows.Pivot;assembly=System.Windows.Pivot"
   7:     mc:Ignorable="d"
   8:     d:DesignHeight="300" d:DesignWidth="400">
   9:  
  10:     <Grid x:Name="LayoutRoot" Background="White">
  11:         <pivot:PivotViewer x:Name="MainPivotViewer" />
  12:     </Grid>
  13: </UserControl>

That’s it for my simple scenario on the UI front.  I’m taking the approach that my app *is* the entire PivotViewer experience.

The next thing I wanted to do was make my simple viewer dynamic.  I wanted this same XAP to be used for any collection.  In my MainPage.xaml.cs code in the Loaded event I use the PivotViewer API and call the LoadCollection function:

   1: public MainPage()
   2: {
   3:     InitializeComponent();
   4:     Loaded += new RoutedEventHandler(MainPage_Loaded);
   5: }
   6:  
   7: void MainPage_Loaded(object sender, RoutedEventArgs e)
   8: {
   9:     string collection = App.Current.Host.InitParams["collection"].ToString();
  10:  
  11:     MainPivotViewer.LoadCollection(collection, string.Empty);
  12: }

You’ll notice that I’m getting a value from Silverlight’s InitParams model.  This enables me to send in the URL of the collection dynamically in my HTML hosting page:

   1: <object data="data:application/x-silverlight-2," type="application/x-silverlight-2" width="100%" height="100%">
   2:   <param name="source" value="ClientBin/SilverlightApplication164.xap"/>
   3:   <param name="onError" value="onSilverlightError" />
   4:   <param name="background" value="white" />
   5:   <param name="minRuntimeVersion" value="4.0.50424.0" />
   6:   <param name="autoUpgrade" value="true" />
   7:   <param name="initParams" value="collection=URL_TO_CXML" />
   8:   <a href="http://go.microsoft.com/fwlink/?LinkID=149156&v=4.0.50424.0" style="text-decoration:none">
   9:        <img src="http://go.microsoft.com/fwlink/?LinkId=161376" alt="Get Microsoft Silverlight" style="border-style:none"/>
  10:   </a>
  11: </object>

So I can re-use this XAP in many places and just change the initParams value in the <object> tag.  I build the XAP and now I can place it anywhere.

Step 5- Publish the result

The final step is to publish everything.  Remember the CXML file and the folder of images?  They need to reside somewhere.  Here are two critical things to note:

  • If they (collection CXML file and images) are not residing in the same location as the XAP implementing the PivotViewer control, it must have cross-domain policies (clientaccesspolicy.xml) in place persuant to the rules of Silverlight and cross-domain.  Otherwise it won’t work.  PivotViewer makes network requests and this policy is required by Silverlight in cross-domain situations.
  • You may need to add a MIME type mapping on your server in order to serve the CXML file.  I did (on Windows 2003).  I simply added a MIME type mapping for .cxml and gave it the content type of text/xml and it worked.

Once I have all that published, I can deploy my HTML page hosting the XAP and pointing to my collection source.  As an example, here is my final result for this: Bing’s Best Pivot Collection.  Notice how the Category column now shows as a filter source on the left.  Had I made more columns, there would be more filter options.  I also could have made more metadata and populated the HREF attribute of the data to actually link to something.

The cool thing as well is that any collection that works with the Pivot schema works.  You can find some samples at the GetPivot Developer site:

Using the project the way I created it, I can just input these URLs in my initParams to change the collection I want it to view.  I was also able to use the Microsoft Organization Pivot Collection that LiveSide created directly in this without modification as well: MSFT Organization Pivot in Silverlight.

Summary

After spending a few minutes with the control, the simplest display scenario is very simple.  In fact, creating the collection source I think will be the most challenging…to determine what is the appropriate metadata that you need and want to display to your users to interact with in your application.

You can download my sample project here: PivotViewerSimpleSample.zip

Hope this helps!

| Comments

Yesterday (7-Jul-2010), the Silverlight Media Framework v2 was released on Codeplex (yeah, it’s Open Source).  If you aren’t familiar with it, it is a Silverlight framework encapsulating the best practices for media playback for Silverlight applications.  It is both a framework and, in v2, they also provided compiled simple player XAPs that you can just drop in HTML.  If you are building apps, you’ll want to take a look at the framework in more detail, but if you want a solid media player experience grab the players too.

Since I use Windows Live Writer as my blogging tool, I wanted to share my workflow for embedding videos into blog posts (or other content that I can author using Live Writer).  First, grab the necessary tools:

Install the Dynamic Template add-in for Writer.  Next step is to put your ProgressiveDownloadPlayer.xap somewhere.  This doesn’t matter, as along as you know the URL to it.  I keep mine on my cloud storage share since I can re-use it in various places.  Once all those pieces are in place here is what I do.

Step 1 – Create the Dynamic Template

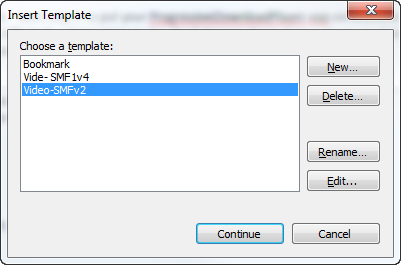
In order to create a template, you have to execute the Insert function for Dynamic Template to bring up the dialog.  Once there, choose to Edit Templates and give it a name.

Dynamic Template insert dialog

Then in the template code, copy this HTML:

   1: <object data="data:application/x-silverlight-2," type="application/x-silverlight-2" width="640" height="480">
   2:   <param name="source" value="URL_TO_YOUR_PLAYER_XAP" />
   3:   <param name="background" value="white" />
   4:   <param name="enableHtmlAccess" value="true" />
   5:   <param name="minRuntimeVersion" value="4.0.50424.0" />
   6:   <param name="initParams" value="MediaUrl=<%= VideoUrl %>,AutoPlay=false,ThumbnailUrl=<%= ThumbnailUrl %>" />
   7:   <param name="autoUpgrade" value="true" />
   8:   <a href="http://go.microsoft.com/fwlink/?LinkID=149156&amp;v=4.0.50424.0" style="text-decoration:none">
   9:       <img src="http://go.microsoft.com/fwlink/?LinkId=161376" alt="Get Microsoft Silverlight" style="border-style:none" />
  10:   </a>
  11: </object>

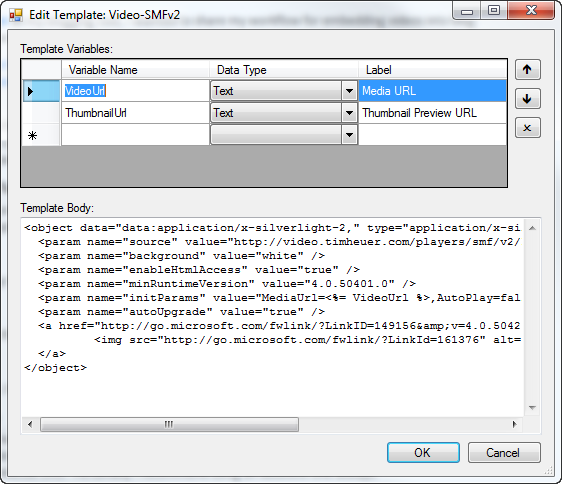
And in the settings use these in this screenshot:

Code variables

Of course, replace with the URL to your player location.  That’s it, that is your template.

Step 2 – Prepare your media

I’m assuming that you already have media to display, but if you don’t, use your favorite media encoding tool to create the media and have the URL.  Note that it doesn’t have to be an absolute URL, but just understand the paths of your web app if you plan on using a relative URL.  Personally I recommend using an absolute one always.

Also the snippet above, while not required, implements the ThumbnailUrl (thanks Kevin) parameter for the player.  You’ll need a URL to a thumbnail image for preview.

Step 3 – Execute the template

Now that you have the template, you can use it.  Rather than talk about it, here’s an embedded video (using the process) demonstrating the process :-)…

Get Microsoft Silverlight

Simple, huh? Now of course you cannot see the final result in Writer (not sure why actually but I think it has something to do with the rendering techniques they use in authoring mode (hence the white box in the vid), but you can see the end result!

Summary

Silverlight Media Framework is awesome.  Live Writer is awesome.  Awesome+Aweomse = Awesomely Awesome.  Kidding aside, if you have similar workflows to me, this should help you.  It has streamlined the content publishing process when I need it in a simple, but efficient way.

Hope this helps!

| Comments

SilverlightShow.net is one of those great community sites providing information, tutorials and general developer information around Silverlight.  They’ve done a great job providing a spectrum of beginner to advanced topics on Silverlight development. 

At MIX10 I was talking with one of the brains behind the site (and Silverlight MVP), Emil Stoychev, one one of the ways they had been displaying book recommendations on their site.  It was a bookshelf view that I thought was cool and I wanted to use it for my own book recommendation list on my blog. 

NOTE: It was funny in talking with Emil because they had this bookshelf control for a while and then the iBooks app for iPhone/iPad came out and looked really familiar.  Of course, the user experience isn’t something entirely new for displaying this type of information, but it was cool to see consistency.

I asked Emil if I could use the control and showcase some of the work they do on that site.  They carved off a little area where I could manage my books and here it is:

SilverlightShow bookshelf

You can see it running live and interact with it on my Silverlight Book Recommendations link here on this site.  I think it is a lot better than just a standard list of links.  Now I just need to fill up the shelves so they don’t look so empty!

Thanks Emil and SilverlightShow! And to answer in advance, I’m not sure if they plan on releasing this as a sample control or what…that is something you’ll have to head over to their site and ask them (and check out their material as well).


| Comments

July 1st is here…time for an updated Windows 7 Smashing Magazine theme pack!

Smashing Magazine July 2010 Windows 7 Theme

The July themes seem to be focuses on more 'summer' things.  Not as many Independence Day things as I would have suspected, but shows a good international design contribution.  So here is your July 2010 Windows 7 Theme Packs for wallpapers – unfiltered and uncensored – about 35 wallpapers in all.

For details on these and to see past ones, visit the Smashing Magazine Windows 7 Theme information for the specifications I used for the theme pack as well as previous themes.  Want to participate and submit yours?  Join in!