| Comments

At Build the Azure team launched a new service called Azure Static Web Apps in preview. This service is tailored for scenarios that really work well when you have a static web site front-end and using things like serverless APIs for your communication to services/data/etc. You should read more about it here: Azure Static Web Apps .

Awesome, so Blazor WebAssembly (Wasm) is a static site right? Can you use this new service to host your Blazor Wasm app? Let’s find out!

NOTE: This is just an experiment for me.  This isn’t any official stance of what may come with the service, but only what we can do now with Blazor apps.  As you see with Azure Static Web Apps there is a big end-to-end there with functions, debug experience, etc.  I just wanted to see if Blazor Wasm (as a static web app) could be pushed to the service.

As of this post the service is tailored toward JavaScript app development and works seamlessly in that setup. However, with a few tweaks (for now) we can get our Blazor app working. First we’ll need to get things setup!

Setting up your repo

The fundamental aspects of the service are deployment from your source in GitHub using GitHub Actions. So first you’ll need to make sure you have a repository on GitHub.com for your repository. I’m going to continue to use my Blazor Wasm Hosting Sample repo (which has different options as well to host Wasm apps) for this example. My app is the basic Blazor Wasm template, nothing fancy at all. Okay, we’ve got the repo set up, now let’s get the service setup.

Create the Azure Static Web App resource

You’ll need an Azure account of course and if you don’t have one, you can create an Azure account for free. Go ahead and do that and then come back here to make it easier to follow along. Once you have the account you’ll log in to the Azure portal and create a new resource using the Static Web App (Preview) resource type. You’ll see a simple form to fill out a few things like your resource group and a name for your app and the region.
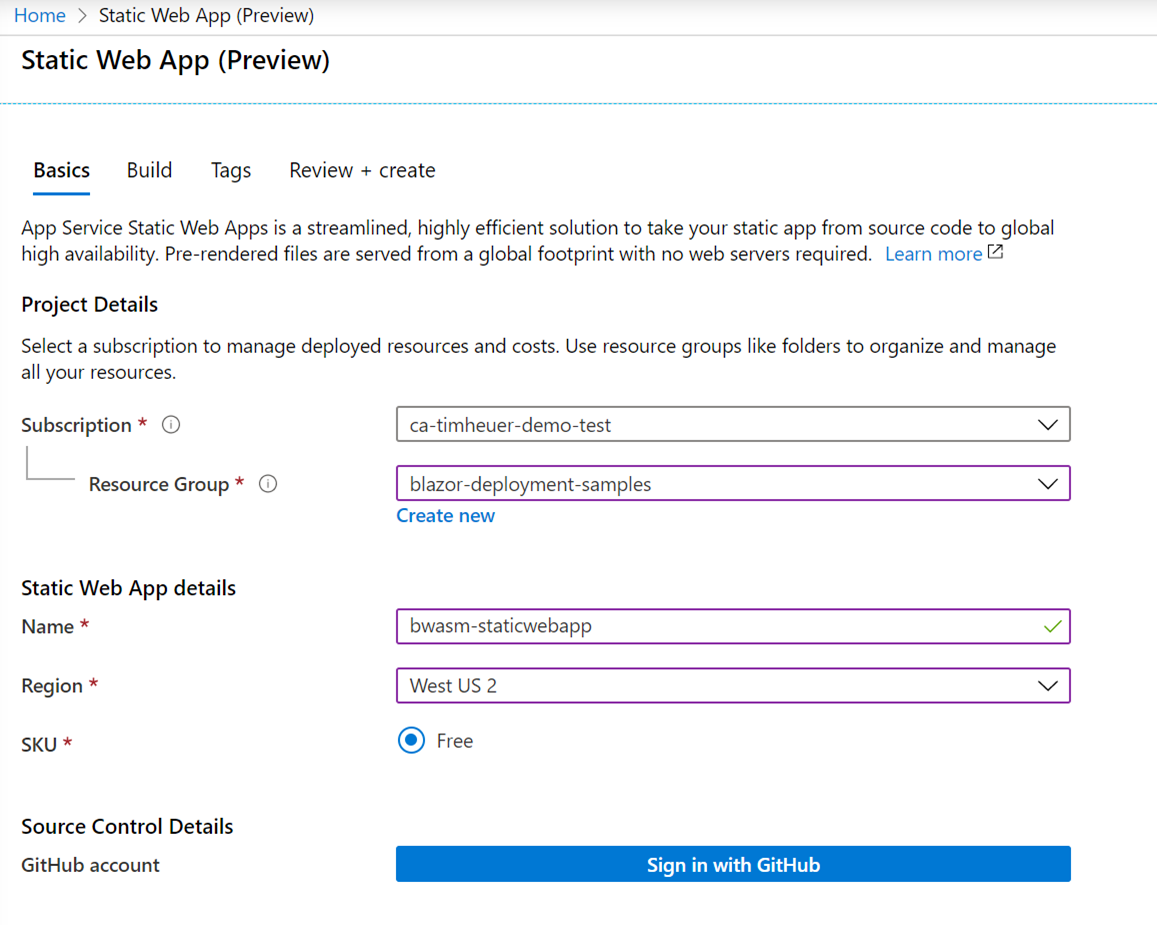
Screenshot of Azure Portal configuration

The last thing there is where you’ll connect to your GitHub repo and make selections for what repo to use. It will launch you to authorize Azure Static Web Apps to make changes to your repo (for workflow and adding secrets):

Picture of GitHub permission prompt

Once authorized then more options show for the resource creation and just choose your org/repo/branch:
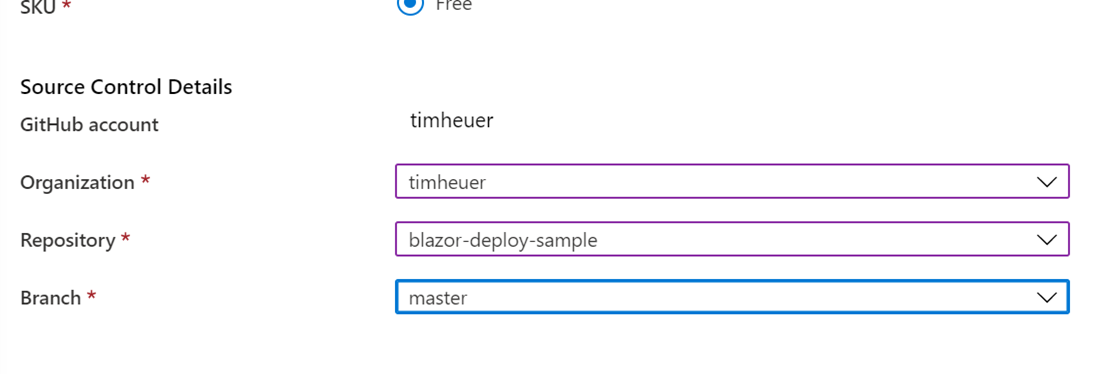
Picture of GitHub repo choices

Once you complete these selections, click Review+Create and the resource will create! The process will take a few minutes, but when complete you’ll have a resource with a few key bits of information:

Picture of finished Azure resource config

The URL of your app is auto-generated with probably a name that will make you chuckle a bit. Hey, it’s random, don’t try to make sense of it, just let the names like “icy cliff” inspire you. Additionally you’ll see the “Workflow file” YAML file and link. If you click it (go ahead and do that) it will take us over to your repo and the GitHub Actions workflow file that was created. We’ll take a look at the details next, but for now if you navigate to the Actions tab of your repo, you’ll see a fail. This is expected for us right now in our steps…more on that later.

Picture of workflows in Actions

In addition to the Actions workflow navigate to the settings tab of your repo and choose Secrets. You’ll see a new secret (with that random name) was added to your repo.

Picture of GitHub secrets

This is the API token needed to communicate with the service.

Why can’t you see the token itself and give the secret a different name? Great question. For now just know that you can’t. Maybe this will change, but this is the secret name you’ll have to use. It’s cool though, the only place it is used is in your workflow file. Speaking of that file, let’s take a look more in detail now!

Understanding and modifying the Action

So the initial workflow file was created and added to your workflow has all the defaults. Namely we’re going to focus on the “jobs” node of the workflow, which should start about line 12. The previous portions in the workflow define the triggers which you can modify if you’d like but they are intended to be a part of your overall CI/CD flow with the static site (automatic PR closure, etc.). Let’s look at the jobs as-is:

jobs:
  build_and_deploy_job:
    if: github.event_name == 'push' || (github.event_name == 'pull_request' && github.event.action != 'closed')
    runs-on: ubuntu-latest
    name: Build and Deploy Job
    steps:
    - uses: actions/checkout@v2
    - name: Build And Deploy
      id: builddeploy
      uses: Azure/[email protected]
      with:
        azure_static_web_apps_api_token: ${{ secrets.AZURE_STATIC_WEB_APPS_API_TOKEN_ICY_CLIFF_XXXXXXXXX }}
        repo_token: ${{ secrets.GITHUB_TOKEN }} # Used for Github integrations (i.e. PR comments)
        action: 'upload'
        ###### Repository/Build Configurations - These values can be configured to match you app requirements. ######
        app_location: '/' # App source code path
        api_location: 'api' # Api source code path - optional
        app_artifact_location: '' # Built app content directory - optional
        ###### End of Repository/Build Configurations ######

Before we make changes, let’s just look. Oh see that parameter for api token? It’s using that secret that was added to your repo. GitHub Actions has built in a ‘secrets’ object that can reference those secrets and this is where that gets used. That is required for proper deployment. So there, that is where you can see the relationship to it being used!

This is great, but also was failing for our Blazor Wasm app. Why? Well because it’s trying to build it and doesn’t quite know how yet. That’s fine, we can help nudge it along! I’m going to make some changes here. First, change the checkout version to @v2 on Line 18. This is faster.

NOTE: I suspect this will change to be the default soon, but you can change it now to use v2

Now we need to get .NET SDK set up to build our Blazor app. So after the checkout step, let’s add another to first set up the .NET SDK we want to use. It will look like this, using the setup-dotnet action:

    - uses: actions/checkout@v2
    
    - name: Setup .NET SDK
      uses: actions/setup-dotnet@v1
      with:
        dotnet-version: 3.1.201

Now that we are setup, we need to build the Blazor app. So let’s add another step that explicitly builds the app and publish to a specific output location for easy reference in a later step!

    - uses: actions/checkout@v2
    
    - name: Setup .NET SDK
      uses: actions/setup-dotnet@v1
      with:
        dotnet-version: 3.1.201

    - name: Build App
      run: dotnet publish -c Release -o published

There, now we’ve got it building!

NOTE: I’m taking a bit of a shortcut in this tutorial and I’d recommend the actual best practice of Restore, Build, Test, Publish as separate steps. This allows you to more precisely see what is going on in your CI and clearly see what steps may fail, etc.

Our Blazor app is now build and prepared for static deployment in the location ‘published’ referenced in our ‘-o’ parameter during build. All the files we need start now at the root of that folder. A typical Blazor Wasm app published will have a web.config and a wwwroot at the published location.
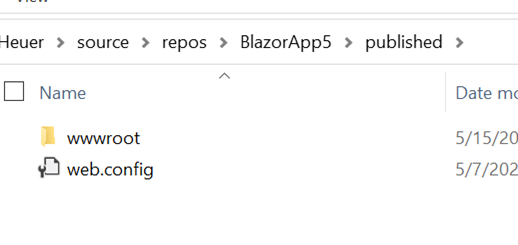
Picture of Windows explorer folders

Let’s get back to the action defaults. Head back to the YAML file and look for the ‘app_location’ parameter in the action. We now want to change that to our published folder location, but specifically the wwwroot location as the root (as for now the web.config won’t be helpful). So you’d change it to look like this (a snippet of the YAML file)

    - uses: actions/checkout@v2
    
    - name: Setup .NET SDK
      uses: actions/setup-dotnet@v1
      with:
        dotnet-version: 3.1.201

    - name: Build App
      run: dotnet publish -c Release -o published

    - name: Build And Deploy
      id: builddeploy
      uses: Azure/[email protected]
      with:
        azure_static_web_apps_api_token: ${{ secrets.AZURE_STATIC_WEB_APPS_API_TOKEN_ICY_CLIFF_XXXXXXXXX }}
        repo_token: ${{ secrets.GITHUB_TOKEN }} # Used for Github integrations (i.e. PR comments)
        action: 'upload'
        ###### Repository/Build Configurations - These values can be configured to match you app requirements. ######
        app_location: 'published/wwwroot' # App source code path
        api_location: '' # Api source code path - optional
        app_artifact_location: 'published/wwwroot' # Built app content directory - optional
        ###### End of Repository/Build Configurations ######

This tells the Static Web App deployment steps to push our files from here. Go ahead and commit the workflow file back to your repository and the Action will trigger and you will see it complete:

Screenshot of completed workflow steps

We have now successfully deployed our Blazor Wasm app to the Static Web App Preview service! Now you’ll note that there is a lot of output in the Deploy step, including warnings about build warnings. For now this is okay as we are not relying on the service to build our app (yet). You’ll also see the note about Functions not being found (reminder we changed our parameter to not have that value). Let’s talk about that.

What about the Functions?

For now the service will automatically build a JavaScript app including serverless functions built using JavaScript in this one step. If you are a .NET developer you’ll most likely be building your functions in C# along with your Blazor front-end. Right now the service doesn’t automatically allow you to specify an API location in your project for C# function classes and automatically build them. Hopefully in the future we will see that be enabled. Until then you’ll have to deploy your functions app separately. You can do it in the same workflow though if it is a part of your same repo. You’ll just leverage the other Azure Functions GitHub Action to accomplish that. Maybe I should update my sample repo to also include that?

But wait, it is broken!

Well maybe you find out that the routing of URLs may not work all the time.  You’re right!  You need to supply a routes.json file located in your app’s wwwroot directory to provide the global rewrite rule so that URLs will always work.  The routes.json file should look like

{
  "routes": [
    {
      "route": "/*",
      "serve": "/index.html",
      "statusCode": 200
    }
  ]
}

and put in your source project’s wwwroot folder.  This will be picked up by the service and interpreted so routes work!

Considerations and Summary

So you’ve now seen it’s possible, but you should also know the constraints. I’ve already noted that you’ll need to deploy your Functions app separately and you have to build your Blazor app in a pre-step (which I think is a good thing personally), so you may be wondering why might you use this service. I’ll leave that answer to you as I think there are scenarios will it will be helpful and I do believe this is just a point in time for the preview and more frameworks hopefully will be supported. I know those of us on the .NET team are working with the service to better support Blazor Wasm, for example.

Another thing that Blazor build does for you is produce pre-compressed files for Brotli and Gzip compression delivered from the server. When you host Blazor Wasm using ASP.NET Core, we deliver these files to the client automatically (via middleware). When you host using Windows App Service you can supply a web.config to have rewrite rules that will solve this for you as well (you can in Linux as well). For the preview of the Static Web App service and Blazor Wasm, you won’t automatically get this, so your app size will be the default uncompressed sizes of the assemblies and static assets.

I hope that you can give the service a try with your apps regardless of if they are Blazor or not. I just wanted to demonstrate how you would get started using the preview making it work with your Blazor Wasm app. I’ve added this specific workflow to my Blazor Wasm Deployment Samples repository where you can see other forms as well on Azure to deploy the client app.

I hope this helps see what’s possible in preview today!
| Comments

Everyone!  As a part of my responsibilities on the Visual Studio team for .NET tools I try to spend the time using our products in various different ways, learning what pitfalls customers may face and ways to solve them.  I work a lot with Azure services and how to deploy apps and I’m a fan of GitHub Actions so I thought I’d share some of my latest experiments.  This post will outline the various ways as of this writing you can host Blazor WebAssembly (Wasm) applications.  We actually have some great documentation on this topic in the Standalone Deployment section of our docs but I wanted to take it a bit further and demonstrate the GitHub Actions deployment of those options to Azure using the Azure GitHub Actions.

Let’s get started!

If you don’t know what Blazor Wasm is then you should read a bit about What is Blazor on our docs.  Blazor Wasm enables you to write your web application front-end using C# with .NET running in the browser.  This is different than previous models that enabled you to write C# in the browser like Silverlight where a separate plug-in was required to enable this.  With modern web standards and browser, WebAssembly has emerged as a standard to enable compilation of high-level languages for web deployment via browsers.  Blazor enables you to use C# and create your web app from front-end to back-end using a single language and .NET.  It’s great.  When you create a Blazor Wasm project and publish the output you are essentially creating a static site with assets that can be deployed to various places as there is no hard server requirement (other than to be able to serve the content and mime types).  Let’s explore these options…

ASP.NET Core-hosted

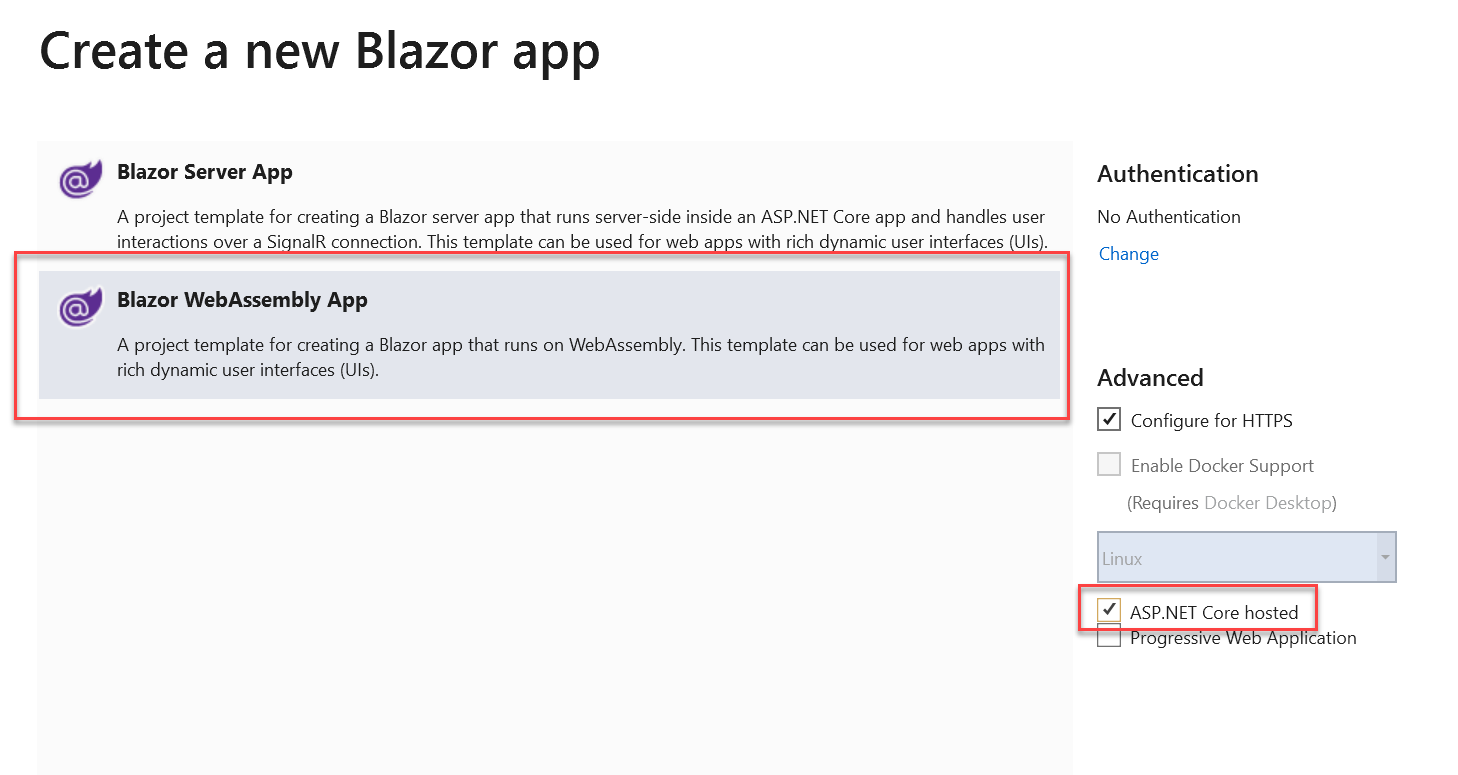
For sure the simplest way to host Blazor Wasm would be to also use ASP.NET Core web app to serve it.  ASP.NET Core is cross-platform and can run pretty much anywhere.  If you are likely using C# for all your development, this is likely the scenario you’d be using anyway and you can deploy your web app, which would container your Blazor Wasm assets as well to the same location (Linux, Windows, containers).  When creating a Blazor Wasm site you can choose this option in Visual Studio by selecting these options:

Blazor Wasm creation in Visual Studio

or using the dotnet CLI using this method:

dotnet new blazorwasm --hosted -o YourProjectName

Both of these create a solution with a Blazor Wasm client app, ASP.NET Core Server app, and a shared (optional) library project for sharing code between the two (like models or things like that).  This is an awesome option and your deployment method would follow the same method of deploying the ASP.NET Core app you’d already be using.  I won’t focus on that here as it isn’t particularly unique.  One advantage of using this method is ASP.NET Core already has middleware to properly serve the pre-compressed Brotli/gzip formats of your Blazor Wasm assets from the server, reducing the payload across the wire.  You’ll see more of this in below options, but using ASP.NET Core does this automatically for you.  You can deploy your app to Azure App Service or really anywhere else easily.

Benefits:

  • You’re deploying a ‘solution’ of your full app in one place, using the same tech to host the front/back end code
  • ASP.NET Core enables a set of middleware for you for Blazor routing and compression

Be Aware:

  • Basically billing.  Know that you would most likely host in an App Service or non-serverless (consumption) model.  It’s not a negative, just an awareness.

Azure Storage

If you just have the Blazor Wasm site and are calling in to a set of web APIs, serverless functions, or whatever and you just want to host the Wasm app only then using Storage is an option.  I actually already wrote about this previously in this blog post Deploy a Blazor Wasm Site to Azure Storage Using GitHub Actions so I won’t repeat it here…go over there and read that detail.

Example GitHub Action Deployment to Azure Storage: azure-deploy-storage.yml

Benefits:

  • Consumption-based billing for storage.  You aren’t paying for ‘on all the time’ compute
  • Blob-storage managed (many different tools to see the content)

Be Aware:

  • Routing: errors will need to be routed to index.html as well and even though they will be ‘successful’ routes, it will still be an HTTP 404 response code.  This could be mitigated by adding Azure CDN in front of your storage and using more granular rewrite rules (but this is also an additional service)
  • Pre-compressed assets won’t be served as there is no middleware/server to automatically detect and serve these files.  Your app will be larger than it could be if serving the compressed brotli/gzip assets.

Azure App Service (Windows)

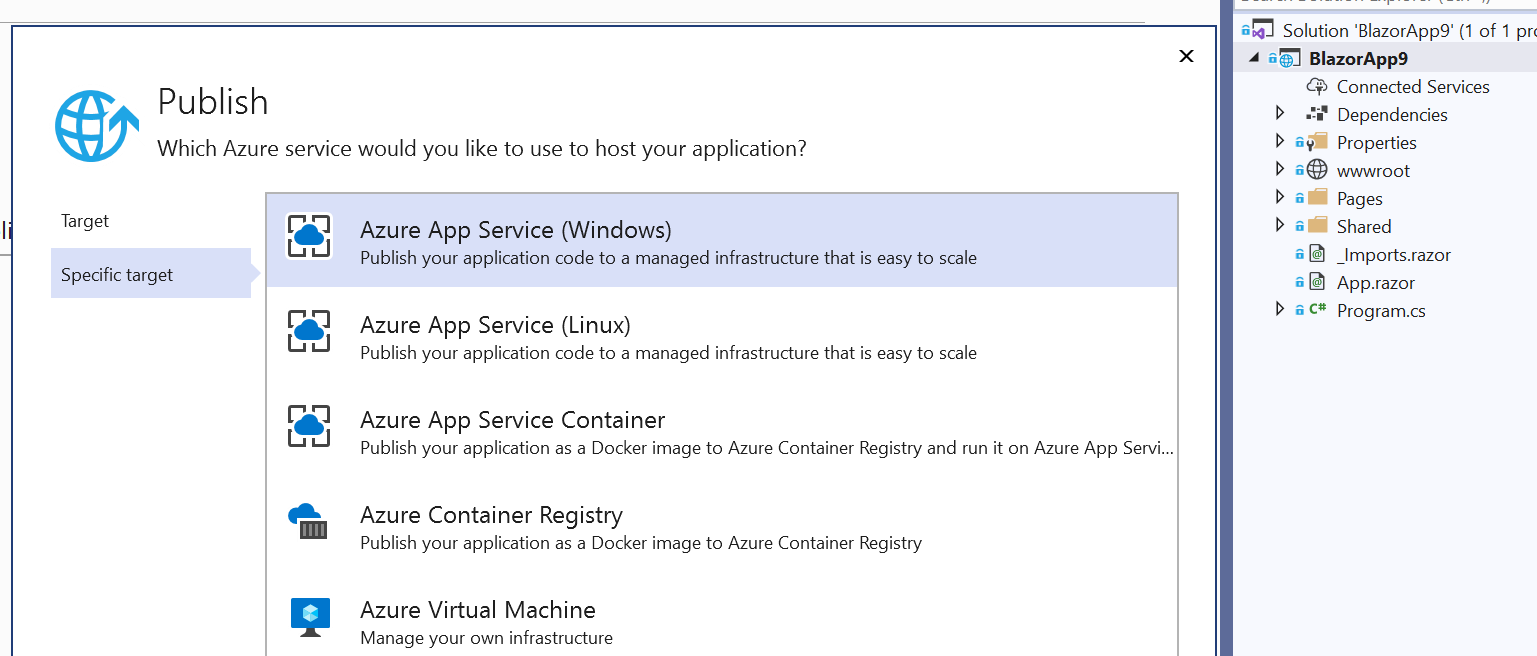
You can directly publish your Blazor Wasm client app to Azure App Service for Windows.  When you publish a Blazor Wasm app, we provide a little web.config in the published output (unless you supply your own) and this contains some rewrite information for routing to index.html.  Since App Service for Windows uses IIS when you publish this output this web.config is used and will help your app routing.  You can also publish from Visual Studio using this method as well:

Visual Studio publish dialog

or using GitHub Actions easily using the Azure Actions.  Without the ASP.NET Core host you will want to provide IIS with better hinting on the pre-compressed files as well.  This is documented in our Brotli and Gzip documentation section and a sample web.config is also provided in this sample repo.  This web.config in the root of your project (not in the wwwroot) will be used during publish instead of the pre-configured one we would provide if there was none.

Example GitHub Action Deployment to Azure App Service for Windows: azure-app-svc-windows-deploy.yml

Benefits:

  • Easy deployment and default routing configuration provided in published output
  • Managed PaaS
  • Publish easily from Actions or Visual Studio

Be Aware:

  • Really just understanding your billing choices for the App Service

Azure App Service (Linux w/Containers)

If you like containers, you can put your Blazor Wasm app in a container and deploy that where supported, including Azure App Service Containers!  This enables you to encapsulate a little bit more in your own container image and also control the configuration of the server a bit more.  For Linux, you’d be able to specify a specific OS image you want to host your app and even supply the configuration of that server.  This is nice because we need to do a bit of that for some routing rules for the Wasm app.  Here is an example of a Docker file that can be used to host a Blazor Wasm app:

FROM mcr.microsoft.com/dotnet/core/sdk:3.1 AS build-env
WORKDIR /app

COPY . ./
WORKDIR /app/
RUN dotnet publish -c Release

FROM nginx:1.18.0 AS build
WORKDIR /src
RUN apt-get update && apt-get install -y git wget build-essential libssl-dev libpcre3-dev zlib1g-dev
RUN CONFARGS=$(nginx -V 2>&1 | sed -n -e 's/^.*arguments: //p') \
    git clone https://github.com/google/ngx_brotli.git && \
    cd ngx_brotli && git submodule update --init && cd .. && \
    wget -nv http://nginx.org/download/nginx-1.18.0.tar.gz -O - | tar -xz && \
    cd nginx-1.18.0 && \ 
    ./configure --with-compat $CONFARGS --add-dynamic-module=../ngx_brotli

WORKDIR nginx-1.18.0
RUN    make modules

FROM nginx:1.18.0 as final

COPY --from=build /src/nginx-1.18.0/objs/ngx_http_brotli_filter_module.so /usr/lib/nginx/modules/
COPY --from=build /src/nginx-1.18.0/objs/ngx_http_brotli_static_module.so /usr/lib/nginx/modules/

WORKDIR /var/www/web
COPY --from=build-env /app/bin/Release/netstandard2.1/publish/wwwroot .
COPY nginx.conf /etc/nginx/nginx.conf
EXPOSE 80 443

In this configuration we’re using an image to first build/publish our Blazor Wasm app, then using the nginx:1.18.0 image as our base and building the nginx_brotli compression modules we want to use (lines 8-19,23-24).  We want to supply some configuration information to the nginx server and we supply an nginx.conf file that looks like this:

load_module modules/ngx_http_brotli_filter_module.so;
load_module modules/ngx_http_brotli_static_module.so;
events { }
http {
    include mime.types;
    types {
        application/wasm wasm;
    }
    server {
        listen 80;
        index index.html;

        location / {
            root /var/www/web;
            try_files $uri $uri/ /index.html =404;
        }

        brotli_static on;
        brotli_types text/plain text/css application/javascript application/x-javascript text/xml application/xml application/xml+rss text/javascript image/x-icon image/vnd.microsoft.icon image/bmp image/svg+xml application/octet-stream application/wasm;
        gzip on;
        gzip_types      text/plain application/xml application/x-msdownload application/json application/wasm application/octet-stream;
        gzip_proxied    no-cache no-store private expired auth;
        gzip_min_length 1000;
        
    }
}

Now when we deploy the Docker image is composed, provided to Azure Container Registry and then deployed to App Service for us.  In the above example, the first two lines are loading the modules we build in the Docker image previously.

Example GitHub Action Deployment to Azure App Service using Linux Container: azure-app-svc-linux-container.yml

Benefits:

  • Containers are highly customizable, allowing you some portability and flexibility
  • Easy deployment from Actions and Visual Studio (you can use the same publish mechanism in VS)

Be Aware

  • Additional service here of using Azure Container Registry (or another registry to pull from)
  • Understanding your billing plan for App Service
  • Might need more configuration awareness to take advantage of pre-compressed assets (by default nginx requires an additional module for brotli and you’d have to rebuild it into nginx)
    • NOTE: The example repo has a sample configuration which adds brotli compression support for nginx

Azure App Service (Linux)

Similarly to App Service for Windows you could also just use App Service for Linux to deploy your Wasm app.  However there is a big known workaround you have to achieve right now in order to enable this method.  Primarily this is because there is no default configuration or ability to use the web.config like you can for Windows.  Because of this if you use the Visual Studio publish mechanism it will appear as if the publish fails.  Once completed and you navigate to your app you’d get a screen that looks like the default “Welcome to App Service” page if no content is there.  This is a bit of a false positive :-).  Your content/app DOES get published using this mechanism, but since we pus the publish folder the App Service Linux configuration doesn’t have the right rewrite defaults to navigate to index.html.  Because of this I’d recommend if Linux is your desired host, that you use containers to achieve this.  However you CAN do this using GitHub Actions as you manipulate the content to push.

Example GitHub Action Deployment to Azure App Service Linux: azure-app-svc-linux-deploy.yml

Benefits:

  • Managed PaaS

Be Aware:

  • Cannot publish ideally from Visual Studio
  • No pre-compressed assets will be served
  • Understand your billing plan for App Service

Summary

Just like you have options with SPA frameworks or other static sites, for a Blazor Wasm client you have similar options as well.  The unique aspects of pre-compressed assets provide some additional config you should be aware of if you aren’t using ASP.NET Core hosted solutions, but with a small bit of effort you can get it working fine. 

All of the samples I have listed here are provided in this repository: timheuer/blazor-deploy-samples and would love to see any issues you may find.  I hope this helps summarize the documentation we have on configuring options in Azure to support Blazor Wasm.  What other tips might you have?

Stay tuned for more!

| Comments

One of the things that I like about Azure DevOps Pipelines is the ability to make minor changes to your code/branch but not have full CI builds happening.  This is helpful when you are updating docs or README or things like that which don’t materially change the build output.  In Pipelines you have the built-in functionality to put some comments in the commit message that trigger (or don’t trigger rather) the CI build to stop.  The various ones that are supported are identified in ‘Skipping CI for individual commits’ documentation.

Today that functionality isn’t built-in to GitHub Actions, but you can add it as a base part of your workflows with the help of being able to get to the context of the commit before a workflow starts!  Here is an example of my workflow where I look for it:

name: .NET Core Build and Deploy

on:
  push:
    branches:
      - master

jobs:
  build:
    if: github.event_name == 'push' && contains(toJson(github.event.commits), '***NO_CI***') == false && contains(toJson(github.event.commits), '[ci skip]') == false && contains(toJson(github.event.commits), '[skip ci]') == false
    name: Build Package 
    runs-on: ubuntu-latest

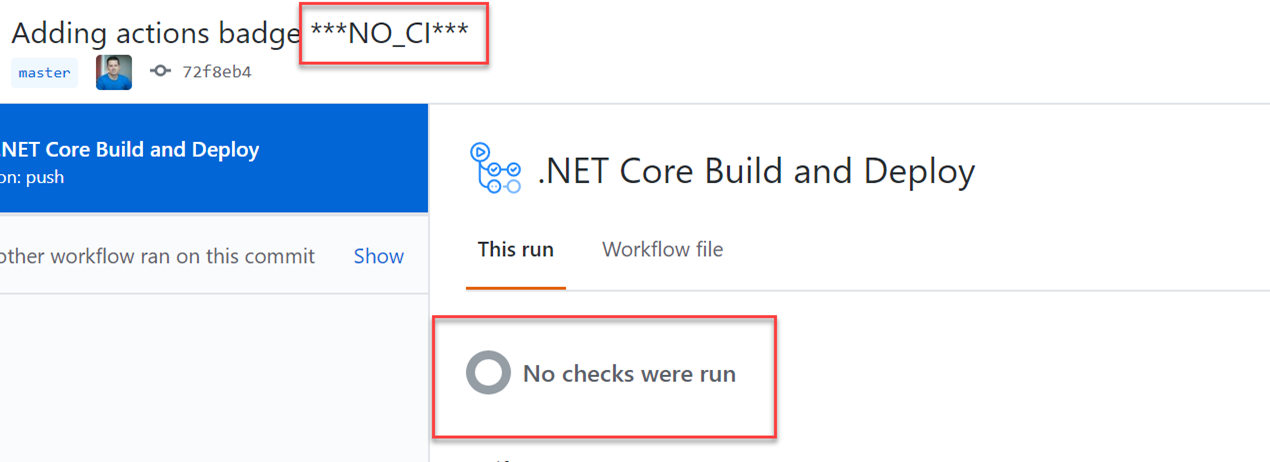
You can see at Line 10 that I’m looking at the commit message text for: ***NO_CI***, [ci skip], or [skip ci].  If any of these are present then the job there does not run.  It’s as simple as that!  Here is an example of my last commit where I just was updating the repo to include the build badge:

Screenshot of a commit message on GitHub

And you can see in the workflows that it was not run:

Screenshot of workflow status on GitHub

A helpful little tip to add to your workflows to give you that flexibility!  Hope this helps!

| Comments

I’ve continuing been doing research on GitHub Actions for .NET developers and came across a comment that someone said (paraphrasing): I wish I could use it for .NET Framework apps but it is just .NET Core.

NOT TRUE! And I want to help fix that perception.  There are some bumps in the road, but allow me to explain some simple (yes I realize they are simple) steps to get it working.

NOTE: I’ve been on this research because I’m looking to better get ‘publish’ experiences in Visual Studio for your apps, but I want to help you get into best practices for CI/CD and DevOps practices.  Basically I’m on a mission for right-click, publish to CI to improve for you :-)

So in this post I’ll walk through an ASP.NET Framework (MVC) app and have it build/publish artifacts using GitHub Actions.  Let’s get started…

The simple app

I am starting from File…New Project and selecting the ASP.NET Web Application (.NET Framework):

Screenshot of template selection

So it’s basic vanilla and I’m not changing anything.  The content of the app is not important for this post, just that we have a full .NET Framework (I chose v4.8) app to use.  From here in Visual Studio you can build the app, run, debug, etc.  Everything you need here is in Visual Studio of course.  If you wanted to use a terminal to build this app, you’d be likely (recommended) using MSBuild to build this and not the dotnet CLI.  The command might look something like this:

code

I’m specifying to build the solution and use a release profile.  We’ll come back to this, now let’s move on.

Publish profile

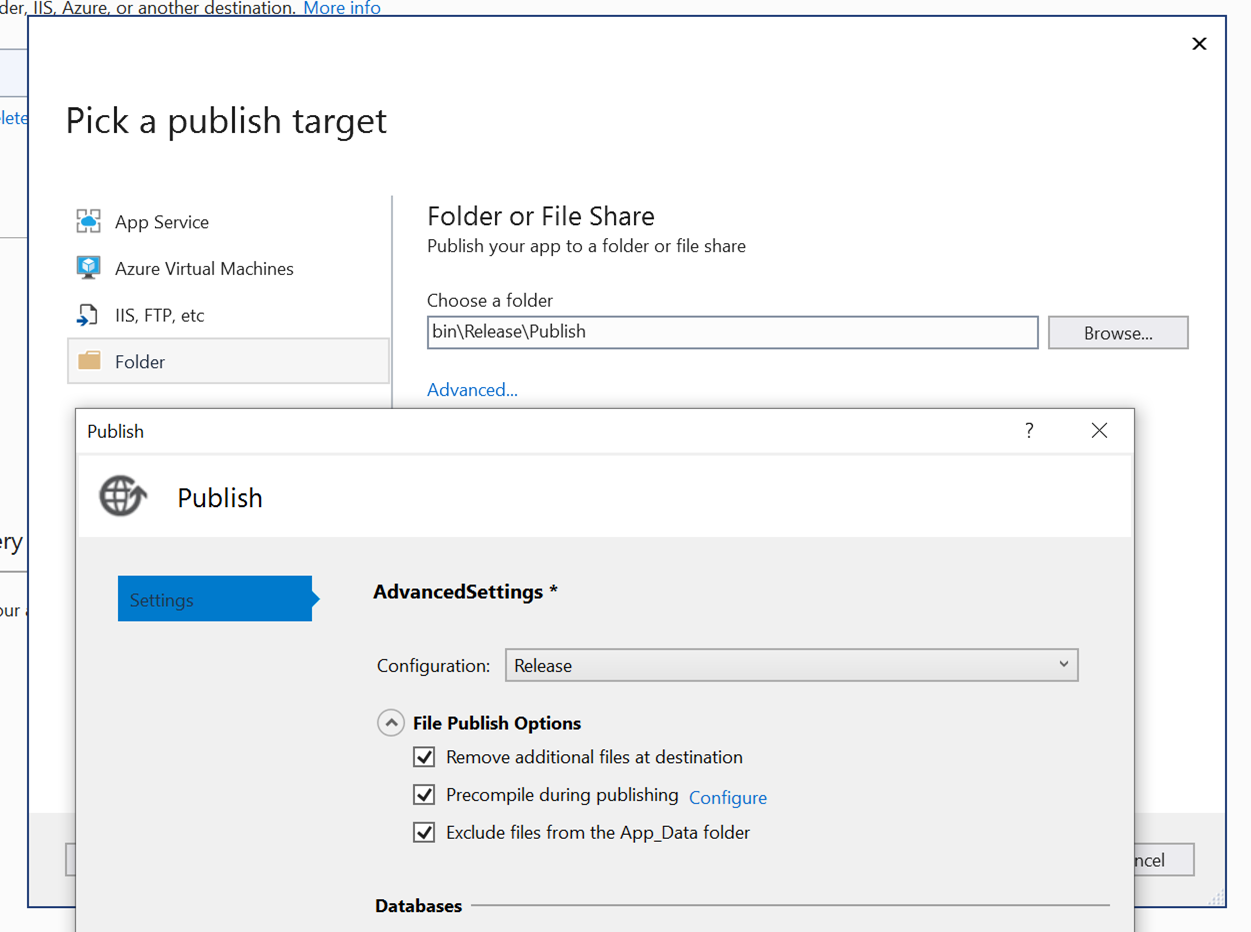
Now for our example, I want to publish this app using some pre-compiled options.  In the end of the publish task I’ll have a folder that I’d be able to deploy to a web server.  To make this simple, I’m using the Publish capabilities in Visual Studio to create a publish profile.  You get there from right-click Publish (don’t worry, we’re not publishing to production but just creating a folder profile).

Publish profile screenshot

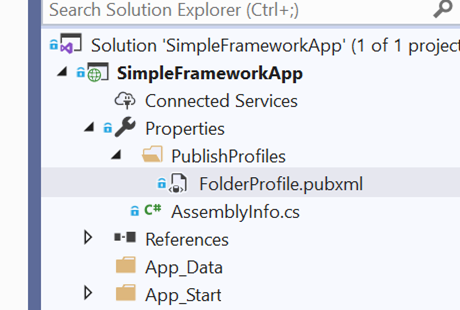
The end result is that it will create a pubxml file in the Properties folder in your solution

Publish profile in solution explorer

So we have our app and our publish (to a folder) profile.  Moving on to the next step!

Publish to the repo and create initial GitHub Actions workflow

From Visual Studio we can add this to GitHub directly.  In the lower right of visual Studio you’ll see the ability to ‘Add to Source Control’ and select Git:

Add to source control tray button

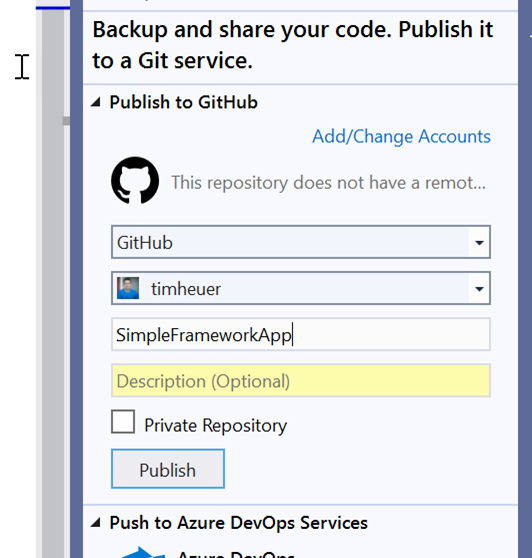
which will bring up the UI to create/push a new repository to GitHub directly from Visual Studio:

Publish to GitHub from VS

Now we have our project in GitHub and we can go to our repository and create the initial workflow.

NOTE: This is the area if you have comments about please do so below.  In the workflow (pun intended) right now you leave Visual Studio and go to GitHub to create a new workflow file then have to pull/sync, etc.  You don’t *have* to do this but usually this is the typical workflow to find templates of workflow files for your app.  Got feedback on what Visual Studio might do here, share below!

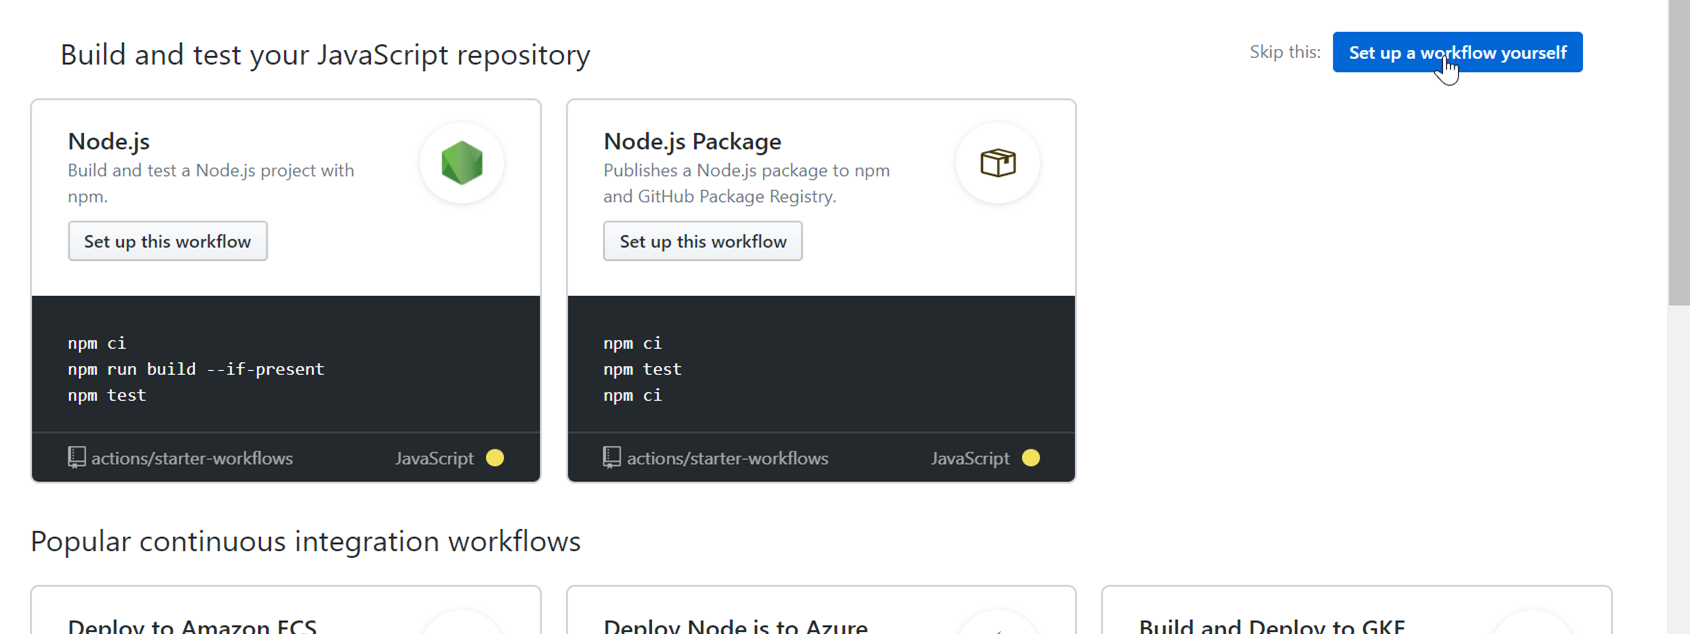
Now that you have the publish profile created and your solution in GitHub you’ll need to manually add the pubxml file to the source control (as by default it is a part of the .gitignore file).  So right click that file in solution explorer and add to your source control.  Now on your repository in GitHub go to the Actions tab and setup a new workflow:

Setting up new workflow

The reason for this (in choosing new) is that you won’t see a template that is detected for .NET Framework.  And due to whatever reason GitHub thinks this is a JavaScript repository.  Anyhow, we’re effectively starting with blank.  Create the workflow and you’ll get a very blank default:

name: CI

on: [push]

jobs:
  build:

    runs-on: ubuntu-latest

    steps:
    - uses: actions/checkout@v1
    - name: Run a one-line script
      run: echo Hello, world!
    - name: Run a multi-line script
      run: |
        echo Add other actions to build,
        echo test, and deploy your project.

And it will not be helpful, so we’ll be wiping it out.  I’ve named my workflow build.yml as I’m only focusing on build right now. 

Defining the .NET Framework build steps

For this post I’m going to put all the steps here rather than build-up and explain each one so you can see the entirety.  Here’s the final script for me:

name: Build Web App

on: [push]

jobs:
  build:

    runs-on: windows-latest

    steps:
    - uses: actions/checkout@v1
      name: Checkout Code
    
    - name: Setup MSBuild Path
      uses: warrenbuckley/Setup-MSBuild@v1
      
    - name: Setup NuGet
      uses: NuGet/[email protected]
    
    - name: Restore NuGet Packages
      run: nuget restore SimpleFrameworkApp.sln

    - name: Build and Publish Web App
      run: msbuild SimpleFrameworkApp.sln /p:Configuration=Release /p:DeployOnBuild=true /p:PublishProfile=FolderProfile

    - name: Upload Artifact
      uses: actions/[email protected]
      with:
        name: published_webapp
        path: bin\Release\Publish

Let’s start explaining them.

Ensuring the right runner

In a previous post I described what a ‘runner’ is: What is a GitHub Action Runner?  In that post I pointed to the documentation of runners including what is installed on them.  Now for .NET Framework apps we need to use Windows because .NET Framework only works on Windows :-).  Our action needs to specify using Windows and we are using the windows-latest runner image as we are on Line 8.  I won’t spend time talking about self-hosted runners here, but regardless even your self-hosted runner needs to support .NET Framework.  As a part of the windows-latest runner image, you can see what is already provided on the image.  Currently windows-latest is defined as Windows Server 2019 and the documentation shows what is provided on the hardware resource.  This includes already having a version of Visual Studio 2019 installed…which means MSBuild is already there!

Setting up MSBuild

Even though Visual Studio is on the runner, MSBuild is not presently in the default PATH environment (as of the date of this writing)…so you have options.  The documentation provides the path to where Visual Studio is installed and you can determine the right location to MSBuild from there and specify the path fully.  However, I think there should be easier ways to do this and the community agrees!  In the marketplace there is an Action you can use to setup the PATH to have the MSBuild toolset in your path and you can see this being used on Line 14/15.  The action here basically does a ‘vswhere’ and sets up the ability to later just call MSBuild directly.  This only does MSBuild and not other VS tools that are added to PATH as a part of the ‘Visual Studio Command Prompt’ that most people use.  But using this one we have here, we can now build our Framework app with less path ugliness.

Building and publishing the app

With our MSBuild setup in place, we can start building.  The first thing we need to do is restore any NuGet packages.  In Line 20,21 is where we use the NuGet CLI to restore the solution’s packages that are needed.

NOTE: For some reason using msbuild –t:Restore was not working at the time of this writing that I expected to work…

Once we have the packages restored, we can proceed to build.  In Line 24 is our full command to build the solution.  We are specifying some parameters:

  • Configuration – simple, we are building release bits
  • DeployOnBuild – this helps us trigger the publish step
  • PublishProfile – this uses the publish profile we specify to execute that step and all the other options we have set in that configuration.  We just have to specify the name, not the path

After the completion of this step (we didn’t set any different output folders) we will have a bunch of files in the default publish folder (which would be bin\<config>\Publish).

Publish the artifacts

Once we have the final published bits, we can upload them as the artifact for this build pipeline.  As we see starting at Line 26 we are using another action to upload our content (binaries, files) to this completed workflow as an artifact named ‘published_webapp’ and this will be associated with this run and zipped up all these assets you can download or later use these artifacts to publish to your servers, cloud infrastructure, etc.

Summary

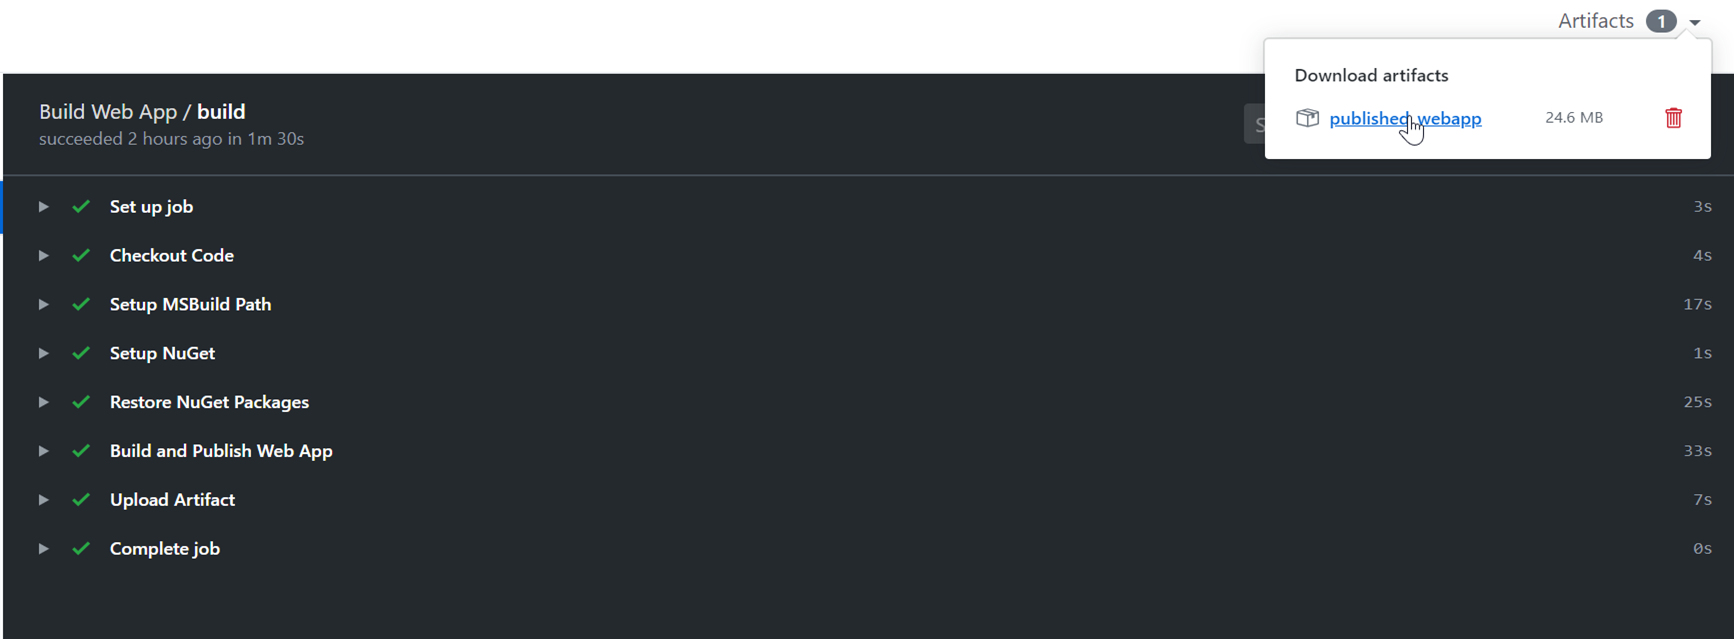
So if you thought you couldn’t use GitHub Actions for your .NET Framework now you know you can with some extra steps that may not have been obvious…because they aren’t.  In the end you have a final build:

Picture of a final build log

What I’ve shared here I put in a sample repro: timheuer/SimpleFrameworkApp where you can see the workflow (in .github/workflows/build.yml) and the logs.  I hope this helps, please share your experiences you’d like to see in Visual Studio to help you better for GitHub Actions.

| Comments

So what exactly is a runner and how do I know what’s in it?  When you use GitHub Actions and specify:

jobs:
  build:
    name: Build
    runs-on: ubuntu-latest

What exactly does that mean ‘ubuntu-latest’?  Well a runner is defined as ‘a virtual machine hosted by GitHub with the GitHub Actions runner application installed.’  Clear? LOL, basically it is a machine that has a target operating system (OS) as well as a set of software and/or tools you may desire for completing your job.   GitHub provides a set of these pre-configured runners that you are using when you use the runs-on label and use any one of the combination of: windows-latest, ubuntu-latest (or ubuntu-18.04 or ubuntu-16.04), macosx-latest.  As of this writing the matrix is documented here with also the specs of the virtual environment: Supported runners and hardware resources.

What is on a GitHub-hosted runner?

I personally think it is good practice to never assume the tool you want is on the environment you didn’t create and you should always acquire the SDK, tools, etc. you need.  That’s just me and possibly being overly cautious especially when a definition of a hosted runner provides the tools you need.  But it makes your workflow very explicit, perhaps portable to other runners, etc.  Again, I just think it is good practice. 

Runner log

But you may want to know what exactly you can use on a GitHub-hosted runner when you specify it.  Luckily GitHub publishes this in the documentation Software installed on GitHub-hosted runners.  For example as a .NET developer you might be interested to know that the windows-latest runner has:

  • Chocolatey
  • Powershell Core
  • Visual Studio 2019 Enterprise (as of this writing 16.4)
  • WinAppDriver
  • .NET Core SDK 3.1.100 (and others)

This would be helpful to know that you could use choco install commands to get a new tool for your desired workflow you are trying to accomplish.  What if you don’t see a tool/SDK that you think should be a part of the base image?  You can request to add/update a tool on a virtual environment on their repo!  Better yet, submit a repo if you can.

How much will it cost me to use GitHub-hosted runners?

Well, if you are a public repository, it’s free.  If you are not a public repository your account gets a certain number of minutes per month for free before billing as well.  It’s pretty generous and you can read all the details here: About billing for GitHub Actions.  In your account settings under the Billing section you can see your usage.  They don’t even bother to show your usage for public repositories because it’s free.  I have one private repo that I’ve used 7 minutes on this month.  My bill is $0 so far.  The cool thing is you can setup spending limits there as well.

Can I run my own runner?

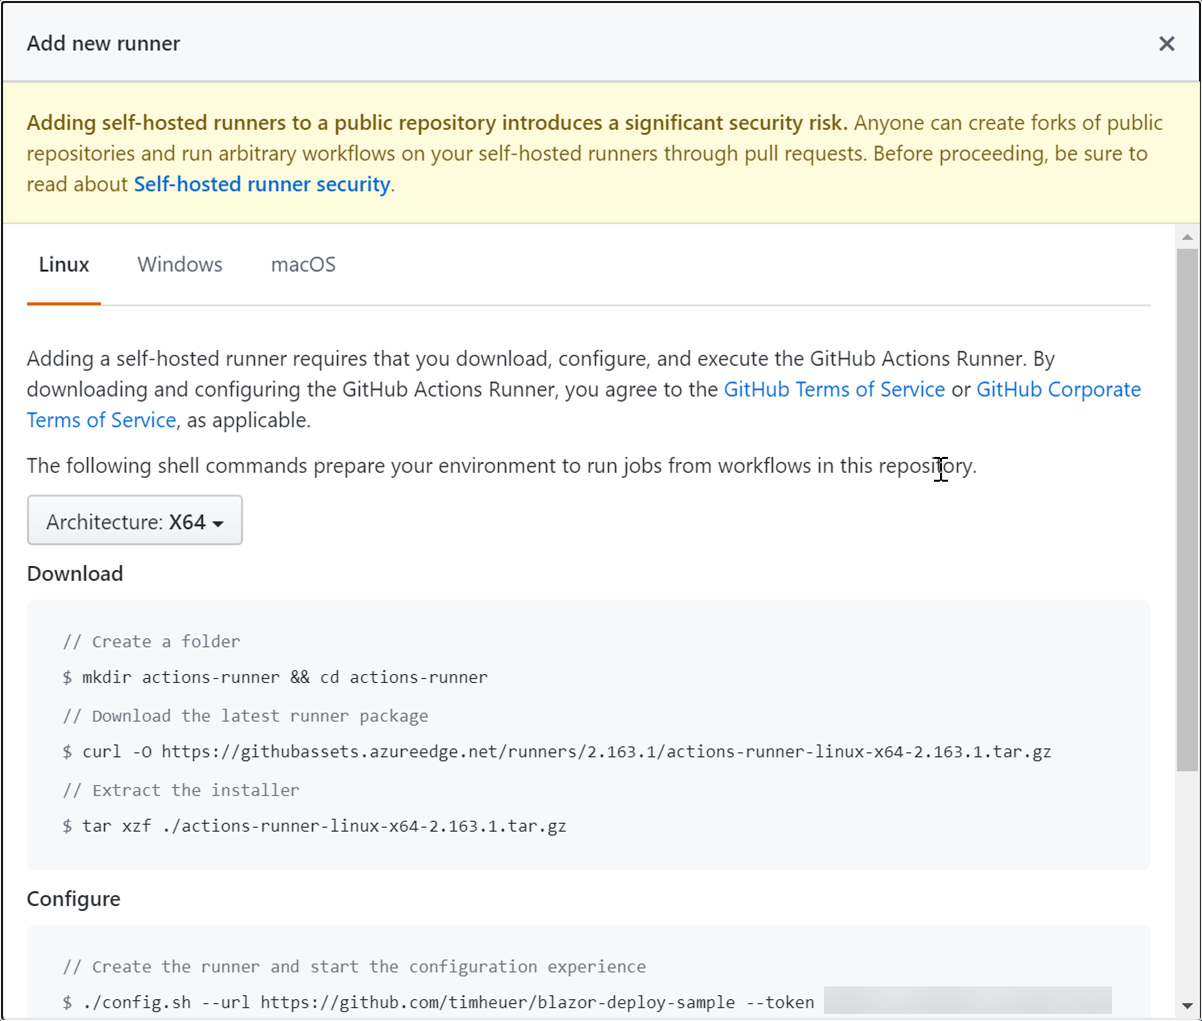
Yes! Similar to Azure Pipelines you can create and host your own self-hosted runner.  The GitHub team did an amazing job with the steps here and it seriously couldn’t be simpler.  Details about self-hosted runners (either on your local machine, your own cloud environment, etc.) can be found in About self-hosted runners documentation.  Keep in mind that now the billing is on you and you should understand the security here as well because PRs and such may end up using these agents and the documentation talks all about this.  But if you are needing to do this, the steps are dead simple and the page in your repo pretty much makes it fool proof for most cases:

Screenshot of self-hosted runner config

It’s good to know what is on the environment you are using for your CI/CD and also cool to know you can bring your own and still use the same workflow.  I’ve experimented with both and frankly like the GitHub-hosted model the best for my projects.  They don’t have unique requirements and since they are all public repositories, no cost to me.  Best of all that I don’t have to now manage an environment!