| Comments

Reflecting back on this blog I realized it’s been 16 years of life here.  It hasn’t always been consistent content focus on tech over the early years versus a more random outlet of my thoughts (and apparent lack of concern over punctuation and capitalization).  Some months had more volume and as my career (and perhaps passions) changed some had lower volume.
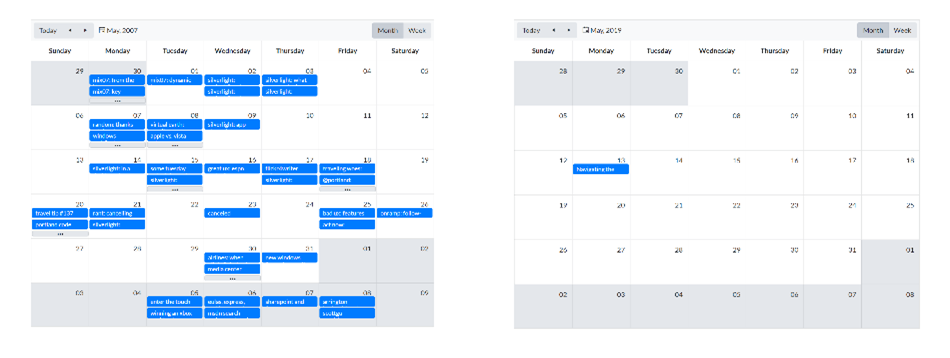
Month comparison of blog post quantity

I’ve enjoyed getting back in to posting more recently and finding more time (and again, perhaps the passion) to do so.  I think also with newer various outlets of social media, my personal passions are posted elsewhere now like Instagram (if you want to follow my escapades on the bike mostly).  Recently this summer in 2019 I switched job roles at Microsoft back into program management with the .NET team.  I’m focusing on a few different things but having spent so much time in UI frameworks on the client side for so long, I missed some waves of changes in ASP.NET and needed to re-learn.  I spent the first month of my new role doing this and exploring the end-to-end experiences.  Instead of building a To-do app, I wanted to have some real scenario for me to work with so I set off to migrate my blog…it was time anyway as just that week I had received warnings on my server about some errors.  I could avoid this no longer.  It wasn’t an easy path, but here was my journey.

Existing website frameworks

My blog started in 20-Aug-2003 and was built using Community Server (from Telligent) initially.  That quickly forked into a product called .TEXT from Scott Watermasysk and I moved to using that as it was solely content management and not forums or other things I didn’t need.  I stayed on .TEXT for as long as it lived until again another fork happened.  This time the .NET ecosystem around Open Source was improving and this fork was one of those projects.  Phil Haack, along with others, created SubText which was initially a pretty direct fork, but quickly evolved.  I wasn’t much interested in the code at this point, but wanted to follow ‘current’ frameworks so I moved to SubText.  All along this path it was easy because these migrations were similar, using the same frameworks and similar (if not same) data structures.  The SubText site was an ASP.NET 2.0 site using SQL Server as the data store.  Over time this moved to .NET 3.5 but not much more after that (for me at least). 

Over time I made a few adjustments to the SubText environment for me, never really concerning myself about the source, but just patching crap in random binaries that I’d inject into the web.config.  My last one was in 2013 to support Twitter cards and it was a painful reminder at the time that this site was fragile.   By this time as well the SubText project itself was fragile and not really being maintained as ASP.NET had moved to newer things like MVC and such.  The writing was on the wall for me but I ignored it.

Hosting environment

In addition to the platform/framework used, I was using an interesting hosting setup.  Well, not abnormal really considering at the time in 2003 there was no ‘cloud’ as we know it today.  I had a dedicated box (1U server) hosted at my own data center (I was managing, among other things, a data center rack at the time).  This was running Windows Server 2000 and whatever goop that came with.  Additionally this was SQL Server Express [insert some old version here].  I had moved on to another job and after a period of time I needed to move that server.  I was using the server for more than just my site, running about 10 other WordPress blogs for my community, my wife’s business, and various other things.  WordPress sites were constantly being attacked/hacked due to vulnerabilities in WordPress and leading to my server being filled with massive video porn files and me not knowing until my site was down then I had to login remotely and clean crap up.  Loads of fun.  I eventually moved that server to a co-located environment at GoDaddy still maintaining a dedicated 1U server for me.  It was nice having direct access to the server to do whatever I wanted, but I was quickly not needing that type of hands-on configuration anymore…but still dealing with the management.

During each of these moves I was just moving folders around.  I had no builds, no original source code reliably, etc.  “Fixing” things was me writing new code and finding interesting ways to redirect some SubText functionality as I didn’t have the source nor was interested in digging up tooling to get the source to work.  I never upgraded from Windows 2000 server and was well beyond support for things I was doing.  When I wanted to upgrade the OS at GoDaddy, I was faced with “Sure we’ll set up a new server for you and you migrate your apps” approach.  So again I was going to have to re-configure everything.  Another nightmare waiting and I just put it off.

To the Cloud!

My first step was moving data to the cloud.  I wrote about this when I did this task back in 2012.  I quickly learned that if my site wasn’t on Azure as well and with the traffic I was still getting, the egress costs were not going to be attractive for me.  A few years ago I went about moving just my blog app to Azure App Service as well.  Not having anything to build, this was going to be a fun ‘deployment’ where I needed to copy a lot of things manually to my App Service environment.  I felt dirty just FTP-ing in to the environment and continually trying things until it worked.  But it eventually did.  I had my .NET Framework SubText app running on App Service and using Azure SQL.  The cool thing about Azure SQL is the monitoring and diagnostics it provides.  I immediately was met with a few recommendations and configuration changes I should make and/or it automatically made on my behalf.  That was awesome.  I did have one stored procedure from SubText that was causing all kinds of performance havoc and contributing to me hitting capacity with my chosen SQL plan requiring me to bump up to the next plan and more costs.  Neither of which I wanted to do.  And due to what I mentioned prior about not having SubText buildable I couldn’t reliably make a change to the stored proc without really changing the code that called it.  Just another dent in the plan.  I needed a real migration plan.

Migrate to ASP.NET Core

I mentioned that in my new role I needed to spend time re-learning ASP.NET and this was a perfect opportunity.  I decided to dedicate the time and ‘migrate’ to ASP.NET Core.  Why the air quotes?  Because realistically I couldn’t migrate anything but data.  I did not have reliably building source for SubText and despite that it was WebForms and I didn’t know what I might be getting myself in to.  I needed a new plan, which meant a new framework and I went looking.  Immediately I was met with recommendations that I should go static sites, that Jekyll and GitHub pages are the new hotness and why would I want anything else.  I don’t know, for me, I still wanted some flexibility in the way I worked and I wasn’t seeing that I’d be able to get what I want out of a static site approach.  I wanted to move to ASP.NET Core solutions and found a few frameworks that looked attractive.  Most were in varying states and others felt just too verbose for my needs.  I landed on a recommendation to look at miniblogcore.  This was the smallest, simplest, most understandable solution to my needs that I found.  No frills, just render posts with some dynamicism.

I did not even attempt to migrate any of my existing ASP.NET WebForms code or styling as modern platforms were using Bootstrap and other things to do the site, so that was where I needed to start.  I spent a good amount of time working on the simple styling structure for a few things and learning MVC in the process to componentize some of the areas.  I added a few pieces of customization on the miniblog source, adding search routing (using Google site search), a timeline/calendar view thanks to Telerik controls, category browsing (although mine is horrendous due to waaay too many categories used over the years), using Disquss for commenting, adding SyntaxHighlighter for code formatting support, an image provider for my embedded images during authoring, and a few other random things.  I wrote a little MVC controller to do the data migration once from SQL to the XML file-based storage that MiniBlog uses.  That was a lot simpler than I thought it would take to migrate the data to the new structure.  Luckily my old blog had ‘slug’ support and this new one had it as well, so the URI mapping worked fine, but now I had to ensure the old routing would work.  I had to play around with some RegEx skills to accomplish this but in the end I found a pattern that would match and implemented that in my routing, using proper redirect response codes:

// This is for redirecting potential existing URLs from the old Miniblog URL format
// old subtext non-slugged & slugged
// https://timheuer.com/blog/archive/2003/08/19/145.aspx
// https://timheuer.com/blog/archive/2015/04/21/join-windows-engineers-at-free-build-events-around-the-world-xaml.aspx
[Route("/post/{slug}")]
[Route("/blog/archive/{year:regex(\\d{{4}})}/{month:regex(\\d{{2}})}/{day:regex(\\d{{2}})}/{slug}.aspx")]
[HttpGet]
public IActionResult Redirects(string slug)
{
    // if the post was a non-named one we need to append some text to it otherwise it will think it is a page
    // if (slug doesn't contain letters) { redirect to $"post-{slug}" }
    var newSlug = slug;
    var isMatch = Regex.IsMatch(slug, "^[0-9]*$");
    if (isMatch) newSlug = $"post-{slug}";

    return LocalRedirectPermanent($"/blog/{newSlug}");
}

That ended up being remarkably simpler than I thought it would be as well.  This alone was causing me stress to maintain the URIs that had existed over time and using ASP.NET routing with RegEx I got what I needed quickly.

Moving to Azure App Service once this was all done was simple.  When I first moved ASP.NET Core 3.0 wasn’t yet available so I had to deploy as a self-contained app.  This isn’t difficult though and in some cases may be more explicitly what you want to do.  I wrote how to Deploy .NET apps as self-contained so you can follow the steps.  This basically is a ‘bring the framework with you’ approach when the runtime might not be there.  Azure App Service now has .NET Core 3.1 available though so I no longer have to do that, but good to know I can test future versions of .NET by using this mechanism.

Summary

So what did I learn?  Well, not having source for your apps you care about hurts.  I didn’t even get a chance to actually attempt to truly migrate SubText to ASP.NET Core because I had let my implementation rot for so long.  I have become such a huge believer in DevOps now it’s unreal.  I won’t do a simple project even without it.  The confidence you gain when your projects have continuity through automation is amazing.  My new blog app is fully run on DevOps and deploys using that as well…I just commit changes and they are deployed when I approve them.  I learned that even though this was ‘just a blog’ it was a fairly involved app with separation of user controls and things.  It didn’t need to be so complex, but it was and I’m glad for MiniBlog not being so complex.  The performance of my content site and costs are much more manageable now and my stress is reduced knowing that should anything happen I’m in a better place for restoring a good state.  My biggest TODO task I think is re-thinking the XML-based data store though.  This actually is the one thing causing me some DevOps pain because the ‘data’ is content within the web app and when using slot-staging deployment that doesn’t work well.  Azure has a way to use Azure Storage as a mounted point to serve content from in your App Service though and I’ve started to try that with some mixed results so far.  Using this approach separates my app from my data and allows for more meaningful deployment flows and data backup.  I’ve also explored using an Azure Storage provider for my data layer, but the method for how the initial cache is build in MiniBlog right now makes this not a great story due to startup latency when you have 2,000 posts to retrieve from blob container.  I’m still playing around with ideas here, so if you have some I’d love to hear (dasBlog users would hit similar concerns).

I’m happy with where I landed and hope this keeps me on a path for a while.  I’ve got a simple design, responsive design, easy-to-maintain source code, all the features I want (for now), no broken links (I think), works with my editing flow (Open Live Writer), and less stress worrying about a server.  I’ve already updated to ASP.NET Core 3.1 and it was a simple config change to do that now that my setup is so streamlined. 

What are your migration stories?
| Comments

Continuing on my research and playing around with GitHub Actions, I was looking to migrate my Alexa.NET project off of Pipelines and in to one place for my open source project.  Pipelines still has an advantage for me right now as I prefer the approval flow that I have right now.  In this post I’ll cover how I modified my build definition to now also include producing the NuGet package, signing it with my code signing certificate, and pushing it to multiple repositories.

Quick tip: if you haven’t follow Ed Thomson before he’s doing a series on GitHub Actions for the month of December.  Check out his GitHub Actions Advent Calendar!

Pre-requisites

We need to first make sure we have the tools needed in the build step, so let’s be sure to get the .NET SDK so we can use the dotnet CLI commands.  This is the start of my build-and-deploy.yaml file and each other snippet builds on this.

name: "Build and Deploy"

on:
  push:
    branches:
      - master

jobs:
  build:
    if: github.event_name == 'push' && contains(toJson(github.event.commits), '***NO_CI***') == false && contains(toJson(github.event.commits), '[ci skip]') == false && contains(toJson(github.event.commits), '[skip ci]') == false
    name: Build Package
    runs-on: ubuntu-latest

    steps:
    - uses: actions/checkout@v1
    - name: Setup .NET Core SDK
      uses: actions/setup-dotnet@v1
      with:
        dotnet-version: 3.1.100

Starting at line 16 I write the steps to get the .NET SDK that I want to use, in this case the .NET 3.1 (which is the long-term support version now) SDK.  Now we are all set…the tools I need are on the runner.

Building the Package

The first thing we obviously need to do is ensure we have an actual NuGet package.  I perform this step during my ‘build’ job when I know things have been successfully built and tested.  After getting the SDK we can how issue our pack command.  This assumes we’ve already run dotnet build, which I didn’t show here.

    - name: Pack
      run: dotnet pack TestLib --configuration Release -o finalpackage --no-build

    - name: Publish artifact
      uses: actions/upload-artifact@master
      with:
        name: nupkg
        path: finalpackage

You can see in line 2 where we use the dotnet CLI to pack into a NuGet package.  Note I’m using an output argument there to put the final nupkg file in a specific location.  In line 5 I am setting up the action to upload the artifact so that I can use it later in other steps in the job.  The upload-artifact agent will use the path ‘finalpackage’ and upload it into the location ‘nupkg’ for me.  It will available for me later as you’ll see.

Signing the Package

Now I want to be a good trusted provider of a library package so I’ve chosen to sign my package using a code-signing certificate.  I got mine through DigiCert.  One of the main differences between Actions and Pipelines is that Actions only has secure storage for ‘secrets’ as strings.  Pipelines has a library where you can also have secure file storage.  To sign a NuGet package, the command requires a path to a certificate file so we have to somehow get the file available for the CLI command.  Based on all the recommendations from people also doing similar activities (needing files in their actions) it seemed to be the approach was to base64-encode the file and put that as a secret…so that’s the approach I took.  I base64-encoded the contents of my PFX and set it as a secret variable named SIGNING_CERT. 

Now the next thing I need to do is not only retrieve that string, but put that into a temporary file.  Searching as best I could on forums I didn’t see an existing script or anything that people used, so I created a new action for myself to use (and you can to) called timheuer/base64-to-file.  This action takes your encoded string, decodes it to a temporary file and sets the path to that temporary file as an output for the action.  Simple enough.  Now with the pieces in place we can set up the steps:

  deploy:
    needs: build
    name: Deploy Packages
    runs-on: windows-latest # using windows agent due to nuget can't sign on linux yet
    steps:
      - name: Download Package artifact
        uses: actions/download-artifact@master
        with:
          name: nupkg
      
      - name: Setup NuGet
        uses: NuGet/[email protected]
        with:
          nuget-api-key: ${{ secrets.NUGET_API_KEY }}
          nuget-version: latest

      - name: Setup .NET Core SDK
        uses: actions/setup-dotnet@v1
        with:
          dotnet-version: 3.1.100

      - name: Get certificate
        id: cert_file
        uses: timheuer/base64-to-file@master
        with:
          fileName: 'certfile.pfx'
          encodedString: ${{ secrets.SIGNING_CERT }}
      
      # Sign the package
      - name: Sign NuGet Package
        run: nuget sign nupkg\*.nupkg -CertificatePath ${{ steps.cert_file.outputs.filePath }} -CertificatePassword ${{ secrets.CERT_PWD }}  -Timestamper http://timestamp.digicert.com –NonInteractive

The above is my ‘deploy’ job that does the tasks.  On line 6 is where we are retrieving the nupkg file from the artifact drop in the previous job.  After that I’m using the new nuget/setup-nuget action to acquire the NuGet CLI tools for subsequent actions.  At present, you cannot use dotnet CLI to sign a NuGet package so we have to use the NuGet tools directly.  We’ll need this later as well so it’s good we have it now.  On line 22 starts the process mentioned above to use my new action to retrieve the encoded string and put it as a temp file.  One line 31 we execute the NuGet sign CLI command to sign the package.  I have a few arguments here but pay attention to the steps.cert_file.outputs.filePath one.  That is the OUTPUT from the base64-to-file action.  The format of steps.{ID}.outputs.{VARIABLE} is what you see here…and you can see in that step I gave it an id of ‘cert_file’ to easily pull out the variable later.

Now, you may have noticed that this agent job runs on windows-latest as the OS and not ubuntu.  This is because presently package signing for NuGet can only be done on Windows machines.  Now that we have a signed package (in the same location, we just signed it and didn’t move it) we can deploy it to package registries.

Publishing the Package to NuGet

Of course for a public library I want this to be available on NuGet so I’m going to publish it there.  NuGet uses an API key authentication scheme which is supported in the dotnet CLI so we can use dotnet CLI push to publish:

      - name: Push to NuGet
        run: dotnet nuget push nupkg\*.nupkg -k ${{ secrets.NUGET_API_KEY }} -s https://nuget.org

Could I have used the NuGet CLI?  Sure, but I already was using this pattern previously so I’m sticking with this from a previous Pipeline definition.  Choice is yours now that we have both CLI tools on the runner machine.  Done, now on to another registry.

Publishing the Package to GitHub Package Registry

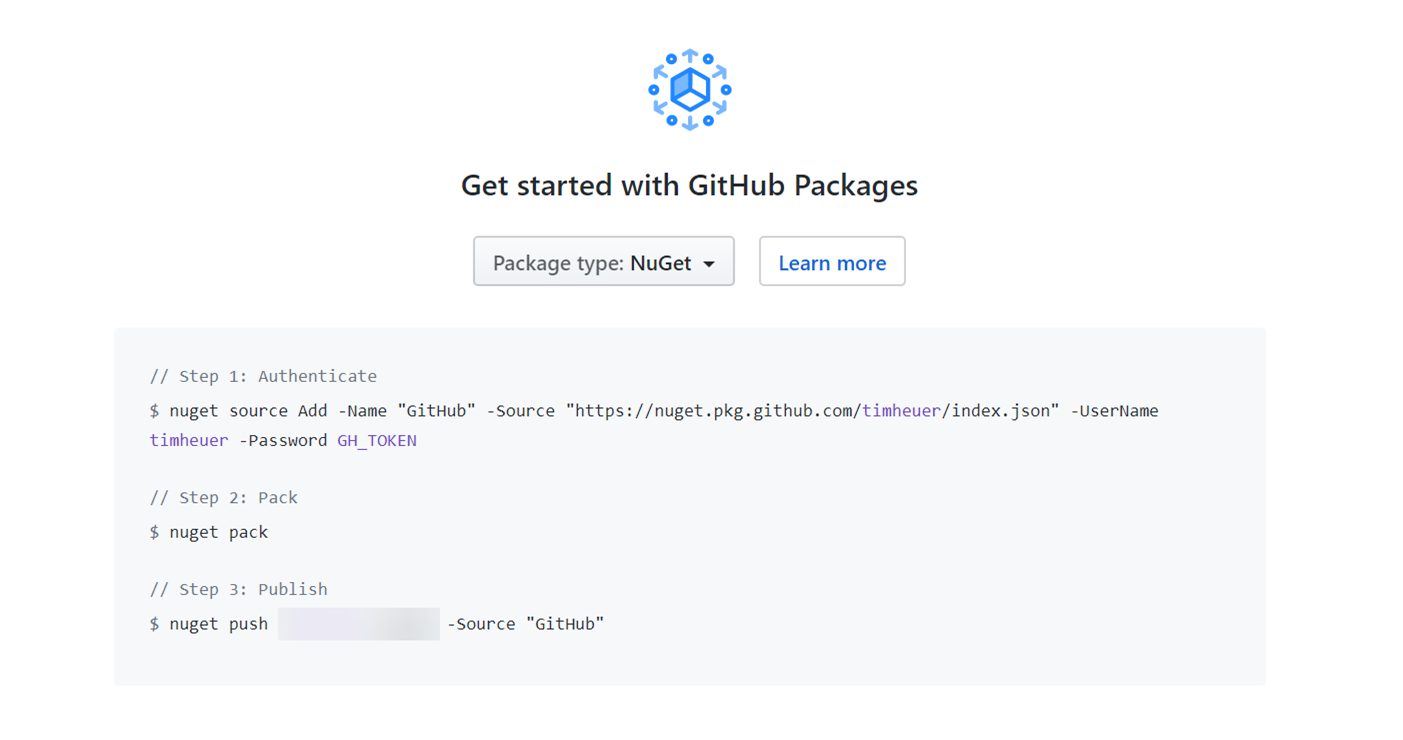
Publishing to the new GitHub Packages Registry takes one extra step.  Since this is not the default location for NuGet, we have to instruct NuGet to let it know where to publish this package.  In your repository you will be provided with a URL from the Packages tab of your repo:

Screenshot of GitHub Packages tab

This is the publishing endpoint for the NuGet CLI.  In our Action we will need two steps: set up the source and publish to it:

      - name: Add GPR Source
        run: nuget sources Add -Name "GPR" -Source ${{ secrets. GPR_URI }} -UserName ${{ GPR_USERNAME }} -Password ${{ secrets.GITHUB_TOKEN }}

      - name: Push to GitHub Packages
        run: nuget push nupkg\*.nupkg -Source "GPR"

In line 2 is where we set up the source we are going to later use.  We can give it any name you want here.  I made the other variables Secrets for my config.  This also requires you to use the UserName/Password scheme as GitHub Packages doesn’t support NuGet API keys right now.  Another reason we need to use the NuGet CLI here.  The password you can use is provided as a default token in any GitHub Action called secrets.GITHUB_TOKEN and your repo’s actions have access to it.  In line 5 then we see us using that source and pushing our package to the GitHub Packages Registry.

Summary

So there you have it!  A GitHub Actions flow packages, signs, and publishes to two package repositories.  It would be nice to standardize on one tooling CLI and I know the teams are looking for feedback here, but it is good to know that you have 2 official supported GitHub Actions in setup-dotnet and setup-nuget to use to get the tools you need.  I hope this helps someone!

| Comments

I’ve been spending a lot of time looking at the GitHub Actions experience for .NET developers.  Right now I’m still using Azure Pipelines for my project, Alexa.NET, in building, testing, and deploying to NuGet.  As the tools and process for using DevOps tools for CI/CD have so vastly improved over the years, I’ve become a huge advocate for this being the means for your build/deploy steps…YES, even as a single developer or a smaller team.  It simply really helps you get to a purer sense of preserving the ability for your code to live on, for others to accurately build it, and for you to have peace of mind that your code works as intended.  I’m just such a huge fan now.  That said, I still think there is a place for ‘right-click publish’ activities in inner-loop development.  In fact, I use it regularly for a few internal apps I’ve written.  For simple solutions that method works well, but I certainly don’t think I can right-click-publish a full solution to a Kubernetes environment though.  I’m currently researching new tooling ways to help those ‘publish to CI/CD’ from Visual Studio (would love your opinions here) so I’ve been spending a lot more time in GitHub Actions.  I decided to look at publishing a Blazor app to Azure Storage as a static site…here’s what I did.

Setting up the Storage endpoint

The first thing you need is an Azure Storage account.  Don’t have an Azure account, no worries you can get a Free Azure account easily which includes up to 5GB of Azure Blob Storage free for the first 12 months.  Worried about pricing afterwards?  Well check out the storage pricing calculator and I’m sure you’ll see that even at 1TB storage it is cost-effective means of storage.  But any rate, you need a storage account and here are the configuration you need.

First, you may already have one.  As a developer do you create your infrastructure resources or are these provisioned for you by infra/devops roles in your company (leave comments)?  Earlier this year at Build we enabled static website hosting in Azure Storage.  You first create a Storage resource (ensuring you choose v2 which is the default, but that is the version that enables this feature).  After you create your resource scroll on the left and you’ll see ‘Static website' section.  Here’s what the configuration looks like and let me explain a few areas here:

Screenshot of the Static website configuration
All of this configuration is under the Static website area.  First you obviously need to enable it…that’s just toggling the enabled/disabled capability.  Enabling this now gets you two things: 2 endpoints (basically the URI to the website) and a specific blob contianer named $web where your static content needs to live.  The endpoints default map to this blob container without having to add a container name to the root URI.  Remember the resource group you’ve given to your storage instance here, you will need that later.

NOTE: You can later add CDN/custom domain to these endpoints, but I’m not covering those here.

The second thing you need is to set a default document and error page.  The default document for your SPA is your root entry point, and for most frameworks I’ve seen this is indeed index.html.  For Blazor WebAssembly (WASM) apps, this is also the default if you are using the template.  So you set the default document as ‘index.html’ and move on.  The error document path is another interesting one…you need to set this for SPA apps because right now the static website capability of Azure Storage does not account for custom routing rules.  What this means is that storage will throw an HTTP 404 error message when you go to something like /somepage where it actually doesn’t exist but your SPA framework knows how to handle it.  Until custom routing works on Azure Storage your error document becomes your route entry point.  So for this set the error document path to also be index.html for Blazor WASM.

NOTE: Yes this isn’t ideal for routing.  On top of that it still does show an HTTP 404 actual network message even though your route is being handled.  Azure Storage team has heard this request…working on advocating for y’all.

That’s it.  Now you have a storage endpoint with a blob container that you can begin putting your content in and browse to using your endpoint URI provided from the portal.  For a simple tool to navigate your storage, I’ve been using Azure Storage Explorer and it is intuitive to me and works well to quickly navigate your storage account and containers (and supports multi-account!). 

Setting up your Azure Service Principal credentials

The next thing you will need is a service principal credential.  This will be used to authenticate with your Azure account to be able to use DevOps tools to work on your behalf in your account.  It’s a simple process if you have a standard account.  I say this only because I know there might be some configurations for environments where you yourself don’t have access to create service principals and may need someone to create one on your behalf, or also there might be credentials you can already use.  Either way here is the process I used.

I used the Azure CLI so if you don’t have that installed go ahead and grab that and install it.  This should now be in your PATH environment and using your favorite terminal you should be able to start executing commands.  To start out, login to the CLI using `az login` – this will launch a browser for you to authenticate via your account and then issue the token in your environment so that for the remainder of your session you’ll be authenticated.  After logging in successfully running `az account show` will emit what subscription you are using and you’ll need the subscription ID later so grab that and put it somewhere on your scratch notepad for later command usage.

NOTE: If you have more than one subscription and have not set a default subscription you should set that using the `az account set` command.

Now you can use the CLI to create a new service principal.  To do that issue this command:

az ad sp create-for-rbac --name "myApp" --role contributor \
                            --scopes /subscriptions/{subscription-id}/resourceGroups/{resource-group} \
                            --sdk-auth

Note on line 2 here that you need to replace {subscription-id} with your own actual subscription id (the GUID) and {resource-group} with the resource group name where your storage account is located.  On line 1 the “myApp” can be anything but I recommend making it meaningful as this is basically the account name of the principal.  The output of this command is your service principal.  The full JSON output.  Save this off in a place for now as we’ll need that later to configure GitHub Actions properly.  Great now to move on to the app!

Create your Blazor WASM app

I assume since you may be reading this far you aren’t new to Blazor and probably already have the tools.  As of this writing, Blazor WASM is still in preview so you have to install the templates separately to acquire them to show up in `dotnet new` and in Visual Studio File…New Project.  To do that from a terminal run:

dotnet new -i Microsoft.AspNetCore.Blazor.Templates::3.1.0-preview4.19579.2

Then you will be able to create a new project.  I’m showing Visual Studio here and this is the WASM template:

Screenshot of Blazor new project dialog

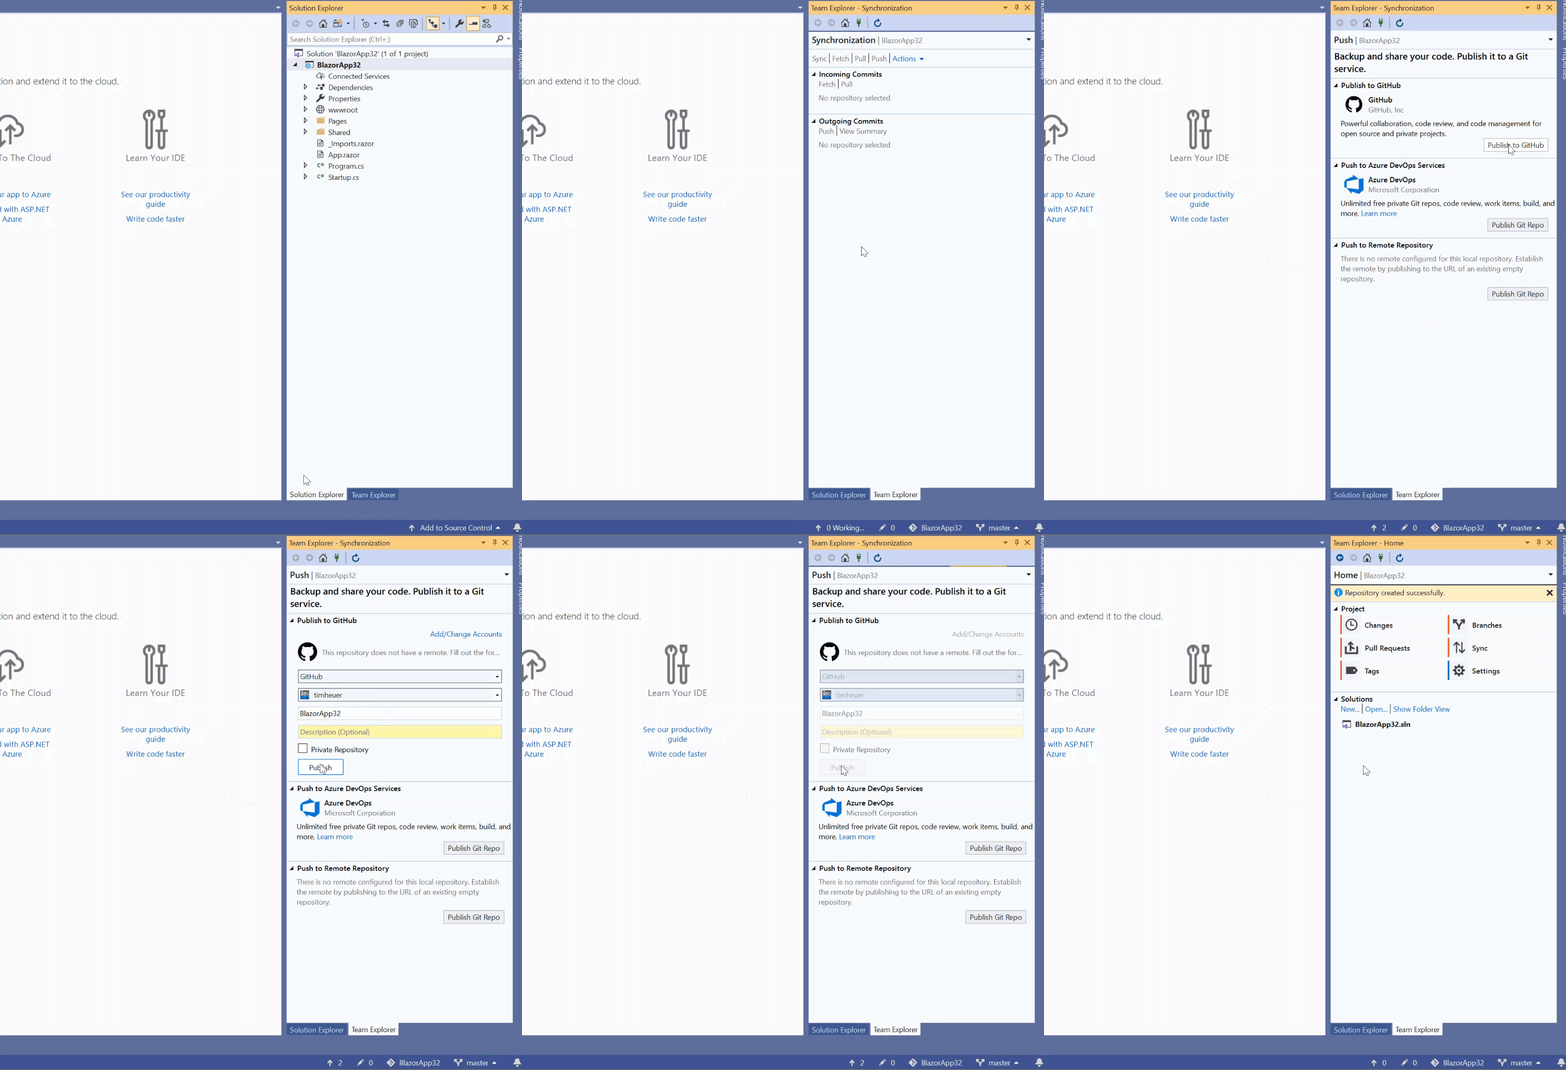
In the dialog here you will see Blazor WebAssembly App and that’s what you will use.  Now you have a choice to have it ASP.NET Core hosted using that checkbox, which if you were going to do other things in ASP.NET maybe that’s what you want.  For the purposes of this article we are talking about just having the WASM app and having a place to host it that isn’t a web server with other content…just hosting static content and using storage to do so…so we aren’t checking that box.  The result will be a Blazor WASM app with no host.  Now let’s add that to GitHub.  If you are using Visual Studio 16.4+ you’ll be able to take advantage of an improved flow for pushing to GitHub.  Once you have your project, in the lower right click ‘Add to Source Control’ choosing Git and then you’ll see the panel to choose GitHub and create/push a repo right away.  You don’t have to go to GitHub site first and clone later…all in one step:

Animation of Visual Studio GitHub flow

Great!  Now we have our WASM project and we’ve created and pushed the current bits to a new GitHub repository.  Now to create the workflow.

Setup the GitHub Action Workflow

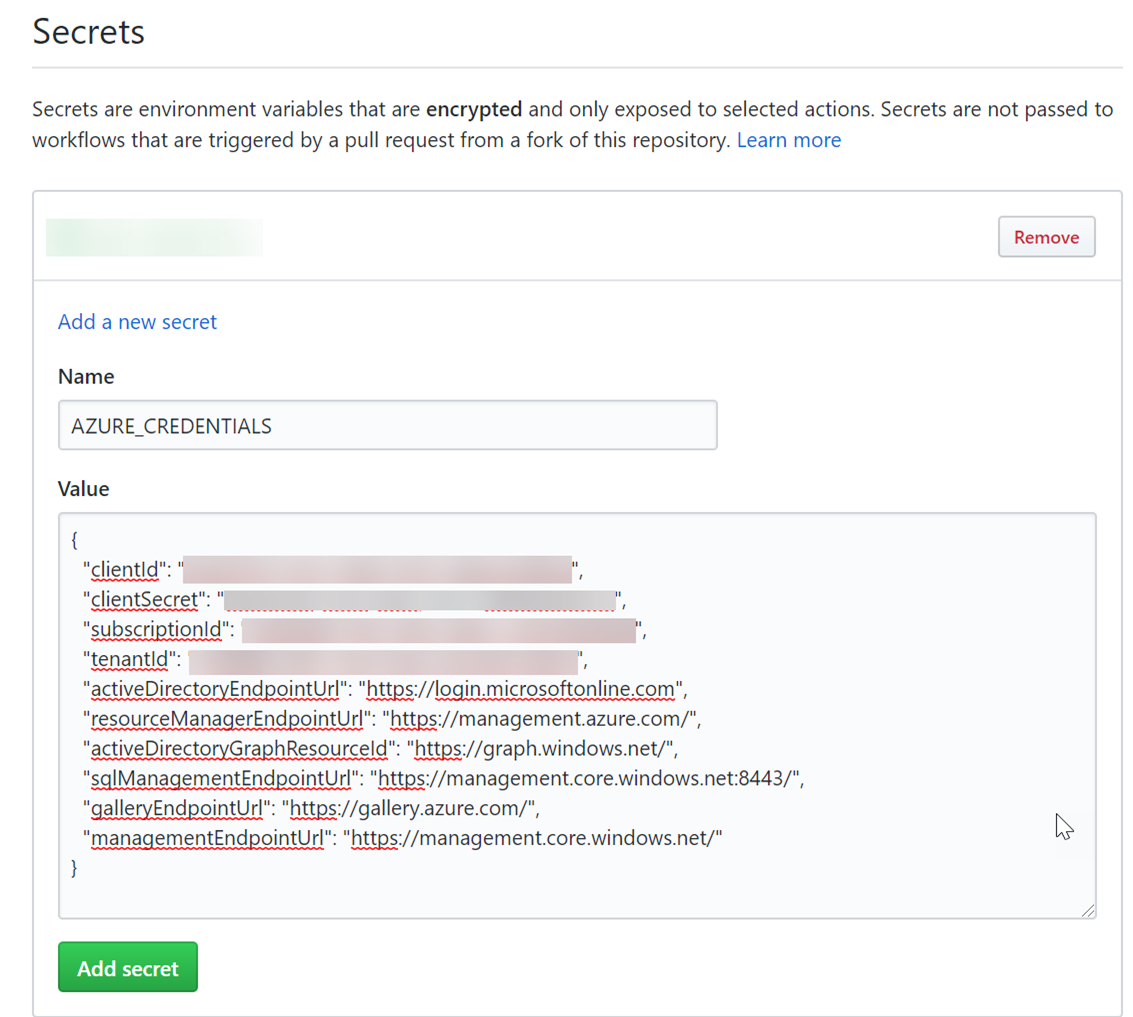
Now we’ve got an Azure Storage blob container, a service principal, a Blazor WASM project, and a GitHub repository…all set to configure the CI/CD flow now.  First let’s put that service principal as a secret in our repository.  In the settings of your repository navigate to the Secrets section and add a secret named AZURE_CREDENTIALS.  The content of this is the full content of your service principal (the JSON blob) that we generated earlier:

Screenshot of GitHub Secrets configuration

This saves the secret for us to use in the workflow and reference as a variable.  You can add more secrets here if you’d like if you wanted to add your resource storage account name as well (probably a good idea).  Secrets are isolated to the original repository so no forks get the secrets at all.  Now that we have these let’s create the workflow file.

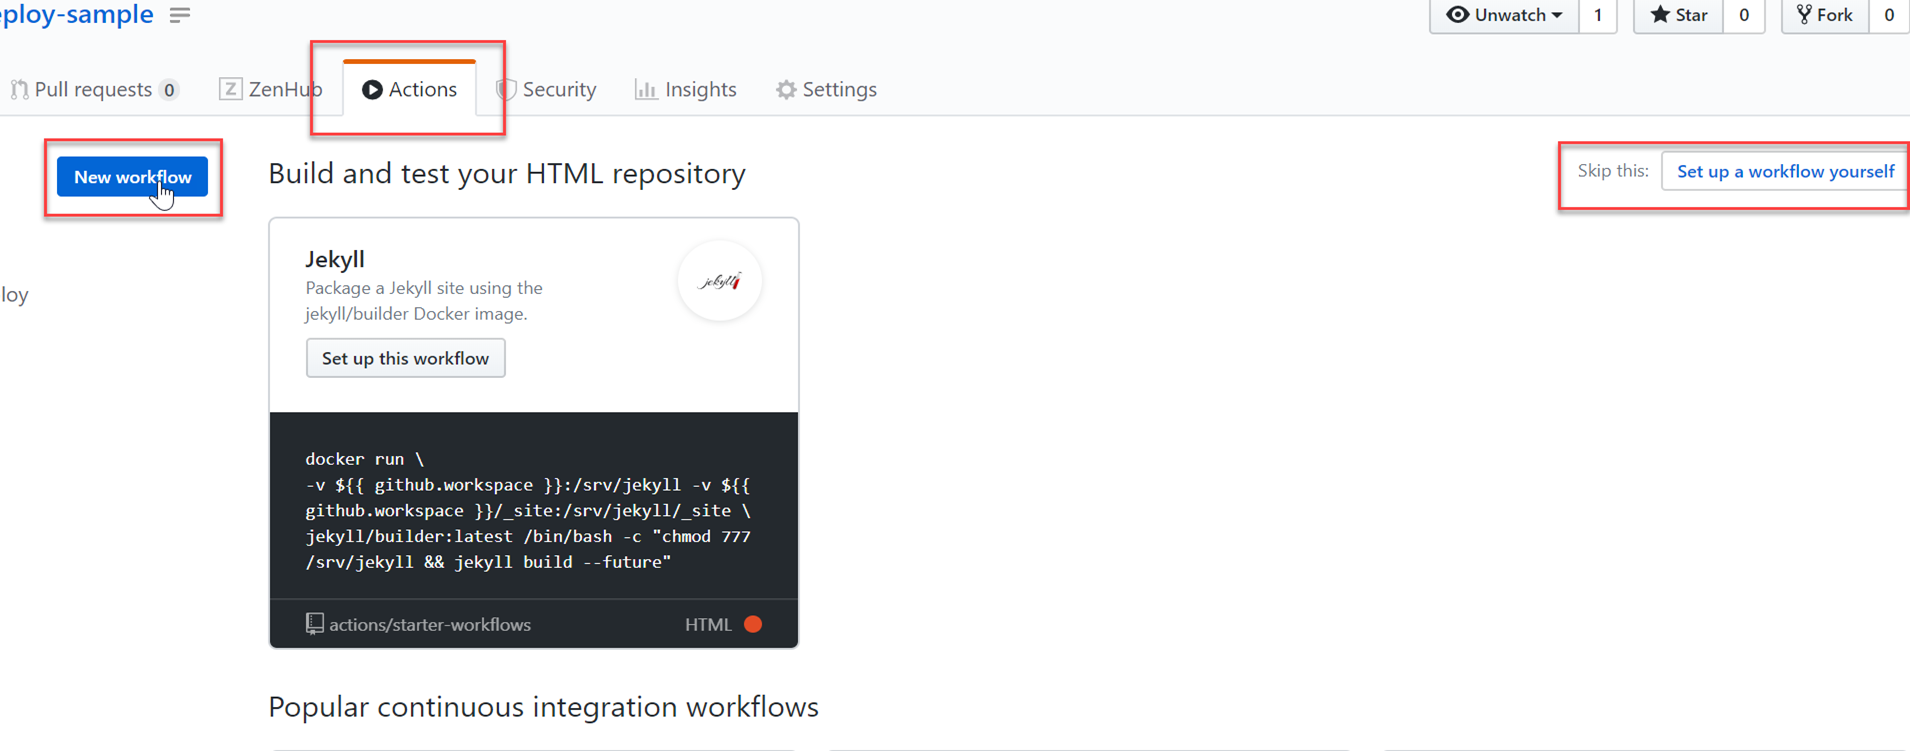
Today, Visual Studio isn’t too helpful in authoring the YAML files (would love your feedback here too!) but a GitHub Action is just a YAML file in a specific location in your repository: .github/workflows/azure-storage-deploy.yaml.  The file name can be anything but putting it in this folder structure is what is required.  You can start in the GitHub repo itself using the Actions tab and through the online editor get some level of completion assistance to help you navigate the YAML editing.  Go to the Actions tab in your repository and create a new workflow.  You’ll be offered a starter workflow based on what GitHub thinks your project is like.  As of this writing it thinks Blazor apps are Jekyll workflows so you’ll need to expand and either find the .NET Core one or just start from a blank workflow yourself.

Screenshot of GitHub Actions config

Four my workflow I want to build, publish and deploy my app.  I’ve separated it into a build and deploy jobs.  You can read all about the various aspects of GitHub Actions in their docs with regard to jobs and other syntax as I won’t try to expound upon that in this article.  Here is my full YAML for the entire workflow with some key areas highlighted:

name: .NET Core Build and Deploy

on: [push]

env:
  AZURE_RESOURCE_GROUP: blazor-deployment-samples
  BLOB_STORAGE_ACCOUNT_NAME: timheuerblazorwasm

jobs:
  build:
    name: Build
    runs-on: ubuntu-latest
    steps:
    - uses: actions/checkout@v1
    - name: Setup .NET Core
      uses: actions/setup-dotnet@v1
      with:
        dotnet-version: 3.1.100

    - name: Build with dotnet
      run: dotnet build --configuration Release
    
    - name: Publish with dotnet
      run: dotnet publish --configuration Release 
    
    - name: Publish artifacts
      uses: actions/upload-artifact@master
      with:
        name: webapp
        path: bin/Release/netstandard2.1/publish/BlazorApp27/dist

  deploy:
    needs: build
    name: Deploy
    runs-on: ubuntu-latest
    steps:

    # Download artifacts
    - name: Download artifacts
      uses: actions/download-artifact@master
      with:
        name: webapp

    # Authentication
    - name: Authenticate with Azure
      uses: azure/login@v1
      with:
        creds: ${{ secrets.AZURE_CREDENTIALS  }}

    # Deploy to storage using CLI
    - name: Deploy to storage using CLI
      uses: azure/CLI@v1
      with:
        azcliversion: latest
        inlineScript: | 
          # show azure account being used
          az account show
          # az storage account upload
          az storage blob upload-batch --account-name ${{ env.BLOB_STORAGE_ACCOUNT_NAME }} -s webapp -d \$web
          # az set content type of wasm file until this is fixed by default from Azure Storage
          az storage blob update --account-name ${{ env.BLOB_STORAGE_ACCOUNT_NAME }} -c \$web -n _framework/wasm/mono.wasm --content-type application/wasm

So a few things going on here, let’s talk about them.

  • Lines 5-7: these are ‘local’ environment variables I set up.  The storage account name is NOT the blob container name but the actual storage account name.  This ideally probably should be a Secret as mentioned above.  Environment variables can be set here and then placeholders reference them later.
  • Starting at line 9 is where the ‘build’ portion is here.  We checkout the code, acquire the SDK and run the build and publish commands.  On line 26-30 is a step where we put the publish output to a specific artifact location for later retrieval of steps.  This is good practice.
  • Lines 40-42 is where we are now in the ‘deploy’ step of our CD and we retrieve those artifacts we previously pushed and we set them as a name ‘webapp’ that the later will use in deployment
  • Line 45 is where we are going to first authenticate to Azure using our service principal retrieved from the Secrets.  The ‘secrets’ object is not something you have to define and is part of the workflow so you just add the property you want to retrieve
  • Line 51 is where we start the deployment to Azure using the CLI commands and our param ‘webapp’ as the source.  This is the CLI command for uploading batch to storage as described in the docs for `az storage blob upload-batch`
  • Line 61 is an additional step that we need for .wasm files.  I believe this to be a bug because there is logic in the CLI to correctly map the content-type but for some reason it is not working…so for now you need to set the content-type for .wasm to `application/wasm` or the Blazor app will not work

This is made possible through a series of actions: checkout, dotnetcore, azure…all brining their functionality we can draw on and configure.  There are a bunch of Azure GitHub Actions we just released for specific tasks like deploying to App Service and such.  These don’t require CLI commands but rather just provide parameters to configure.  Because there is no Storage specific Action as of now, we can use the default CLI action to script what we want.  It is an enabler in lieu of a more strongly-typed action.  Now that we have this workflow YAML file complete we can commit and push to the repository.  In doing that we now have a CI/CD action that will trigger on any push (because that’s how we configured it).  We can see this action happening in my sample repo and you can see since we separate it in two jobs it will show them separately:

Screenshot of action deployment log

Summary

So now we have it complete end-to-end.  And subsequent check-in will trigger the workflow and deploy the bits to my storage account and I can now use my Azure Storage account as a host for my static website built on Blazor WASM.  This full YAML sample flow is available on my repo for this and you can examine it in more detail.

I would love to know how y’all are coming along using GitHub Actions with your .NET projects.  Please comment below! 

| Comments

I’ve been doing a lot of playing around with GitHub Actions lately.  GitHub has had access to repo activity via webhook capabilities for a while.  Actions basically gives similar capabilities in a DevOps flow on the repo itself, where the code for your ‘hook’ is an asset in the repo…using YAML configuration.  Recently an idea came up in one of our teams to provide better pro-active notification of certain types of Issues on our repos.  In GitHub, you can monitor activity in a few ways as a consumer: watching the repo and subscribing to a conversation.  In watching a repo you get a lot of noise of lots of notifications.  In subscribing to an Issue you can only do so after the issue is created and not notification when it is initially created.  What I wanted was simple: Notify me when an Issue is added to a repo that has been labeled as a breaking change.  So with that goal I set off to create this.

Creating the Action

Creating the action was simple.  I followed the great javascript-action template.  I recommend following the instructions in the template rather than the actual documentation as it is simpler to follow and more concise.  The cool thing about the template is you can click ‘Use this template’ and get a new repo for your action quickly:

actionstemplate1

I was able to configure my action quickly.  My goal was to accomplish the following things:

  • Look at an Issue
  • If the issue had a specific (or multiple) labels grab the content of the issue
  • Convert the contents from markdown to HTML and send an email to a set of folks

Actions are JavaScript apps and I was able to use two libraries to help me achieve this quickly: remarkable (to convert Markdown) and SendGrid (to email).  Aside from those you are able to use GitHub core SDKs to get access to the ‘context’ of what that Action is…well, acting upon.  In having this context, I can examine the payload and the specific Issue within that payload.  It looks something like this (relevant lines highlighted):

var core = require('@actions/core');
var github = require('@actions/github');
var sendgrid = require('@sendgrid/mail');
var moment = require('moment');
var Remarkable = require('remarkable').Remarkable;
var shouldNotify = false;

// most @actions toolkit packages have async methods
async function run() {
  try { 
    // set SendGrid API Key
    sendgrid.setApiKey(process.env.SENDGRID_API_KEY);

    // get all the input variables
    var fromEmail = core.getInput('fromMailAddress');
    var toEmail = core.getInput('toMailAddress');
    var subject = core.getInput('subject');
    var verbose = core.getInput('verbose');
    var labelsToMonitor = core.getInput('labelsToMonitor').split(",");
    var subjectPrefix = core.getInput('subjectPrefix');

    // check to make sure we match any of the labels first
    var context = github.context;
    var issue = context.payload.issue;

This context gives me all I need to inspect the Issue contents, labels, etc.  From that then I can decide that I need to perform the notification, convert, and send the email.  Simple and done.

Consuming the Action

Since the Action is now defined, something needs to consume it.  This is in the form of a GitHub Workflow.  This is a YAML file that decides when to operate and what to do.  Specifically you define a Trigger.  These can be things like when a push happens, a PR is issued, or, in my case, when an Issue happens.  So now on my repo I can consume the action and decide when it should operate.  As an example here is how I’m consuming it by putting a yaml file in .github/workflows folder in my repo.

name: "bc-notification"
on: 
  issues:
    types: [edited, labeled]

jobs:
  test:
    runs-on: ubuntu-latest
    steps:
    - uses: actions/checkout@v1
    - uses: timheuer/[email protected]
      env:
        SENDGRID_API_KEY: ${{ secrets.SENDGRID_API }}
      with:
        fromMailAddress: '${{ secrets.BC_NOTIFY }}'
        toMailAddress: '${{ secrets.BC_NOTIFY }}'
        subject: 'BC:'
        subjectPrefix: 'BC:'
        labelsToMonitor: "Breaking change"

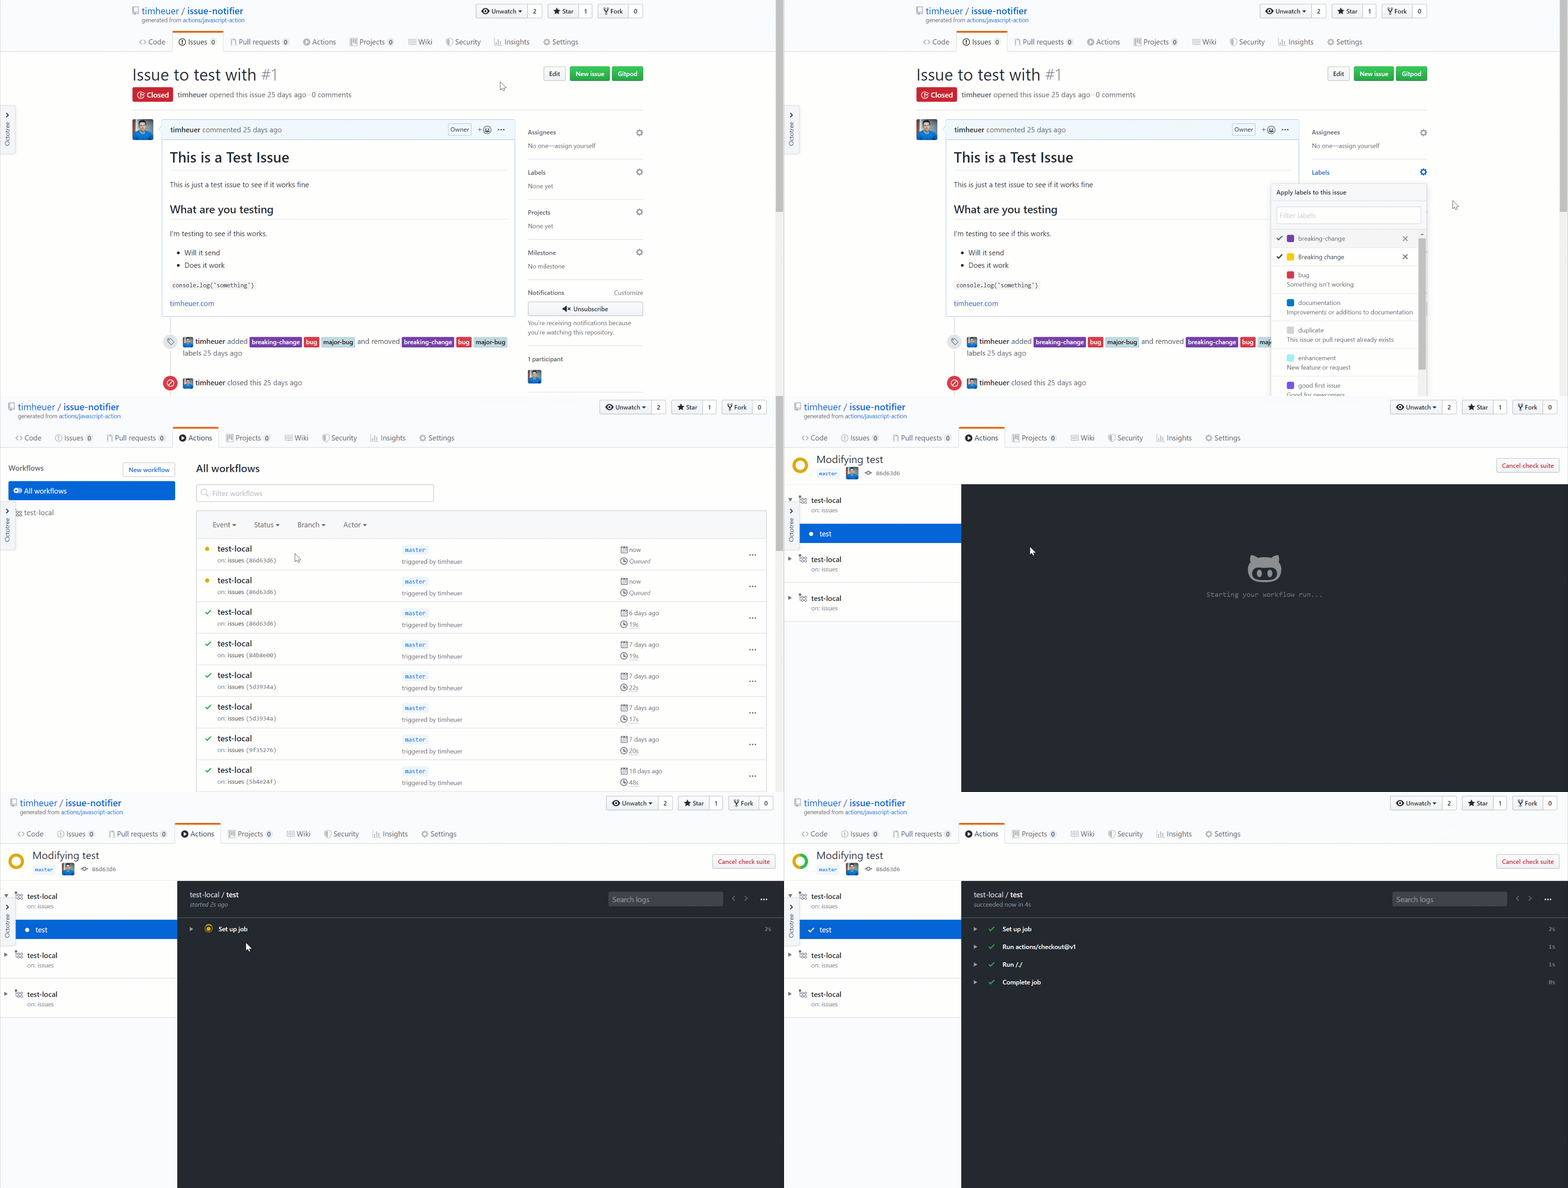
Looking at this workflow you can see in the highlighted areas that I’m triggering on Issues, and then secondarily only when they are edited or labeled.  Then later on this workflow defines using my new action I created (and now published as a tagged version) called issue-notifier.  Done.  Now whenever an Issue is labeled as a breaking change in this repo and email is sent to a set of partners via email proactively without them having knowledge that there may be something they want to subscribe to in the repo.  Here is an example of seeing it triggered:

issuesampleanim

and the result notification in my inbox:

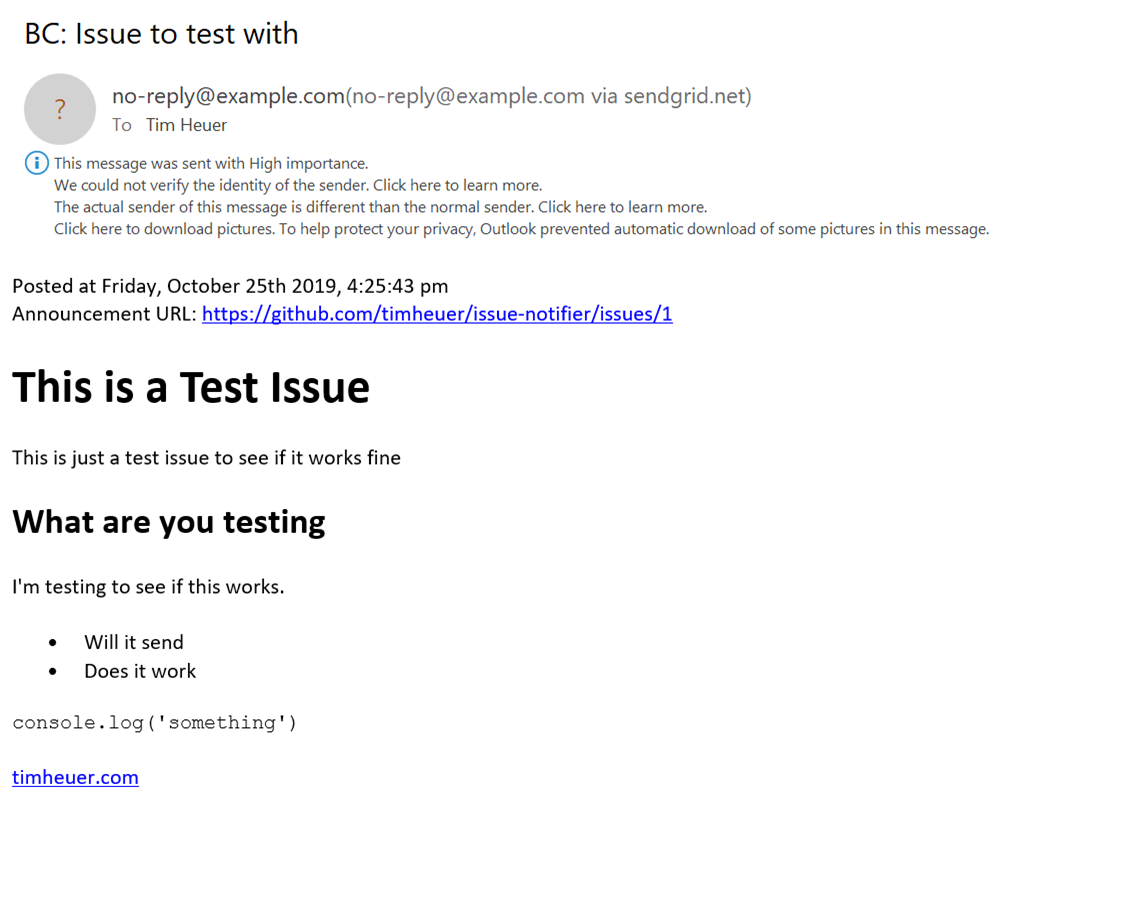
samplemail

Dev experience for Actions

I’ve had a good experience working with GitHub Actions and learning the various ways of automating a few things beyond just build in my repos.  My #1 wish for the ‘inner loop’ experience in creating Actions is the debugging experience.  You have to actually push the workflow and trigger it so ‘test’ it.  This leads to a slow inner-loop development flow.  It would be nice to have some more local runner capability to streamline this process and not muddy the repo with a bunch of check-ins fixing dumb things as you are iterating.

Anyhow, if you want to use this action I created, feel free: https://github.com/marketplace/actions/github-issue-notifier

| Comments

On this lazy Sunday morning I was catching up among the feeds and saw Scott Hanselman’s post about customizing Windows Terminal a bit more.  I had already done this a while back and got my terminal all fancy looking with those cool Powerline fonts and such. 

Screenshot of Windows Terminal

It’s a simple thing, but actually does make my experience a bit nicer to work in the terminal environment.  I’m not really a CLI kind of person – it’s growing on me though – so these customizations help make it more pleasing to me.  I use PowerShell (PowerShell Core to be specific) as my default shell.  I use it because I like the ability of some of the modules from time to time that enable me to do some quick things working with Azure.  Scott’s post had a step to customize basically your startup script for PowerShell.  You can get to this from your shell by typing:

notepad $PROFILE

from a PowerShell prompt.

NOTE: PowerShell and PowerShell Core do NOT share the same profile script, so if you want similar customizations for both, you need to edit both profiles.  The $PROFILE trick above will take you to the right startup profile script for each shell.

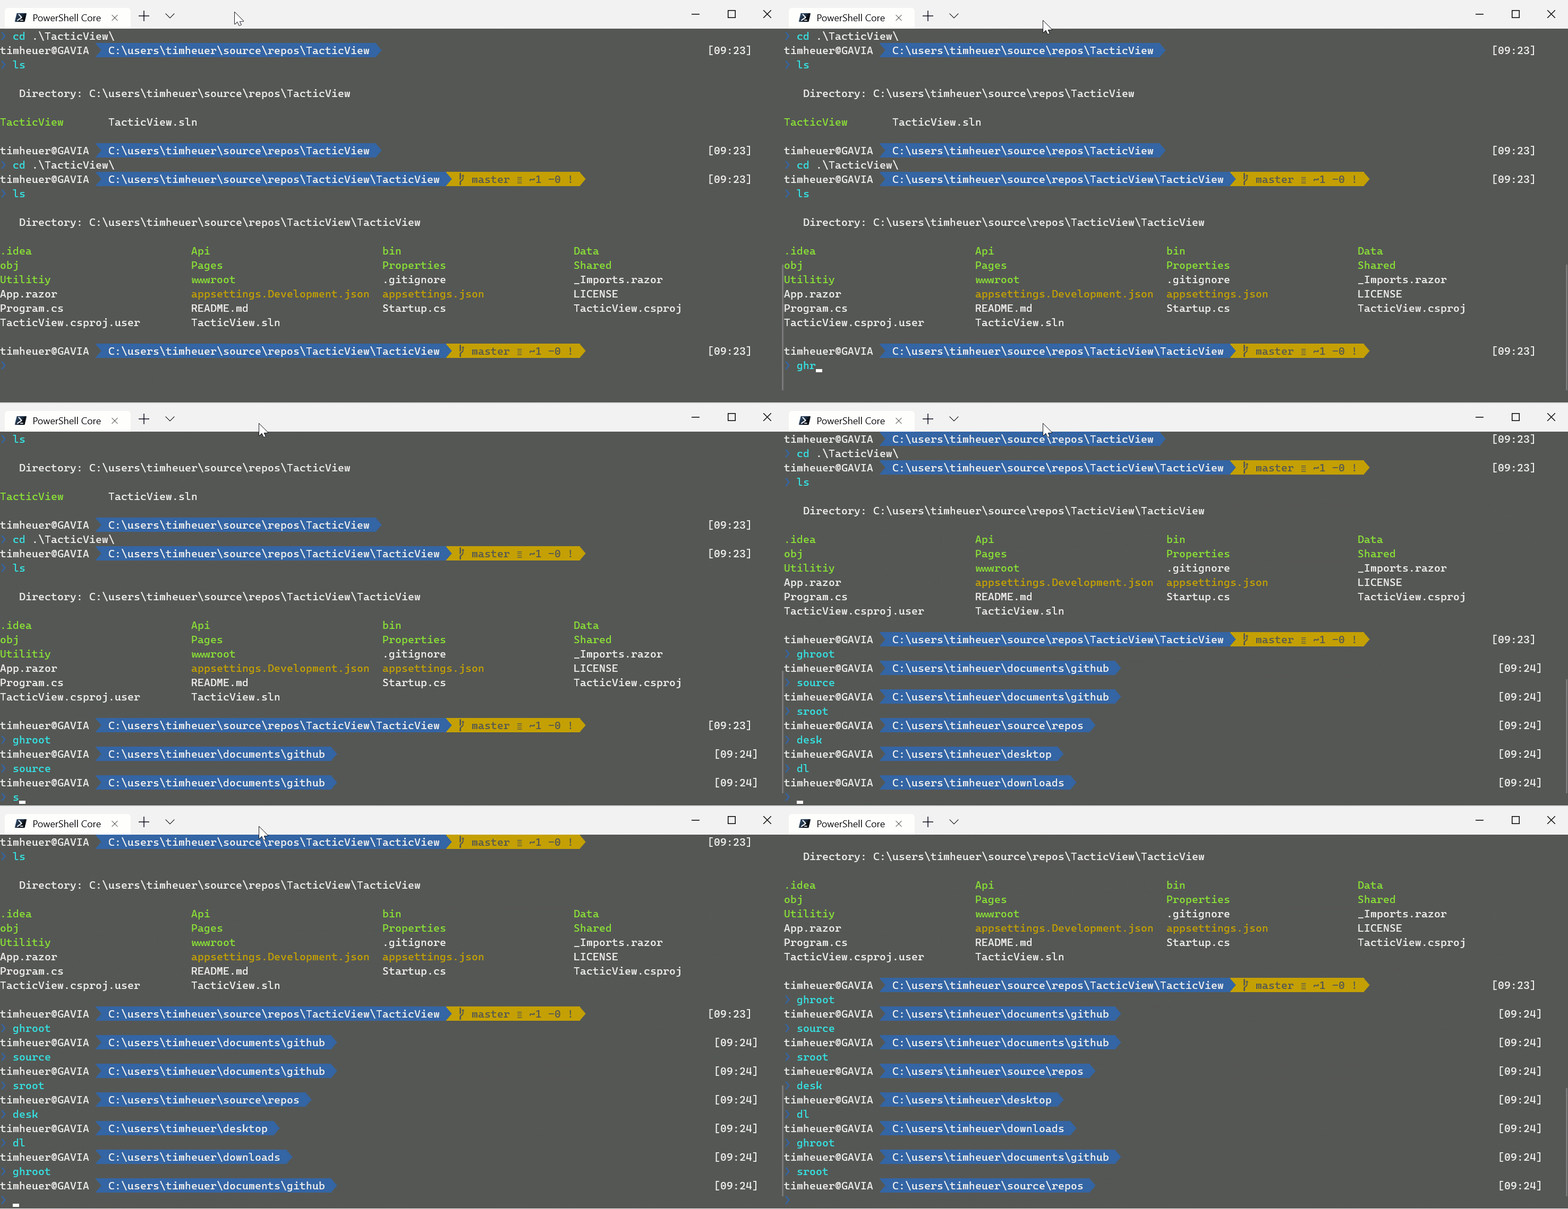
As I inspected mine, I was reminded of my favorite command: Set-Location.  It’s simple but it will let you basically create aliases to quickly move to directories.  Take a look in action for me.  While I do have a startup directory configured for Windows Terminal, it’s nice to quickly navigate around.

Animated GIF image of using Windows Terminal shortcuts

So for me I’ve got a few quick shortcuts to get to some most-used directories while working in Terminal.  Here’s mine that I have:

# Helper function to change directory to my development workspace
function source { Set-Location c:\\users\\timheuer\\documents\\github }
function ghroot { Set-Location c:\\users\\timheuer\\documents\\github }
function sroot { Set-Location c:\\users\timheuer\\source\\repos }
function dl { Set-Location c:\\users\\timheuer\\downloads }
function desk { Set-Location c:\\users\\timheuer\\desktop }
function od { Set-Location c:\\users\\timheuer\\OneDrive }

It’s dumb simple, but it saves me keystrokes when I’m working in Terminal and moving back and forth.  What’s your favorite tips to use in Terminal?