| Comments

Yay! .NET Core 3.0 is now available!  You now are migrating your apps and want to get it to your favorite cloud hosting solution.  But they may not have it quite ready yet and you are still eager to deploy to production.  No worries, we have a solution for you.

As our documentation explains on different deployment models we have for .NET Core apps (simplified);

  • Framework-dependent (FDD): you are expecting the required framework to be where you are deploying…you are just deploying your code.
  • Self-contained (SCD) : you are packaging the required libraries and runtimes needed for your code to run, not expecting any shared runtime on your endpoint.
  • Framework-dependent executable (FDE): similar to FDD, but packaged as an executable, but expects a shared runtime to exist where you are deploying

Ideally your favorite cloud host provider will have your desired runtime available to you in their PaaS offerings.  But we’ve already established you are eager and want to get your new app there sooner.  No worries, then SCD is for you.  So how do you do that?  Here’s some helpful hints to get you going.

Producing the bits for SCD deployment is a part of the ‘publish’ pipeline to get the fully functional bits in all the right formats/places for you.  Here’s how you get it going in a few different environments.  First, though all of these require the understanding of runtime identifier values, or RID as we affectionately call it.  RIDs identify the target platform where the app will run.  You can see a list of all possible values in the RID catalog.  Understanding your value is key first.  For this, I’m going to deploy to Azure App Service for Linux and going to use linux-64 as my RID in all samples below.  This would vary based on what/where you are deploying.  I am also assuming in my samples that I’m executing these commands where they know the context of where my csproj file exists.  You can, of course, specify the path to your project files explicitly.

dotnet CLI

From the dotnet CLI you would first want to build and then publish using the RID.  Why build?  Well, it’s valuable to ensure your building against the RID that you will publish.  Catch any build errors in advance, ya know?  So from the CLI:

dotnet build -r linux-x64
dotnet publish --self-contained -r linux-x64

The key here is the ‘-r’ and ‘--self-contained’ arguments.  I’m using ‘-r’ but you can also use ‘--runtime’ for the long form.  What this will produce (unless you specified a different output argument) is a folder with your RID and then the publish folder within that.  So for me above in my project directory it would be in \bin\release\netcoreapp3.0\linux-x64\publish and everything in that \publish is what is needed for SCD. 

Using the CLI is the basic you can do.  Now it’s on your own to push the bits where they need to be, specify startup commands, etc.  But better, you can use some tools that build on top of this CLI goodness.

Azure DevOps 

Let’s first talk about DevOps.  You should be using this.  No let’s be real clear – USE CI/CD!!! “But I’m only myself as a developer!” So what, you should still use this.  I’m a believer now and it is so simple to set up and you then just worry about committing your code and your DevOps flow/pipelines take care of build/test/publish/release for you…it’s awesome.  With that out of the way, let’s show you how to do it in Azure DevOps. 

Honestly, if you haven’t gotten the hang of CI/CD you really should spend the time in one day and get your project configured.  Whether it is Azure DevOps, GitHub Actions, AppVeyor, Jenkins, whatever, you will be better off.  Azure DevOps is basically free and you’ll be happier once you’ve got it done.  You owe it to yourself.  But don’t worry, I explain the other ways below too.

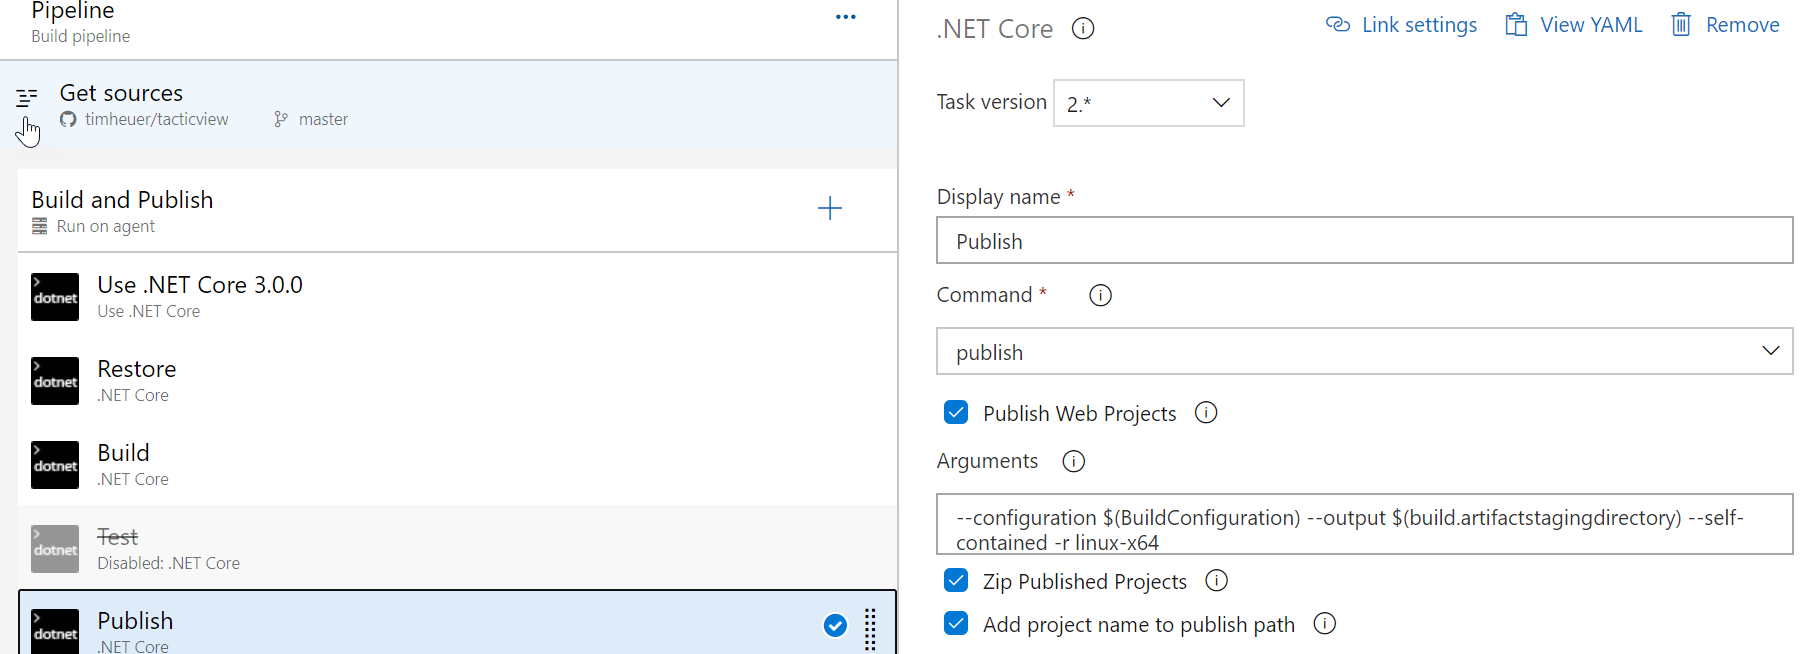
In your pipeline you would add the .NET Core task and configure it for publish (assuming you also have the build/test).  This task basically calls the CLI so you put the same arguments as we just went through.  Here is my task in part one:

Screenshot of Azure DevOps pipeline showing publish arguments

Observe the ‘Zip Published Projects’ – I enabled this because this is what will be used for Azure App Service deploy next.

SPECIAL NOTE: When using the ‘Use .NET Core’ task in Azure DevOps, I recommend using the major.minor.x pattern to specify the version, so in this case 3.0.x.  This will ensure you get the latest patch updates for your specified major.minor version.  For self-contained this is smart since you are bringing the platform runtime with you and not getting auto-updates from the platform.

Then you want to deploy it, and for me to Azure App Service, I add the Azure App Service Deploy task and configure it using my published bits from the previous step.  Notice I’m still specifying the Runtime Stack value (even though at the time of this writing I need to use SCD) and specifying the startup command as the folder path to my app.

Screenshot of Azure DevOps pipeline showing deployment

And that’s it…now when I commit a change, these pipelines run and build/publish/deploy my app to my cloud provider without me having to worry if they have the runtime available yet or not.  You should be able to do this with Azure, AWS, wherever, and still use Azure DevOps to manage your workflow (or GitHub Actions).

Oh you’re a YAML person?  Sorry about that…here’s basically what it looks like using Azure DevOps tasks:

steps:
    # task for publish CLI command
    - task: DotNetCoreCLI@2
    displayName: Publish
    inputs:
    command: publish
    publishWebProjects: True
    arguments: '--configuration $(BuildConfiguration) --output $(build.artifactstagingdirectory) --self-contained -r linux-x64'
    zipAfterPublish: True

    #task for deploy to Azure App Service
    - task: AzureRmWebAppDeployment@4
    displayName: 'Azure App Service Deploy: tacticview'
    inputs:
    azureSubscription: 'Azure-Microsoft'
    appType: webAppLinux
    WebAppName: tacticview
    deployToSlotOrASE: true
    ResourceGroupName: 'timheuer-linuxappsvc'
    SlotName: staging
    RuntimeStack: 'DOTNETCORE|3.0'
    StartupCommand: /home/site/wwwroot/TacticView
    

So there you have it for Azure DevOps!

GitHub Actions

For GitHub Actions, it is very similar to Azure DevOps using the CLI.  Here’s the relevant snippet for those steps (minus the deploy part):

name: ASP.NET Core CI

    on: [push]

    jobs:
    build:

    runs-on: ubuntu-latest

    steps:
    - uses: actions/checkout@v1
    - name: Setup .NET Core
    uses: actions/setup-dotnet@v1
    with:
    dotnet-version: 2.2.108
    - name: Build with dotnet
    run: dotnet build --configuration Release
    - name: Publish with dotnet
    run: dotnet build --configuration Release -r linux-x64 --self-contained


You would them want to add the deploy pieces in GitHub Actions and you can follow along with that from Abel’s blog post.

Visual Studio

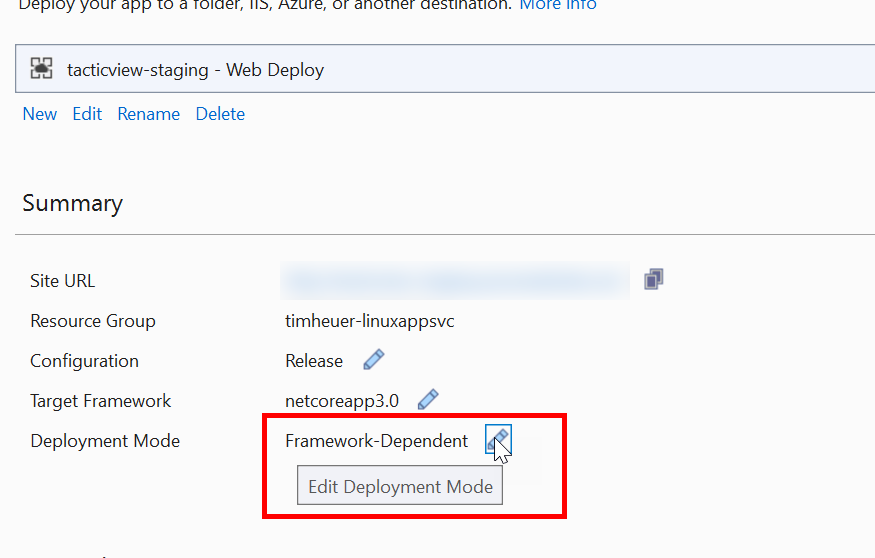
I STRONGLY recommend you adopt a full CI/CD workflow for all your projects.  This has gotten so simple for most cases that it would be a shame not to do that.  But we do also provide means in Visual Studio tools to publish as well.  In your ASP.NET Core application if you right-click and choose Publish, you’ll see the options.  You first create a publish profile which walks you through where you want to publish.  I won’t show that part because it can be different depending on your selection.  But once complete you’ll be presented with this view:

Screenshot of Visual Studio showing deployment mode option

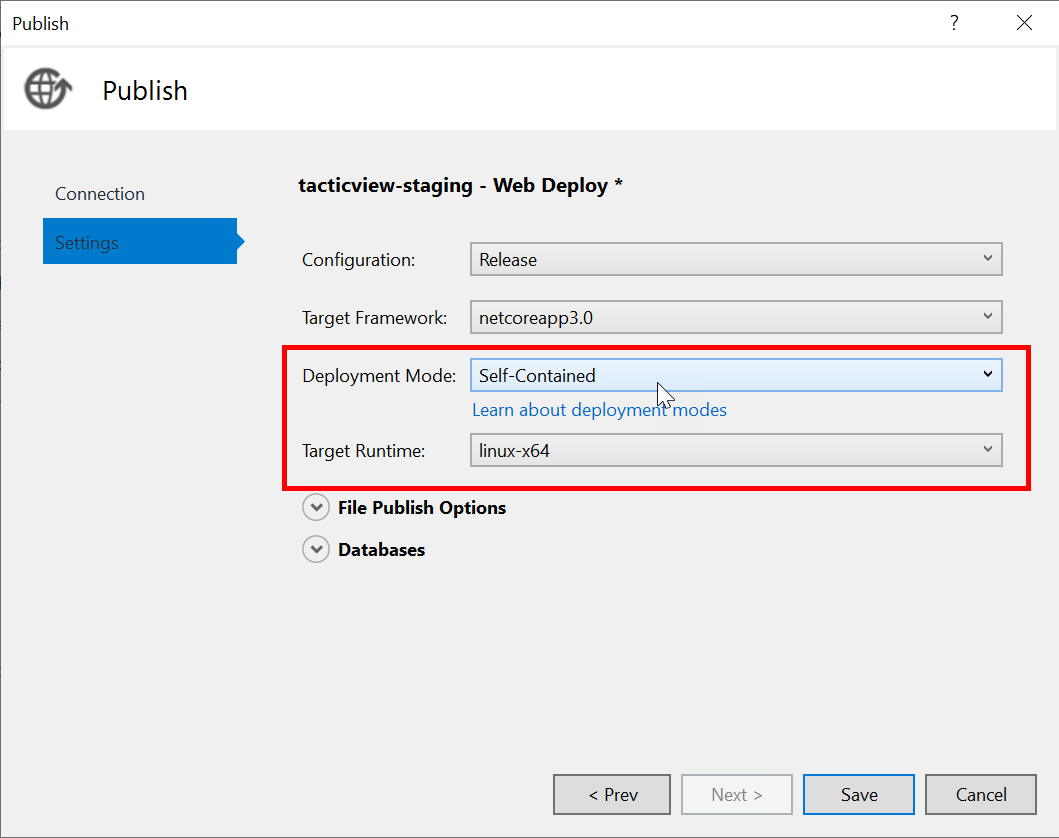
In that view you click on the area highlighted that is labeled Deployment Mode and will be presented with the dialog to change:

Screenshot of Visual Studio showing deployment mode and target runtime options

Once those two things are changed, then when you click Publish it will use the self-contained version of your app and push to whichever endpoint you chose.  And you are done for Visual Studio.

VS Code

What about if you use Visual Studio Code, VS Code?  With the latest release of the Azure App Service extension, .NET projects got better support for deploying to Azure App Service.  The default flow for this is simpler and doesn’t assume you want to deploy using SCD, so you have to do a bit more setup.  When you have a C# project in VS Code you should get prompted (and you should accept) the option to add assets to your project.

Screenshot of Visual Studio Code dialog requesting to add assets

This adds a .vscode foler with a tasks.json file in it that looks like this:

{
    "version": "2.0.0",
    "tasks": [
    {
    "label": "build",
    "command": "dotnet",
    "type": "process",
    "args": [
    "build",
    "${workspaceFolder}/testwebdeploy.csproj",
    "/property:GenerateFullPaths=true",
    "/consoleloggerparameters:NoSummary"
    ],
    "problemMatcher": "$msCompile"
    },
    {
    "label": "publish",
    "command": "dotnet",
    "type": "process",
    "args": [
    "publish",
    "${workspaceFolder}/testwebdeploy.csproj",
    "/property:GenerateFullPaths=true",
    "/consoleloggerparameters:NoSummary"
    ],
    "problemMatcher": "$msCompile"
    },
    {
    "label": "watch",
    "command": "dotnet",
    "type": "process",
    "args": [
    "watch",
    "run",
    "${workspaceFolder}/testwebdeploy.csproj",
    "/property:GenerateFullPaths=true",
    "/consoleloggerparameters:NoSummary"
    ],
    "problemMatcher": "$msCompile"
    }
    ]
    }
    

Note lines 17-24 which show the CLI commands we’ve already been talking about here.  So these you’d have to change to add arguments.  For brevity I’m only showing the modified publish lines here to what you would need:

{
    "label": "publish",
    "command": "dotnet",
    "type": "process",
    "args": [
    "publish",
    "${workspaceFolder}",
    "--configuration",
    "Release",
    "/property:GenerateFullPaths=true",
    "/consoleloggerparameters:NoSummary",
    "--runtime",
    "linux-x64",
    "--output",
    "bin/release/netcoreapp3.0/publish",
    "--self-contained",
    ],
    "problemMatcher": "$msCompile",
    "dependsOn": "clean"
    }
    

But that’s not it.  Remember when we talked about how the CLI publishes to a /netcoreapp3.0/<RID>/publish folder?  You’ll need to know that for the Azure App Service deploy.  Notice I added an explicit output argument here.  Why?  Well laziness for one.  The App Service Extension when you deploy will also add a settings.json file in your .vscode folder that looks like this:

{
    "appService.preDeployTask": "publish",
    "appService.deploySubpath": "bin/Release/netcoreapp3.0/publish"
    }
    

Notice the appService.deploySubpath argument?  Well I just didn’t want to change that to /linuxx64/publish.  Either way, you could have changed the argument here or in tasks.json but the bottom line is they need to match paths so the extension knows what you want to publish!  With these two complete, when you choose to publish using the extension you’ll be publishing a self-contained app to your provisioned Azure App Service instance.

I hope this helps get an idea of the different ways you can publish and how to use the SCD option.  Realistically you don’t need to use this in cloud environments which support your framework version.  In fact, as soon as they do support your version, go back in to your DevOps flow and remove the SCD argument and kick off a new release…no need to change code in your project or use your dev tools…another benefit of using DevOps – you can even do it from your phone!

Thanks for reading this far!

| Comments

I don’t like C++.  There I said it…got it out of the way.  It’s not a fair statement, as I know many people who do and think I’m crazy for not only writing code in C++.  As someone who didn’t come from a traditional computer science background, I just never ‘grew up’ on C or C++ as fundamentals. 

NOTE: You can hear more about my journey (and others) to tech on the awesome CodeNewbie podcast.  Here’s my episode right here: From police recruit to developer.

Go ahead, insert ‘you’re not a real programmer’ comments below.  I’ve established enough thick skin over the years to hear that feedback.  Anyhow, I digress.  While I’m not a fan of C++ it really isn’t about the language but the iteration dev loop.  I’ve often found it slower than what I’d like and the mix/match of toolsets, settings, etc. has left a lot to be desired to me.  HOWEVER, all this said, looking at C++ code is an excellent way to learn and to actually appreciate more the language and code that others write.  No better source of learning development exists than code.

Last week at the Microsoft Build conference a fun new project was unleashed to the developer community…a new Windows Terminal.  AND it is Open Source! 

I’ve never seen as much excitement about a terminal app in this ecosystem as I have the past 10 days.  So much fun.  First, here’s the team that brings you the Windows Terminal project:

Great people, passionate about making Windows a great development environment for no matter what you are developing.  This is also the team bringing you WSL and the new capabilities there!  So you want to try out the terminal…your first question is Where can I get it?

Building Windows Terminal

Well, for now it is source only.  This will likely change over the course of the next few months, but for now if you really want to try it out, you need to build it yourself.  The repository on GitHub has all the bits and instructions for you to do so.  I jumped on this right away like others but ran into a few bumps because I was using Visual Studio 2019.  Luckily this has been solved by this PR to help make the scavenger hunt for dependencies less painful. 

SIDE NOTE: If you have an open source or team-based project, do yourself a favor and add a .vsconfig file now.  Details: Configure Visual Studio across your organization with .vsconfig

Basically the steps are:

If you use Visual Studio 2019 (recommended by me) opening the OpenConsole.sln file should prompt you with a screen that will give you a note to ‘install’ the missing dependencies in the Solution Explorer:

If you click Install it will run you through the missing components you may not have enabled for completing the build.  Finish that process.  Once done, you will have all the bits and can go back to the OpenConsole.sln project and choose ‘Build Solution’ and start the process.  Lots of stuff building for the first time so it will take a bit.  Now what?

Deploying/Running Windows Terminal

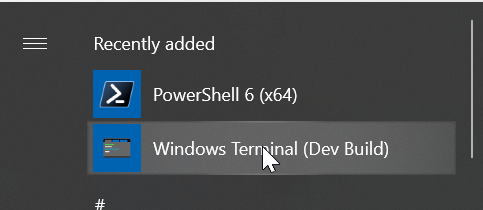
Building is step 1, now you want to run it.  Windows Terminal is a Universal Windows Platform (UWP) application and must be deployed first.  The easiest way for doing this is from Visual Studio, but you may want to know what project!?  The Terminal\CascadiaPackage project is the one you want and just right-click on that and choose Deploy.  This will deploy it to your machine (assuming you enabled developer mode).  And this will now be in your start menu:

Click/tap/whatever on that and you will launch Terminal for the first time!

Wait, where are the tabs I saw?

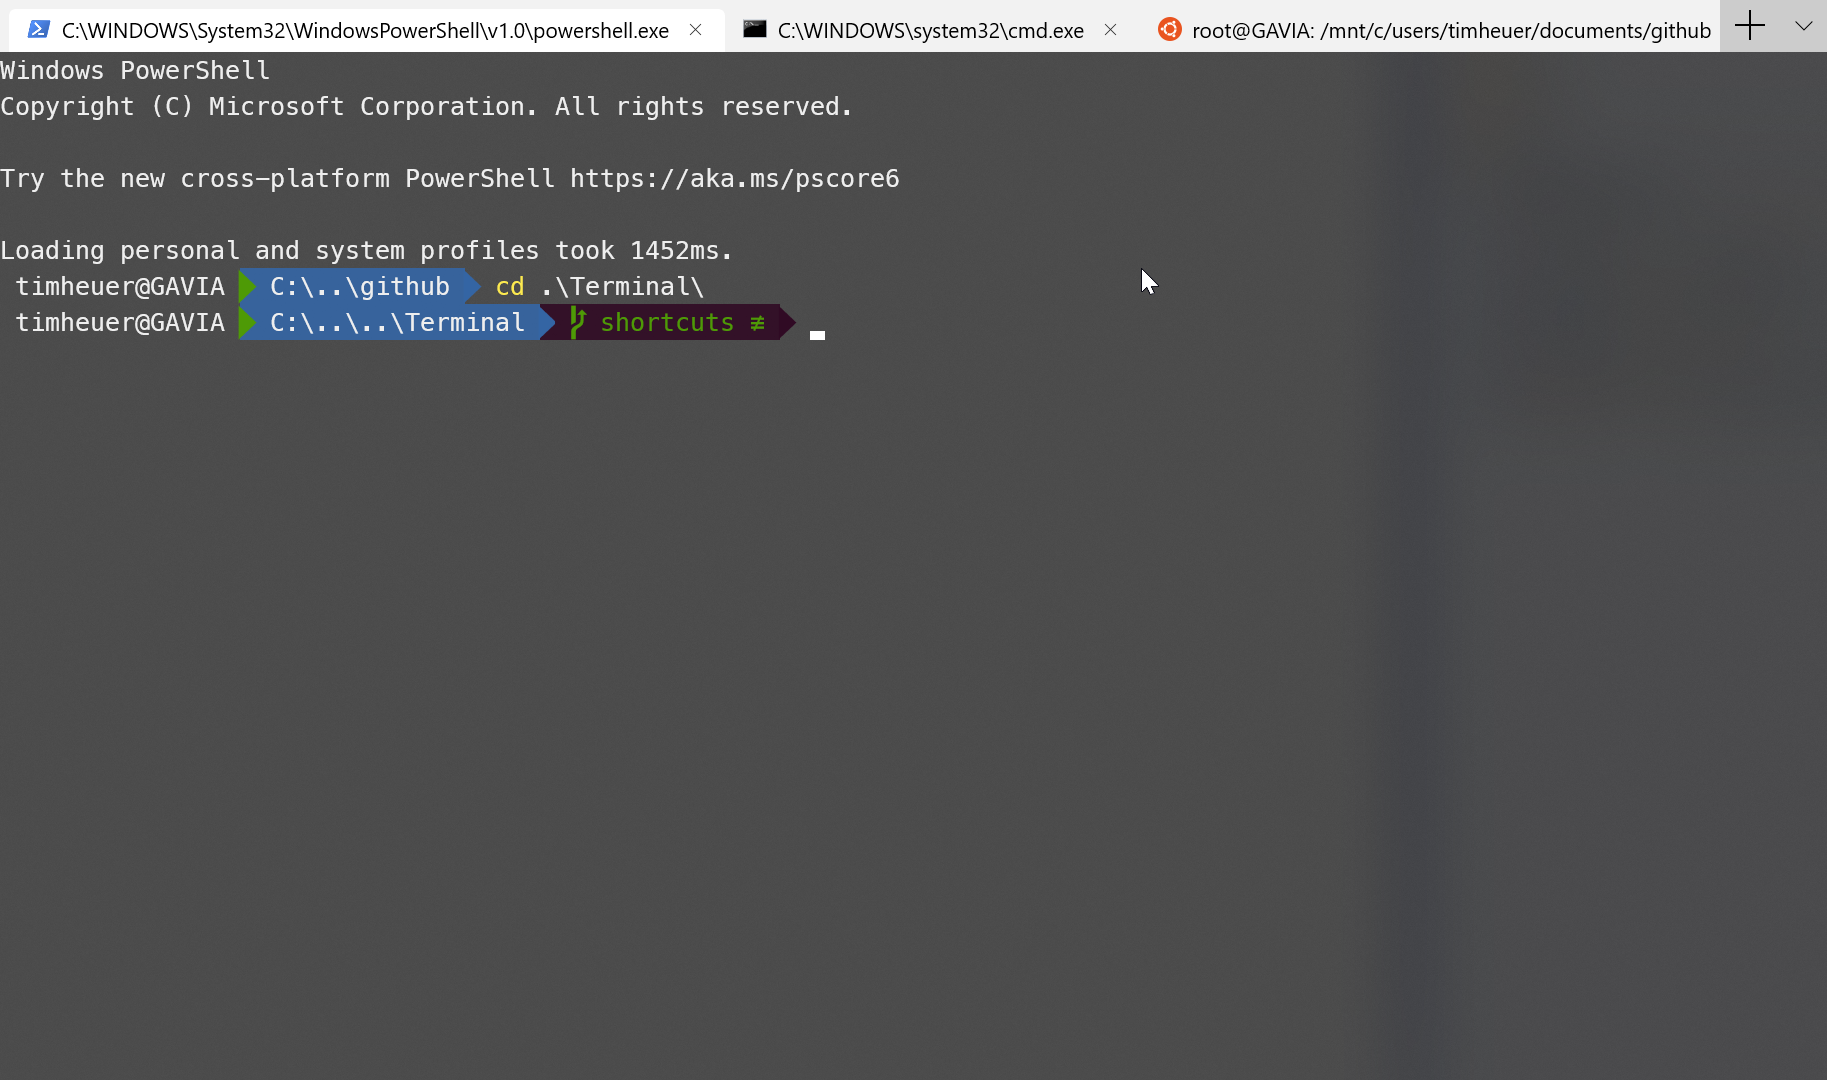
Ah, now that you have it running, let’s take a tour.  The settings right now are a JSON file that you can access via the settings menu.  How do you get the settings menu?  Hit CTRL + T to bring up the tab view and then you should have a drop-down menu in the upper right area:

If you click Settings it will open up the profile.json file in the default editor on your machine configured for editing JSON files.  For me this was Visual Studio, but you can use Code or other editor as well.  This is editing your own profile for your terminal environment.  By default this JSON is void of white-space so you may want to format it to make it more readable.  In Visual Studio that is CTRL + K, CTRL + D and it will prettify it for you.  You’ll then see some initial settings in the top of the file:

{
  "defaultProfile": "{a933a071-2a32-42c9-b03a-550845793252}",
  "initialRows": 30,
  "initialCols": 120,
  "alwaysShowTabs": true,
  "showTerminalTitleInTitlebar": true,
  "experimental_showTabsInTitlebar": false,

If you change line 5 here like I did to true then you will always start with tabs even if only one console host is running.  When you save the profile.json file it will re-format to no whitespace FYI (there is a watcher on the file in the code) but the settings will become immediate.

Navigating the profile.json options

The profile file main meat is in the profiles themselves.  These drive what shells/consoles you can launch and their configuration.  For example here is a snippet of what mine looks like right now a bit:

{
  "defaultProfile": "{a933a071-2a32-42c9-b03a-550845793252}",
  "initialRows": 30,
  "initialCols": 120,
  "alwaysShowTabs": true,
  "showTerminalTitleInTitlebar": true,
  "experimental_showTabsInTitlebar": false,
  "profiles": [
    {
      "startingDirectory": "c:\\users\\timheuer\\documents\\github",
      "guid": "{b056b6a8-89ba-4868-86c6-2ea078cd4fdd}",
      "name": "cmd",
      "colorscheme": "UbuntuLegit",
      "historySize": 9001,
      "snapOnInput": true,
      "cursorColor": "#FFFFFF",
      "cursorHeight": 25,
      "cursorShape": "vintage",
      "commandline": "cmd.exe",
      "fontFace": "Cascadia Code",
      "fontSize": 12,
      "acrylicOpacity": 0.75,
      "useAcrylic": true,
      "closeOnExit": true,
      "padding": "0, 0, 0, 0",
      "icon": "ms-appdata:///roaming/cmd-icon.png"
    },
    {
      "startingDirectory": "c:\\users\\timheuer\\documents\\github",
      "guid": "{a933a071-2a32-42c9-b03a-550845793252}",
      "name": "PowerShell",
      "background": "#0C0C0C",
      "colorscheme": "UbuntuLegit",
      "historySize": 9001,
      "snapOnInput": true,
      "cursorColor": "#FFFFFF",
      "cursorHeight": 25,
      "cursorShape": "vintage",
      "commandline": "powershell.exe",
      "fontFace": "Meslo LG M for Powerline",
      "fontSize": 12,
      "acrylicOpacity": 0.75,
      "useAcrylic": true,
      "closeOnExit": true,
      "padding": "0, 0, 0, 0",
      "icon": "ms-appdata:///roaming/powershell_64.png"
    },

While I don’t have all options enabled a little spelunking the source code helps you know what other options exist:

  • name: the name of the particular profile.  Right now this is what shows in the drop-down menu shown previously.  There is an issue logged to perhaps make this the name of the tab as well.
  • guid: the unique identifier of this profile.  Incidentally if you didn’t know and wanted to create your own profiles and need a GUID, VIsual Studio has a “Create GUID” tool available from the tools menu…choose registry format and then copy/paste
  • colorscheme: this maps to the color scheme for this area…which is an array of colors that maps to the various foreground/background/text/highlight/etc. settings that are also configurable.  You can see in your profile file that Campbell and a few others (Solarized Dark/Light) are pre-configured.  You can use iterm2colors values to create a new scheme.
  • foreground: the foreground, duh (overwriting colortable/scheme)
  • background: the background, duh (overwriting colortable/scheme)
  • colortable: an in-line version of the color array that would be within a scheme
  • historySize: I honestly haven’t looked at this one yet in the code to know
  • snapOnInput: I honestly haven’t looked at this one either
  • cursorColor: color of the cursor style you chose
  • cursorShape: different options to show the cursor: vintage (thick underscore), bar (vertial bar), underscore (thin underscore), filledBox, emptyBox
  • cursorHeight: height for the cursor
  • commandline: the command to run for the profile (full path or something that will be found in PATH)
  • fontFace: the fond to use for this profile.  You may see in mine that I am using ‘Meslo LG M for Powerline’ to get the cool customizations of the prompt.  Find more on how to do that here and it works in Windows Terminal
    • Note: the team will also be open sourcing a new font that will be used for the terminal, but is not yet available as of this post
  • fontSize: size of the font
  • acrylicOpacity: the opacity of the window if you choose to use the acrylic (transparency) feature.  value from 0-1
  • useAcrylic: true/false if you want to use the transparency
  • scrollbarState: hidden/visible are the options
  • closeOnExit: true/false if you want the tab to close when you initiate the exit command for your host
  • padding: this affects some of the output but honestly not working well right now, recommend leaving at 0,0,0,0
  • startingDirectory: the startup directory for this profile.  I have mine configured with my github directory where all my code is instead of $home (which is default)
  • icon: an icon that will show in the menu and the tab.  These live in your RoamingState directory (C:\Users\<yourusername>AppData\Local\Packages\WindowsTerminalDev_8wekyb3d8bbwe\RoamingState) and the format for the value is “ms-appdata:///roaming/<yourfilename>”

For now these are the available options that you should fitz around with to customize what you need to change.  I’ve messed around with these enough and got to where I want them to be for me right now.

Navigating the source and contributing

As I started this post about how I didn’t like C++, it is a good place to learn a lot.  The Windows Terminal source is a maze of someone else’s code and right now without a clear map.  So the best way is to really just dig in and follow a particular flow.  I find this is the best way to navigate any project source code: find one feature and try to find and follow it in the code.  For me, I was messing with the settings file so much and I hated using the menu with my mouse I wanted a keyboard shortcut.  I knew that CTRL + T launched a new tab, so hey I could implement a keyboard shortcut to launch the settings file quickly.  I first logged that feature as an issue on the project: Add keybinding for access to Settings and then went to work.  I knew that the new tab shortcut existed so I took my own advice: follow the code!  After a few tries and navigating all the headers and various code files I submitted a PR to the project for my own issue: PR#684.  There were 6 files changed to add this key binding and if you look at the change I proposed, there was already a function I could call (same one the menu uses) and I really just needed to map the key binding and have it call the existing function.  Simple, but I learned a bit of how the current code is structured in the repository.

So my recommendation would be to find something that you are seeing as a piece of existing functionality or something you want to add yourself and start looking at searching for where you think it might be.  You’ll quickly find out some of the structure around TerminalSettings, TerminalCore, TerminalControl, etc. and play around with making some changes.  Keep in mind this is active development and things will change around quite frequently.  The team even indicates much:

Note: The Command-Line Team is actively working out of this repository and will be periodically re-structuring the code to make it easier to comprehend, navigate, build, test, and contribute to, so DO expect significant changes to code layout on a regular basis.

I have already been bitten a bit by a merge, but no big deal just fix up a few things and move along again!

What’s Next?

The team has a good aspiration of what they want to accomplish and just getting started.  Quality will improve, bugs will get fixed, consumption of the terminal will be better, etc.  Read the README file in the repository and engage with the team on Twitter (their contact info in the README).

Hope this helps!

| Comments

I’ve been reading a lot of great content on dev.to lately (seriously you should go check it out and follow some tags…great community there) and came across this great headline “How I Solved My NYC Parking Problem With Python, the Search Tweets API and Twilio” by Jessica Garson, a Developer Advocate at Twitter.  Jessica was trying to solve a problem that NYC folks have when trying to determine when to move their street-side parked cars each night due to ‘alternate  side regulations’ which determine when certain sides of roads can be used or the regulations won’t be enforced due to holidays, events, whatever.

New York City parking sign

She delved into using Python, the Twitter Search APIs and Twilio to tie these all together.  Fun problem to solve and results in a text to Jessica whether she needs to worry about moving her car or not.  Immediately after reading it I though of the game show Name That Tune.

Picture of Name That Tune game show

The premise of the game show is that contestants battle it out to who can identify a song based on the fewest amount of notes in a song.  So of course, it is 100% applicable to code, right?  Anyhow I thought to myself Self, I can solve this problem in less effort and with NO code!

Immediately I went to work using Azure Logic Apps.  Azure Logic Apps are a means to…well, let’s let the marketing people tell us what they are:

Azure Logic Apps simplifies how you build automated scalable workflows that integrate apps and data across cloud services and on-premises systems. 

Lots of buzzwords there but basically it’s workflow/orchestration platform that allows you to use ‘connectors’ between various inputs and outputs.  Logic Apps can be developed using code, but most are easily developed using no code and using the graphical connector tools.  If you’ve ever used/heard of Microsoft Office Flow this is powered by Azure Logic Apps underneath!  So immediately after reading the article I went to work.  I knew that Azure already had pre-build connectors for Twitter and Twilio and that I should be able to do this easily.  Connectors are pre-defined pieces of logic that help get access to events, data, and actions across other apps and platforms, in our case Twitter and Twilio!

Jessica’s problem was fairly simple: Watch when the @NYCASP account tweets and if it indicates rules are ‘suspended’ then alert her with a text message.  Now this relies on @NYCASP account being consistent in their tweets and it turns out they are VERY consistent in them, so it’s easy to search for the simple terms as Jessica did.  So let’s do the same. 

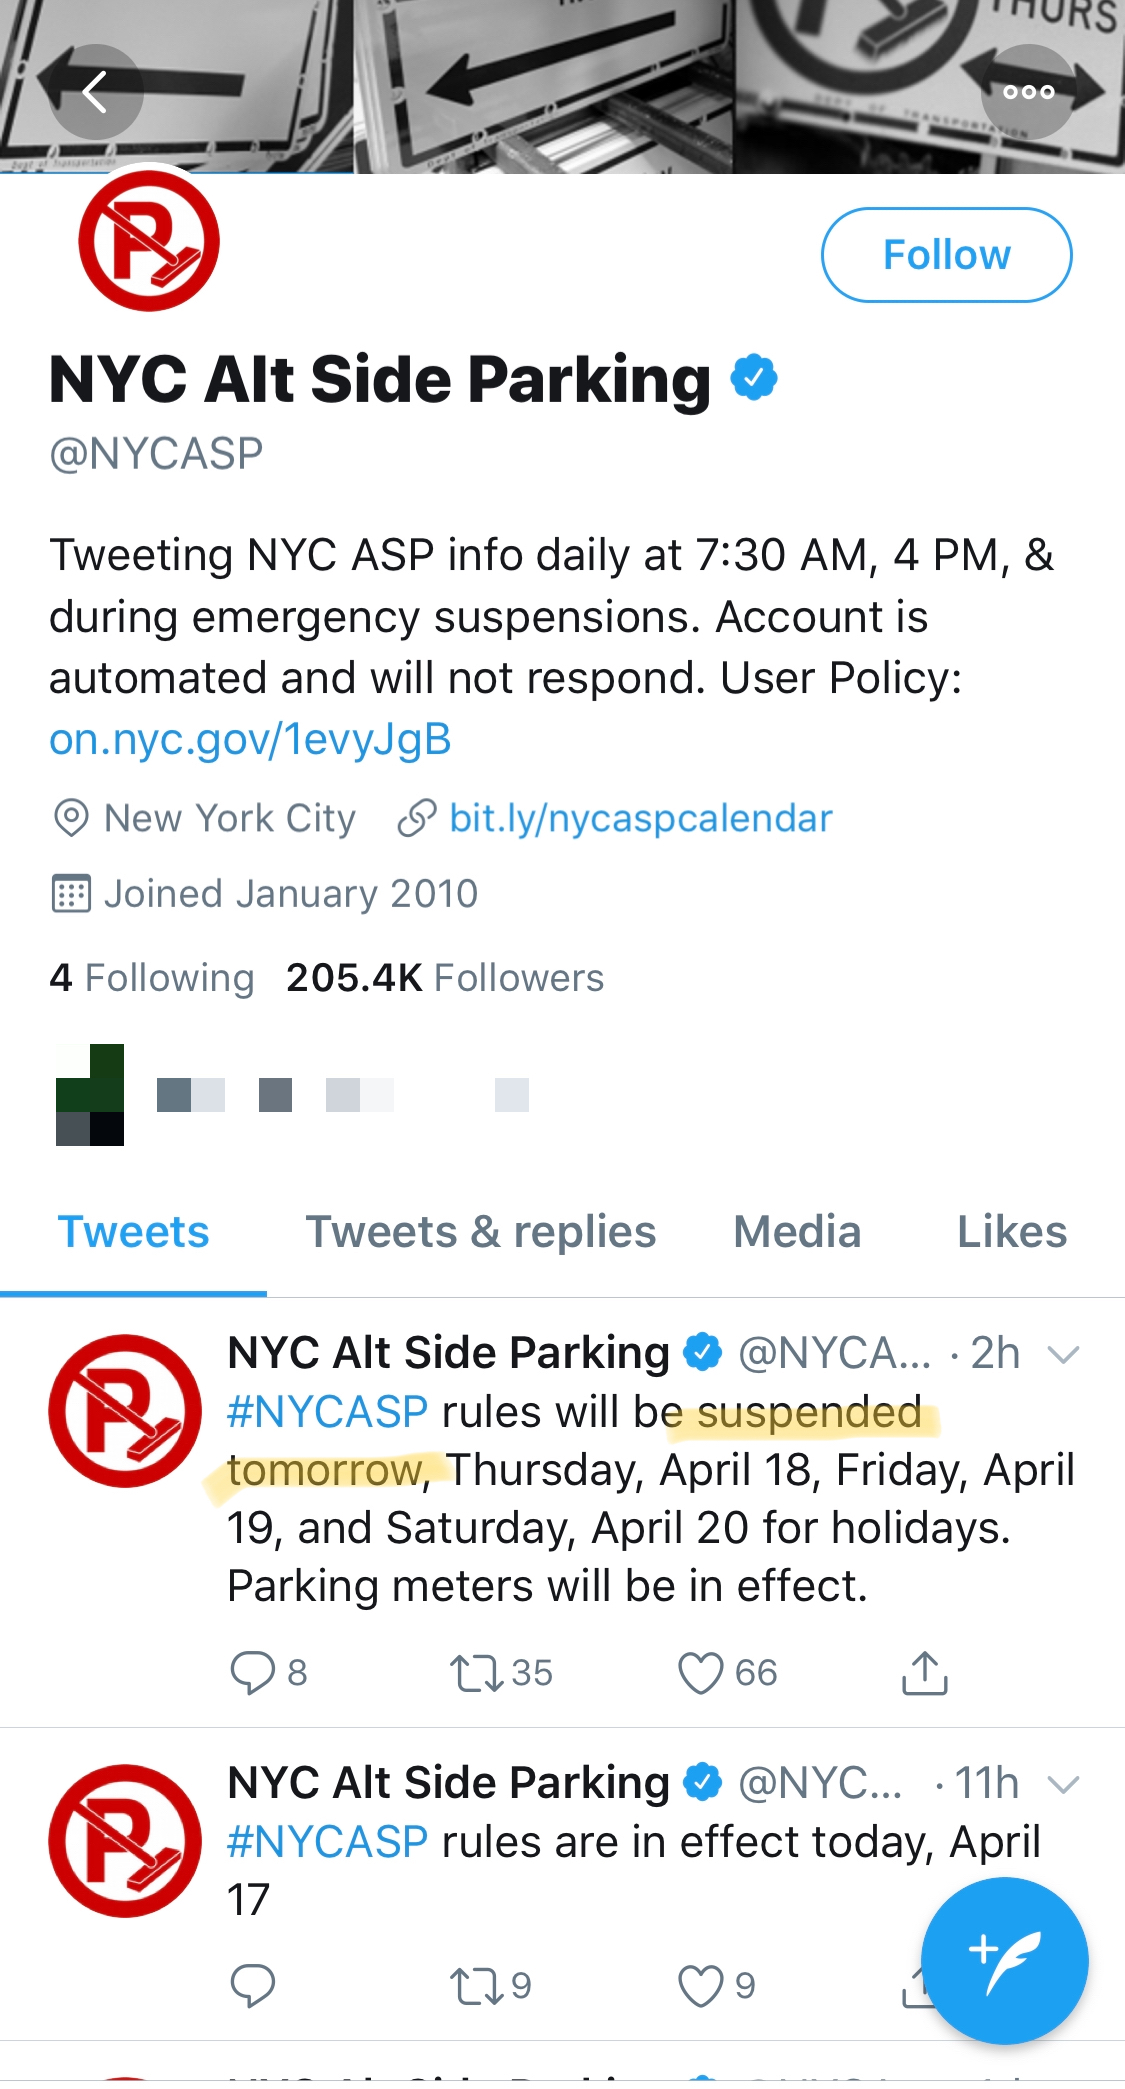
Screenshot of Twitter account for NYCASP

To get started I needed an Azure account which is free to get started and there are a ton of services free that you can use forever.  I also still needed a Twilio account like Jessica notes so you still need that to get your Twilio credentials…be sure you have that.  With both of these in hand, let’s log in to the Azure Portal….we won’t even need any tools other than a browser to complete this app!

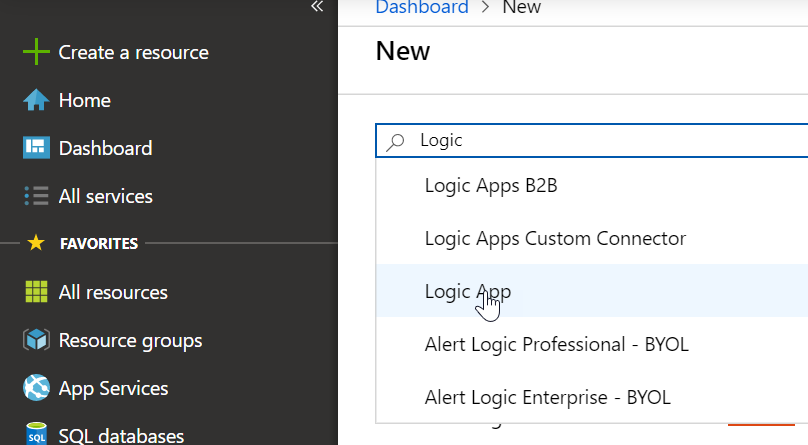
In the portal you’ll create a new resource in Azure…search for Logic App and it will show up:

Screenshot of Azure portal

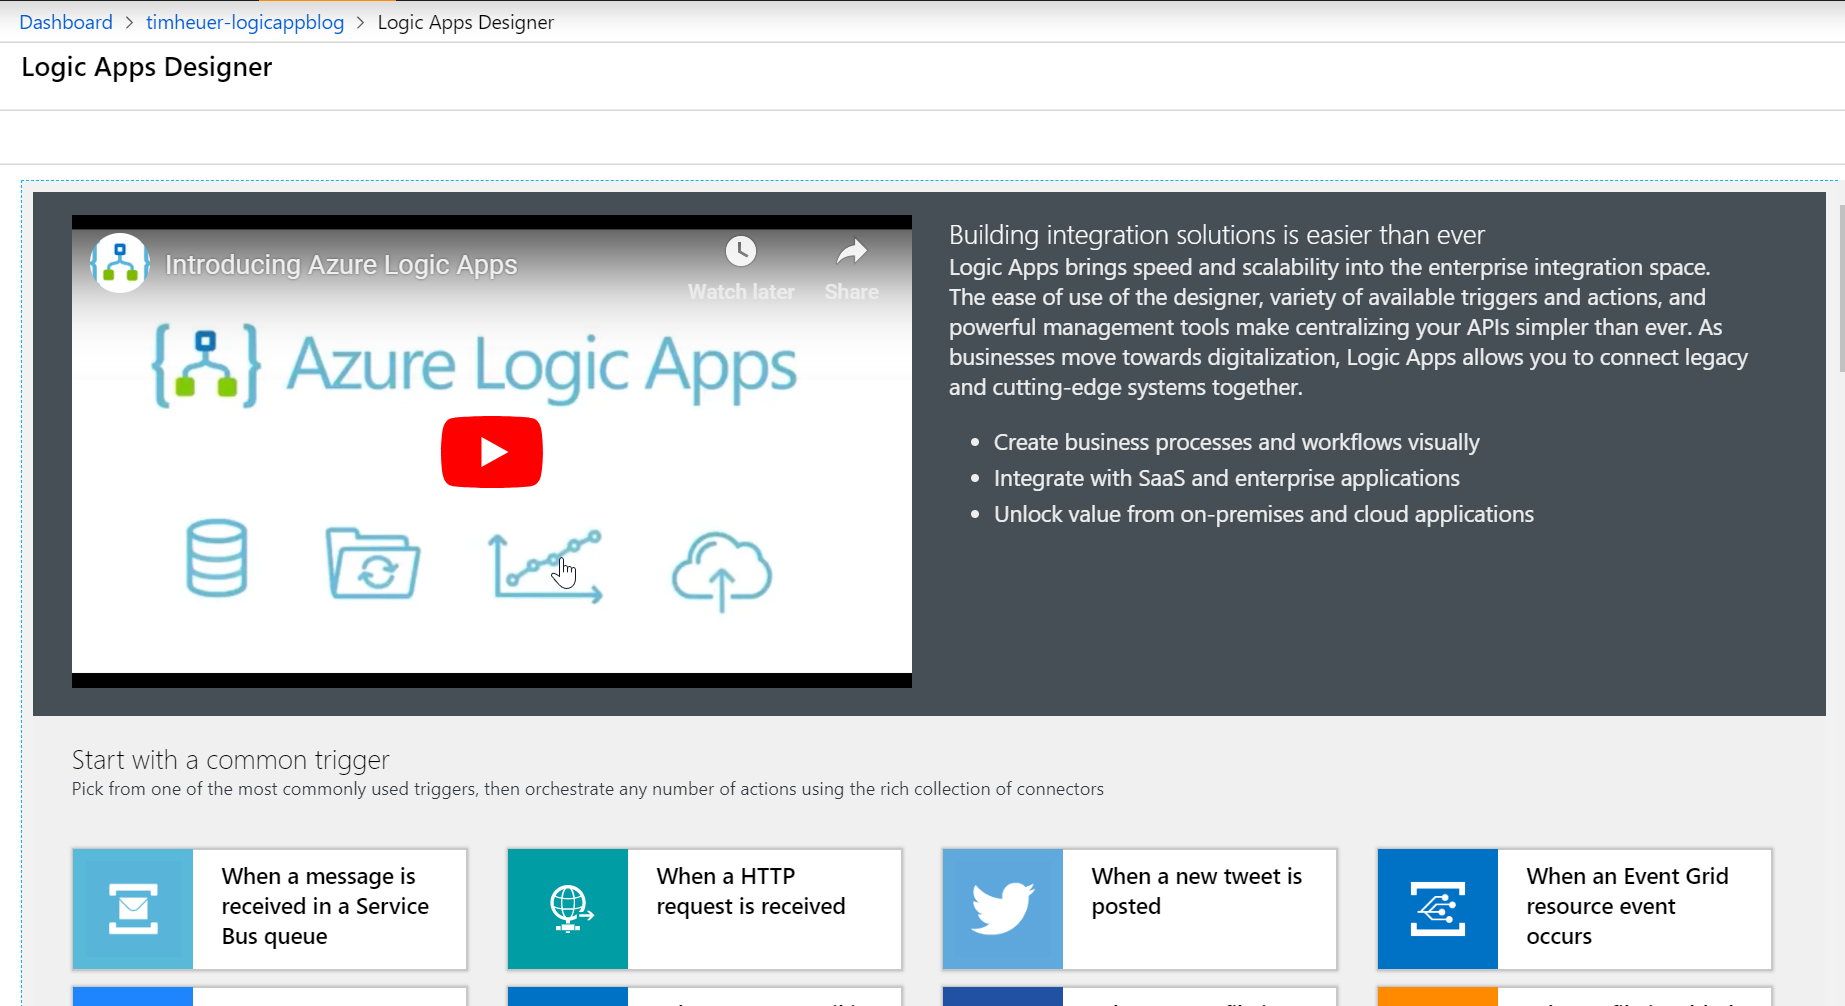
You’ll need to provide a name, choose a resource group plan and a geographic location where you want this to live.  If you’ve never created any Azure resources before, a resource group is a container for certain compute resources to leverage.  For this, I recommend creating an App Service resource group and using a free plan that comes with your free trial account.  Then you can use this resource group for your Logic App.  Once you have that created navigate to that resource and you will see a page that welcomes you with a tutorial video and some options for pre-configured templates.  Thankfully one of the starting options is “When a new tweet is posted” so let’s use that one to help us get started as it will default add the Twitter connector!

Screenshot of Azure Portal Logic App creation

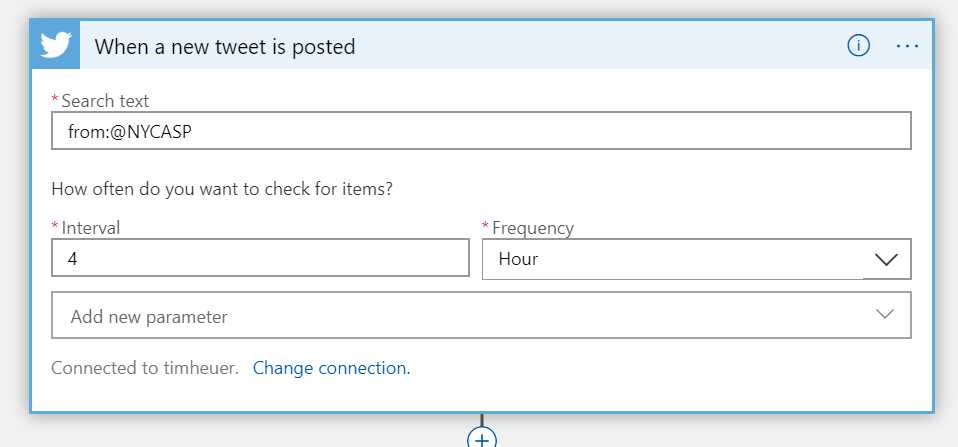
This dumps us into the Logic App designer, a graphical interface that helps us do the connections.  You’ll immediately see the first ‘trigger’ which is our Twitter one and it wants you to sign in to be able to use the functionality (think of this as authorizing use of the API).  Once you sign in click continue and you’ll get the options.  Now basically we want to look for when a new tweet is posted by @NYCASP on a time interval.  Their account is pretty consistent so I chose every four hours and used the ‘from:@NYCASP’ query language as the search text.

Screenshot of Twitter connector

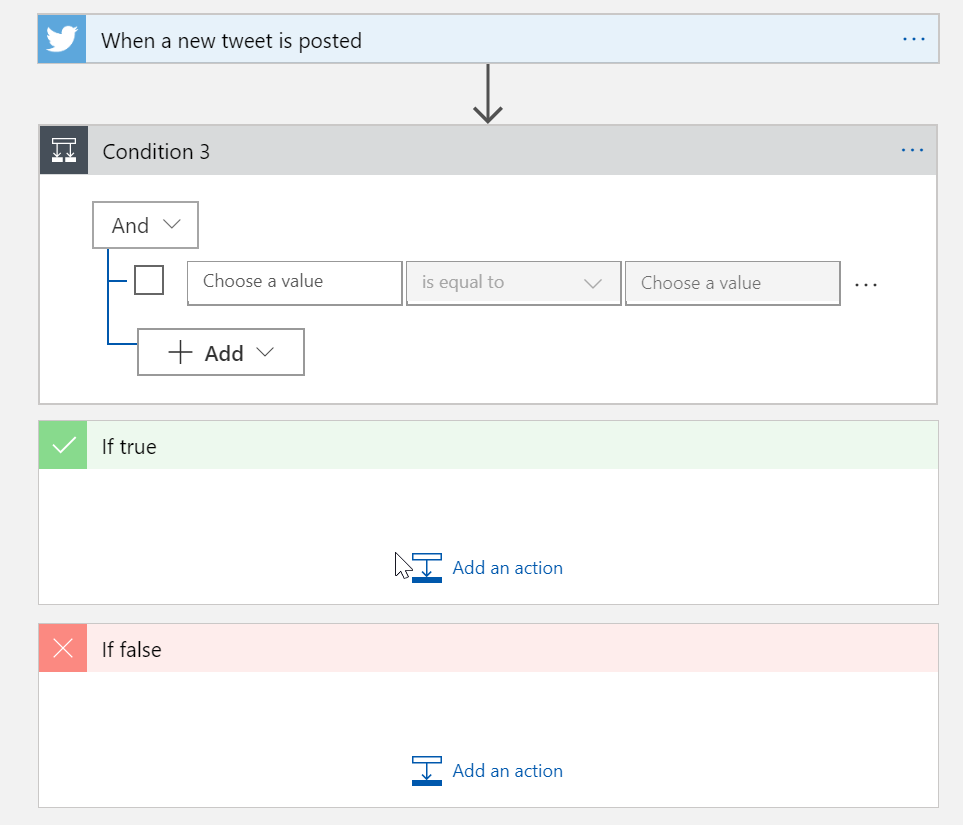
That’s it for Twitter.  No code successfully so far!  So now every 4 hours this will check for a new tweet from that account.  Now let’s do something with it!  In Jessica’s scenario we need to look at the tweet and act upon it only if a specific condition was met.  So let’s use that little “+” symbol on the designer and add a new action.  Search for 'Condition’ and you will see ‘Control’ come up as an option…select that, then you will see the Condition connector…choose that.  The condition connector gives us a simple decision tree: what is the condition, what do you want to do if true, what do you want to do if false:

Screenshot of Condition action connector

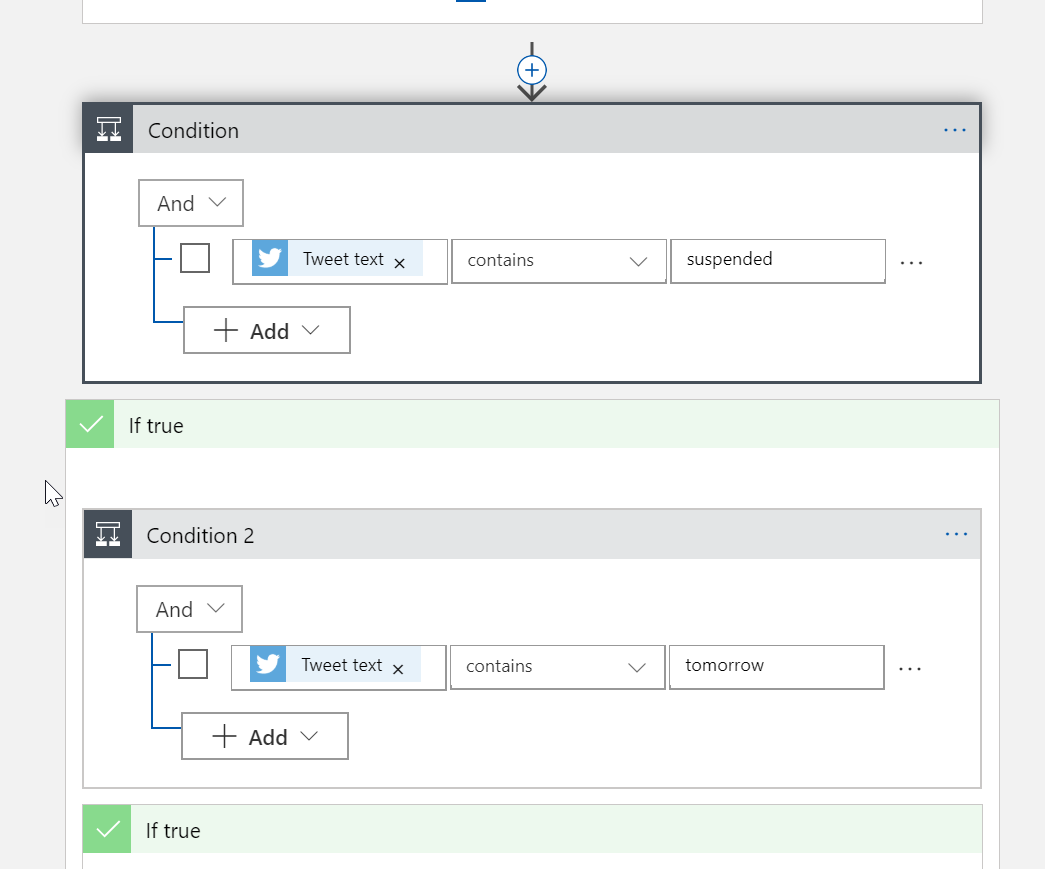
In the condition area where it says ‘Choose a value’ when you click in to there, data from the previous trigger will be made available to you and you can see all the details it exposes!  We will scroll and look for Tweet text and select that.  Change the oeprator to ‘contains’ and type in ‘suspended’ as the value.  It should look like this:

Screenshot of Condition action connector

Now we know that the tweet is telling us something about suspending…but Jessica wants to know if she has to move her car for tomorrow.  Let’s add another condition to now check to see if it contains ‘tomorrow’ in the text.  We follow the same steps in creating a new condition trigger and connecting it. 

At this point we have a nested condition.  Could we have put them in the same one?  Probably, but I’m just following similarly Jessica’s flow. 

It should look like this:

Screenshot of Condition Action connector

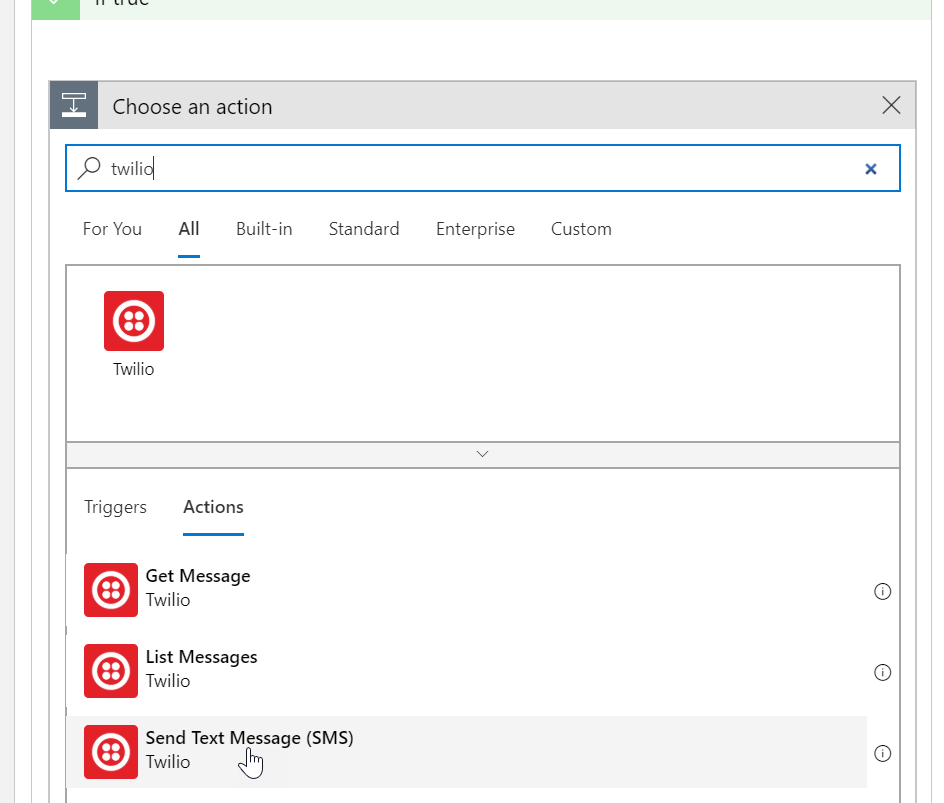
Now we know if both of those are true we need to send a text message.  Click the ‘Add an action’ button in the True condition and search for Twilio and select the ‘Send a Text Message’ action.  This will add the provided Twilio connector which provides this functionality (and more).  Similarly like twitter you will see it and after selecting have to authenticate to your account to get the credentials.

Screenshot of Twilio search for connector

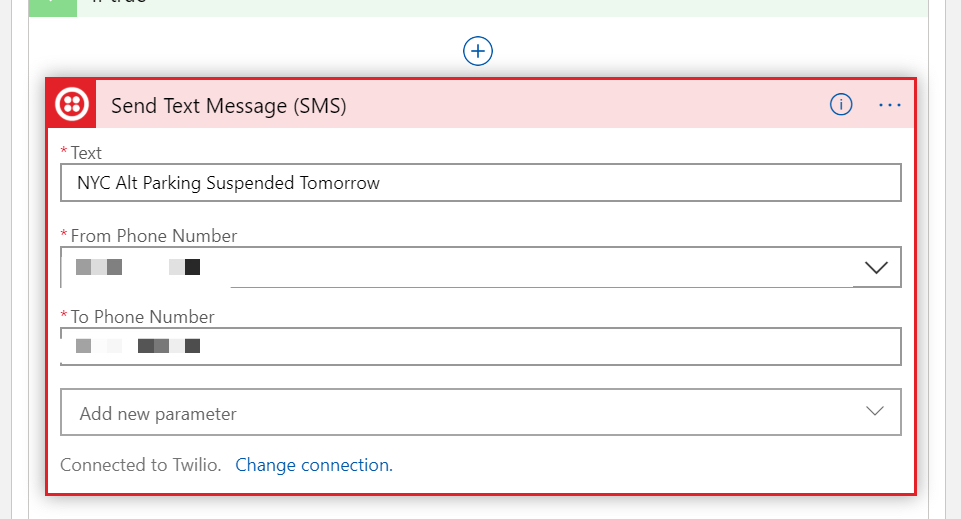
After doing that you now simply enter the details of your text message.  For Twilio the From number must be your account SMS number unless you have premium services that enables you to do something more.  If you try to get fancy without premium services from them, this will fail.  Don’t get fancy…we’re just moving cars across the street remember?  Enter the text you want to send and to the phone number you want to send it to…done!

Screenshot of Twilio connector

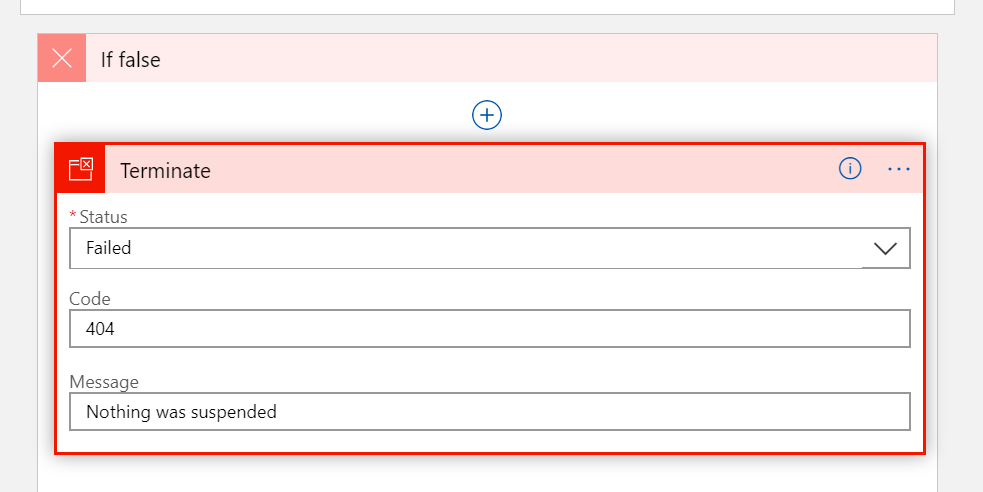
Now on the false conditions we do still have to tell the Logic App what to do.  In these cases, unless you want to do more, again add an action and choose System, then look for ‘Terminate’ – it’s a simple action that basically just stops the flow and can log a message.  I configured mine like this on BOTH false conditions:

Screenshot of Terminate action connector

That’s it, I’m done.  No code.  This took me longer to write this post then it did to actually do the Logic App the first time.  Now I waited.  And waited.  And waited.  I completed the logic app right after reading Jessica’s article and wanted to ‘naturally’ test this with the real deal tweets.  But no parking regulations were suspended.  My logs looked like this:

Screenshot of Azure log files

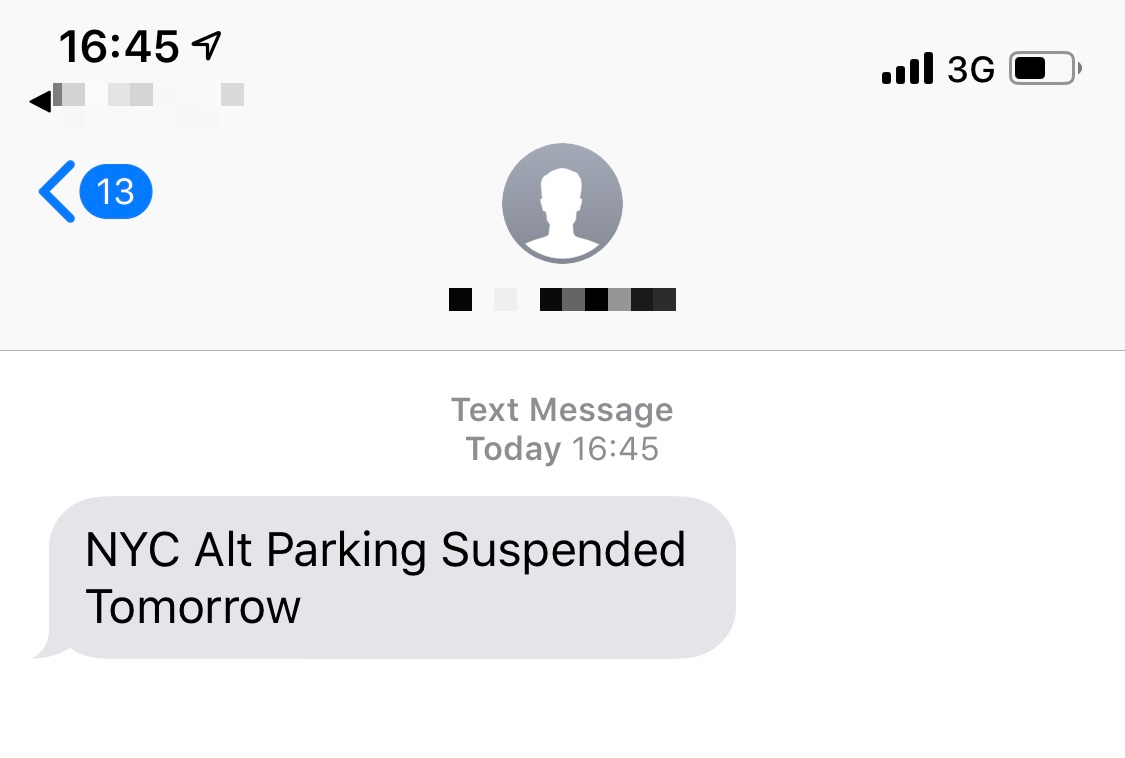
UNTIL A FEW DAYS AGO!  My phone buzzed, I looked down and BOOM:

Screenshot of SMS text message stating 'NYC Alt Parking Suspended Tomorrow'

Animated GIF image of people happily dancing

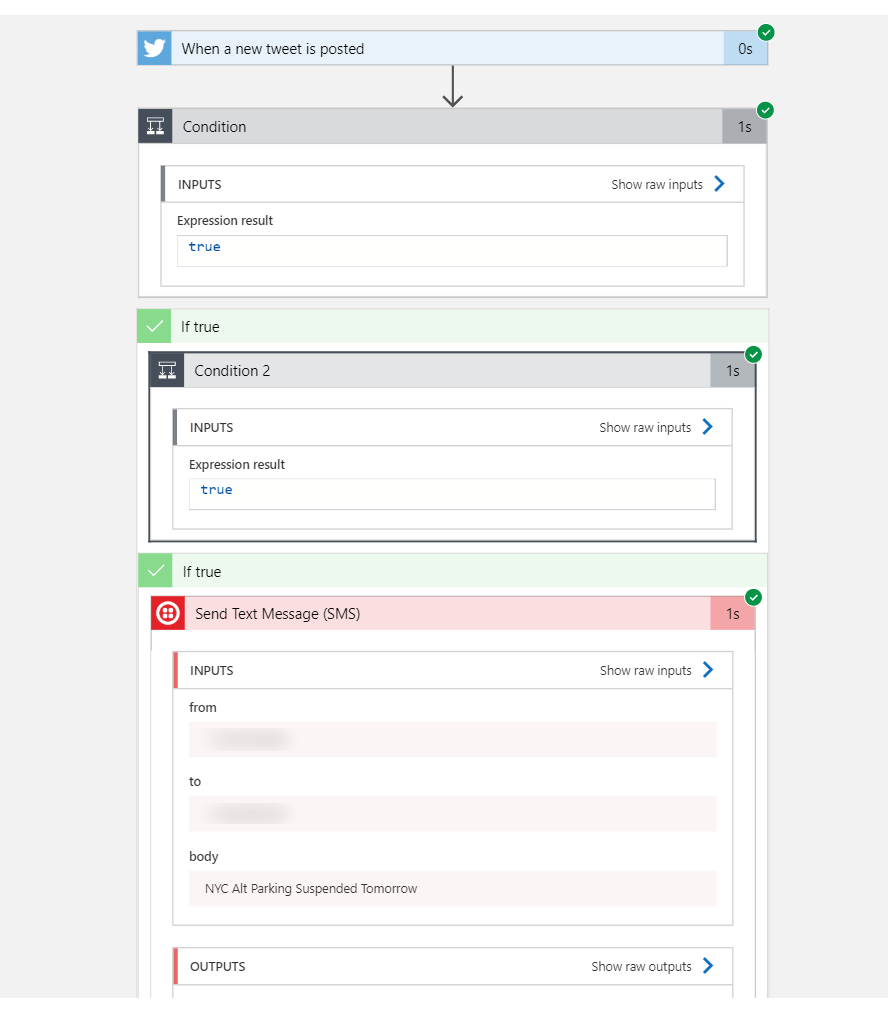
I wonder if Jessica got a text message too!  I was so happy and I don’t even live in NYC or have to worry about moving my car to a different side of the street!  The logs of Logic Apps are pretty cool as well and also graphically follow your flow and show you input/output state along the way:

Screenshot of Logic App log

So with no code and only a few steps to authenticate to Twitter and Twilio, I was able to use only a browser and complete the same task.  Did I win Name That Tune?  Who cares…doing software isn’t a competition, it’s fun and we get to use the tools and technology we feel most productive with.  For me, this was just a gut reaction to see if could be done as easily as I thought and indeed it could.  So yeah I won :-D.

Check out more about the pieces I used to put this together and get your custom logic apps working:

Hope this helps!

| Comments

Like most things in life, this all started with someone’s message on Twitter.

You can code-sign a NuGet Package?  I don’t know why I didn’t know that other than I figured I had no idea that I should care or have even given a second thought to it.  But Phil’s article and subsequent discussion on Twitter made me just realize I should take a look at the flow.  After all more sage wisdom from Phil kicked me over the edge:

You’re right Phil, and how can you argue with that forehead…so let’s do this. 

What is NuGet? NuGet is a package management system that was primarily developed for .NET developers and has now become a de-facto package/release mechanism for that ecosystem.  What npm is to Node.js developers, NuGet is to .NET developers.  More info at https://www.nuget.org

I’ve got a little library for helping .NET developers be more productive with creating Alexa apps, Alexa.NET.  When I started this project I used to just have this on my local box and would build things using Visual Studio and manually upload the NuGet package.  Then people made fun of me.  And I ate my sorrows in boxes of Moon Pies.  Luckily I work with a bunch of talented folks and helped me see the light in DevOps and helped me establish a CI/CD pipeline using Azure DevOps.  Since then I’ve got my library building, a release approval flow, automated packaging/publishing to the NuGet servers.  I simply just check-in code and a new version is released.  Perfect.  Now I just want to add code-signing to the package.  Naturally I do what every professional developer does and Google’d went to read the docs about code signing NuGet packages.  Luckily there is some pretty good documentation on Signing NuGet Packages

The first thing you need is a code-signing certificate.  There are many providers of these and different prices so pick your preferred provider.  I chose to use DigiCert for this one but have used other providers in the past.  The process for getting a code-signing cert is a bit more than just an average SSL certificate so be sure to follow the steps carefully.  Once you have that in place, export the DER and PFX versions as you will need both of these for this process.  Your provider should provide instructions on how to do this for you.

Next up was to modify my Azure DevOps Pipeline.  I do my NuGet activity in a Release pipeline after a successful build and an approval step to actually complete the deployment.  My simple release pipeline looks like this:

Screenshot of Azure DevOps NuGet Push definition

The signing is provided by the NuGet CLI and so I just needed to add another task to this flow right?  I added another one in and was going to just choose the ‘sign’ command as the configured option.  Well, the ‘sign’ command isn’t a selectable option in the task.  There is a request to make this one of the default options for the Azure Pipeline Task right now but it isn’t in there yet.  So for this we will use the ‘custom’ option which allows us to pass in any command and args.  The docs already told me the commands that I would need: a certificate file being the minimum I would have to have.  Hmm, how am I going to have a certificate file in my CD pipeline?!  As it turns out there is a secure file storage in Azure Pipelines I can use! This allows me to upload a file that I can later reference in a pipeline using an argument.  Remember that PFX file we exported?  In your DevOps project under Pipelines there is a ‘Library’ menu option.  Going there takes you to where you can upload files and I uploaded my PFX file there:

Screenshot of Azure DevOps Library

The next thing I need to do is also provide my password for that exported PFX file (you did export it with a password right!).  To do this I made use of variable groups in Azure DevOps, created a group called CertificateValues and added my name/value pair there, marking the value as a secret.  As a variable group I can ‘link’ this group to any build/release definition without explicitly having the variable in those definitions.  This is super handy to share across definitions.  You can now link to an Azure KeyVault for secrets (more to come on that in a part 2 blog post here).  I’ve got my code signing cert (PFX) and my certificate password stored securely.  With these two things now I’m ready to continue on my definition.

Now how will I get the file from the secure storage?!  As I read in the docs, there is a Download Secure File task that I can add to my pipeline.  The configuration asks me what file to use and then in the Reference Name of the Output Variables area I give it a name I can use, in this case ‘Certificate’:

Screenshot of Azure DevOps Download Secure File

This variable name allows me to use it later in my definitions as $(Certificate.secureFilePath) so I don’t have to fiddle around guessing where it downloaded to on the agent machine.  Now that we have that figured out, let’s move back to the signing task…remember that ‘custom’ one we talked about earlier.  In the custom task I specify in the Command and Arguments section the full command + arguments I need according to the docs.  My full definition looks like this:

sign $(System.ArtifactsDirectory)\$(Release.PrimaryArtifactSourceAlias)\drop\*.nupkg 
    -CertificatePath $(Certificate.secureFilePath) 
    -CertificatePassword $(CertificatePassword)  
    -Timestamper http://timestamp.digicert.com

To explain a bit I’m using some pre-defined variables System.ArtifactsDirectory and Release.PrimaryArtifactSourceAlias to help build the path to where the drop folder is on the agent machine.  The others are from the secure files (Certificate.secureFilePath) and variable group (CertificatePassword) previously defined.  These translate to real values in the build (the secret is masked in the logs as shown below) and complete the task. 

Screenshot of Azure DevOps release definition

Here was my log output from today in fact:

2019-04-04T19:10:44.4785575Z ##[debug]exec tool: C:\hostedtoolcache\windows\NuGet\4.6.4\x64\nuget.exe
2019-04-04T19:10:44.4785807Z ##[debug]arguments:
2019-04-04T19:10:44.4786015Z ##[debug]   sign
2019-04-04T19:10:44.4786248Z ##[debug]   D:\a\r1\a\_Alexa.NET-master\drop\*.nupkg
2019-04-04T19:10:44.4786476Z ##[debug]   -CertificatePath
2019-04-04T19:10:44.4786687Z ##[debug]   D:\a\_temp\timheuer-digicert.pfx
2019-04-04T19:10:44.4786916Z ##[debug]   -CertificatePassword
2019-04-04T19:10:44.4787190Z ##[debug]   ***
2019-04-04T19:10:44.4787449Z ##[debug]   -Timestamper
2019-04-04T19:10:44.4787968Z ##[debug]   http://timestamp.digicert.com
2019-04-04T19:10:44.4789380Z ##[debug]   -NonInteractive
2019-04-04T19:10:44.4789939Z [command]C:\hostedtoolcache\windows\NuGet\4.6.4\x64\nuget.exe sign D:\a\r1\a\_Alexa.NET-master\drop\*.nupkg -CertificatePath D:\a\_temp\timheuer-digicert.pfx -CertificatePassword *** -Timestamper http://timestamp.digicert.com -NonInteractive
2019-04-04T19:10:52.6357013Z 
2019-04-04T19:10:52.6357916Z 
2019-04-04T19:10:52.6358659Z Signing package(s) with certificate:
<snip to remove cert data>
2019-04-04T19:10:52.6360408Z Valid from: 4/4/2019 12:00:00 AM to 4/7/2020 12:00:00 PM
2019-04-04T19:10:52.6360664Z 
2019-04-04T19:10:52.6360936Z Timestamping package(s) with:
2019-04-04T19:10:52.6361268Z http://timestamp.digicert.com
2019-04-04T19:10:52.6361576Z Package(s) signed successfully.

Done!  Some simple added tasks and reading a few docs to get me having a signed NuGet package.  Now re-reading the docs on signed packages I have to upload my certificate to my NuGet profile to get it to be recognized.  This time I only need to provide the DER export.  Once provided and my package is published, I get a little badge next to the listing showing me that this is a signed package:

Screenshot of NuGet version history listing

This was a good exercise in helping me learn a few extra steps in Azure DevOps working with files and custom task variables.  Immediately as I was doing this, my friend Oren Novotny couldn’t help but chastise me for this approach. 

So stay tuned for a secondary approach using Azure KeyVault completely to complete this without having to upload a certificate file.

| Comments

Last week, the Microsoft Build team announced the dates of the conference as well as announced that there is a Call for Speakers.  Yes, that’s right, the premier MIcrosoft-provided developer event is asking the public to be a part of the show!

I was pretty excited about this as one who has been involved in the Professional Developer’s Conference (PDC), the previous name for this conference, and Build for the past number of years.  I shared on Twitter to get excited too!

After that I got a few questions about the process.  I should be clear that I don’t own the process, have no influence over your submission, probably don’t even have a say in the selection of sessions, but generally want to see people try and get excited about the conference and sharing your passion to others on a broader scale opportunity than usual.  A few on my team have discussed some of this topic of ‘what’ should people submit as well.  I’ll try to change your mind and share my opinion and some thoughts from some colleagues.

First and foremost: TELL A STORY!

I’ve been too guilty myself of being the one to share just all the ‘stuff’ my team did over time.  Sometimes these can be fun sharing all the hard work the team put in to releasing a product.  These ‘lap around my features’ sessions work well for presenters, but I’ve learned over time may not be the best for the audience.  When all I’m doing is telling you about a cool tech feature I’m doing a disservice to your time and the product capabilities usually.  I should be telling you how to solve a problem, how to innovate in your project/process, or how to make you more productive.  To do this I need to think of you, dear reader/attendee, and not me/my team/my product.  So to me, this is the best advice I can give you…put yourself in an attendee perspective and think about what you can share that will help them get to their ‘next,’ whatever that may be.

Some thoughts on how to do this…

  • How does your title read?  Is it “New network settings for Azure Virtual Machines” or could it be “Be smart and secure your cloud networks” – both probably end up showing a similar tech aspect, but the second focuses more on the problem, putting yourself in the audience shoes.  Think of titles as the problem question.  And hey, I often give advice as well to ‘think clickbait’ – some people hate that but it puts you in a mindset to entice the reader/user.  “Migrating your APIs to serverless infrastructure will save you time and money, I’ll prove it!"
  • Brief but specific abstract.  Your abstract shouldn’t be full of buzzwords and non-sentences.  If it reads like an analyst brochure, re-think it.  Start with leading off your title.  Someone is reading the abstract because the title grabbed them.  Get more practical in the first 1-2 sentences.  Keep it brief between there explaining what you’ll show, then end with what THEY will get out of it.  Some call this a ‘call to action’ but think about it in those terms like When you leave you’ll know how to save time deploying your containers to the cloud and have more time for code!
  • Think of the audience.  I said this already but sincerely think of them.  Most of the time I’ve seen conference sessions think of the speaker.  *I* want to show you something.  *I* know better than you so listen to me.  Flip that.  Put yourself in the other seat and tell them how you are going to help them.  If you tell me you’re going to help me in my job in a way that entices me in your language, you’re speaking to me…I’m relating more.  I may not know I need to figure out my container clusters in a specific node configuration…but I do know that I have a problem managing my apps at scale, for example.

These aspects speak both to the inevitable session but also to the Call for Speakers selection team.  The Build team (and other conferences) will receive lots of submissions.  Your title will be the first thing that needs to grab attention.  Then your first 2 sentences.  Telling a story through those helps be unique and specific to help someone learn and not come across as you wanting to ‘tell them stuff.’  Niall Merrigan has a good post about the process that he has been a part of that touches on some of these.  It’s a helpful read from a different perspective.  And different perspectives matter!  So another pro-tip…run your idea by a few that might be your target audience.  That will help!

So with all that said, good luck and submit an idea.  We’ve already got a LOT of submissions.  I have no idea how many will be chosen from the public group, but force the team to be in a hard place to choose the best and maybe expand the number of them…submit well thought out sessions!  Best of luck to you and I look forward to seeing you at Build 2019!

I hope this helps!