| Comments

I’ve made no hiding the fact that my blog is build on Subtext and that I’m very happy with it right now.  Lately though my wife has been blogging more (that’s another story) and she also started her own business.  Being curious about all the WordPress love, I decided to start checking it out.

Thankfully, the Web Platform Installer helped me get started on WordPress without any troubles at all and I was up and running on my Windows server (I didn’t want to start another hosting account anywhere).  I have to say, I really like what WordPress has done, especially with the extensibility points and the administration options. 

That being said, I started looking at the various plugins available and was curious about anything for Silverlight…to be able to easily put Silverlight content within a post like other plugins have enabled.  Sure, it isn’t a difficult task to begin with, but sometimes different hosts/tools make it difficult for us to add <object> type content.  After some searching in the WordPress plugin library, I found one that was built back in the Silverlight 2 beta days.  The link to the author was no longer valid so I decided to create one using that as a base.

NOTE: I totally failed my Internet duties to look via any search for one…I kept my searching to the official plugin directory.  Apologies to Peter Loebel for not recognizing he also did some work, but admittedly it was also during the beta days.  I’ve credited both Peter and Juergen Oberngruberin my readme.txt for the plugin as contributors.

So after a few minutes, I was able to get it working and created the Silverlight for WordPress plugin.  It’s simple and you basically can input into your post data:

   1: [silverlight: <app>, <width>, <height>, <initParams>, <minVer>]

Where:

  • app is the URI to your Silverlight application (XAP)
  • width/height should be obvious
  • initParams will map to the initParams of your application
  • minVer maps to the minRuntimeVersion required for your app

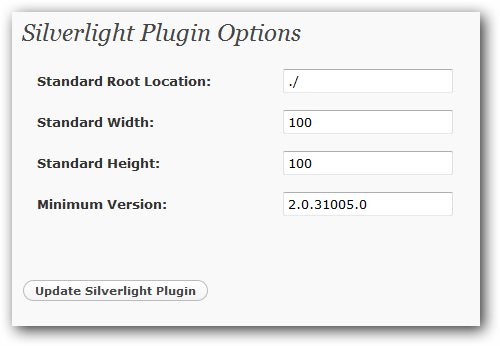
The only parameter required is <app> and all others are optional and have defaults which you can change via the plugin settings:

Silverlight for WordPress default settings

I’ve applied yesterday to put the plugin in the official WordPress plugin directory, but haven’t heard back yet and they don’t really have any SLA.  I’m hoping to get it in soon, because they have a good discovery model for updates, etc. and authors can install in one click.  For now, I’m also going to maintain a link to the current version with release notes on my site here: Silverlight for WordPress.

UPDATE: Silverlight for WordPress is now available in the plugins directory…just search on Silverlight.

Like I said, it’s simple (and perhaps dumb to some), but I look to your input.  Hopefully some WordPress authors may be able to use it.  I know my wife’s new photography site will :-).

Hope this helps!


This work is licensed under a Creative Commons Attribution By license.

| Comments

After looking at the options available for WordPress plugins for Silverlight, I found one that was outdated and the author’s URL looked to be broken.  So I adapted/updated the plugin to work again.

I’ve now provided the Silverlight Plugin for WordPress for an easy way to host Silverlight applications within your WordPress content.  You can get the plugin via the WordPress plugin directory by searching on Silverlight or clicking here.

Once downloaded, unzip the contents in your /wp-content/plugins directory.  You’ll then be able to activate the plugin and start working with it.  Adding content is as simple as adding this text to your post:

[silverlight: myapp.xap]

And you will have your content in your post.  You can optionally specify the width, height and minimum Silverlight version required.

Version 1.0.3 (31 MAR 2009) includes:

  • Ability to add local/absolute Silverlight applications (XAP)
  • Optionally set width/height/minRuntimeVersion of the Silverlight host plugin
  • Optionally provide initParams to the plugin

Silverlight Media Player (new 2010!)

I also have a Silverlight Media Player for WordPress which is built on top of the Silverlight Media Framework.  It is also as simple as tagging content and supports any Silverlight-supported video type, including IIS Smooth Streaming:

[sl-media: http://mysite.com/myhomemovie.mp4]

You can find this and the installation/configuration details page in the WordPress plugin directory as well!

Please leave a comment for things you’d like to see or bugs you find!


This work is licensed under a Creative Commons Attribution By license.

| Comments

Ok I’ve seen all the announcements and read all the buzz.  I know some folks on the team as well and had heard all their raving about their offering.  It wasn’t until today where I really realized what was going on.  In fact I was thinking about titling this post: WordPress installed and configured in under 5 minutes, but it’s much more than just that.

Introducing: Web Platform Installer 2.

The team at Microsoft has been working hard to make getting your web platform (server and client) up and running quickly and taking any pain out of the process.  In one click you can have Visual Studio and Silverlight Tools installed, IIS7 configured, Smooth Streaming enabled, etc.

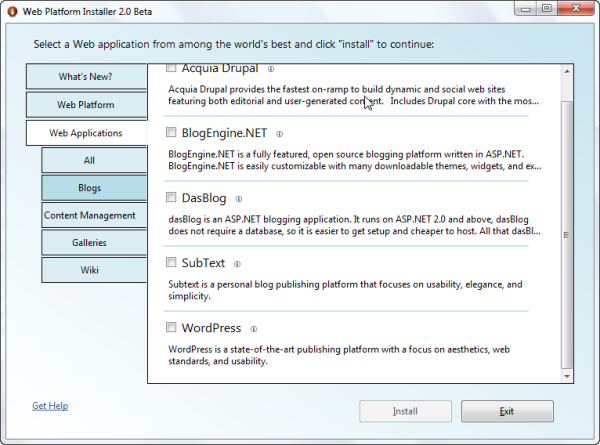
But it’s much more than just that.  You see the team partnered with the community and popular Open Source projects to provide much more than just Microsoft offerings.  Earlier today I wanted to check out WordPress templates in more detail and wanted them on my own server.  Let me set the stage for you.  My server is Windows 2003, IIS6, and has no SQL Server installed.  That’s it…a bare web vanilla front end.  I fired up WebPI (as it is affectionately known) and look what you see:

Web Platform Installer Applications

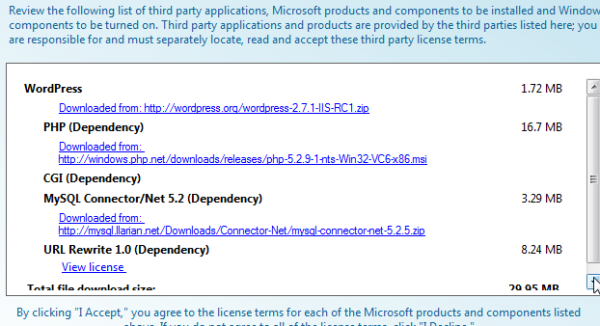
That’s right, WordPress as an offering.  No, not some hacked “run as .NET” version of WordPress.  The real deal from the WordPress project site…Microsoft hosts nothing but a simple manifest describing the project.  I selected WordPress and the tool knew what was missing from my environment: MySQL, PHP, FastCGI, etc. 

WordPress Install dependencies

I clicked “install” and literally in about less than 10 minutes I was running WordPress.  I’m not saying “installed” or downloaded.  In fact most of the time of that 10 minutes was from downloading the various bits.  When the “You’re finished” message came up, I had a working WordPress site, configured to MySQL, configured with a content database, etc.  I had to do nothing to configure my MySQL settings, I had to do nothing to my get PHP running on my site…WebPI did it all for me.  It was totally friction free.

It’s not just WordPress either.  Drupal, Umbraco, DasBlog, Subtext, ScrewTurn Wiki, etc.  And you can put your app there as well.  It really is a great resource not only for server components but also for client web platform stuff like I mentioned previously for Visual Studio and Silverlight developer tools.

Great job to this team and you all should definitely check it out.  They really did a good job.  My server didn’t get screwed up at all and everything “just worked.”  I think this installs WordPress faster than WordPress instructions! :-)
| Comments

If you are like any other developer, including me, you probably disregard most warnings and are usually the same type that keeps clicking next when installing things without paying attention to detail.  That’s okay I do it too.

In the release of Silverlight 3 Beta, we noted that this is a developer release and that no “Go Live” licensing was going to be available for this release.  What this means is that we don’t recommend putting things in production as we’ve not exposed or wired up the end-user runtime for Silverlight 3.  The only way people can view Silverlight 3 content during this Beta phase is by having one of the versions of the developer runtime for either Windows or Mac installed.  We’ve not integrated the end-user upgrade/install into the template for now.  So what does this mean to you when you put a sample out for people to see in your organization or perhaps if you have a preview of a product or something and users visit this application.  Here’s a few scenarios for you – keeping in mind the information below is related to the application being build in Silverlight 3: No Silverlight installed, Silverlight 3 installed, Silverlight 1/2 installed and a note about the plugin MIME type.

Scenario: No Silverlight Installed

If the user has no previous version of Silverlight installed at all, they’ll be presented with whatever your default “not installed” experience is.  If you’ve don nothing to customize this, shame on you :-).  The default Visual Studio templates will simply provide you with a static image.  That link in the templates links to a “coming soon” page which describes the situation.  You can view that page here: Silverlight 3 coming soon page.  If the user installs one of the developer runtimes then they’d be able to review your application.

NOTE: People with Silverlight 3 Developer runtimes cannot “upgrade” to an end-user runtime.  This means that if an end-user (non-developer) installs the developer runtime, then when Silvelright 3 releases they will have to manually uninstall the developer runtime to get the update of the released runtime.  If you’re a developer, you probably don’t care and future developer runtimes can install on top of other developer runtimes.  This is one of the driving reasons for no Go Live support at this time.

You should inform your viewers of your beta sample of the scenario and what they may have to do in the future.

Scenario: Silverlight 3 developer runtime installed

If the user has the correct version of the Silverlight 3 runtime as defined by your application, then they will be able to view your application.  You define the minimum version of the runtime required when you instantiate the plugin using the minRuntimeVersion parameter.  This might look like:

   1: <object data="data:application/x-silverlight-2," type="application/x-silverlight-2">
   2:     <param name="minRuntimeVersion" value="3.0.40307.0" />
   3:     ...
   4: </object>

If the user has the minimum you specified, all should be well.

Scenario: Silverlight installed (any released version)

Ah, this is the tricky one.  If the user has any released version of Silverlight (1.0 or 2), the experience they see at your beta sample will be driven off of two properties as you instantiate the plugin: minRuntimeVersion and autoUpgrade.  Let’s look at what will happen and assume that the user has Silverlight 2 installed.

minRuntimeVersion=”3.0.40307.0” and autoUpgrade=”true” – if you do nothing else, the user will see this:

Silverlight default auto upgrade

This is bad on a few levels.  First because it isn’t a customized experience, it is the default.  Second because the “install” link will take them to the latest released runtime – which they already have most likely.  What happens?  The user feels like they are in and endless loop of Visit Site –> prompted to upgrade –> seemingly install –> visit site –> prompted to upgrade –> repeat.  This will frustrate your beta visitor and confuse you :-). 

You should always customize the user experience for the end user.  For beta, here’s what I recommend doing to ensure they aren’t confused with the goals being the following:

  • Detect if the user needs to upgrade to see your beta sample
  • Inform them of the situation and that your sample is beta
  • Direct them to the coming soon information page for Silverlight 3

Here’s what you need to do.  Ensure that your application (object tag) is within some type of HTML container, like a div and give that an appropriate ID.  In your plugin instantiation you’ll want to add 3 parameters like this:

   1: <div id="silverlightControlHost">
   2:     <object data="data:application/x-silverlight-2," type="application/x-silverlight-2">
   3:         <param name="minRuntimeVersion" value="3.0.40307.0" />
   4:         <param name="autoUpgrade" value="false" />
   5:         <param name="onerror" value="pluginError" />
   6:         ... other param values as required ...
   7:     </object>
   8: </div>

The minRuntimeVersion specifies the version required for your application, which for Silverlight 3 beta is 3.0.40307.0.  The second is to turn autoUpgrade to false.  This prevents the default experience.  The third is to add an error handler as since autoUpgrade is now false it will throw an error saying that the required version isn’t installed.  In your error function you would want to do something like this:

   1: function pluginError(sender, args) {
   2:     if (args.ErrorCode == 8001) {
   3:         var msg = "This sample application was built with Silverlight 3 Beta.\n";
   4:         msg += "You currently have Silverlight installed, but not the version required to view this sample.\n\n";
   5:         msg += "For more information about Silverlight 3, please visit: \n";
   6:         msg += "<a href=\"http://go.microsoft.com/fwlink/?LinkID=141205\">Silverlight 3 Coming Soon</a>.";
   7:  
   8:         var hostContainer = document.getElementById("silverlightControlHost");
   9:         hostContainer.innerHTML = msg;
  10:     }
  11:     else {
  12:         // handle other plugin errors here
  13:     }
  14: }

The error code of 8001 means that an upgrade is required.  Since we know we have a beta app and we know that the user has some version of Silverlight installed, but not the beta version.  Replace the container inner content with some HTML explaining that your application is a sample application and direct them to the coming soon page for more information.  This way your users aren’t sent in an endless loop, get confused, and hate you.

Why isn’t the <object> type attribute “application/x-silverlight-3”?

A common misconception is that the data and type attributes on the plugin object directly correlate to the runtime version of the plugin you are using.  This is not true.  Just because you have a Silverlight 3 application does not mean you need to change it to type=”application/x-silverlight-3” and in fact you’ll have problems if you do!  These attributes refer to the plugin MIME type and not the runtime version.  You would still use application/x-silverlight-2 for a Silverlight application (in fact you could use x-silverlight if you wanted to handle edge cases of Silverlight 1.0).

Summary

Beta software is fun and confusing.  It’s fun for us developers because we’re technically astute, understand what beta means, and are probably accustomed to working with others’ beta software all the time.  For end users, it can be confusing because they see things/links/articles and want to check it out, but may not have the required software.  As developers we can do things to help our beta visitors understand the scenario much clearer and do our job to inform.

So if you are showing Silverlight 3 beta samples, please take an extra moment to follow this guidance and trap the upgrade error code and handle it with information to inform the user.

Hope this helps!

| Comments

One of the new features in Silverlight 3 is providing an application navigation framework via the Frame and Page controls in the APIs.  If you saw my guide to Silverlight 3, you may have seen the section on navigation which describes the functionality and as well has a link to a video tutorial about it.

I wanted to augment that tutorial with some additional information about URI routing, which I think is one of the great features of the framework.  You see typically your UriMapper might have a 1:1 mapping and look something like this (note in my sample here I’m putting this in App.xaml, but the model may change in the future of where you can/should place UriMapper):

   1: <Application xmlns="http://schemas.microsoft.com/winfx/2006/xaml/presentation"
   2:              xmlns:x="http://schemas.microsoft.com/winfx/2006/xaml" 
   3:              x:Class="NavigationSample.App"
   4:              xmlns:navcore="clr-namespace:System.Windows.Navigation;assembly=System.Windows.Controls.Navigation"
   5:              >
   6:     <Application.Resources>
   7:         <navcore:UriMapper x:Key="uriMapper">
   8:             <navcore:UriMapping Uri="About-Us" MappedUri="/Views/AboutPage.xaml" />
   9:         </navcore:UriMapper>
  10:     </Application.Resources>
  11: </Application>

But what if you still wanted to provide friendlier routes, obfuscate the physical location of the view, but handle the default scenario?  You can as long as you follow your own naming conventions.  Take for instance if we contain all our pages in a folder called Views in our application.  We could then map our routes like this:

   1: ...
   2: <navcore:UriMapper x:Key="uriMapper">
   3:     <navcore:UriMapping Uri="{}{page}" MappedUri="/Views/{page}.xaml" />
   4: </navcore:UriMapper>
   5: ...

You could also follow some naming conventions if you wanted to make sure you limited it to only pages or something so you require the view page to be named SomethingPage.xaml and then can have a route like:

   1: ...
   2: <navcore:UriMapper x:Key="uriMapper">
   3:     <navcore:UriMapping Uri="{}{page}" MappedUri="/Views/{page}Page.xaml" />
   4: </navcore:UriMapper>
   5: ...

The navigation routes are read top down so you can still have explicit (or additional) routes in addition to the default.  So given:

   1: ...
   2: <navcore:UriMapper x:Key="uriMapper">
   3:     <navcore:UriMapping Uri="About-Us" MappedUri="/Views/AboutPage.xaml" />
   4:     <navcore:UriMapping Uri="History" MappedUri="/Views/AboutPage.xaml" />
   5:     <navcore:UriMapping Uri="{}{page}" MappedUri="/Views/{page}.xaml" />
   6: </navcore:UriMapper>
   7: ...

A request to About-Us, History or About would navigate to /Views/AboutPage.xaml regardless.  This provides you some flexibility and granularity in your implementation and also provides additional SEO points for your content.

I really like the UriMapper in the navigation framework and have been lobbying to change the default templates Visual Studio spits out to use the UriMapper by default.  It provides you with a cleaner (and perhaps shorter) URI as well as obfuscates your “code” from your URI logic.  Be sure to check out the video if you aren’t familiar with the framework at all.

I hope this helps and would love to know what you think about the navigation framework?


This work is licensed under a Creative Commons Attribution By license.