Verbose XAML, we all love it right?  What?!  You don’t like writing massive amounts of angle brackets to get to define certain properties?  I mean who doesn’t love something like this:

<MapControl>
    <MapControl.Center>
        <Location>
            <Location.Latitude>47.669444</Location.Latitude>
            <Location.Longitude>-122.123889</Location.Longitude>
        </Location>
    </MapControl.Center>
</MapControl>

What’s not to love there?  Oh I suppose you prefer something like this?

<MapControl Center="47.669444,-122.123889" />

In the XAML dialect this is what we refer to as a ‘type converter’ or more affectionately at times ‘string to thing’ as the declarative markup is just a string representation of some structure.  In WPF and Silverlight this was implemented through requiring to use the System.ComponentModel.TypeConverter class model where you would attribute your class with a pointer to an implementation of TypeConverter that would override the common things you need, most of the time ConvertFrom capabilities.

In UWP where we currently could not rely on the exact same implementation of System.ComponentModel.TypeConverter as it is not a part of the API exposure to UWP apps at this time as well as being a .NET concept which wouldn’t be available to other WinRT developers.  In looking at ways to achieve the same primary scenario, we can now look at the Creator’s Update to deliver the functionality for us.  In the markup compiler for Creator’s Update we now leverage the metadata CreateFromString attribute in WinRT to generate the correct metdata to do the conversion.  The responsibility lies in the owner of the class (looking at you ISVs as you update) to add this metadata capabilities.

NOTE: To enable this capability, the consuming app must currently have minimum target to the Creator’s Update.

Let’s use an example following my pseudo map control I used above.  Here is my class definition for my MyMap control

using Windows.UI.Xaml.Controls;

namespace CustomControlWithType
{
    public class MyMap : Control
    {
        public MyMap()
        {
            this.DefaultStyleKey = typeof(MyMap);
        }

        public string MapTitle { get; set; }
        public Location CenterPoint { get; set; }
    }
}

Notice it has a Location type.  Here’s the definition of that type:

using System; namespace CustomControlWithType { public class Location { public double Latitude { get; set; } public double Longitude { get; set; } public double Altitude { get; set; } } }

Now without a type converter I can’t use the ‘string to thing’ concept in markup…I would have to use verbose markup.  Let’s change that and add an attribute to my Location class, and implement the conversion function:

using System;

namespace CustomControlWithType
{
    [Windows.Foundation.Metadata.CreateFromString(MethodName = "CustomControlWithType.Location.ConvertToLatLong")]
    public class Location
    {
        public double Latitude { get; set; }
        public double Longitude { get; set; }
        public double Altitude { get; set; }

        public static Location ConvertToLatLong(string rawString)
        {
            string[] coords = rawString.Split(',');
            
            var position = new Location();
            position.Latitude = Convert.ToDouble(coords[0]);
            position.Longitude = Convert.ToDouble(coords[1]);

            if (coords.Length > 2)
            {
                position.Altitude = Convert.ToDouble(coords[2]);
            }

            return position;
        }
    }
}

As you can see in the highlighted lines, I added two things.  First I added an attribute to my class to let it know that I have a CreateFromString method and then provided the fully qualified name to that method.  The second obvious thing is to implement that method.  It has to be a public static method and you can see my simple example here.

Now when using the MyMap control I can specify the simpler markup:

And the result would be converted and my control that binds to those values in it’s template are able to see them just fine

Yes, my control is quite lame but just meant to illustrate the point.  The control binds to the CenterPoint.Latitude|Longitude|Altitude properties of the type.

If you are in this scenario of providing APIs that are used in UI markup for UWP apps, try this out and see if it adds delighters for your customers.  I’ve uploaded the full sample of this code to my GitHub in type-converter-sample if you want to see it in full.  Hope this helps! 

After a sick day a few weeks ago and writing my first Alexa Skill I’ve been pretty engaged with understanding this voice UI world with Amazon Echo, Google Home and others.  It’s pretty fun to use and as ‘new tech’ it is pretty fun to play around with.  Almost immediately after my skill was certified, I saw this come across my Twitter stream:

I had spent a few days getting up-to-speed on Node and the environment (I’ve been working in client technologies for a long while remember) and using VS Code, which was fun.  But using C# would have been more efficient for me (or so I thought).  AWS Lambda services just announced they will support C# as the authoring environment for a Lambda service.  As it turns out, the C# Lambda support is pretty general so there is not compatibility in the dev experience for creating a C# Lambda backing a skill as there presently is for Node.JS development…at least right now.  I thought it would be fun to try and was eventually successful, so hopefully this post finds others trying as well.  Here’s what I’ve learned in the < 4 hours (I time-boxed myself for this exercise) spent trying to get it to work.  If there is something obvious I missed to make this simpler, please comment!

The Tools

You will first need a set of tools.  Here was my list:

With these I was ready to go.  The AWS Toolkit is the key here as it provides a lot of VS integration that will help make this a lot easier.

NOTE: You can do all of this technically with VS Code (even on a Mac) but I think the AWS Toolkit for VS makes this a lot simpler to initially understand the pieces and WAY simpler in the publishing step to the AWS Lambda service itself.  If there is a VS Code plugin model, that would be great, but I didn’t find one that did the same things here.

Armed with these tools, here is what I did…

Creating the Lambda project

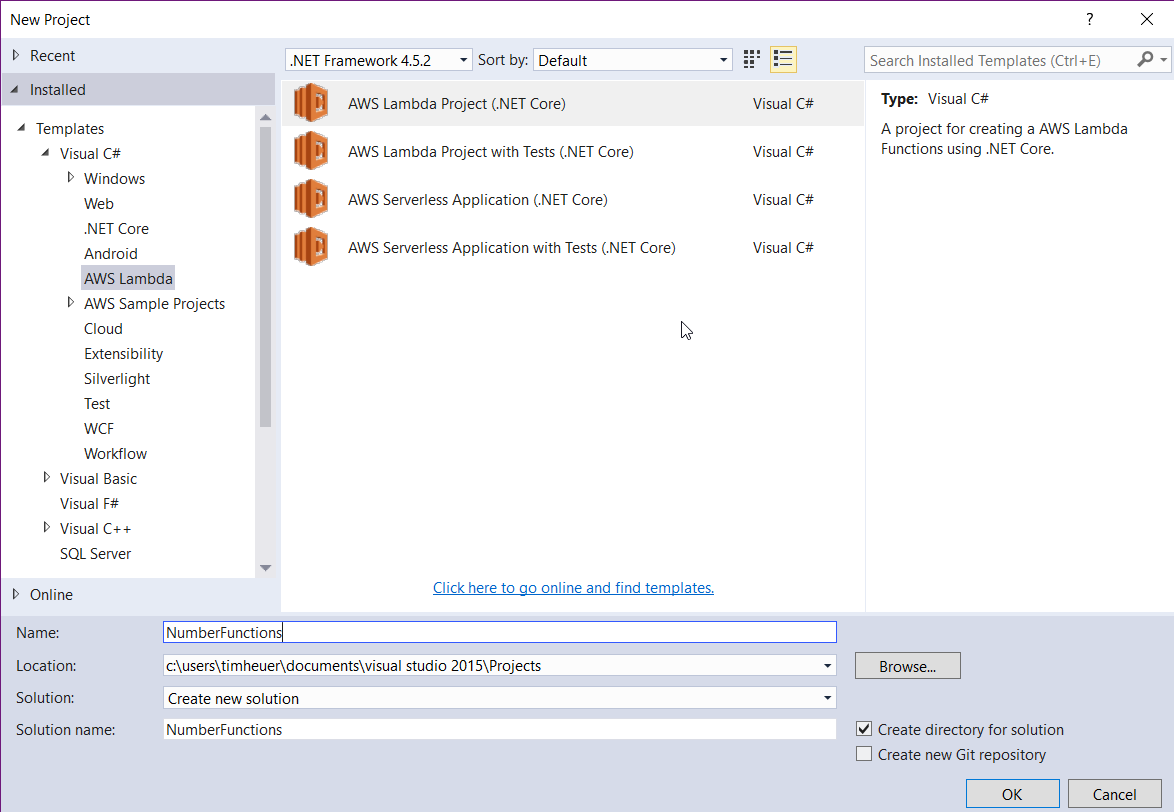
First, create a new project in VS, using the AWS Lambda template:

This project name doesn’t need to map to your service/function names but it is one of the parameters you will set for the Lambda configuration, so while it doesn’t entirely matter, maybe naming it something that makes sense would help.  We’re just going to demonstrate a dumb Alexa skill for addition so I’m calling it NumberFunctions.

NOTE: This post isn’t covering the concepts of an Alexa skill, merely the ability to use C# to create your logic for the skill if you choose to use AWS Lambda services.  You can, of course, use your own web server, web service, or whatever hosted on whatever server you’d like and an Alexa skill can use that as well. 

Once we have that created you may see the VS project complain a bit.  Right click on the project and choose to restore NuGet packages and that should clear it up.

Create the function handler

The next step is to write the function handler for your skill.  The namespace and public function name matter as these are also inputs to the configuration so be smart about them.  For me, I’m just using the default namespace, class and function name that the template provided.  The next step is to gather the input from the Alexa skill request.  Now a Lambda service can be a function for anything…it is NOT limited to serve Alexa responses, it can do a lot more.  But this is focused on Alexa skills so that is why I’m referring to this specific input.  Alexa requests will come in the form of a JSON payload with a specific format.  Right now if you accept the default signature of the function handler of string, ILambdaContext it will likely fail due to issues you can read about here on GitHub.  So the best way is to really understand that the request will come in with three main JSON properties: request, version, and session.  Having an object with those properties exposed will help…especially if you have an object that understands how to automatically map the JSON payload to a C# object…after all that’s one of the main benefits of using C# is more strongly-typed development you may be used to.

Rather than create my own, I went on the hunt for some options.  There doesn’t exist yet an Alexa Skills SDK for .NET yet (perhaps that is coming) but there are two options I found.  The first seemed a bit more setup/understanding and I haven’t dug deep into it yet, but might be viable.  For me, I just wanted to basically deserialize/serialize the payload into known Alexa types.  For this I found an Open Source project called Slight.Alexa.  This was build for the full .NET Framework and won’t work with the Lambda service until it was ported to .NET Core, so I forked it and moved code to shared and created a .NET Core version of the library. 

NOTE: The port of the library was fairly straight forward sans for a few project.json things (which will be going away) as well as finding some replacements for things that aren’t in .NET Core like System.ComponentModel.DataAnnotations.  Luckily there were replacements that made this simple.

With my fork in place I made a quick beta NuGet package of my .NET Core version so I could use it in my Lambda service (.NET Core projects can’t reference DLLs so they need to be in NuGet packages).  You can get my beta package of this library by adding a reference to it via your new Lambda project:

This now gives me a strongly-typed OM against the Alexa request/response payloads.  You’ll also want to add a NuGet reference to the JSON.NET library (isn’t every project using this now…shouldn’t it be the default reference for any .NET project???!!!).  With these both in place now you have what it takes to process.  The requests for Alexa come in as Launch, Intent and Session requests primarily (again I’m over-simplifying here but for our purposes these are the ones we will look at).  The launch request is when someone just launches your skill via the ‘Alexa, open <skill name>’ command.  We’ll handle that and just tell the user what our simple skill does.  Do do this, we change the function handler input from string to SkillRequest from our newly-added Slight.Alexa.Core library we added:

public string FunctionHandler(SkillRequest input, ILambdaContext context)

Because SkillRequest is an annotated type the library knows how to map the JSON payload to the object model from the library.  We can now work in C# against the object model rather than worry about any JSON path parsing.

Working with the Alexa request/response

Now that we have the SkillRequest object, we can examine the data to understand how our skill should respond.  We can do this by looking at the request type.  Alexa skills have a few request types that we’ll want to look at.  Specifically for us we want to handle the LaunchRequest and IntentRequest types.  So we can examine the type and let’s first handle the LaunchRequest:

Response response;
IOutputSpeech innerResponse = null;
var log = context.Logger;

if (input.GetRequestType() == typeof(Slight.Alexa.Framework.Models.Requests.RequestTypes.ILaunchRequest))
{
    // default launch request, let's just let them know what you can do
    log.LogLine($"Default LaunchRequest made");

    innerResponse = new PlainTextOutputSpeech();
    (innerResponse as PlainTextOutputSpeech).Text = "Welcome to number functions.  You can ask us to add numbers!";
}

You can see that I’m just looking at the type and if a LaunchRequest, then I’m starting to provide my response, which is going to be a simple plain-text speech response (with Alexa you can use SSML for speech synthesis, but we don’t need that right now).  If the request is an IntentRequest, then I first want to get out my parameters from the slots and then execute my intent function (which in this case is adding the parameters):

else if (input.GetRequestType() == typeof(Slight.Alexa.Framework.Models.Requests.RequestTypes.IIntentRequest))
{
    // intent request, process the intent
    log.LogLine($"Intent Requested {input.Request.Intent.Name}");

    // AddNumbersIntent
    // get the slots
    var n1 = Convert.ToDouble(input.Request.Intent.Slots["firstnum"].Value);
    var n2 = Convert.ToDouble(input.Request.Intent.Slots["secondnum"].Value);

    double result = n1 + n2;

    innerResponse = new PlainTextOutputSpeech();
    (innerResponse as PlainTextOutputSpeech).Text = $"The result is {result.ToString()}.";

}

With these in place I can now create my response object (to provide session management, etc.) and add my actual response payload, using JSON.NET to serialize it into the correct format.  Again, the Slight.Alexa library does this for us via that annotations it has on the object model.  Please note this sample code is not robust, handles zero errors, etc…you know, the standard ‘works on my machine’ warranty applies here.:

response = new Response();
response.ShouldEndSession = true;
response.OutputSpeech = innerResponse;
SkillResponse skillResponse = new SkillResponse();
skillResponse.Response = response;
skillResponse.Version = "1.0";

return skillResponse;

I’ve now completed my function, let’s upload it to AWS!

Publishing the Lambda Function

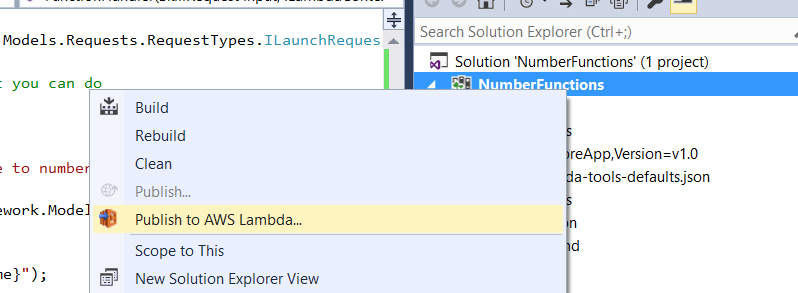
Using the AWS Toolkit for Visual Studio this process is dead simple.  You’ll first have to make sure the toolkit is configured with your AWS account credentials which are explained here in the Specifying Credentials information.  Right click on your project and choose Publish to AWS Lambda:

You’ll then be met with a dialog that you need to choose some options.  Luckily it should be pretty self-explanatory:

You’ll want to make sure you choose a region that has the Alexa Skill trigger enabled.  I don’t know how they determine this but the US-Oregon one does NOT have that enabled, so I’ve been using US-Virginia and that enables me just fine.  The next screen will ask you to specify the user role (I am using the basic execution role).  If you don’t know what these are, re-review the Alexa skills SDK documentation with Lambda to get started there.  These are basically IAM roles in AWS that you have to choose.  After that you click Upload and done.  The toolkit takes care of bundling all your stuff up into a zip, creating the function (if you didn’t already have one – as if you did you can choose it from the drop-down to update an existing one) and uploading it for you.  You can do all this manually, but the toolkit really, really makes this simple.

Testing the function

After you publish you’ll get popped the test window basically:

This allows you to manually test your lambda.  In the pre-configured requests objects you can see a few Alexa request object specified there.  None of them will be the exact one you need but you can start with one and manually modify it easily to do a quick test.  If you notice my screenshot I modified to specify our payload…you can see the payload I’m sending here:

{
  "session": {
    "new": false,
    "sessionId": "session1234",
    "attributes": {},
    "user": {
      "userId": null
    },
    "application": {
      "applicationId": "amzn1.echo-sdk-ams.app.[unique-value-here]"
    }
  },
  "version": "1.0",
  "request": {
    "intent": {
      "slots": {
        "firstnum": {
          "name": "firstnum",
          "value": "3"
        }, "secondnum" : { "name": "secondnum", "value": "5" }
      },
      "name": "AddIntent"
    },
    "type": "IntentRequest",
    "requestId": "request5678"
  }
}

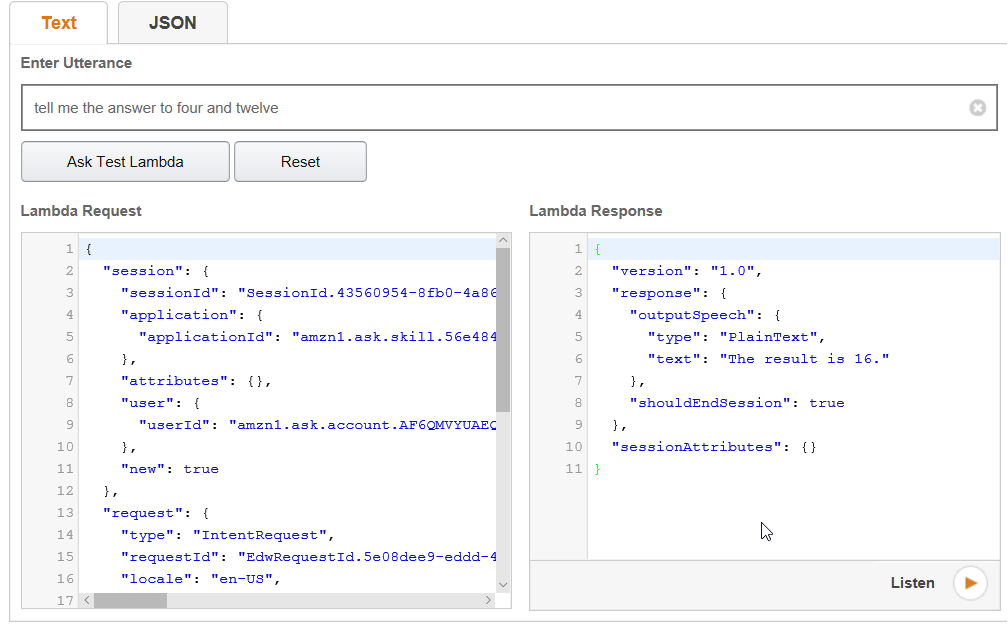
That is sending an IntentRequest with two parameters and you can see the response functioned correctly!  Yay!

Of course the better way is to use Alexa to test it so you’ll need a skill to do that.  Again, this post isn’t about how to do that, but once you have the skill you will have a test console that you can point to your AWS Lambda function.  I’ve got a test skill and will point it to my Lambda instance:

UPDATE: Previously this wasn’t working but thanks to user @jpkbst in the Alexa Slack channel he pointed out my issue.  All code above updated to reflect working version.

Well I had you reading this far at least.  As you can see the port of the Slight.Alexa library doesn’t seem to quite be working with the response object.  I can’t pinpoint why the Alexa test console feels the response is valid as the schema looks correct for the response object.  Can you spot the issue in the code above?  If so, please comment (or better yet, fix it in my sample code).

Summary (thus far)

I set out to spend a minimal amount of time getting the C# Lambda service + Alexa skill working.  I’ve uploaded the full solution to a GitHub repository: timheuer/alexa-csharp-lambda-sample for you to take a look at.  I’m hopeful that this is simple and we can start using C# more for Alexa skills.  I think we’ll likely see some Alexa Skills SDK for .NET popping up elsewhere as well. 

Hope this helps!

A long while back it seemed like the new cool app thing to do was to represent people/avatars in circles instead of the squares (or squares with rounded corners).  I made a snarky comment about this myself almost exactly 2 years ago when I noticed that some apps I was using at the time switched to this:

Now since this seems to be a popular trend and people are doing it I’ve thought XAML folks have figured it out.  However I’ve seen enough questions and some people trying to do a few things that make it more complex that I thought I’d drop a quick blog post about it.  I’ve seen people trying to do profile pic upload algorithms that clip the actual bitmap and save on disk before displaying it to people stacking transparent PNG ‘masking’ techniques.  None of this is needed for the simplest display.  Here you go:

<Ellipse Width="250" Height="250">
    <Ellipse.Fill>
        <ImageBrush ImageSource="ms-appx:///highfive.jpg" />
    </Ellipse.Fill>
</Ellipse>

That’s it.  You’ll see that Line 3 shows us using an ImageBrush as the fill for an Ellipse.  Using an Ellipse helps you get the precise circular drawing clip without having pixelated edges or anything like that.  The above would render to this image as the example in my app:

Circular image

Now while this is great, using an ImageBrush doesn’t give you the automatic decode-to-render-size capability that was added in the framework in Windows 8.1.

NOTE: This auto decode-to-render-size feature basically only decodes an Image to the render size even if the image is larger.  So if you had a 2000x2000px image but only displayed it in 100x100px then we would only decode the image to 100x100px size saving a lot of memory.  The standard Image element does this for you.

For most apps that control your image sources, you probably are already saving images that are only at the size you are displaying them so it may be okay.  However for apps like social apps or where you don’t know where the source is coming from or your app is NOT resizing the image on upload, etc. then you will want to ensure you save memory by specifying the decode size for the ImageBrush’s source specifically.  This is easily done in markup using a slightly more verbose image source syntax.  Using the above example it would be modified to be:

<Ellipse Width="250" Height="250">
    <Ellipse.Fill>
        <ImageBrush>
            <ImageBrush.ImageSource>
                <BitmapImage DecodePixelHeight="250" DecodePixelWidth="250" UriSource="ms-appx:///highfive.jpg" />
            </ImageBrush.ImageSource>
        </ImageBrush>
    </Ellipse.Fill>
</Ellipse>

No real change other than telling the framework what the decode size should be in Line 5 using DecodePixelHeight and DecodePixelWidth.  The rendering would be the same in my case.  This tip is very helpful to when you are most likely going to be displaying a smaller image than the source and not the other way around. 

So there you go.  Go crazy with your circular people representations!  Hope this helps.

Wow, what a week.  I have to say even as employees of Microsoft, we get surprised when we go to our conferences and see some of the bigger announcements.  There are things that are being worked on that are new or just in different divisions that we’re not focused on.  This past week at the Build 2015 conference was an example of that for me.  Lots of good stuff for developers from client to server!

Universal Windows Platform

At Build this year we introduced the Universal Windows Platform v10 with a set of new APIs and unified features for all Windows devices.  Perhaps the best vision of this is the Day 2 Keynote where Kevin Gallo walked through an example of this and a single app running on tablet, phone, Surface Hub, HoloLens, etc. 

Visit the keynote and watch the whole thing or if you want to jump to the start of this portion it starts at about 23 minutes in.  A really well done, compelling demonstration of the Universal Windows Platform.

XAML Session Recap

For the XAML developer on Windows, there was a lot of goodness shown from my team.  We’ve been working hard on a lot of internals and new API exposure for the Universal Windows Platform.  Our team had some representation in some deep-dive sessions from Build and the recordings are all now available…here’s a list for you to queue up:

One of the things I was really happy to have is part of the Office team come and talk about how they build Office on the same platform we ask you to build apps on.  It is good insight into a large application with lots of legacy and goals that might not be typical of smaller apps or smaller ecosystems.  A big focus for XAML this release was performance given that customers like Office and the Windows shells themselves leveraging XAML for their UI.

I hope that if you are a XAML developer you take some time to look at what new features are available in the Universal Windows Platform for you in Windows 10.

Get the goods!

If you want to get started playing around, the best way is to be a part of the Windows Insiders program.  Everything you need to get started you can find here https://dev.windows.com/en-US/windows-10-for-developers.  You’ll want to join the Insiders program, then download the Visual Studio tools and get started creating/migrating apps!  To help get you started after that here are some helpful links:

Give us feedback!

As you play around with the bits, please continue to give us feedback.  The best way is to be involved in the conversation on the forums.  Ask questions there, get help from the community, share learnings, etc.  Secondarily the Windows Insider Feedback tool (an app that is installed on Windows already for you as ‘Windows Feedback’) is available for you to give direct feedback to the teams.  Please choose categories carefully so that the feedback gets directly to the right team quickly. 

Thanks for helping make the Windows Platform better.  I hope these direct links help you jumpstart your learning!

I can’t wait to talk XAML at Build 2015 with you all!!!

Hey all!  Been really quiet here on the blog as I’ve been focusing on both new personal and work aspects of my life.  On the work front, the team I work on has been working hard on delivering on our promise of converged Windows app development using the native UI framework for the platform – XAML.  It has been a real journey of change, stress of new customers and some exciting changes to the platform that are just the beginning.

My team (XAML) and the entire Windows Developer Platform team will be joining thousands of you in San Francisco for Build 2015 to share what we’ve been working on for Windows 10.

I’ll be joining members of my team in San Francisco to talk about what’s new in the UI framework, some ideas/tools/new ‘stuff’ to build apps across mobile and desktop, improvements in data binding, all the work we did in the platform for performance, and more!

Aside from San Francisco, I’ve been fortunate enough to be asked to deliver an address at a few events as a part of the Build Tour.  These are a set of events across the globe (25 events running from after Build main event until near end of June) that bring the best of Build along with local flare/content with partner showcases and are FREE events!

I will be joining the local community of developers in Atlanta (20-May-2015 at the Georgia Aquarium) and Chicago (10-June-2015 at The Field Museum of Natural History) in the United States event.  Unfortunately (for me as well as I would have loved to meet more in the world) some of the international events conflicted with personal obligations so more of my colleagues will be attending those representing the developer platform.

Please consider joining me and colleagues around the world at these FREE events by registering for your closes Build Tour at http://www.build15.com and encourage your friends and co-workers to register as well!

I look forward to sharing our work with you, hearing your feedback about the Windows developer platform and seeing what kind of apps you are bringing to the ecosystem for our mutual customers!

See you in San Francisco, Atlanta and Chicago!