| Comments

I received a comment regarding the new Expression Encoder SP1 Silverlight player templates and how they can be used within your own application.  Right now the templates appear to stand on their own.  That’s only because the output of an Encoder action will be an encoded file, the template you chose (XAP) and an HTML page to host the Silverlight player application.

But what if you already have an application and are trying to integrate media playback within it?  How can you take advantage of the Encoder templates, but just drop them in your existing application?  Let’s take a quick look.

Let’s say we have an existing application.  For the sake of this post, let’s just show some primitive controls and display a Button and TextBox within some StackPanel layouts:

   1: <UserControl
   2:     xmlns="http://schemas.microsoft.com/winfx/2006/xaml/presentation"
   3:     xmlns:x="http://schemas.microsoft.com/winfx/2006/xaml"
   4:     x:Class="ExPlayer.Page"
   5:     Width="640" Height="480" 
   6:     >
   7:  
   8:     <Grid x:Name="LayoutRoot" Background="White">
   9:         <StackPanel Orientation="Horizontal">
  10:             <StackPanel Height="Auto" Width="309">
  11:                 <Button Content="Button"/>
  12:                 <TextBox Text="TextBox" TextWrapping="Wrap"/>
  13:             </StackPanel>
  14:             <StackPanel Height="Auto" Width="250" x:Name="MediaArea"/>
  15:         </StackPanel>
  16:     </Grid>
  17: </UserControl>

Now we want to add a media player using the Encoder templates to our application in the StackPanel labeled MediaArea.  First, we need to get the media player from the template as a control.  Easy enough since the source code for the Expression Encoder Silverlight 2 templates are included.  Browse to your install directory for Expression (usually C:\Program Files\Microsoft Expression\Encoder\Templates\en\) and pick the Silverlight 2 template you want to use.  NOTE: This is only for Silverlight 2 templates, so be sure not to get frustrated at me :-) -- you’ve been forewarned.  I’ll choose the SL2Standard template.  Notice within that folder there is also a Source folder.  Within there is an ExpressionPlayer folder and associated C# source code project.  Open that project in Visual Studio 2008.

Now build the project.  Done.  You now have a control you can use.  Here’s how we’ll do it.

Going back to our own application we need to add a reference to the ExpressionPlayer.dll and MediaPlayer.dll we just built.  Go ahead and do that in your Silverlight application by choosing Add Reference and then pointing to the assembly location.  Now we need to inform our XAML that we’ll be using this control.  Of course if you add these controls to your Visual Studio 2008 toolbox you can drag-and-drop them onto the XAML code surface and it will append the xmlns attribute for you, or we can add it ourself:

   1: <UserControl
   2:     xmlns="http://schemas.microsoft.com/winfx/2006/xaml/presentation"
   3:     xmlns:x="http://schemas.microsoft.com/winfx/2006/xaml"
   4:     x:Class="ExPlayer.Page"
   5:     Width="640" Height="480" 
   6:     xmlns:expression="clr-namespace:ExpressionMediaPlayer;assembly=ExpressionPlayer"
   7:     xmlns:ExpressionMediaPlayer="clr-namespace:ExpressionMediaPlayer;assembly=MediaPlayer"
   8:     >

I’ve called my namespace “expression” and “ExpressionMediaPlayer” and you can see I’ve pointed (actually Visual Studio’s Intellisense did it all for me) the namespace to the assembly I just referenced.  Now we can use the control.  Here’s the XAML for adding it to my application and adding a media file that is in my applicaiton:

   1: <UserControl
   2:     xmlns="http://schemas.microsoft.com/winfx/2006/xaml/presentation"
   3:     xmlns:x="http://schemas.microsoft.com/winfx/2006/xaml"
   4:     x:Class="ExPlayer.Page"
   5:     Width="640" Height="480" 
   6:     xmlns:expression="clr-namespace:ExpressionMediaPlayer;assembly=ExpressionPlayer"
   7:     xmlns:ExpressionMediaPlayer="clr-namespace:ExpressionMediaPlayer;assembly=MediaPlayer"
   8:     >
   9:  
  10:     <Grid x:Name="LayoutRoot" Background="White">
  11:         <StackPanel Orientation="Horizontal">
  12:             <StackPanel Height="Auto" Width="309">
  13:                 <Button Content="Button"/>
  14:                 <TextBox Text="TextBox" TextWrapping="Wrap"/>
  15:             </StackPanel>
  16:             <StackPanel Height="Auto" Width="250" x:Name="MediaArea">
  17:                 <expression:ExpressionPlayer Width="242" Height="177">
  18:                     <expression:ExpressionPlayer.Playlist>
  19:                         <ExpressionMediaPlayer:PlaylistItem MediaUrl="Lake.wmv"/>
  20:                     </expression:ExpressionPlayer.Playlist>
  21:                 </expression:ExpressionPlayer>
  22:             </StackPanel>
  23:         </StackPanel>
  24:     </Grid>
  25: </UserControl>

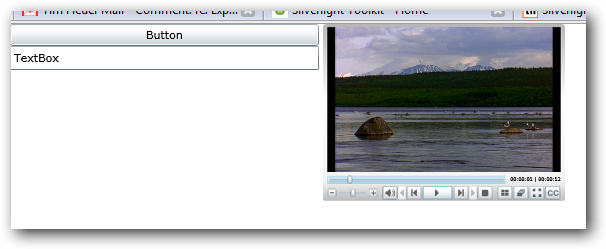
Of course you can interact with it via code as well, but getting the control in your app is easy once you know these steps.  Now my application has a fully-functional media playback without me writing any code and being able to integrate it within my existing application.  I might want to change the style of course to fit my application’s experience, but dropping in a few style attributes wouldn’t be that difficult…and I an always make that a part of the Encoder template as well!  Here’s the “after” screenshot of it in play:

You get full functionality out of the player…with one exception.  I’ve noticed that the fullscreen option doesn’t act the same as if the player was the only app.  To be honest I haven’t looked at what it would take to do that,but remember that now the media player is a part of a bigger app and isn’t the application itself.  So “fullscreen” mode is a part of the container Silverlight application and not just the media player…something to watch out for if you expected your embedded media player now to automatically have the same fullscreen functionality.

| Comments

The other day I wrote a simple little Silverlight application using a DataGrid to help navigate the TechEd DVD contents.  My code was admittedly quick and dirty.  I loaded up some data, and based on some events re-filtered and re-bound that data.  After thinking about it I am not sure why I didn’t just use some existing controls to help me do that work.  I found that AutoCompleteBox from the new Silverlight Toolkit would do this for me.

One thing that the AutoCompleteBox does quickly is provide filtering for simple string data.  But what about custom types?  My data in the TechEd application has a List<TechEdSession> where TechEdSession is respresented as such:

   1: public class TechEdSession
   2: {
   3:     public string DiscNumber { get; set; }
   4:     public string SessionCode { get; set; }
   5:     public string Track { get; set; }
   6:     public string SessionTitle { get; set; }
   7:     public string Speakers { get; set; }
   8:     public string TechEdConf { get; set; }
   9: }

If you wire up the AutoCompleteBox.ItemsSource to my List<> nothing will happen.  Why?  Well the control doesn’t know how to understand the data exactly.  So we have to help it.  It knows the data is there but doesn’t know what to return based on the filter.

This is simply done using the ItemFilter property on the control.  We can easily provide a Lambda expression to help the control understand the filter.  After setting the ItemsSource property to the results of my LINQ query, I add the expression to help the control understand the data:

   1: SessionFilter.ItemsSource = sessions;
   2: SessionFilter.ItemFilter = (search, item) =>
   3:     {
   4:         TechEdSession session = item as TechEdSession;
   5:         if (session != null)
   6:         {
   7:             string filter = search.ToLower();
   8:             return ((session.SessionCode.ToLower().Contains(filter) || 
   9:                 session.SessionTitle.ToLower().Contains(filter) || 
  10:                 session.Speakers.ToLower().Contains(filter)) &&
  11:                 session.TechEdConf.ToLower().Contains(((ComboBoxItem)ConfSelector.SelectedItem).Content.ToString().ToLower()));
  12:         }
  13:  
  14:         return false;
  15:     };

That’s it.  I’ve now defined the filter for the control so as the user types data it does the appropriate filtering logic and displays the results.  I’ve chosen to still display the results as a DataGrid for easy reading in this application, but could have also used an ItemTemplate if I desired.  The ItemFilter expects a search predicate to be passed to it.

So the resulting application has the same capabilities, but a lot less code for me to write.  Here’s the ending result:

So if you need to implement AutoCompleteBox and have it search/filter your custom types, be sure to supply your own ItemFilter to help the control know where to look!

| Comments

Thanks for all the feedback on the TechEd North America DVD issues with viewing the content once Silverlight 2 released.  In trying to do a good job providing a good user experience to viewing the content easily, the TechEd team created a Silverlight 2 Beta 2 player for the TechEd Online site as well as the offline DVD content.

Obviously, when Silverlight 2 released and people installed the final version on their machines, the DVD Silverlight player stopped working and presented you with an “Install Silverlight” badge.  This was, of course, due to the use of Beta 2.  This doesn’t render the DVD set useless as the content is still there, but you just aren’t able to use the Silverlight player from the DVD.

The team has updated the player in the online version of the content already.  Unfortunately you can’t service burned DVDs (aside from burning new sets and sending them to the thousands of people, which isn’t efficient, cost effective or environmentally friendly), but we can help you understand the maze of content folders.  We’ve finalized the document that maps out where the content files are as well as providing you with a “content map” of the codes to the session descriptions and the speakers who delivered the sessions.  This list was made based on your feedback and the team tried to include as much information as they could to make it easy to discover.  You can download a PDF copy of this content map here: TechEd 2008 North America DVD content map.

I’ve also taken the liberty to make a quick Silverlight application to help you do some quick filtering of the data.  It’s uploaded into Silverlight Streaming so you can embed it into your site or as well into your Intranet if your employees or others in your organization are needing to navigate the DVD set as well.  You can select which conference (Developer or IT) and also type some filter in there that will search the speaker/title and filter it down.

In hindsight, choosing to burn a copy of a Beta 2 application to a distributable disc was not a good idea.  We admit that and apologize.  Hopefully you can see that the content is the king here and that is not lost or unusable.  Thanks for your patience while we created the content map based on your feedback!

| Comments

My friend Gilbert Corrales has been working for a company called ArtinSoft who has a product Aggiorno.  They describe Aggiorno as:

Aggiorno is an automated HTML, XHTML, ASP.NET, PHP… expert that transforms Web site code into fully accessible, Web standards compliant, fast-loading dynamos. A few clicks will analyze your pages and perform any number of time-saving code Transformations that will improve the quality and reach of your Web sites. The best part? You don’t have to be a rocket scientist to use it. (source: http://aggiorno.com)

I’ve been messing around with it for a bit playing with the rules (which they call Aggiornings).  While at PDC a few others from the team were there showing what they can provide for IE8 developers.  I took the opportunity to give feedback on my experience to Gilbert and his team.  Hopefully some of my suggestions can be looked at to add even more value.  For now, two features helped me greatly.

Aggiorno is provided as a stand-alone application or as a Visual Studio add-in.  I’m using the latter.  While in my web project I can load up the Aggiorno add-in and see what options are available to me…here’s what I see on my particular instance of a standard HTML page:

Notice how they have a simple rule to help you add the IE8 meta tag based on your needs to your content.  I used the XHTML rules and was surprised that my site passed most of them :-).  It provides a really good “diff” report of your content as it applies to the XHTML standards and how you can change certain things.

The next thing I wanted to do was to enable an IE Web Slice for my site for the most recent post.  Using the tool I selected the block that represented the first post and fired up Aggiorno:

I used the Create Web Slice option which generated the markup I needed to add to my site.  It was quick.  Sure the markup itself is relatively easy from IE8, but this makes it easier and you don’t have to think.  Two clicks and I have a web slice – no typing :-).  Check it out if you are viewing my site in IE8, you should be able to either hover over the first post or notice the Web Slice icon light up on the toolbar of IE8 as well.  Adding it will add my site as a slice and when a new post comes in, it will alert you subtly (changes to bold).  You see a partial post (slice) and can click through to the main page.  I’m liking this feature of IE8 and hope to see more sites do this.

The web slice feature was one where I gave some feedback to the Aggiorno team in addition to enhanced support for sites that use templates (like blog engines).  Their team “gets it” which is good and they have some smart folks on the team.

Anyway, it was good to see Gilbert again at PDC and get a chance to work more with the product hands-on.  Check it out and view some quick start information on their site.

| Comments

Apparently “soon” means “the next day” to the Encoder team :-).  On 28 OCT James Clarke told us all about the goodness that is coming to Encoder SP1 and noted it would be available “real soon.” Little did we know he had already clicked the publish process to the download servers. 

What are you waiting for, go start the download for Encoder SP1 and I’ll share my thoughts on some things here.

What’s in it?  I’ll pick my favorites: New Silverlight output templates, H.264/AAC support and IIS7 smooth streaming support.

H.264/AAC Device Encoding Support

SP1 brings the promise made earlier of supporting encoding profiles for H.264 and AAC.  For now we’re supporting two device profiles: 320x240 for smaller flash-based devices and 640x480 for larger displays (output container is single MP4).  As previously note, Silverlight will continue to evolve the codec support in the runtime and you should expect to see broadening support in Encoder for that as well.

I think this is a nice added value to a “service pack” for Encoder (I like how service packs are starting to introduce new features in some of our products).  Hopefully you can integrate this into your encoding workflow as well as one of your outputs.

New Silverlight 2 Output Templates

I personally know that this has been a desire of James and the team for a long time.  One of the things the team wanted to do was provide Silverlight 2 templates but also create a base that people can extend to their specific needs.  Here’s the new “Silverlight 2 Default” template:

It exhibits all the core features you’d expect in a media player base as well as things like closed captioning support and playlist support if needed.  As you can see the UI is also base.  The great thing is that the source for these templates is also provided.  The templates get dumped in the same location as the previous and in each new Silverlight 2 template you’ll also see a folder called “Source” that contains the source for that particular template.  If you look at the ExpressionPlayer folder in these templates you’ll see some of the base functionality that you may extend for your needs.

There are 6 new Silverlight 2 templates in all, with 2 audio-only ones for your podcast embedding in your blog and such.  The new output options provides a listing of the templates in the template directory separated by Silverlight 1 and 2 versions so you can quickly see them grouped by Silverlight version.  The preview window is still there and will provide you a preview of the template regardless of which version you select.  The advantage of using the Silverlight 2 templates is that you can quickly use the <object> instantiation methods and there is no dependent Javascript files associated.  The output of a typical encoding is: your media, default.html host page, and the XAP.  So if you want to swap out a different media player XAP based on an Encoder template, it is a cut/paste operation.  Take a look at the default.html page generated to see some of the initParam usage to drive the initialization of the media.

IIS7 Smooth Streaming Support

Additional support has been added to provide container output support for IIS7 smooth streaming, which provides a container for each bitrate to enable that adaptive streaming affect in delivering your media.  An example of this can be seen at the new SmoothHD.com site, which is using IIS7 smooth streaming and a delivery network provided by Akamai.  It’s some great video on good bandwidth, and even on non-high bandwidth you can see it scale quality as needed.

There are some additional enhancements that come with Encoder SP1 for your media so beyond these two features I’m highlighting here, you should definitely download the Encoder SP1 and take advantage of the features.  Hat tip to James and the Encoder team for this service pack and providing us improvements as well as new features!  Check out their team blog for a detailed post on all the new SP1 features.