A guide to what has changed in the Silverlight 4 RC
| Comments- | Posted in
- silverlight
- wpf
- xaml
- mix
- ria
- xap
- riaservices
- mix10
- sllauncher
UPDATE: Silverlight 4 is RELEASED! READ HERE!
 At MIX10, Silverlight 4 released an update, the Silverlight 4 RC (release candidate). A few things have changed since the beta which was released in November. If you haven’t read my guide to Silverlight 4 you may want to check that out. The features still exist, but there are some changes to the implementations of some of the features as well as some new ones. Please go read the previous post to familiarize yourself with the features. This post will be complimentary to that and identify new/changed.
First let’s get you going with the tools:
- Visual Studio 2010 RC
- Silverlight 4 Tools for Visual Studio 2010 (this installs Silverlight developer runtime, SDK, tools, and WCF RIA Services).
- Silverlight Toolkit March 2010 Release (coming soon)
- WCF RIA Services Toolkit
- Expression Blend 4 beta (note: existing Blend 3 licensed users will get this as a free upgrade)
- BREAKING CHANGES DOCUMENTATION – read this
- Windows Phone Developer tools
And since sometimes people just want to get going with learning resources here’s my top suggestions:
- Silverlight learning videos for Silverlight 4 (3 new feature ones added)
- Silverlight 4 hands-on-labs – major updates including an 8-part business application lab
- Silverlight 4 books – check out what you can pre-order from the experts
So here we go, here’s my brain dump of some key areas of what you’ll be seeing in the Silverlight 4 RC. This is not all-inclusive, but I think a list of some that most will want to know about.
| Changed | New |
A quick note about Visual Studio 2010 RC
The Silverlight 4 tools linked above target the RC release of Visual Studio. There have been 2 patches to Visual Studio 2010 RC since it’s release. It is recommended that you have these two patches installed prior to installing the Silverlight tools. Information about these patches (and links to them) is available here.
RichTextBox (the control formerly known as RichTextArea)
Silverlight 4 introduced a new control for enabling editing and display of rich text. (See original details here for RichTextArea.) A few things have changed here, one key one being the name: RichTextBox. This was to be more consistent with WPF and also based on your feedback. Additional improvements were also enabling the ability to get the XAML that makes up the underlying runs and paragraph of the rich text. This is helpful for saving off the data and re-hydrating later if desired. It’s a simple property on the RichTextBox control (assuming the control name is ‘MyRichContent’):
1: string richText = MyRichContent.Xaml;
In addition to that, there are also some new text selection and position APIs to enable you programmatically select text and/or know where the current position of the text is located. This is best demonstrated in the ‘Silverlight Notepad’ sample application in the hands-on-lab area where you can see examples of it being used.
WebBrowser control
The beta provided us with a mechanism for hosting HTML content within an out-of-browser application. This is still available to us, however some APIs have changed. The HtmlBrush is now called the WebBrowserBrush to be consistent in naming and what it actually does.
You can view a video on using the WebBrowser control here.
Printing API enhancements
The printing API was enhanced to help developers query for the printer page size and the printable area. Another change was where the ‘document name’ is provided. It is now required and a part of the Print() method. Before:
1: PrintDocument doc = new PrintDocument();
2: doc.DocumentName = "Sample Document";
3: doc.Print(); After:
1: PrintDocument doc = new PrintDocument();
2: doc.Print("Sample Document");
You can view a video on using the printing APIs here.
Native automation (COM interop)
API changes in the naming of the native integration (COM interop) feature for trusted applications. Before:
1: dynamic excel = ComAutomationFactory.CreateObject("Excel.Application");
After:
1: dynamic excel = AutomationFactory.CreateObject("Excel.Application");
Simple, but will catch you in a recompile :-). You can view a video on using native integration here.
Language/script support
Silverlight now has extended language support, including Thai and Vietnamese. Additionally we added support for multiple Indic scripts. The following Indic scripts are now supported:
| Script | Language |
| Bengali | Bengali, Assamese, Manipuri |
| Oriya | Oriya |
| Malayalam | Malayalam |
| Kannada | Kannada |
| Tamil | Tamil |
| Telugu | Telugu |
| Gujarati | Gujarati |
| Gurmukhi | Punjabi |
| Devanagari | Hindi, Marathi, Sanskirt, Konkani, Kashmiri, Nepali, Sindhi |
Networking
In the beta, socket ports were still being restricted in trusted applications. In this release, the port restriction for socket ranges in trusted applications is removed.
Additionally, the client networking stack (ClientHttp) has been enhanced to enable UploadProgress reporting and caching support.
User consent dialogs (webcam/clipboard/etc.)
We call those dialogs that require user permissions ‘consent dialogs.’ Your users will see these whenever code requires things like requesting device access for webcam/microphone, clipboard access, or quota increase for IsolatedStorage. In the beta we showed these dialogs always and didn’t have a mechanism for enabling the user to determine if they wanted their consent preference saved. That has changed in this release. Consent dialogs now give the user the option to remember the setting which is persisted to their preferences only for that application and is in their control. Here’s the new consent dialog for clipboard, webcam and full-screen pinning:
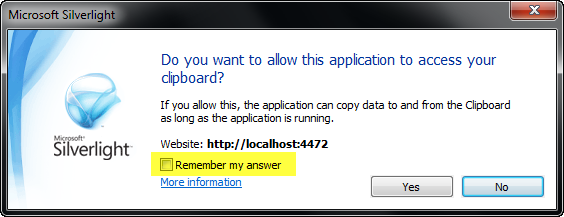
And if you look at the Silverlight configuration dialog you’ll notice a permissions tab now where these permissions are set for the user, which they can change or delete:
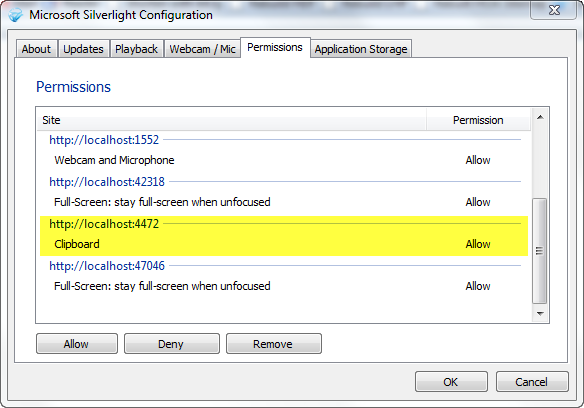
This consent dialog ‘remember my preference’ setting is not available for IsolatedStorage quote increase however. It doesn’t make sense to enable that really for that scenario.
XAP Signing for trusted applications
We think trusted applications (or elevated privileges applications) will be a widely used feature for this release. We changed the install prompt dialog for trusted applications. These are different dialogs than the typical out-of-browser install prompt as we need the user to have more information provided about them. One key feature of a trusted application is the ability to code-sign the XAP file. Here’s a trusted application install prompt from an un-signed application:
Windows:
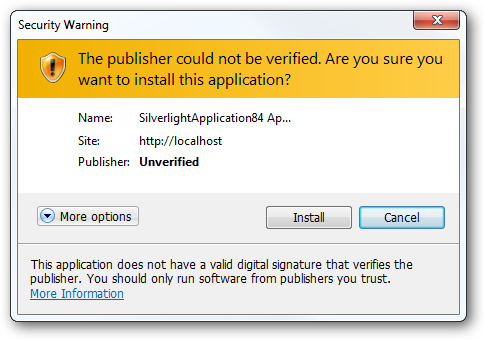
Mac OSX:
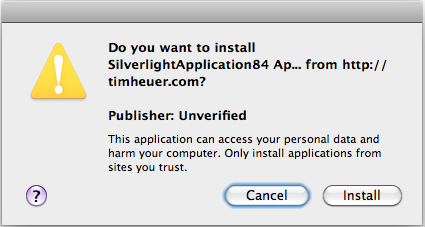
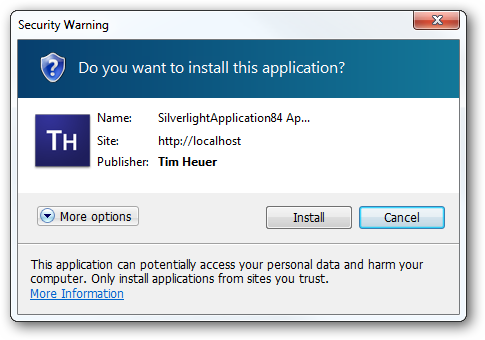
And here is one from a code-signed one:
Windows:
Mac OSX:
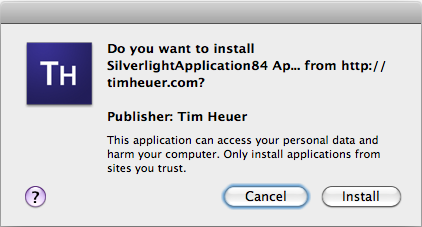
Which would you feel more comfortable installing? Notice that in signed applications your custom icon will show as well (even if you have the icon settings set up, if the app is unsigned they will not show). The process of code signing is very simple and although I expect the tooling for Silverlight to improve on this, it is as simple as adding a post-build event task (or a task for automated builds) that uses the signtool.exe (installed with Visual Studio) to sign the XAP. Here’s my post-build event task:
1: "%ProgramFiles%\Microsoft SDKs\Windows\v7.0A\Bin\signtool.exe" sign /v
2: /f c:\users\timheuer\documents\authenticode\timheuer.pfx 3: /p "MYPASSWORD"
4: /t TIMESTAMP_URI_FROM_PROVIDER $(TargetName).xap The PFX file is an exported certificate with my private key and password protected. You can acquire code-signing certificates (normal Authenticode ones) from providers. We were thankful to get assistance in testing this feature from the following providers who can provide you code-signing certificates for your organization:
All of the above provide Authenticode code-signing certificates and are trusted certificate authorities (CA) on Windows. A trusted CA means that their root certificates are already a part of Windows verification. The process of obtaining one is not instant so plan ahead. There is a specific organizational verification process that occurs which may require documentation of proof of the organization and a few phone calls. Once you have these certificates you will be on your way to providing even more trusted applications to your users.
NOTE: Thawte code-signing certificate requests should be made from a Windows XP machine as their current process does not support Windows Vista or Windows 7. If you use Vista/7 you will not be able to export to a PFX file for automated build or to have your certificate stored on other machines. Read each instructions carefully.
You can also sign your XAP using self-signed certificates. If you do so, it is likely that you are not a trusted CA on machines and would have to instruct your users further. In my opinion, it is better to acquire a trusted CA cert for external applications. Take a look at Jeff Wilcox’s epic post on Code Signing 101.
A special note on trusted applications…please read! If you want to take advantage of using the update features of Silverlight for your application (aka CheckAndDownloadUpdateAsync), then your application must be signed. If you do not sign your XAP for a trusted application it cannot auto-update. Self-signed works here to, but don’t get your application in a state where it cannot be updated automatically!
You can view a video walk-through of XAP signing here.
Custom window chrome
One of the more requested features of trusted applications is the ability to customize the ‘chrome’ around the window. The chrome area refers to the standard OS-specific border and title bar that a typical out-of-browser application will receive. In this release we give you the ability to customize this for your users. The Visual Studio tools also build in the capability to make this easier for you:
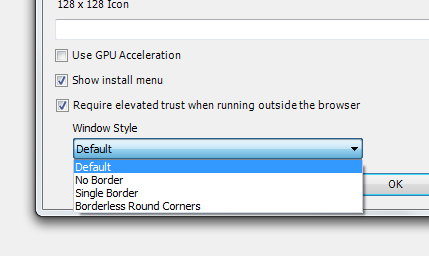
You can see there are a few options to choose from for window types. Right now we do not support transparent windows or irregular shapes but are aware of the desire to have these. Here’s an example of the Facebook client before:
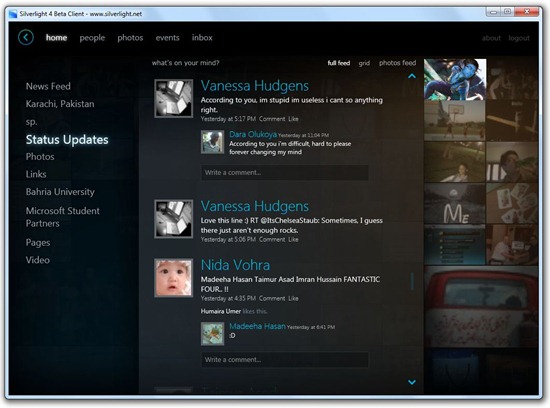
and with custom window chrome:
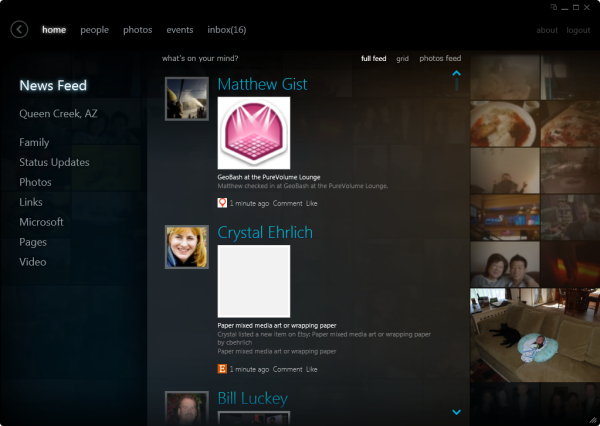
You’ll notice that in the custom window mode that since you don’t have the OS-specific title bar with minimize/maximize/close that you’ll be responsible for doing that. That also includes handling the window moving and resizing events. We enable APIs for you to do all of this easily.
You can view a video on customizing window chrome and handling resizing and moving here.
Pinned full-screen mode
Are you a developer with multiple monitor setup? I’m jealous. If you’ve used silverlight you’ve no doubt run into a situation where you’ve put something in full-screen on one monitor and anticipated being able to work on other stuff in the other monitor. Maybe you’re watching a Netflix movie while working? You’ve likely experienced the issue that the full-screen mode goes back to regular when activity occurs in the second monitor.
We’ve changed that to enable the developer to prompt for permission to 'pin’ the Silverlight application to the monitor. This will prompt the consent dialog option (with preference remembering) to get the user’s permission. The code is extremely simple:
1: App.Current.Host.Content.FullScreenOptions = System.Windows.Interop.FullScreenOptions.StaysFullScreenWhenUnfocused; Once that is implemented, the full-screen application will remain pinned until the user hits ESC key or until you change the IsFullScreen mode in the code for them.
You can view a video on using the full-screen pinning mode here.
ContextMenu control
In the beta we introduced the right-click event handling capabilities. In most cases this would be used by developers to implement context menus. The Silverlight Toolkit for March 2010 release now provides a ContextMenu control for you to use and wire-up for this event. It’s similar to the one Jesse Bishop created for the beta, so if you’ve used that it should be familiar. It also supports ICommand too!
You can get the ContextMenu control and other great controls by ensuring you download and install the Silverlight Toolkit March 2010 release.
SLLauncher silent installs
One of the features we added in this release was using the sllauncher.exe (which is the program that assists in out-of-browser applications) to provide silent install capabilities for your applications. The primary scenario here would be something like CD-based installation situations. Using a command like this:
1: "%ProgramFiles%\Microsoft Silverlight\sllauncher.exe"
2: /install:"D:\deploy\demoapp.xap"
3: /origin:"http://foocompany.com/apps/ClientBin/demoapp.xap"
4: /shortcut:desktop+startmenu 5: /overwrite would enable you to deploy an application in this type of a situation. Setting the origin flag here enables the application to determine where it would get future updates from if CheckAndDownloadUpdateAsync methods are called within the application.
WCF RIA Services Toolkit
If you read above you’ll know that installing the Silverlight 4 Tools for Visual Studio also automatically installs the WCF RIA Services framework for you. This release the RIA Services team also has a toolkit of their own. After installing the RIA Services Toolkit you’ll get:
- LinqToSql DomainService
- SOAP endpoint – enabling exposing a SOAP endpoint for your DomainService
- JSON endpoint – enabling exposing a JSON endpoint for your DomainService
- ASP.NET DomainDataSource – enabling your ASP.NET application to talk to your DomainService
This is a separate install that you must complete. For more details on this toolkit, visit Deepesh’s blog.
If you aren’t familiar with WCF RIA Services, you can view an introductory video here.
Summary
It’s been a fast pace since getting the Silverlight 4 beta in your hands in November. We’ve had a lot of work to do to finish things up and implement some new key features. We are very excited about this release of Silverlight 4 for developers and look forward to seeing the great applications you build with it!
Be sure to visit the MIX10 site for video recordings of various Silverlight-related presentations as the event is happening and as reference later on! I really encourage you to view the keynote to see some new consumer-facing application experiences built on Silverlight, like eBay, Associated Press (Windows Phone 7)
Hope this helps! Be sure to subscribe here via RSS or email and if you’re on Twitter you can follow me there as well for Silverlight updates/resources
Please enjoy some of these other recent posts...
Comments