This is part 3 in a series on getting started with Silverlight.  To view the index to the series click hereYou can download the completed project files for this sample application in C# or Visual Basic.

Now that we have our initial layout outlined and some controls to work with, let’s start getting the data.  Since we’re going to use Twitter search, we’ll be leveraging their web service API.  In our application we won’t be hosting our own database or anything but I did want to point out the various ways you can access data via Silverlight before we go to work on ours.

Data access options

One of the bigger beginner misconceptions about accessing data in Silverlight is people looking for some ADO.NET class library in Silverlight.  Stop looking, it isn’t there.  Remember, Silverlight is a client technology that is deployed over the Internet.  You wouldn’t want a browser plug-in to have direct access to your database…as you’d have to expose your database directly to the web.  We all know that is generally a big no-no.

So the next logical step is to expose data via service layers.  This is how Silverlight can communicate with data.  Here are the primary means:

  • Web services: SOAP, ASP.NET web services (ASMX), WCF services, POX, REST endpoints
  • Sockets: network socket communication
  • File: accessing static content via web requests.

Sockets

Sockets are probably the most advanced data access endpoints.  These require a socket host to exist and, at the time of this writing, also require communication over a specific port range.  If this is acceptable for you, this can be a very efficient and powerful means of communication for your application.  I don’t think, however, that this is going to be the norm if your application is public facing on the web – I see sockets right now being more for business applications.  Some resources for Sockets:

Working with Sockets requires you to really understand your deployment scenario first before you jump right in and think this will be the best method.

File Access

Silverlight can communicate with local data or data on the web.  For local data access, the application does not have direct access to the file system, but rather can read/write data via user-initiated actions using the OpenFileDialog and SaveFileDialog APIs to request and save streams of data to the local user’s machine.

Additionally, you can use plain text files or XML files on the web and have your Silverlight application use standard HTTP commands to read/write that information.  Here’s some helper information on using some of these methods:

You may find yourselves using these techniques to save settings-based data or use very simple data access.

Web Services

This is the heart of accessing data in Silverlight – through a service layer.  Silverlight supports accessing standard ASP.NET web services (ASMX) or WCF-based services using the familiar Add Service Reference methods in Visual Studio that will generate strongly-typed proxy code for you.

Additionally you can use the standard HTTP verbs to access more POX (Plain old XML) or REST-based endpoints.  Understanding how to consume these various service types is probably the best time spent a developer can educate themselves on understanding what will be right for their scenario.  Here’s some resources:

The third point there, .NET RIA Services, is a new framework that aims to make accessing data simpler and more familiar.  The link to the video will walk you through an introduction of that topic.  RIA Services is best when you own the database and are hosting services in the same web application that will be serving up the Silverlight application.

Asynchronous access

All data access in Silverlight is asynchronous.  This is perhaps another area that gets typical web developers tripped up initially.  For example in the server world it would be reasonable to see something like this:

   1: MyWebService svc = new MyWebService();
   2: string foo = svc.GetSomeValue();
   3: MyTextBox.Text = foo;

In Silverlight you wouldn’t be able to do that synchronous call.  To those who haven’t done asynchronous programming before this can be confusing, but it is well worth the learn and will make you a better developer.  Using the above pseudo code, in Silverlight you’d do something like this:

   1: MyWebService svc = new MyWebService();
   2: svc.Completed += new CompletedHandler(OnCompleted);
   3: svc.GetSomeValue();
   4:  
   5: void OnCompleted(object sender, EventArgs args)
   6: {
   7:     MyTextBox.Text = args.Result;
   8: }

Notice that you use the result of the service call in a completed event handler.  This is the pattern that you will see over and over again with basic service access.

Cross-domain data access

Since Silverlight is a web client technology, it operates in the browser’s secure sandbox area and are limited to certain access policies.  One of these restrictions is referred to as cross-domain access.  That is that your application hosted in one domain cannot access services in another domain unless the service says you can.  This “opt-in” approach is commonly known as cross-domain policy files.  Silverlight, like other rich client plug-ins, conforms to these policies.  This is an area that you as a Silverlight developer will likely hit at some point.  Educate yourself sooner than later.  Here are some pointers:

In our Twitter application, we actually will be accessing a service hosted elsewhere and will need to conform to these policies.  Luckily, the search API for Twitter enables this access through their cross-domain policy file (http://search.twitter.com/crossdomain.xml). The other areas of Twitter do NOT, which is why, for now, you would not be able to access them directly through Silverlight.  In this situation you would proxy those service calls through your own service that you could enable cross-domain access via a policy file for Silverlight.  Confusing?  It’s simpler than it sounds.

COMMON MYTH: You need the Silverlight and the Adobe cross-domain policy files in your service to enable access.  This is NOT TRUE and I see it to often people saying I have crossdomain.xml and clientaccesspolicy.xml and it still doesn’t work.  If you are building a service for Silverlight consumption via cross-domain, you only need the clientaccesspolicy.xml file format – that is what we look for first and is the most flexible and secure for Silverlight.

Now that we have a high-level overview, let’s start accessing our data!

Calling the Twitter API

The Twitter search API is a simple REST-based API that we’ll only really be calling GET requests on in our application.  The format they provide is the Atom specification which makes our job a lot easier because it is a standard format and Silverlight has framework libraries that support direct consumption of that format.

We will initiate calling the API when the user clicks the SEARCH button in our application and there is content in the search input box.  Let’s wire up an even to the click button like we did in step 1 in our Hello World application.  In our Search.xaml I’m adding the click event to our SearchButton.  Add the Click event handler to the SearchButton and use the name SearchForTweets as the function name:

   1: <Button x:Name="SearchButton" Width="75" Content="SEARCH" Click="SearchForTweets" />

In Visual Studio, if you right-click now on the function name, you can Navigate to Event Handler and it will generate the stub code for you in the code page.  In this function we’re going to search the Twitter API for postings matching our criteria.  Since the API is a simple REST GET call, we’re going to use the simple WebClient Silverlight API.  This is the simplest networking API to use and allows you to read/write data via GET/POST commands as long as you don’t need to alter headers.  Before we do that I’m going to set up some member variables for some tracking that we’ll use to monitor our search terms:

   1: const string SEARCH_URI = "http://search.twitter.com/search.atom?q={0}&since_id={1}";
   2: private string _lastId = "0";
   3: private bool _gotLatest = false;

Now we can wire up our SearchForTweets function.  Remember that I mentioned that network activity is asynchronous in Silverlight?  This is where we will start experiencing this.  We’re going to use the OpenRead API on WebClient.  Because the function will be asynchronous, we’ll need to wire up a Completed event handler to receive the response and do whatever we need with it.  Here’s what we have so far:

   1: private void SearchForTweets(object sender, RoutedEventArgs e)
   2: {
   3:     WebClient proxy = new WebClient();
   4:     proxy.OpenReadCompleted += new OpenReadCompletedEventHandler(OnReadCompleted);
   5:     proxy.OpenReadAsync(new Uri(string.Format(SEARCH_URI, HttpUtility.UrlEncode(SearchTerm.Text), _lastId)));
   6: }
   7:  
   8: void OnReadCompleted(object sender, OpenReadCompletedEventArgs e)
   9: {
  10:     throw new NotImplementedException();
  11: }

Notice we first create a new WebClient instance.  Then we set up the completed event handler, and finally call the OpenReadAsync funciton with a formatted URI.  The result in our completed handler (e.Result) will be a stream.  Because we are going to manipulate the response a bit and do some databinding, we’re going to create a local class to represent the structure of our search result.  I called mine TwitterSearchResult.cs and is just a class file in my project under a folder called Model:

   1: using System;
   2: using System.Windows.Media;
   3:  
   4: namespace TwitterSearchMonitor.Model
   5: {
   6:     public class TwitterSearchResult
   7:     {
   8:         public string Author { get; set; }
   9:         public string Tweet { get; set; }
  10:         public DateTime PublishDate { get; set; }
  11:         public string ID { get; set; }
  12:         public ImageSource Avatar { get; set; }
  13:     }
  14: }

With our model in place we can shape the result and do some data binding.

Other networking options: HttpWebRequest and ClientHttp

There are two other network APIs we could have used to access the Twitter API: HttpWebRequest and ClientHttp.  HttpWebRequest is essentially what we *are* using with WebClient as it is a simple wrapper around that API.  If you needed more granular control over the headers in the request, you’d want to use HttpWebRequest.  Both WebClient and HttpWebRequest make use of the browser’s networking stack.  This presents some limitations, namely not being able to receive all complete status codes or leverage some expanded verbs (PUT/DELETE).  Silverlight has also introduced a ClientHttp option and uses a custom networking stack that enables you to use more verbs as well as receive status code results beyond 200/404.

More information:

As an example if we wanted to use ClientHttp, our call would look like this:

   1: private void SearchForTweets(object sender, RoutedEventArgs e)
   2: {
   3:     bool httpBinding = WebRequest.RegisterPrefix("http://search.twitter.com", 
   4:                 WebRequestCreator.ClientHttp);
   5:     WebClient proxy = new WebClient();
   6:     proxy.OpenReadCompleted += new OpenReadCompletedEventHandler(OnReadCompleted);
   7:     proxy.OpenReadAsync(new Uri(string.Format(SEARCH_URI, HttpUtility.UrlEncode(SearchTerm.Text))));
   8: }

Note that we *are not* using this method, but just wanted to point these out for you.  The call to RegisterPrefix denotes that we registered it to use the ClientHttp networking stack instead of the browser’s networking stack.  In the above sample we registered only calls to the Twitter search domain, but we could have enabled it for all HTTP requests as well.

These are additional options for you to consider in your applications.

Start simple binding some data with smart objects

Because our application is going to ‘monitor’ search terms in Twitter, we want to really just set up binding to an object collection once, and then just manipulate that collection (in our case, add to it).  To do this we are going to use two helpful objects in Silverlight: ObservableCollection<T> and PagedCollectionViewObservableCollection is a collection type that automatically provides notifications when items are modified within the collection (added, removed, changed).  PagedCollectionView will be used to help us automatically give some sorting to our objects. 

We’ll create these as member variables in our project:

   1: ObservableCollection<TwitterSearchResult> searchResults = new ObservableCollection<TwitterSearchResult>();
   2: PagedCollectionView pcv;

Now that we have the member variables, let’s initialize the PagedCollectionView in the constructor of the control so it will be available quickly.  We also want to bind our UI to our elements in the XAML.  It is good practice not to do anything to your UI in the constructor of your UserControl (in our case Search.xaml).  Because of this we’ll add a Loaded event handler in the constructor and set up the initial binding in that handler.  Our combination of constructor and Loaded event handler now looks like this:

   1: public Search()
   2: {
   3:     InitializeComponent();
   4:  
   5:     pcv = new PagedCollectionView(searchResults);
   6:     pcv.SortDescriptions.Add(new System.ComponentModel.SortDescription("PublishDate", System.ComponentModel.ListSortDirection.Ascending));
   7:  
   8:     Loaded += new RoutedEventHandler(Search_Loaded);
   9: }
  10:  
  11: void Search_Loaded(object sender, RoutedEventArgs e)
  12: {
  13:     SearchResults.ItemsSource = pcv;
  14: }

Notice that in the loaded handler we set the ItemsSource property of our DataGrid (SearchResults) to be the PagedCollectionView that is sorted (see the SortDescription we added in line 6 above).  Now our UI is bound to this PagedCollectionView…so we should probably populate it.  Remember that it is actually a view of the data in our ObservableCollection<TwitterSearchResult> – so that is what we need to add items to in order for some data to be seen.

Populating our ObservableCollection

Now go back to the OnReadCompleted function we had before that will fire after our network request to the search API.  We now are going to populate our ObservableCollection in this function.  Here’s the code we’ll use to do that:

   1: void OnReadCompleted(object sender, OpenReadCompletedEventArgs e)
   2: {
   3:     if (e.Error == null)
   4:     {
   5:         _gotLatest = false;
   6:         XmlReader rdr = XmlReader.Create(e.Result);
   7:  
   8:         SyndicationFeed feed = SyndicationFeed.Load(rdr);
   9:  
  10:         foreach (var item in feed.Items)
  11:         {
  12:             searchResults.Add(new TwitterSearchResult() { Author = item.Authors[0].Name, ID = GetTweetId(item.Id), Tweet = item.Title.Text, PublishDate = item.PublishDate.DateTime.ToLocalTime(), Avatar = new BitmapImage(item.Links[1].Uri) });
  13:             _gotLatest = true;
  14:         }
  15:  
  16:         rdr.Close();
  17:     }
  18:     else
  19:     {
  20:         ChildWindow errorWindow = new ErrorWindow(e.Error);
  21:         errorWindow.Show();
  22:     }
  23: }
  24:  
  25: private string GetTweetId(string twitterId)
  26: {
  27:     string[] parts = twitterId.Split(":".ToCharArray());
  28:     if (!_gotLatest)
  29:     {
  30:         _lastId = parts[2].ToString();
  31:     }
  32:     return parts[2].ToString();
  33: }

A few things are happening here.  First, the e.Result matches the Stream of response we’ll get from a successfull search.  If an error occurs, we’ll use the ErrorWindow template which is provided for us in the navigation application template we chose.  The _gotLatest member variable helps us track the whether or not we need to reset the max value (which is so future queries request only the latest since the previous query).  After we get the stream we load it into an XmlReader for ease of parsing with our SyndicationFeed class.  SyndicationFeed is a class in the System.ServiceModel.Syndication library that you’ll have to add a reference too in your project.  It has built-in functions for parsing known syndication formats, like RSS and Atom.

NOTE (Here be dragons): System.ServiceMode.Syndication brings with it other dependency assemblies.  It is not a small library, but convenient to have.  Take caution in using it for your project and know when and why you need it.  We are using it here so you can be aware of the features and productivity benefits.  An alternative method (especially for just reading syndicated feeds) would be to actually just use LINQ to XML and query the resulting XDocument after loading it.  Again, for demonstration purposes, I wanted to point out the productivity use of SyndicationFeed as a strongly-typed class available to you. 

More information about reading Syndication data can be found here:

Once we have the SyndicationFeed data loaded, we simply iterate through it and add a new TwitterSearchResult to our ObservableCollection<TwitterSearchResult> object.  You’ll notice we’re doing some conversion on the Image URI to an ImageSource for easier binding later.  Additionally, we’re parsing out the ID of the tweet so we can set the first result (which is the latest) as the most recent ID for later querying (_lastId).

Giving feedback back to our users

In our final step here, we want to make sure we are giving some feedback to our users that we are doing something (searching).  Luckily we have something easy for you in an ActivityControl.  At the time of this writing, the ActivityControl was a part of the .NET RIA Services templates, but you can get it here on David Poll’s blog.  You’ll have to build the control and then add a reference to it in your project (if you download the source to our projects the binary is already included in the Libraries folder for you).

UPDATE NOTE: While the contents of this tutorial remains unchanged, the ActivityControl is now called the BusyIndicator and is released as a part of the Silverlight Toolkit.  Following the same techniques you can get the official control from the toolkit and have it deployed with your application.  No more need to compile on your own.

Once you have the reference, then you’ll add the same xmlns notation in your Search.xaml like we did with the DataGrid in step 2.  Then add the control as the root control and the Grid as it’s child.  My resulting Search.xaml now looks like this:

   1: <navigation:Page 
   2:            xmlns="http://schemas.microsoft.com/winfx/2006/xaml/presentation" 
   3:            xmlns:x="http://schemas.microsoft.com/winfx/2006/xaml" 
   4:            xmlns:d="http://schemas.microsoft.com/expression/blend/2008"
   5:            xmlns:mc="http://schemas.openxmlformats.org/markup-compatibility/2006"
   6:            mc:Ignorable="d"
   7:            xmlns:navigation="clr-namespace:System.Windows.Controls;assembly=System.Windows.Controls.Navigation"
   8:            xmlns:data="clr-namespace:System.Windows.Controls;assembly=System.Windows.Controls.Data" x:Class="TwitterSearchMonitor.Views.Search"
   9:            xmlns:activity="clr-namespace:System.Windows.Controls;assembly=ActivityControl"
  10:            d:DesignWidth="640" d:DesignHeight="480"
  11:            Title="Twitter Search Page">
  12:     <activity:Activity x:Name="ActivityIndicator">
  13:         <Grid x:Name="LayoutRoot">
  14:             <Grid.RowDefinitions>
  15:                 <RowDefinition Height="32"/>
  16:                 <RowDefinition/>
  17:             </Grid.RowDefinitions>
  18:  
  19:             <StackPanel HorizontalAlignment="Left" Margin="0,-32,0,0" VerticalAlignment="Top" Grid.Row="1" Orientation="Horizontal">
  20:                 <TextBox x:Name="SearchTerm" FontSize="14.667" Margin="0,0,10,0" Width="275" TextWrapping="Wrap"/>
  21:                 <Button x:Name="SearchButton" Width="75" Content="SEARCH" Click="SearchForTweets" />
  22:             </StackPanel>
  23:             <data:DataGrid x:Name="SearchResults" Margin="0,8,0,0" Grid.Row="1"/>
  24:         </Grid>
  25:     </activity:Activity>
  26: </navigation:Page>

In our code for starting the search (SearchForTweets) simply add the line:

   1: ActivityIndicator.IsActive = true;

and when the OnReadCompleted event is done add the line:

   1: ActivityIndicator.IsActive = false;

And you’ll have visual progress to the end user.  At this point we can run our application (F5) and enter a search term.  You’ll see the activity control:
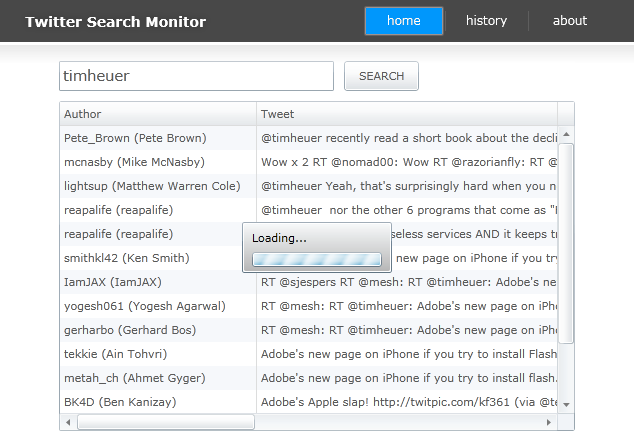
ActivityControl view

And then the resulting view of results in the DataGrid:
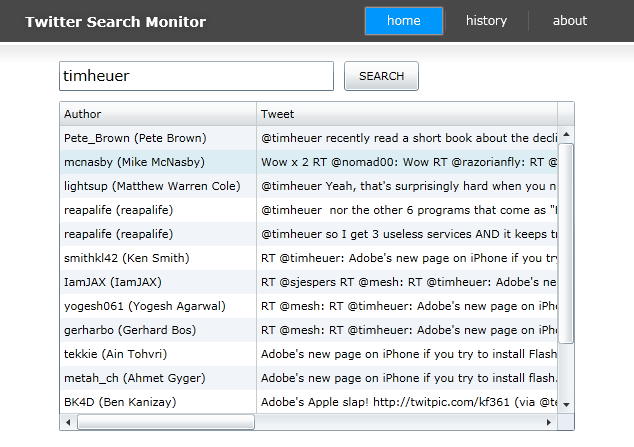
Search result view

Add some monitoring via timers

Now since we call this a monitoring service, we want the search to automatically refresh for us.  Silverlight provides a few different ways to trigger automatic activity.  We’re going to use a DispatcherTimer for our application.  This is nothing more than a timer that fires a Tick event handler at our defined interval.  We’ll add another member variable:

   1: DispatcherTimer _timer;

and then in the constructor initiate our timer with adding an event handler:

   1: double interval = 30.0;
   2:  
   3: _timer = new DispatcherTimer();
   4: #if DEBUG
   5: interval = 10.0;
   6: #endif
   7: _timer.Interval = TimeSpan.FromSeconds(interval);
   8: _timer.Tick += new EventHandler(OnTimerTick);

Now we want to refactor some code, because we want the SearchForTweets to be fired on the timer tick event.  We’re going to use Visual Studio refactoring tools to extract the method function code from SearchForTweets into a new method SearchForTweetsEx which we’ll call in our Tick event handler OnTimerTick.  We’ll also modify our Loaded event to actually start the timer and start the initial search for us (note our Timer is going to have a DEBUG interval of 10 seconds, otherwise 30 seconds).  Our refactored complete Search.xaml.cs now looks like this:

   1: using System;
   2: using System.Collections.ObjectModel;
   3: using System.Net;
   4: using System.Net.Browser;
   5: using System.ServiceModel.Syndication;
   6: using System.Windows;
   7: using System.Windows.Browser;
   8: using System.Windows.Controls;
   9: using System.Windows.Data;
  10: using System.Windows.Media.Imaging;
  11: using System.Windows.Navigation;
  12: using System.Windows.Threading;
  13: using System.Xml;
  14: using TwitterSearchMonitor.Model;
  15:  
  16: namespace TwitterSearchMonitor.Views
  17: {
  18:     public partial class Search : Page
  19:     {
  20:         const string SEARCH_URI = "http://search.twitter.com/search.atom?q={0}&since_id={1}";
  21:         private string _lastId = "0";
  22:         private bool _gotLatest = false;
  23:         ObservableCollection<TwitterSearchResult> searchResults = new ObservableCollection<TwitterSearchResult>();
  24:         PagedCollectionView pcv;
  25:         DispatcherTimer _timer;
  26:  
  27:         public Search()
  28:         {
  29:             InitializeComponent();
  30:  
  31:             // set interval value for Timer tick
  32:             double interval = 30.0;
  33:  
  34:             _timer = new DispatcherTimer();
  35: #if DEBUG
  36:             interval = 10.0;
  37: #endif
  38:             _timer.Interval = TimeSpan.FromSeconds(interval);
  39:             _timer.Tick += new EventHandler(OnTimerTick);
  40:  
  41:             // initialize our PagedCollectionView with the ObservableCollection
  42:             // and add default sort
  43:             pcv = new PagedCollectionView(searchResults);
  44:             pcv.SortDescriptions.Add(new System.ComponentModel.SortDescription("PublishDate", System.ComponentModel.ListSortDirection.Descending));
  45:  
  46:             Loaded += new RoutedEventHandler(Search_Loaded);
  47:         }
  48:  
  49:         void OnTimerTick(object sender, EventArgs e)
  50:         {
  51:             SearchForTweetsEx();
  52:         }
  53:  
  54:         void Search_Loaded(object sender, RoutedEventArgs e)
  55:         {
  56:             SearchResults.ItemsSource = pcv; // bind the DataGrid
  57:             _timer.Start(); // start the timer
  58:             SearchForTweetsEx(); // do the initial search
  59:         }
  60:  
  61:         // Executes when the user navigates to this page.
  62:         protected override void OnNavigatedTo(NavigationEventArgs e)
  63:         {
  64:         }
  65:  
  66:         private void SearchForTweets(object sender, RoutedEventArgs e)
  67:         {
  68:             SearchForTweetsEx();
  69:         }
  70:  
  71:         /// <summary>
  72:         /// Method that actually does the work to search Twitter
  73:         /// </summary>
  74:         private void SearchForTweetsEx()
  75:         {
  76:             if (!string.IsNullOrEmpty(SearchTerm.Text))
  77:             {
  78:                 _timer.Stop(); // stop the timer in case the search takes longer than the interval
  79:                 ActivityIndicator.IsActive = true; // set the visual indicator
  80:  
  81:                 // do the work to search twitter and handle the completed event
  82:                 WebClient proxy = new WebClient();
  83:                 proxy.OpenReadCompleted += new OpenReadCompletedEventHandler(OnReadCompleted);
  84:                 proxy.OpenReadAsync(new Uri(string.Format(SEARCH_URI, HttpUtility.UrlEncode(SearchTerm.Text), _lastId)));
  85:             }
  86:         }
  87:  
  88:         /// <summary>
  89:         /// Method that fires after our SearchForTweetsEx runs and gets a result
  90:         /// </summary>
  91:         /// <param name="sender"></param>
  92:         /// <param name="e"></param>
  93:         void OnReadCompleted(object sender, OpenReadCompletedEventArgs e)
  94:         {
  95:             if (e.Error == null)
  96:             {
  97:                 _gotLatest = false; // reset the latest detector
  98:                 XmlReader rdr = XmlReader.Create(e.Result); // load stream into a reader
  99:  
 100:                 SyndicationFeed feed = SyndicationFeed.Load(rdr);  // load syndicated feed (Atom)
 101:  
 102:                 // parse each item adding it to our ObservableCollection
 103:                 foreach (var item in feed.Items)
 104:                 {
 105:                     searchResults.Add(new TwitterSearchResult() { Author = item.Authors[0].Name, ID = GetTweetId(item.Id), Tweet = item.Title.Text, PublishDate = item.PublishDate.DateTime.ToLocalTime(), Avatar = new BitmapImage(item.Links[1].Uri) });
 106:                     _gotLatest = true; // reset the fact that we already have the max id needed
 107:                 }
 108:  
 109:                 rdr.Close();  // close the reader
 110:             }
 111:             else
 112:             {
 113:                 // initialize our ErrorWindow with exception details
 114:                 ChildWindow errorWindow = new ErrorWindow(e.Error);
 115:                 errorWindow.Show();
 116:             }
 117:             ActivityIndicator.IsActive = false; // reset the UI
 118:             _timer.Start(); // reset the timer
 119:         }
 120:  
 121:         /// <summary>
 122:         /// Parses out the Tweet ID from the tweet
 123:         /// </summary>
 124:         /// <param name="twitterId"></param>
 125:         /// <returns></returns>
 126:         private string GetTweetId(string twitterId)
 127:         {
 128:             string[] parts = twitterId.Split(":".ToCharArray());
 129:             if (!_gotLatest)
 130:             {
 131:                 _lastId = parts[2].ToString();
 132:             }
 133:             return parts[2].ToString();
 134:         }
 135:     }
 136: }

The flow will be that our Search page will load, start the timer and start the initial search.  After the interval time fires, the search will be executed again, but remember it will use the last known ID to start from as not to load all the repeats again.  This future search data will be added to our ObservableCollection and since the DataGrid is already bound to that, it will be automatically represented in the UI in the appropriate sort order.

We also added some checking to make sure the search term is there and we’re not searching for a blank value.

Summary

At this point of step 3 we’ve made a lot of progress.  We’ve wired up a service call to a 3rd party service, hooked it up to a DataGrid using binding, and added a timer to automatically fetch the service.  We could be done, but we’re not – the DataGrid isn’t exactly how we want to represent the final UI,  Let’s move on to part 4 where we actually do some data templating and introduce you to the XAML binding syntax.

This is part 4 in a series on getting started with Silverlight.  To view the index to the series click hereYou can download the completed project files for this sample application in C# or Visual Basic.

In the previous step 3 we did a lot of work to get back our data from a public web service and display it in a control.  The DataGrid control we used, however, isn’t really the UI we’re looking for so let’s define what we want.  To do this we’re going to use an ItemsControl and a DataTemplate.  This will introduce us to XAML binding syntax and how to leverage more powerful data binding information.

Starting the UI over – delete the DataGrid

Well, after all that work, let’s delete the DataGrid and just the DataGrid.  We won’t be needing the assembly reference or the xmlns:data values anymore as well, so go ahead and remove them.

Replace the DataGrid with an ItemsControl like this:

   1: <ItemsControl x:Name="SearchResults" Margin="0,8,0,0" Grid.Row="1" />

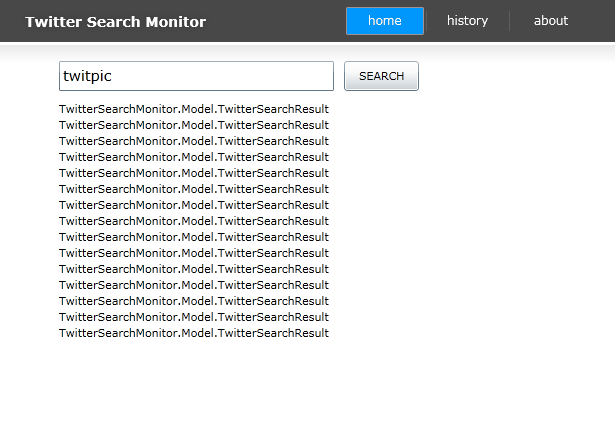
Now here is where Blend is going to be helpful for us again.  Go into Blend and we’re going to modify the ItemTemplate for the ItemsControl.  ItemsControl is just essentially a rendering control that does what we tell it to.  If we do nothing but change the DataGrid to an ItemsControl and run our application this is what we’ll get:

ItemsControl rendering with no template

The ItemsControl has no idea how we want to display the data, so we have to tell it how in a template…back to Blend.  The general concept we’re going to go for is this (repeated of course):

ItemsControl template mockup

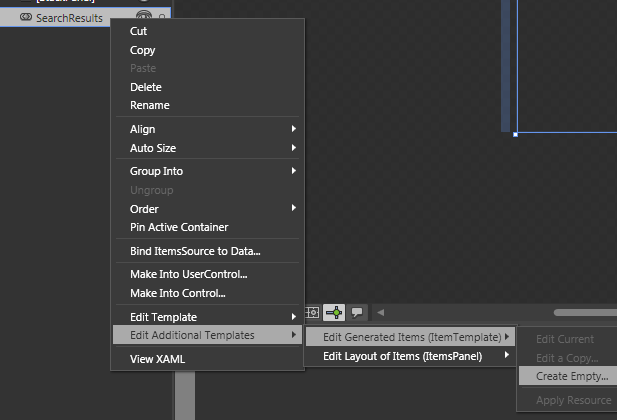
where the box is the avatar of the user posting the message.  Using our knowledge of layout from the previous steps we can create the template easily.  In Blend, locate the SearchResults object in the tree and right click to edit the ItemsTemplate (under the Generated Templates section):

Edit Generated Items menu option

we now have an empty template we can put stuff in.  I called mine SearchResultsTemplate in the dialog that came up.  Now we are in layout editing mode and can drag/move/etc items in our layout.  I created a Grid-based layout and here’s my resulting XAML for the template:

   1: <DataTemplate x:Key="SearchResultsTemplate">
   2:     <Grid Margin="4,0,4,8" d:DesignWidth="446" d:DesignHeight="68">
   3:         <Grid.ColumnDefinitions>
   4:             <ColumnDefinition Width="Auto" />
   5:             <ColumnDefinition Width="*" />
   6:         </Grid.ColumnDefinitions>
   7:         <Border VerticalAlignment="Top" Margin="8" Padding="2" Background="White">
   8:             <Image Width="40" Height="40" />
   9:         </Border>
  10:  
  11:         <StackPanel Grid.Column="1" VerticalAlignment="Top" Margin="0,4,0,0">
  12:             <TextBlock x:Name="AuthorName" FontWeight="Bold" />
  13:             <Grid Margin="0,6,0,0">
  14:                 <Grid.RowDefinitions>
  15:                     <RowDefinition Height="Auto" />
  16:                     <RowDefinition Height="2" />
  17:                     <RowDefinition Height="Auto" />
  18:                 </Grid.RowDefinitions>
  19:                 <TextBlock x:Name="TweetMessage" TextWrapping="Wrap" />
  20:                 <TextBlock x:Name="PublishDateLabel" Grid.Row="2"  />
  21:             </Grid>
  22:         </StackPanel>
  23:     </Grid>
  24: </DataTemplate>

I’m also putting the ItemsControl itself into a ScrollViewer since the ItemsControl doesn’t natively provide a scrolling view:

   1: <ScrollViewer Grid.Row="2" HorizontalScrollBarVisibility="Disabled" VerticalScrollBarVisibility="Auto" BorderThickness="1">
   2:         <ItemsControl x:Name="SearchResults" Margin="0,8,0,0" Grid.Row="1" ItemTemplate="{StaticResource SearchResultsTemplate}" />
   3:     </ScrollViewer>

Now all we have is a template, but we have to tell that template what to do with the data it will be receiving.

The XAML binding syntax

Here’s where our binding syntax is going to come in.  You see, ItemsControl is getting data to it (remember we haven’t changed our code so the SearchResults.ItemsSource is still being set to our PagedCollectionView.  To map our model elements to our template we need to use Binding.  The basic XAML binding syntax is:

{Binding Path=<some-data-path>, Mode=<binding mode>}

There are more advanced features you could get into, but this is the basic and we’ll start here.  For instance, to bind our Image element in our template to our Avatar from TwitterSearchResult model, it will look like this:

   1: <Image Width="40" Height="40" Source="{Binding Path=Avatar, Mode=OneWay}" />

And to bind the Author to the AuthorName element like this:

   1: <TextBlock x:Name="AuthorName" FontWeight="Bold" Text="{Binding Path=Author, Mode=OneWay}" />

In both of these we are using OneWay syntax because we don’t need to have it be TwoWay as we aren’t changing data back.  For the PublishDate, we want to provide some explicit formatting of the data.  We can do this through Value Converters.

Building a Value Converter

Value converters are classes that implement IValueConverter, which provides a Convert and ConvertBack methods.  For our PublishDate we’re going to basically allow explicit formatting of the DateTime object.  We’ll create a DateTimeConverter.cs class in a folder in our project called Converters.  The class looks like this:

   1: using System;
   2: using System.Threading;
   3: using System.Windows.Data;
   4:  
   5: namespace TwitterSearchMonitor.Converters
   6: {
   7:     /*
   8:      * Use this converter for formatting dates in XAML databinding
   9:      * Example:
  10:      *  Text="{Binding Path=PublishDate, Converter={StaticResource DateTimeFormatter}, ConverterParameter=MMM yy}" />
  11:      * 
  12:      * */
  13:     public class DateTimeConverter : IValueConverter
  14:     {
  15:         #region IValueConverter Members
  16:  
  17:         public object Convert(object value, Type targetType, object parameter, System.Globalization.CultureInfo culture)
  18:         {
  19:             DateTime? bindingDate = value as DateTime?;
  20:  
  21:             if (culture == null)
  22:             {
  23:                 culture = Thread.CurrentThread.CurrentUICulture;
  24:             }
  25:  
  26:             if (bindingDate != null)
  27:             {
  28:                 string dateTimeFormat = parameter as string;
  29:                 return bindingDate.Value.ToString(dateTimeFormat, culture);
  30:             }
  31:  
  32:             return string.Empty;
  33:         }
  34:  
  35:         public object ConvertBack(object value, Type targetType, object parameter, System.Globalization.CultureInfo culture)
  36:         {
  37:             throw new NotImplementedException();
  38:         }
  39:  
  40:         #endregion
  41:     }
  42: }

Now to use this we'll go back to our XAML page that will be using this (Search.xaml) and add an xmlns declaration and a resource.  The xmlns we’ll use looks like this:

   1: xmlns:converters="clr-namespace:TwitterSearchMonitor.Converters"

and then in the Resources section of the XAML (where the other template is defined) we’ll add a resource that points to the converter:

   1: <navigation:Page.Resources>
   2:         <converters:DateTimeConverter x:Key="DateTimeFormatter" />
   3: ...

With these two things in place we can use our converter on our PublishDateLabel element like this:

   1: <TextBlock x:Name="PublishDateLabel" Text="{Binding Path=PublishDate, 
   2:         Converter={StaticResource DateTimeFormatter},
   3:         ConverterParameter=dd-MMM-yyyy hh:mm tt}" Grid.Row="2"  />

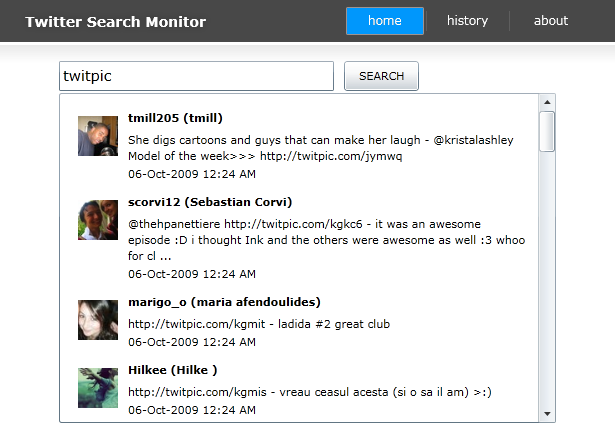
This tells XAML that it should run the IValueConverter to get the rendered output.  Our result is the explicit formatting of data that we want.  The result of all this additional syntax for binding now shows the rendering in our desired mockup:

Rendered ItemsControl data template

(yes I know that ‘twitpic’ as a search shows some interesting results…but you can count on it to have fast refreshing data as a search term!)

Great!  That wasn’t that difficult, was it?  This binding syntax will be essential to building applications for you.

Storing some settings and configuration data

One of the things that would be helpful for our application is to store the last tweet ID so that the next time the application is run, we can start where we left off without starting over.  Additionally it would be cool to save the search term history so that we can view it in our History navigation point later.

To accomplish this, we’ll be using Isolated Storage available in Silverlight.  Isolated Storage enables a low-trust user-specific location for storing simple data.  For some more information on Isolated Storage:

To do this I’m going to add a Helper class to our Model folder.  This helper class will assist us in saving/reading data from our isolated storage location.  The basics of IsolatedStorage are that you create a file to which you can read data from or write data to if you want.  In our use we’ll use IsolatedStorageSettings for saving simple name/value pair data (search term/last ID).  Here’s the contents of the Helper.cs class:

   1: using System.IO.IsolatedStorage;
   2:  
   3: namespace TwitterSearchMonitor.Model
   4: {
   5:     public class Helper
   6:     {
   7:         internal static string GetLatestTweetId(string searchTerm)
   8:         {
   9:             if (IsolatedStorageSettings.ApplicationSettings.Contains(searchTerm))
  10:             {
  11:                 return IsolatedStorageSettings.ApplicationSettings[searchTerm].ToString();
  12:             }
  13:             else
  14:             {
  15:                 return "0";
  16:             }
  17:         }
  18:  
  19:         internal static void SaveLatestTweetId(string searchTerm, string latestId)
  20:         {
  21:             if (IsolatedStorageSettings.ApplicationSettings.Contains(searchTerm))
  22:             {
  23:                 IsolatedStorageSettings.ApplicationSettings[searchTerm] = latestId;
  24:             }
  25:             else
  26:             {
  27:                 IsolatedStorageSettings.ApplicationSettings.Add(searchTerm, latestId);
  28:             }
  29:         }
  30:     }
  31: }

Now in our Search.xaml.cs we’ll add the following in SearchForTweetsEx after the activity indicator is set:

   1: _lastId = Helper.GetLatestTweetId(SearchTerm.Text); // get the latest ID from settings
   2:  
   3: Helper.SaveLatestTweetId(SearchTerm.Text, _lastId); // saving for history even if a result isn't found

and then in the OnReadCompleted after we close the XmlReader we’ll add this:

   1: Helper.SaveLatestTweetId(SearchTerm.Text, _lastId); //saving last tweet id

And that now saves the search terms used as well as the last ID found if a result was found.

Summary

In this step we’ve set up a data template for a control, used some simple data binding using the XAML declarative syntax, added a value converter to format our view of information and save settings information to a local storage mechanism.

We’ve got basically our application working, so let’s start adding some interesting polish to the UI.

Let’s move on to part 5 where we add some new controls to enhance the experience using the data we just stored in this step.


This work is licensed under a Creative Commons Attribution By license.

This is part 5 in a series on getting started with Silverlight.  To view the index to the series click hereYou can download the completed project files for this sample application in C# or Visual Basic.

In our previous step we added better data binding and saved some data to our isolated storage area.  Let’s start integrating some other controls to make our experience a little better.

AutoCompleteBox

Remember the history data we save every time a search term is used?  Let’s help our users search better, by providing them a history of their searches in the TextBox while they type.  We’re going to use a control from the Silverlight Toolkit to accomplish this, AutoCompleteBox.

To do this we need to add a reference to the System.Windows.Controls.Input assembly.  Then add an xmlns to your Search.xaml file:

   1: xmlns:input="clr-namespace:System.Windows.Controls;assembly=System.Windows.Controls.Input"

With this in place, change the control named SearchTerm from TextBox to input:AutoCompleteBox:

   1: <input:AutoCompleteBox x:Name="SearchTerm" FontSize="14.667" Margin="0,0,10,0" Width="275"
   2:      IsTextCompletionEnabled="True" />

Now we need to provide data for the AutoCompleteBox.  In our Helper.cs class I added the following function:

   1: internal static string[] GetSearchTermHistory()
   2: {
   3:     List<string> searchHistory = new List<string>();
   4:  
   5:     foreach (var item in IsolatedStorageSettings.ApplicationSettings.Keys)
   6:     {
   7:         searchHistory.Add(item.ToString());
   8:     }
   9:  
  10:     return searchHistory.ToArray();
  11: }

Then in the Loaded event handler for Search.xaml.cs I added a call to Helper.GetSearchTermHistory():

   1: void Search_Loaded(object sender, RoutedEventArgs e)
   2: {
   3:     SearchResults.ItemsSource = pcv; // bind the DataGrid
   4:     _timer.Start(); // start the timer
   5:     SearchForTweetsEx(); // do the initial search
   6:     SearchTerm.ItemsSource = Helper.GetSearchTermHistory(); // populate autocomplete
   7: }

The result of which now is that when the application loads it will give the user some hinting while they search:

AutoCompleteBox in action

Helpful!

Adding our History view

Now that we have our search history, we can provide some data in a new view called History.xaml.  You should have already created this in the Views folder in a previous step, but if you haven’t, do so now (using the Silverlight Page item template).  Here we’ll want to show perhaps a simple list of all the terms.  We can easily do this using a ListBox in our XAML like this:

   1: <StackPanel>
   2:     <TextBlock x:Name="HeaderText" Style="{StaticResource HeaderTextStyle}" 
   3:                    Text="Serach Term History"/>
   4:     <ListBox x:Name="SearchTermHistory" />
   5: </StackPanel>

Then using a function we already have in Helper.cs, we can bind new data to the listbox like this in History.xaml.cs:

   1: protected override void OnNavigatedTo(NavigationEventArgs e)
   2: {
   3:     SearchTermHistory.ItemsSource = Helper.GetSearchTermHistory();
   4: }

So we are able to make re-use of a function to display a complete history of our terms:

History pane view

Adding some more navigation functionality

Now that we have a couple of views in the application, notice the navigation framework working.  You can navigate using the buttons, but also the back/forward browser buttons will also trigger the same functionality!

We can actually take this to the next level with the History view now.  In the ListBox I’m adding a SelectionChanged event handler:

   1: <ListBox x:Name="SearchTermHistory" SelectionChanged="SearchTermHistory_SelectionChanged" />

The function looks like this in History.xaml.cs:

   1: private void SearchTermHistory_SelectionChanged(object sender, SelectionChangedEventArgs e)
   2: {
   3:     this.NavigationService.Navigate(new Uri(string.Format("/Search/{0}", 
   4:             SearchTermHistory.SelectedItem.ToString()), UriKind.Relative));
   5: }

Notice the URI format I’m using?  It will end up being /Search/{term}.  We need to instruct our Navigation Frame in the application to map that accordingly.  Go back to MainPage.xaml and find the UriMapper content and add this line:

   1: <uriMapper:UriMapping Uri="/Search/{term}" MappedUri="/Views/Search.xaml?term={term}" />

Now we need to make our Search.xaml page understand this.  In Search.xaml.cs in the OnNavigatedTo I add this functionality:

   1: protected override void OnNavigatedTo(NavigationEventArgs e)
   2: {
   3:     if (this.NavigationContext.QueryString.ContainsKey("term"))
   4:     {
   5:         SearchTerm.Text = this.NavigationContext.QueryString["term"].ToString();
   6:         SearchForTweetsEx();
   7:     }
   8: }

Now when a user goes to the History page and selects an item, it automatically executes the search!

Summary

Integrating other controls and 3rd party controls like this will help define your user experience and hopefully provide an better experience for your users of the application.  There are a bunch of 3rd party control vendors producing great sets of components.  Visit my Silverlight Controls post for a list of them.  Be sure to check out the Silverlight Toolkit for others from Microsoft and a sample application showing all the controls.

We’ve got our application pretty well working, but the UI could use some more polish, in the next step in part 6 let’s show how we can better template this without affecting functionality.

This is part 6 in a series on getting started with Silverlight.  To view the index to the series click here. You can download the completed project files for this sample application in C# or Visual Basic.

We now have a functioning application but could use some more polish.  Let’s make the data template for the search results look a little better.  We’re going to modify a few things in the data template in Search.xaml for the ItemsControl. 

These modifications can be done in Blend just like we have been doing with the editing template features.  This is how it was accomplished above.  With these styles now applied the new UI looks like this:

Styled results

Notice how more polished that looks and we didn’t affect any code, just the template style.  Since there was a few changes here since the last step it would be a lot of code to write out but let me point out where the styles are in the final project.

The styles and templates are applied just like the binding syntax with data and the templates.  If we look at the ScrollViewer it now states:

   1: <ScrollViewer Style="{StaticResource scrollViewerStyle}" ...
   2: ...

Notice the familiar syntax?  instead of {Binding} it uses {StaticResource} to refer to a resource that either exists in the document or the App.xaml.  In this case the style is in the App.xaml (look for the scrollViewerStyle and scrollBarStyle nodes at the bottom of the file).

We also just made some subtle changes to the colors of the included style from the template.  With styling and templating in Blend, you don’t have to worry about modifying your .NET code most of the time.  We are able to change the visual layout and theme of controls without changing the code.

More resources on using Expression Blend:

Having a designer friend at this stage of polishing the UI is extremely helpful.  In fact, you’d likely have this UI defined MUCH earlier in the project than our exercise here.  The two tools, Expression Blend and Visual Studio, share the same project structure file so you can easily open the project in either tool instead of passing around loose files.

Take a look around the Assets/Styles.xaml file in the completed project to understand how styles and templates can be used.

Next step: finishing off our application by making it available out-of-browser in part 7.

This is part 7 in a series on getting started with Silverlight.  To view the index to the series click hereYou can download the completed project files for this sample application in C# or Visual Basic.

In our final stage of this getting started series, we are going to make our application available for installation outside of the browser.  The steps are much simpler than you think.

Create the manifest

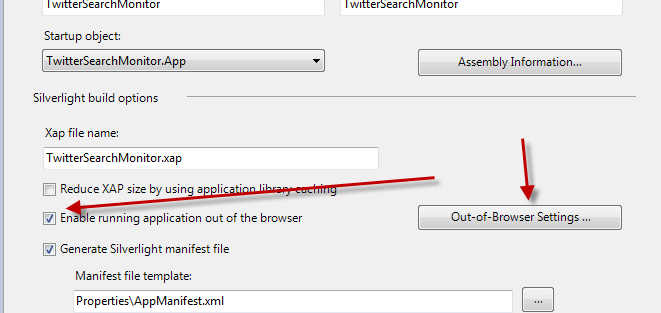
Using Visual Studio, right-click on the Silverlight application’s project and choose properties.  You’ll see a dialog box come up – notice the checkbox about Out-of-browser settings:

Application properties

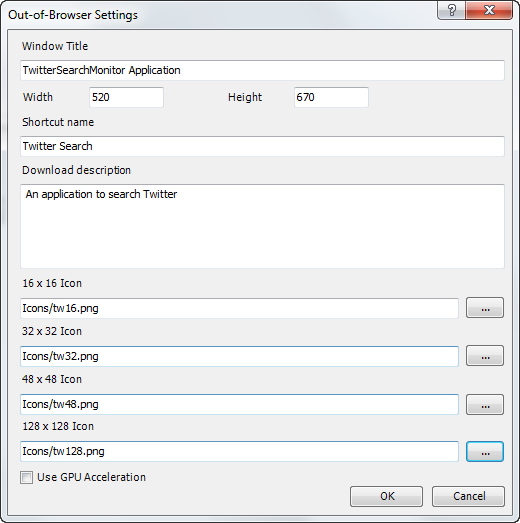
When you click that you’ll be greeted with options to complete:

Out-of-browser settings dialog

These settings are important to provide visual information about your application when installed and running out of the browser.

  • Window Title – what is displayed in the window chrome for the app
  • Width/Height – the starting width and height of your application when launched
  • Shortcut name – the name for the desktop/start menu shortcut
  • Download description – a description of the application
  • Icons – must be PNG and must be included in the project marked as Content

Once you have all those in place your app is enabled for out-of-browser capabilities.  Let’s add an install button for your users in the navigation area in MainPage.xaml in the StackPanel called LinksStackPanel, add this XAML:

   1: <Rectangle x:Name="Divider3" Style="{StaticResource DividerStyle}"/>
   2: <HyperlinkButton x:Name="InstallLink" Style="{StaticResource LinkStyle}" 
   3:                  Content="install" Click="InstallOffline"/>

Now in MainPage.xaml.cs write the function for InstallOffline:

   1: private void InstallOffline(object sender, RoutedEventArgs e)
   2: {
   3:     if (Application.Current.Install())
   4:     {
   5:         InstallLink.Visibility = Visibility.Collapsed;
   6:     }
   7: }

You can see that after we check for a successful install, we hide the install button as it isn’t needed anymore.  What we need to do though is make that more dynamic in that it automatically knows to do that.  Additionally we don’t want the install button to show if the application is launched out-of-browser to begin with.  Luckily we have an API with a few properties that will help us out: InstallState and IsRunningOutOfBrowser.  Let’s make use of both of these.

Detecting InstallState and IsRunningOutOfBrowser

In the MainPage.xaml.cs file, we’re going to add an event handler to detect the change of our installation state of our application as well as a loaded event handler:

   1: public MainPage()
   2: {
   3:     InitializeComponent();
   4:     Loaded += new RoutedEventHandler(MainPage_Loaded);
   5:     Application.Current.InstallStateChanged += new EventHandler(OnInstallStateChanged);
   6: }

In that method we’ll check the various states to determine if our InstallLink should be visible or not (as well as the last divider):

   1: void OnInstallStateChanged(object sender, EventArgs e)
   2: {
   3:     switch (Application.Current.InstallState)
   4:     {
   5:         case InstallState.InstallFailed:
   6:             break;
   7:         case InstallState.Installed:
   8:             ToggleInstallLinks(true);
   9:             break;
  10:         case InstallState.Installing:
  11:             break;
  12:         case InstallState.NotInstalled:
  13:             ToggleInstallLinks(false);
  14:             break;
  15:         default:
  16:             break;
  17:     }
  18: }
  19:  
  20: void ToggleInstallLinks(bool hidden)
  21: {
  22:     InstallLink.Visibility = hidden ? Visibility.Collapsed: Visibility.Visible;
  23:     Link3.Visibility = hidden ? Visibility.Collapsed : Visibility.Visible;
  24: }

Now in the Loaded event handler we’ll check to see if the application is running out-of-browser or not:

   1: void MainPage_Loaded(object sender, RoutedEventArgs e)
   2: {
   3:     if (App.Current.IsRunningOutOfBrowser)
   4:     {
   5:         ToggleInstallLinks(true);
   6:     }
   7:     else
   8:     {
   9:         if (App.Current.InstallState == InstallState.Installed)
  10:         {
  11:             ToggleInstallLinks(true);
  12:         }
  13:     }
  14: }

Using these two APIs we can now automatically change our UI to hide functions not needed.

Detecting network changes

If our application doesn’t have network access, we shouldn’t allow the search to run because it may not have the capability of finding the Twitter search API.  There is an additional API for NetworkInterface that we can use to detect this.  We’ll do this in our Search.xaml.cs page by first adding an event handler in the constructor after our Loaded event handler line:

   1: NetworkChange.NetworkAddressChanged += new NetworkAddressChangedEventHandler(OnNetworkChanged);

This raises an event when the network status has changed.  Now in the OnNetworkChanged event handler we’ll check to see if the network is available and, if it isn’t, disable searching capabilities until it is:

   1: void OnNetworkChanged(object sender, EventArgs e)
   2: {
   3:     if (!NetworkInterface.GetIsNetworkAvailable())
   4:     {
   5:         // network may not be available, halt searching
   6:         SearchButton.IsEnabled = false;
   7:         SearchButton.Content = "DISCONNECTED";
   8:         _timer.Stop();
   9:     }
  10:     else
  11:     {
  12:         SearchButton.Content = "SEARCH";
  13:         SearchButton.IsEnabled = true;
  14:         _timer.Start();
  15:     }
  16: }

This is only an example of course, and you could provide other UI hints such as status indicators, etc. but for our application this should work now.

NOTE (Here be dragons): Simply checking for GetIsNetworkAvailable doesn’t guarantee in all circumstances that the Internet is not available.  Due to various ways corporations configure proxy servers and local IP addressing it is always good practice to have a fallback mechanism if you need to verify WAN Internet access.  This can be done by simply doing a WebClient request for a file on the web server – if the request succeeds you have Internet access, otherwise you may not.

You can find out more information about Out-of-browser experiences here:

Out of browser updates

You may be wondering how to trigger updates to an application if it was installed on to the machine.  There is an API that a developer can use called CheckAndDownloadUpdateAsync which triggers the update model.  The update model is outlined here.  Even though that article has a different API, the model of updating is the same *after* that method above is called.

Summary

Now we’ve taken our application from a blank slate to a working application with data and that can be installed out of the browser.  I hope this has been a helpful exercise to walk through.  Download the code to be sure to play around with it and learn.  Here are some other helpful resources for you:

Hopefully this will get you started writing Silverlight applications!