Being more involved in the engineering process of a product I had the chance to participate in the design of various features instead of just the ones that I’m responsible for delivering.  One of those areas was the way we would enable developers to produce localized applications.  Before this process I have to be honest and as an app developer never really paid much attention to providing localized versions of any app that I wrote.  I had absolutely no good reason for coming to that decision, just never bothered.  In helping to design and understand localization a bit more I can say that it is easy to do this in your app and there shouldn’t be any excuse for any app developer to create their application in a way to make it localized at any given moment.  Note I didn’t say localized immediately, but rather I mean to create your app in a way that would make it easy to provide a localized version in a fairly quick turnaround.

As I do some app development for Windows 8 I wanted to share my thoughts around localization and what it really means to me to provide a ‘world-ready’ application.  The three areas of focus are 1) how the platforms support a localized app, 2) what technical tools you have to automate localization 3) getting culture-correct localization and 4) testing your localized app.

Platform support for localization

The first thing you have to understand is how the platform you are targeting enables support for your app to easily be localized.  This may be in how you organize your content, how you name certain things, and how you write code.  For most platforms there is a pretty predictable method of doing this.  I would argue not all platforms make this extremely intuitive, but also state that inferring how (and what) you want to localize your app isn’t something a platform can predict well for every app.  It is important for the app developer to plan for a global market and fully understand the models before writing a line of code to understand how to make the app localized more easily later in the process.

For Windows 8, a new resource model is introduced for WinRT that is common across the entire platform regardless of the UI framework choice.  The areas you should understand are Windows.ApplicationModel.Resources and Windows.ApplicationModel.Resources.Core.  These two areas are where most Windows 8 developers will spend most of their time with regard to localization of UI strings (and other content).  For most, the GetString() method is probably where you’ll spend your time when using code.  String values are indexed during the build process of your application.  Your strings will either reside in a RESJSON (for HTML/JS) or RESW (for XAML) file.  Both of these are essentially name/value collections for your strings.  An example of the process of naming and managing your string resources can be found here: How to manage string resources.

NOTE: Yes the Consumer Preview version of that documentation shows only Javascript right now, but will be updated.  The naming conventions are the same.

In XAML we created a new way to do XAML UI localization in your markup, by moving some functionality into the platform for you.  Previously in platforms like Silverlight people used techniques like data binding to accomplish the mapping from the RESX-generated class to the UI.  Because the indexing of the string resources changed a bit (i.e., currently no strongly-typed resource class representation), we wanted to have the platform do some more heavy lifting for you.  We already load the index file (resources.pri) automatically during load of the app, so we’re aware of the resources and all the context the app may have (i.e., what locale, screen resolution, etc.).  Because of this we enabled a markup mechanism in XAML for you to provide easy string localization.  Let’s use a simple example of a TextBlock that you might have a static string:

   1: <TextBlock x:Uid="MyTextBlock" FontSize="24.667" Text="Design Placeholder" />

Notice the x:Uid value here.  This now maps back to the key in your RESW file.  Anything with that starting key will have properties merged into it.  So we can have a key in our RESW for “Text” using the key name MyTextBlock.Text with a value of “Hello World” and the runtime will do the replacement for you.  This applies to properties other than text (i.e. width) as well as attached properties.  While we think this is a great new method, it may not work for everyone’s situations and you still have control over retrieving strings using the Windows.ApplicationModel.Resources WinRT APIs.  You can read more about this method with some examples here: QuickStart: Make your Metro style app world ready and an SDK Sample here: Application Resources.

Tools to help with localizing content

Once you have understood what your platform provides and you have taken the effort to prepare your app for easy localization, the next step is to actually use tools/process to perform the localization.  I’ve come across a few tools that I think are helpful for XAML developers who are ‘small shops’ and don’t have an existing process for app localization.

The easiest thing for a developer to do is to use machine translation using automated services.  There are a few tools out there that I think can be helpful for this method.  It is important to note we are talking about machine translation here…I will get to that point later on in the post.

RESX Translator with Bing

Since the RESW format is identical with RESW (restriction is that RESW only supports string values currently), you can use a lot of existing RESX tools.  There is a RESX Translator with Bing project on CodePlex that was done by Microsoft UK Consulting Services.  This allows you to select a file and source language and translate to any language that Microsoft Translator supports. 

RESX Translator with Bing

Since the current project supports (and only loads) .resx files, I had submitted some patch files to quickly make it support the .resw file extension.  The contributor hasn’t accepted these patches, but you can find them on the patches section for the project.

Multilingual App Toolkit

Released with the Visual Studio 11 Beta, the Multilingual App Toolkit from Microsoft provides an integrated method for generating resources for your app.  One of the benefits of this app is that it produces some standards-based files that are used to send to localizers and can be used in other tools.  This includes the TPX and XLIFF file formats.  Once installed the tool is integrated within visual studio and your flow would be something like the following.

First you’d have your app and an initial RESW file containing your default language (in my case en-US) resources.  Once I have that I can right-click on the project and choose Add translation languages and when doing so, launches:

Add translation language dialog

which I can select the languages I would prefer.  Notice the translator icon next to some of them indicating that these could be machine-translated.  Once you select the languages you want, you’ll see a folder within your app that contains the configuration information:

Multilingual resources folder

Now if you open the XLF files you’ll basically see some XML that contains configuration information but initially won’t see any of your string values.  You need to do a build to populate those files.  After building you’ll see the XLF files regenerated with the keys to be localized:

   1: <?xml version="1.0" encoding="utf-8"?>
   2: <xliff version="1.2" xmlns="urn:oasis:names:tc:xliff:document:1.2" xmlns:xsi="http://www.w3.org/2001/XMLSchema-instance" xsi:schemaLocation="urn:oasis:names:tc:xliff:document:1.2 xliff-core-1.2-transitional.xsd">
   3:   <file datatype="xml" source-language="en-US" target-language="de-DE" original="LocTesting_Multilingual.prilog.xml" tool-id="MAT" product-name="LocTesting" product-version="Version 1" build-num="1.0.0.0">
   4:     <header>
   5:       <tool tool-id="MAT" tool-name="Multilingual App Toolkit" tool-version="1.0" tool-company="Microsoft" />
   6:     </header>
   7:     <body>
   8:       <group id="Resources">
   9:         <trans-unit id="Resources\SomeTextBlock\Text" translate="yes" xml:space="preserve">
  10:           <source>Good morning!  Have a nice day!</source>
  11:           <target state="new">Good morning!  Have a nice day!</target>
  12:         </trans-unit>
  13:         <trans-unit id="Resources\SomeButton\Content" translate="yes" xml:space="preserve">
  14:           <source>Click to Save</source>
  15:           <target state="new">Click to Save</target>
  16:         </trans-unit>
  17:       </group>
  18:     </body>
  19:   </file>
  20: </xliff>

Now you send those off for translation by right-clicking on the XLF file and choosing Send for translation which will give you a dialog to choose if you want to mail them or save to a folder and which format (TPX/XLIFF).  At this point your translation process can begin.  If you don’t have a translation process where you would normally send the XLIFF files, you can use the MAT Localization Editor that is installed with the toolkit.  Launching this tool and opening your XLIFF file will allow you (or the person doing translations) to edit the files with the correct value.  The MAT editor also has the Microsoft Translator capability as well.  Here’s an example of the above German file in the editor with one value translated by the Microsoft Translator:

MAT Localization Editor

Once you have the edited XLIFF file you import that back into your project.  Notice there are some other workflow-related properties in the XLIFF (i.e., Signed off, ready for review, etc.) that you can enforce.  Right-click on the XLF file in your project and choose Import translation and the XLIFF file that was modified.  Once imported, when I build next the signed-off items will be indexed within my app’s resource lookup (resources.pri) and packaged.  You will not see any new RESW files generated as using this process does the indexing during the build process with the XLF file and a build task.

Amanuens

Another tool that I’ve come across is Amanuens, which is more of a service/tool than anything that integrates into Visual Studio or runs on your machine.  This service acts as a broker to translators.  You basically create a project and then upload files to be localized.  After you login and create a project (specifying the type as Metro as they now support Windows 8 application file types) then you upload your “master” RESW/RESJSON file.  After doing that you can assign a translation and this is the core of their service.  You can assign a file for translation to a person that is a user on the system as you may have a German speaking friend who might help you out.  Or you can assign to an agency and get a quote:

Amanuens agency service

This way you can send it off and wait.  Either way when the translation comes back you just download the file, put it in your project in the appropriate folder and rebuild your app.  Amanuens is a pay service with a free option, but if you have an app and want to manage the workflow of that process, it seems like a pretty cool service.  They also have automatic source control synchronization that you can opt-in for so as your translations come in, they are automatically in your app via a repo sync.

Culture-correct localization

While all the above tools are awesome and fast to get you started, to build a really targeted localized app it is highly recommended you do more than machine translation, or at a minimum verify that machine translation.  Many times, especially for east Asian languages, the machine translation can be grammatically incorrect or sometimes culturally insensitive as most do dictionary-based translation rather than really understanding any context.

I recall a time in high school where a classmate went to Germany for exchange.  Having taken 6 semesters of German she felt pretty confident in her skills.  Little did she know her hoch Deutsch would prove to be a problem.  Upon arrival she went to a café with some friends and proclaimed she was hot.  However, her dictionary translation was bad and she effectively said “I’m horny” which immediately caught the attention of all the men in the room.  So it is key to understand context and culture when translating!

For this services like Amanuens really help out in both the flow and identifying a person to do the translation.  If you don’t know anyone who speaks Swedish, but want to target that market, using a service could help you get more culturally-correct translations for your app over just machine translation.  This, of course, does not come without a cost, but usually it is minimal and is a one-time translation.

One thing I’d love to see happen is somewhat of a co-op of software developers from around the world to offer translation help.  Working at Microsoft I had the chance to get correct translations of my Sudoku app for German, Japanese, Korean and French.  It was helpful to just send off the RESW file and get back the translation from a human who speaks the language and understands technology terms as well.  A service like Amanuens can help facilitate that co-op having a bank of users that are willing to donate their translation services for your project.  I think the struggle is that it is mostly English apps that need the help and hard for an English person to really reciprocate the value.  But if you are willing to help out other software developers perhaps we can start this co-op idea?

Testing your localized app

[!!_Śò ẃĥâт đõ Уôú ďó įƒ ўôú đõи'ť ћãνê тŕáйşłâţêď ţę×т ýęţ áйď ẅàήт тó тęšť ÿòµѓ ãрρ?_!!!!!!!!!!!!!!!!!!!!!!!!]

Could you read that?  Squint a little more.  It is what we call Pseudo Language.  Not a ‘real’ language but something that simulates a lot of different characteristics of localized language challenges.  Using the Multilingual Toolkit you can have all your strings translated to this Pseudo Language (sometimes called “ploc” within the walls of Microsoft) to test your app before your real language translations come in.  Using ploc helps you identify various artifacts that may exist in localizing an app.  Let’s take a simple example from above.  We had a button that said “Click to Save” in English and we translated it to German.  When rendered it would look like this respectively:


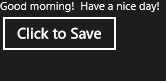
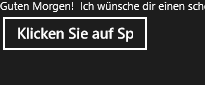
Notice that the German translation didn’t fit within the Button MaxWidth we had set because the translation of the text was longer than our English version.  Testing this is important for us to realize we need to change the constraint of the XAML sizes to accommodate our languages that we are targeting.

Historically testing localized versions of apps may have been challenging requiring you to install a language pack, try to navigate menus that you may not understand, or relying on others to verify for you.  In Windows 8, this process has become easier using the language list preferences.  The Building Windows 8 blog had a post called “Using the language you want” which talks about this concept in detail. 

NOTE: If using the Pseudo Language option and you want to test, when in the Language panel search for “qps-ploc” and you’ll see it under English (qps-ploc) as an option and then you can really test the boundaries of your app with the ploc strings!

Effectively as a developer I can go into the Language panel, add German, set it as my first language and run my app.  Now I’ll get my German resources first and I can visible verify things that need to be changed without installing any language pack on my machine…and I can quickly change back without any reboots.

Summary

Developing your application to be world-ready doesn’t have to be a huge undertaking and can turn out not to be difficult at all for your app.  While not every app is going to be the same and how you choose to architect your code may dictate how you get your resources, the concepts are still the same and starting with the mindset that your app may be localized at some point is the right thing to do.  Using RESW/RESJSON from the start and understanding the options you have for extracting those resources will make localization later very easy…in fact in some cases as easy as just putting in the updated RESW file and recompiling.

Start smart from the beginning and think global even if you aren’t ready for it just yet.  You never know when your German friend might help out translating for you and then you can instantly expand to that market within a day!

Hope this helps!

Just a little post to point out a hidden gem if you are a .NET developer creating a Metro style app: you can bind to anonymous types.  This came up in a discussion with a customer today that I was having and, frankly, I never tried it until then because my mind was back in Silverlight where this isn’t possible.  There may not be a tone of cases where this is valuable for you, but knowing it is there may help.

Let’s assume I have a basic class Person:

   1: public class Person
   2: {
   3:     public int Age { get; set; }
   4:     public string FirstName { get; set; }
   5:     public string Gender { get; set; }
   6: }

And in my application I have a list of that Person type that I somehow received.  In this example, I’m just hard-coding it right now.

   1: List<Person> people = new List<Person>();
   2: people.Add(new Person() { Age = 38, FirstName = "Tim", Gender = "Male" });
   3: people.Add(new Person() { Age = 9, FirstName = "Zoe", Gender = "Female" });
   4: people.Add(new Person() { Age = 5, FirstName = "Zane", Gender = "Male" });

I can then decide I want to bind to a ListView control which has a particular template:

   1: <ListView x:Name="PeopleList" Width="500" Height="300">
   2:     <ListView.ItemTemplate>
   3:         <DataTemplate>
   4:             <StackPanel Orientation="Horizontal">
   5:                 <TextBlock Text="{Binding TheName}" Margin="0,0,10,0" />
   6:                 <TextBlock Text="{Binding GuysAge}" />
   7:             </StackPanel>
   8:         </DataTemplate>
   9:     </ListView.ItemTemplate>
  10: </ListView>

Notice that I’m binding to properties (TheName and GuysAge) that don’t exist on my Person class?  In my code, I can then create a LINQ query to filter out only the “dudes” from my list and bind that result:

   1: var onlyGuys = from g in people
   2:                where g.Gender == "Male"
   3:                orderby g.FirstName descending
   4:                select new
   5:                {
   6:                    GuysAge = g.Age,
   7:                    TheName = g.FirstName,
   8:                    Gender = "Dude"
   9:                };
  10:  
  11: PeopleList.ItemsSource = onlyGuys;

The result is that my ListView now shows 2 people in the list.  Nice.

Get in the real world

Now I would probably agree that since you already have a strongly-typed class this is probably not the use case here.  It certainly might be helpful, but you already have a class (and in this example, one that you completely control so you could shape it to be what you really need).  What about those times you don’t have a class or you don’t own the type coming back?  JSON ring a bell?  Using the sample JSON response (I’m not focusing on how to retrieve data here just how to bind to it) from Twitter APIs, we can demonstrate how this might be more helpful.  Here’s the Twitter JSON data I’m referring to in this example: Twitter Mentions API.

My app wants to retrieve and bind to Twitter data but I don’t really want to have a “TwitterResponse” data type that I have to serialize in/out in my code.  The mention data is an array of mentions.  For the sake of simplicity I’ve basically put my JSON string in a file rather than confuse this sample in how to work with Twitter.  My code looks like this (assume that ‘data’ is the resulting Twitter mentions JSON string:

   1: // parse the data into a JsonArray object
   2: var mentions = JsonArray.Parse(data);
   3:  
   4: // build the query out of the mentions
   5: var qry = from m in mentions
   6:           select new
   7:           {
   8:               MentionText = m.GetObject()["text"].GetString(),
   9:               FromUser = m.GetObject()["user"].GetObject()["screen_name"].GetString(),
  10:               ProfilePic = m.GetObject()["user"].GetObject()["profile_image_url"].GetString()
  11:           };
  12:  
  13: MentionData.ItemsSource = qry;

Notice the LINQ query for creating a “new” type that I will bind to my ListView.  In my XAML I have a simple DataTemplate to demonstrate:

   1: <ListView x:Name="MentionData" Width="500" Height="300">
   2:     <ListView.ItemTemplate>
   3:         <DataTemplate>
   4:             <StackPanel>
   5:                 <TextBlock Text="{Binding FromUser}" />
   6:                 <TextBlock Text="{Binding MentionText}" TextWrapping="Wrap" />
   7:             </StackPanel>
   8:         </DataTemplate>
   9:     </ListView.ItemTemplate>
  10: </ListView>

The result is me being able to create a LINQ query and create a new anonymous type and directly bind to it.

Voila!  Perhaps you already discovered this little gem and are using it.  It is a welcome addition to the data binding story for Metro style app development with XAML and .NET!  Of course the same benefit can be had for XML data using XLINQ queries, so while this example is for JSON data, really any source data applies…it is all about that new anonymous type you create!

Hope this helps!

I should have known better honestly.  I’ve had one strike with cloud billing catching me by surprise and I’m not sure why I’m shocked it happened again.  This time, however, I thought I really did plan it out, pay attention to things and asked what I thought were the right questions.  Unfortunately I didn’t get the full answers.  This time I was stung by my shiny new SQL Azure service choice.

UPDATE 12-APR-2012: Based on comments I've received I feel the need to clarify that I'm not bashing Azure or cloud services in general here.  I don't think anywhere I indicated Azure was a crap product or that I hated it at all.  In fact, I indicated I was completely happy with the service offering.  My frustration was *only* with the fact that the pricing was unclear to me based on how I researched it...that is all and nothing more.  As many have pointed out, cloud services like Azure are extremely important in the marketplace and the ability to scale real-time with minimal effort is an exceptional feature.  *FOR ME* I currently don't have those needs so I couldn't justify the charges beyond what I had planned...that is all, nothing more.  My experience with SQL Azure was a positive one as a product.  Quick setup, familiar tools to manage, worry-free database management, great admin interface and a reliable data storage solution.  My architecture, however, just didn't prove ideal currently with my site not being in Azure as well.  When VM roles come out of beta I will be sure to evaluate moving sites there and plan better.

A while back I heard about the change in price for some Windows Azure services and the one that piqued my interest was the SQL Azure.  At the time it hit me right as I needed to move around some of my hosting aspects of my site.  The lure of the $5/month SQL Azure database (as long as it was < 100MB) was appealing to me.  The SQL server aspect of my site has always been a management headache for me as I don’t want to have to worry about growing logs, etc.

Stung by marketing

I followed the announcements to the http://www.windowsazure.com site and read the descriptions of the services.  I was immediately convinced of the value and heck, it was a service from my company so why shouldn’t I give it a try and support it?  When I began to set it up, however, there were questions being asked during setup and I started to get concerned.  I asked around about if this $5 fee was really the only fee.  I didn’t want to get surprises by things like compute time.  Perhaps I wasn’t asking specific enough questions, but all answers I got was that signs pointed to yes, that would be my only fee.

NOTE: As of this writing yes I am a Microsoft employee, but this is my own opinion and I realize that peoples’ expectations and results vary.  This is only my experience.  I’m not only an employee but also a customer of Microsoft services and in this instance a full paying customer.  No internal benefits are used in my personal Azure hosting accounts.

Yesterday I learned that wasn’t the case.  I received my first Azure billing statement and it was way more than I expected.  Yes my $5 database was there as expected, but also was suddenly “Data Transfer” charges of $55.

Trying to make sense of billing

I immediately tried to make sense of this billing.  I immediately remembered that I had created a storage account as well for a quick test and perhaps I forgot to disable/delete that service.  I logged into the management portal and saw that my storage account was properly deleted and nowhere to be seen.  But how to make sense of these charges from the past week then?  Luckily Azure provides detail usage download data so I grabbed that.  The CSV file I download did indeed provide some detail…perhaps too much as some of it I couldn’t discern, namely the one piece that I had hoped would help me: Resource ID.  This ID was a GUID that I thought pointed to a service that I used.  It did not, or at least that GUID was nowhere to be seen on my Azure management portal.

I contacted the billing support immediately to help.  I was able to talk with a human fairly quickly which was a plus.  The gentleman explained to me that I had a lot of outgoing data leaving the Azure data centers and that was the source of the costs.  He asked if I knew if anything was connecting to my SQL Azure instance externally.  Well, duh, yes it was my site!  He went on to explain that this constitutes “Data Transfer” and I’m billed at a per GB rate for any data that leaves the Azure data center. 

I took a deep breath and asked where this was documented in my SQL Azure sign-up process.  We walked through the site together and he agreed that it wasn’t clear.  After being put on hold for a while, I was assured I would receive a credit for the misunderstanding.  Unfortunately for Azure, the damage was done and they lost a customer.

Where the failure occurred

For me the failure was twofold: me for not fully understanding terms and Azure for not fully explaining them in context.  I say “in context” because that was the key piece that was missing in my registration of my account.  Let me explain the flow I took (as I sent this same piece of internal feedback today as well) as a customer once I heard the announcement about the SQL Azure pricing changes:

  • I received notice of updated SQL Azure pricing
  • I visited the site http://www.windowsazure.com for more information
  • I clicked the top-level “PRICING” link provided as that was my fear
  • I was presented with a fancy graphical calculator.  I moved the slider up to 100MB and confirmed the pricing on the side (no asterisks or anything)
  • I notice a “Learn more about pricing, billing and metering” link underneath the calculator and click it to learn more
  • I’m presented with a section of 10 different options all presented at the same level giving the appearance as unique services.
  • I choose the Database one and again read through and confirm the charge for the 100MB database option.
  • I click the “More about databases” link to double-verify and am presented with another detailed description of the billing

Not once during that process was context provided.  Not at any of the steps above (3 different pricing screens) was there context that additional fees could also apply to any given service.  Data transfer, in fact, doesn’t even describe itself very well.  As I was assured in asking folks involved in Azure about my concern on pricing, this “Data Transfer” wasn’t brought up at all.  I’m not sure why at all it is listed along side services and almost presented as a separate service as it appears all Azure services are subject to data transfer fees.  This is not made clear during sign up nor marketing of the pricing for each service.  SQL Azure should clearly state that the fees are database *plus* any additional fees resulting from data transfer.  Heck Amazon does this with S3 which also makes it so confusing to anticipate the cost of billing there as well…but at least it is presented that I need to factor that into my calculation.

I’m to blame, so why am I whining

I said I’m to blame as well for not understanding better what I’m getting into.  It is unfortunate because I really did like the service and felt an assurance of more reliability with my database then I had before.  The management portal was great and the uptime and log management was something I didn’t have to think about anymore. 

So why, you might ask, am I complaining about a service fee for something that was providing me value? 

NOTE: You may ask why I didn’t just move my site within Azure as well so that no data would be leaving the data centers.  This is a fair question, but unfortunately my site won’t run on any Azure hosting services and additionally I manage a few sites on a single server so it is cost prohibitive to have multiple Azure hosting instances for me right now.

Well it is simple.  I’m not made of money.  This blog has no accounting department or annual budget and such, I have to be smart about even the smallest cost.  I already have sunk costs into the server that hosts this site as well as a few others.  A $5/month database fee was nothing and justifiable easily with the value I was getting and the minor additional cost.  $50 (and growing) just wasn’t justifiable to me.  It was already at the same cost as my dedicated server and just no longer made sense for my scenario here.  In this instance I’m the “little guy” and need to think like one.  Perhaps cloud services are not for me.

Summary

So what did I learn?  Well, I really need to understand bandwidth and transfer data better for the sites I have.  Unfortunately this isn’t totally predictable for me and as such if I can’t predict the cost then it isn’t something that I should be using.  If you are considering these types of services regardless of if they are from Azure or Amazon (or whomever) you need to really plan out not only the service but how it will be used.  Don’t be lured by those shiny cost calculators that let you use sliders and show you awesome pricing but don’t help you estimate (or alert you) to that some of those sliders should be linked together.

I think Azure (and other similar services) have real customer value…there is no doubt in that.  For me, however, it just isn’t the time right now.  The services, based on my configuration needs, just don’t make sense.  Had I had a clearer picture of this when signing up, I wouldn’t have been in this situation of frustration.  Choose your services wisely and understand your total usage of them.  For me it currently doesn’t make sense and I’m moving back to a SQL Express account on my server.  Yes I’ll have to manage it a bit more, but my costs will be known and predictable.

Hope this helps.

My blog runs on Subtext which has a pretty good skinning model (albeit a tad outdated) and allows you to customize whatever you want.  I’ve had my own custom theme since 2009.  I figured I was due for an update.  I was further strengthened by a post from Jon Galloway last week.

Now when I saw this I figured it was another nudge.  I did also have some time this weekend without any distractions so I took it as an opportunity to do some ‘work’ on this here blog.  Now a while back I was inspired by what Scott Hanselman had done on his site with a designer.  I reached out to a few designers that I admired, but frankly never heard back :-(.  I figured that was okay as I wasn’t in a position to really pay what I know it is worth for a good designer.  So I went looking for things on the web that I could do myself.  I did want some subtle design tweaks to represent some things I’m currently passionate about.

Bootstrap your CSS

After some digging I saw a ton of pointers to Bootstrap.  This is an Open Source Javascript/CSS library that sets your site up for styling success and layout goodness.  The documentation was some of the better docs I’ve seen for a library.  Each aspect of the library/styles where in the docs that I could visually see, interact with and see the code that produced the behavior.  I liked what I saw and went to work.

When I got all the styles configured (using the basic setup from Bootstrap) I went to work on some of my own minor tweaks.  One of the things I really liked is the responsive layout options, not only for the grid but also for different screen sizes.  By adding a simple class I can specify certain aspects that shouldn’t be displayed when viewing the site on a tablet or phone.  There were other cool responsive options for this such as the main menu will switch to a drop-down approach when on a smaller device.  Using Firebug, IE F12 tools and real devices I was able to get the precise tweaks that I wanted.  Here’s what my site looks like on an iPhone as an example:

timheuer.com on an iPhone

Notice the menu at the top is gone but replaced with a little icon (which is a drop-down).  Also notice the sidebar area is no longer visible (it is on the bottom of the site in this device view).  I like this subtle configuration that was really easy to do with just adding a class name to the area I wanted to collapse.

The other thing I wanted was to implement my primary navigation links in a little-more-than-text style.  I used the CSS sprite method by creating a single image that I would then define styles that used clips within that image to pull out the right area.  Here is the image in entirety:

Notice how the normal and hover states are the same image. 

NOTE: I put this on a black background so you can see them but it is actually a transparent background so the theme’s background shows through.

What I do then is just define a style for the <a> tag like:

   1: #follow {
   2:     background-image: url("navbarglyphs.png");
   3:     background-position: -195px 0px;
   4: }
   5:  
   6: #follow:hover {
   7:     background-image: url("navbarglyphs.png");
   8:     background-position: -195px -70px;
   9: }

Now I was having a bit of difficulty with this because I was misunderstanding the background-position value in CSS.  A quick set of second eyes with Shawn Wildermuth (who is doing a bunch of HTML dev posts right now) helped me realize my math was wrong and I needed to use the negative value instead of what I was using.  Once that forehead-slap moment was done, I was set. 

I still have a few tweaks to go (need to re-work the comments sections but didn’t have the time to think about a design more) but I’m happy with the quick re-design.  It is very simple for sure, but I like it.  I tried on a few different screen sizes and I think I have met Jon’s challenge to adapt to the available space for the screen.  If you are working with a new site and aren’t a CSS/JS guru I highly recommend looking at Bootstrap as a solid starting point for your efforts.

If you’ve been playing around with the Windows 8 Consumer Preview then hopefully you’ve seen the hundreds of samples provided and downloaded some apps form the store.  In a lot of those applications you’ll notice the common theme of the use of an AppBar…the command bar that shows when you swipe from the top or bottom of the screen.  You can also invoke the AppBar by right-clicking or using the Windows 8 keyboard shortcut of Windows key + ‘z’ to bring it up as well.

Bing Maps AppBar
Picture of the AppBar in the Bing Maps application

Most of the applications use the standard AppBar button concepts that clicking invokes some action for the app.  There may be times, however, where that button serves as a “toggle” to something in your app.  Using the Bing Maps app as an example, the “Show Traffic” command is actually a toggle command that, well, shows traffic.  You want to give your users some visual indication whether that toggle selection is on/off.  This can be accomplished in XAML by using 2 buttons and toggling their visibility, but that may be overkill for what you simple want to do.

The Visual Studio project templates provide a set of styles for the AppBar for you, but more importantly a base style AppBarButtonStyle that serves as the core design.  Altering this just slightly and you can have a ToggleAppBarButtonStyle for your project.  Here’s the style for that base:

   1: <Style x:Key="ToggleAppBarButtonStyle" TargetType="ToggleButton">
   2:     <Setter Property="Foreground" Value="{StaticResource AppBarItemForegroundBrush}"/>
   3:     <Setter Property="VerticalAlignment" Value="Stretch"/>
   4:     <Setter Property="FontFamily" Value="Segoe UI Symbol"/>
   5:     <Setter Property="FontWeight" Value="Normal"/>
   6:     <Setter Property="FontSize" Value="21.333"/>
   7:     <Setter Property="AutomationProperties.ItemType" Value="AppBar ToggleButton"/>
   8:     <Setter Property="Template">
   9:         <Setter.Value>
  10:             <ControlTemplate TargetType="ToggleButton">
  11:                 <Grid Width="100" Background="Transparent">
  12:                     <StackPanel VerticalAlignment="Top" Margin="0,14,0,13">
  13:                         <Grid Width="40" Height="40" Margin="0,0,0,5" HorizontalAlignment="Center">
  14:                             <TextBlock x:Name="BackgroundGlyph" Text="&#xE0A8;" FontFamily="Segoe UI Symbol" FontSize="53.333" Margin="-4,-19,0,0" Foreground="{StaticResource AppBarItemBackgroundBrush}"/>
  15:                             <TextBlock x:Name="BackgroundCheckedGlyph" Visibility="Collapsed" Text="&#xE0A8;" FontFamily="Segoe UI Symbol" FontSize="53.333" Margin="-4,-19,0,0" Foreground="{StaticResource AppBarItemForegroundBrush}"/>
  16:                             <TextBlock x:Name="OutlineGlyph" Text="&#xE0A7;" FontFamily="Segoe UI Symbol" FontSize="53.333" Margin="-4,-19,0,0"/>
  17:                             <ContentPresenter x:Name="Content" HorizontalAlignment="Center" Margin="-1,-1,0,0" VerticalAlignment="Center"/>
  18:                         </Grid>
  19:                         <TextBlock
  20:                         x:Name="TextLabel"
  21:                         Text="{TemplateBinding AutomationProperties.Name}"
  22:                         Margin="0,0,2,0"
  23:                         FontSize="12"
  24:                         TextAlignment="Center"
  25:                         Width="88"
  26:                         MaxHeight="32"
  27:                         TextTrimming="WordEllipsis"
  28:                         Style="{StaticResource BasicTextStyle}"/>
  29:                     </StackPanel>
  30:                     <Rectangle
  31:                         x:Name="FocusVisualWhite"
  32:                         IsHitTestVisible="False"
  33:                         Stroke="{StaticResource FocusVisualWhiteStrokeBrush}"
  34:                         StrokeEndLineCap="Square"
  35:                         StrokeDashArray="1,1"
  36:                         Opacity="0"
  37:                         StrokeDashOffset="1.5"/>
  38:                     <Rectangle
  39:                         x:Name="FocusVisualBlack"
  40:                         IsHitTestVisible="False"
  41:                         Stroke="{StaticResource FocusVisualBlackStrokeBrush}"
  42:                         StrokeEndLineCap="Square"
  43:                         StrokeDashArray="1,1"
  44:                         Opacity="0"
  45:                         StrokeDashOffset="0.5"/>
  46:  
  47:                     <VisualStateManager.VisualStateGroups>
  48:                         <VisualStateGroup x:Name="CommonStates">
  49:                             <VisualState x:Name="Normal"/>
  50:                             <VisualState x:Name="PointerOver">
  51:                                 <Storyboard>
  52:                                     <ObjectAnimationUsingKeyFrames Storyboard.TargetName="BackgroundGlyph" Storyboard.TargetProperty="Foreground">
  53:                                         <DiscreteObjectKeyFrame KeyTime="0" Value="{StaticResource AppBarItemHoverBackgroundBrush}"/>
  54:                                     </ObjectAnimationUsingKeyFrames>
  55:                                 </Storyboard>
  56:                             </VisualState>
  57:                             <VisualState x:Name="Pressed">
  58:                                 <Storyboard>
  59:                                     <DoubleAnimation
  60:                                     Storyboard.TargetName="OutlineGlyph"
  61:                                     Storyboard.TargetProperty="Opacity"
  62:                                     To="0"
  63:                                     Duration="0"/>
  64:                                     <ObjectAnimationUsingKeyFrames Storyboard.TargetName="BackgroundGlyph" Storyboard.TargetProperty="Foreground">
  65:                                         <DiscreteObjectKeyFrame KeyTime="0" Value="{StaticResource AppBarItemForegroundBrush}"/>
  66:                                     </ObjectAnimationUsingKeyFrames>
  67:                                     <ObjectAnimationUsingKeyFrames Storyboard.TargetName="Content" Storyboard.TargetProperty="Foreground">
  68:                                         <DiscreteObjectKeyFrame KeyTime="0" Value="{StaticResource AppBarItemPressedForegroundBrush}"/>
  69:                                     </ObjectAnimationUsingKeyFrames>
  70:                                 </Storyboard>
  71:                             </VisualState>
  72:                             <VisualState x:Name="Disabled">
  73:                                 <Storyboard>
  74:                                     <ObjectAnimationUsingKeyFrames Storyboard.TargetName="OutlineGlyph" Storyboard.TargetProperty="Foreground">
  75:                                         <DiscreteObjectKeyFrame KeyTime="0" Value="{StaticResource AppBarItemDisabledForegroundBrush}"/>
  76:                                     </ObjectAnimationUsingKeyFrames>
  77:                                     <ObjectAnimationUsingKeyFrames Storyboard.TargetName="Content" Storyboard.TargetProperty="Foreground">
  78:                                         <DiscreteObjectKeyFrame KeyTime="0" Value="{StaticResource AppBarItemDisabledForegroundBrush}"/>
  79:                                     </ObjectAnimationUsingKeyFrames>
  80:                                     <ObjectAnimationUsingKeyFrames Storyboard.TargetName="TextLabel" Storyboard.TargetProperty="Foreground">
  81:                                         <DiscreteObjectKeyFrame KeyTime="0" Value="{StaticResource AppBarItemDisabledForegroundBrush}"/>
  82:                                     </ObjectAnimationUsingKeyFrames>
  83:                                 </Storyboard>
  84:                             </VisualState>
  85:                         </VisualStateGroup>
  86:                         <VisualStateGroup x:Name="FocusStates">
  87:                             <VisualState x:Name="Focused">
  88:                                 <Storyboard>
  89:                                     <DoubleAnimation
  90:                                         Storyboard.TargetName="FocusVisualWhite"
  91:                                         Storyboard.TargetProperty="Opacity"
  92:                                         To="1"
  93:                                         Duration="0"/>
  94:                                     <DoubleAnimation
  95:                                         Storyboard.TargetName="FocusVisualBlack"
  96:                                         Storyboard.TargetProperty="Opacity"
  97:                                         To="1"
  98:                                         Duration="0"/>
  99:                                 </Storyboard>
 100:                             </VisualState>
 101:                             <VisualState x:Name="Unfocused" />
 102:                             <VisualState x:Name="PointerFocused" />
 103:                         </VisualStateGroup>
 104:                         <VisualStateGroup x:Name="CheckStates">
 105:                             <VisualState x:Name="Checked">
 106:                                 <Storyboard>
 107:                                     <DoubleAnimation
 108:                                     Storyboard.TargetName="OutlineGlyph"
 109:                                     Storyboard.TargetProperty="Opacity"
 110:                                     To="0"
 111:                                     Duration="0"/>
 112:                                     <ObjectAnimationUsingKeyFrames Storyboard.TargetName="BackgroundGlyph" Storyboard.TargetProperty="Foreground">
 113:                                         <DiscreteObjectKeyFrame KeyTime="0" Value="{StaticResource AppBarItemForegroundBrush}"/>
 114:                                     </ObjectAnimationUsingKeyFrames>
 115:                                     <ObjectAnimationUsingKeyFrames Storyboard.TargetName="BackgroundCheckedGlyph" Storyboard.TargetProperty="Visibility">
 116:                                         <DiscreteObjectKeyFrame KeyTime="0" Value="Visible"/>
 117:                                     </ObjectAnimationUsingKeyFrames>
 118:                                     <ObjectAnimationUsingKeyFrames Storyboard.TargetName="Content" Storyboard.TargetProperty="Foreground">
 119:                                         <DiscreteObjectKeyFrame KeyTime="0" Value="{StaticResource AppBarItemPressedForegroundBrush}"/>
 120:                                     </ObjectAnimationUsingKeyFrames>
 121:                                 </Storyboard>
 122:                             </VisualState>
 123:                             <VisualState x:Name="Unchecked"/>
 124:                             <VisualState x:Name="Indeterminate"/>
 125:                         </VisualStateGroup>
 126:                     </VisualStateManager.VisualStateGroups>
 127:                 </Grid>
 128:             </ControlTemplate>
 129:         </Setter.Value>
 130:     </Setter>
 131: </Style>

Now with that style we can have a simple style that shows a toggle on and off for the same button:

   1: ...
   2: <Page.BottomAppBar>
   3:     <AppBar>
   4:         <ToggleButton Style="{StaticResource ToggleAppBarButtonStyle}" 
   5:                 AutomationProperties.Name="Search" 
   6:                 Content="&#xE11A;" />
   7:     </AppBar>
   8: </Page.BottomAppBar>
   9: ...

The result would show:

 
ToggleButtonAppBarStyle in off/on state

This way we exhibit all the same behaviors of the AppBarButtonStyle, but just applied to the ToggleButton element in XAML.  Now we could probably refactor both to have an even more derivative base style and use more BasedOn styling, but how it is currently structured we couldn’t have a ToggleButton based on a Button style.  But thanks to the style/template engine in XAML we can re-use a lot and serve our needs!

Notice that you can set the Content to be whatever you want.  Since my base style uses the Segoe UI Symbol font, I’m setting the unicode value for a glyph here for Search.  A set of some cool glyphs you can use can be found in my previous post on XAML AppBar button styles.

You can get the ToggleAppBarButtonStyle from here: https://gist.github.com/2131230.

Hope this helps!