First a word on the “continuum” I keep hearing about for applications. I’d like to apply it to my digital lifestyle. You know that vision where you only have one place to keep your music, but can access it anywhere, etc., etc. I still haven’t hit nirvana like that yet, but for movie watching it’s getting close.
I used to be a customer of Netflix when they first launched. To be honest, at that time their pricing was singular and I just wasn’t watching enough movies at home to warrant the cost, so I ended my relationship. Now I have kids, travel a bit, have an XBOX, etc. For me, Netflix has become more relevant as a matter of convenience…oh and the fact they have a pricing model that totally fits in line with my use. The thing that is great about Netflix for me now is that they “get it” with regard to how digital and old-school movie rentals can/should occur. Why? Simple, it’s everywhere for my lifestyle now. My Netflix account enables me to get DVDs the traditional way (even with Blu-Ray even though I don’t have a player, but nice to know the option is there) as well as digitally. Recently they changed their Watch Instantly capabilities to use Silverlight. But that wasn’t all. With the launch of the XBOX next generation experience, Netflix now has an application for the XBOX. So now I can get DVDs, watch on my computer(s) and watch on my home theater system. All with one account, one place, etc. The only missing piece is a supported/legal way to download to my portable media player (iPod, Zune, etc.).
The one thing that I really like about the instant watch capability is the fact that it remembers where you were. So if I am traveling and start watching a video but couldn’t finish, when I get home to my XBOX, it starts where I left off. Nice polish on that feature. I can still start over if I want, but it is great to see that added value of watching where I left off. For me, Netflix truly has figured out fast how I want to watch movies and innovates to offer the options for me.
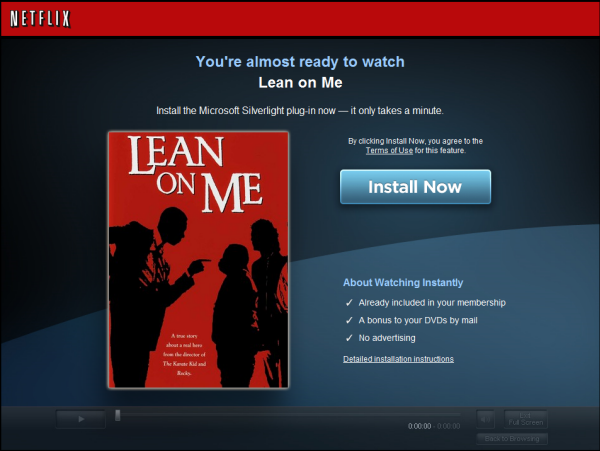
I was showing my family these features and went to a PC in my house to show them the instant watch capabilities as an example. It just so happened to be a machine that didn’t have Silverlight installed on it yet for some reason. After logging in to my Netflix account and picking the first movie to demonstrate to them, I was greeted with this images:

It was a reminder of two things for me: 1) that I didn’t have Silverlight installed and 2) what paying attention to the install experience of your web application features can do to enhance the experience and loyalty of your customers. You see in reality Netflix could have just left the default Silverlight install experience:
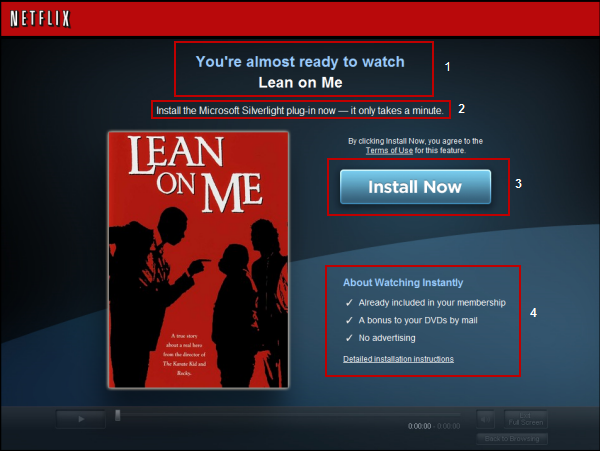
on a blank screen. For me, I would have known what that meant and still been reminder. But I’ve ranted about providing a great Silverlight deployment experience, about some easy ways of implementing it and how important it is not to assume and to optimize your rich client experiences for your users. Netflix nails it and is the best example I’ve seen yet. Period. Let’s examine the key areas here (numbering mine):
Netflix focused on the main tenants of first impressions with new technology:
Maintain Visual Cues
Netflix keeps the user engaged, not by using the default Silverlight install image, but by maintaining a consistent user experience in the design. Although the user has chosen to “watch instantly” and they are not there yet, this design helps keep a consistent brand recognition and even shows a player in the background a little bit. This tells the user that they are still starting along the same action they desired.
Focus on the Content
Content is king. Content is king. Nobody will install anything if they don’t believe the content is relevant. Look at how Netflix uses some personalization in this experience. In section 1 you can see that they’ve alerted you about the content you chose…they haven’t forgotten about your desire. They also put the DVD cover as a part of this experience to remind you of the content you wanted to watch. This is HUGE to the experience.
Reduce Barriers to Entry
Some people might be apprehensive about installing new things. In section 4 Netflix helps alleviate some concerns by showing the value of the action, and assurance that this is not something that has to do with advertising, etc. They are providing you with additional information to help you make a decision and help you feel that the process is relative only to the task you requested (watch instantly).
Set Reasonable Expectations
In section 2, the authors of this experience help give some reasonable expectations to the user with “it only takes a minute” instructions. This gives the user a reasonable expectation of time. They have a reasonable assumption now that they aren’t downloading the entire movie, or something huge that will take 20 more minutes before they can watch their selected video.
Minimize Decisions
They haven’t given you any other offers here. No option to create a new account, or sign up for other methods. You’ve asked to watch instantly and that’s what they are presenting here…the option to do that. They are making that decision clear in section 3 as well – this is the call to action…no other.
You may also notice the absence of giant Silverlight logos. To me, this is a good thing. It is important that you provide some context to your users about what they are installing if it isn’t directly from you though, whether it be from Microsoft, Adobe, wherever. Here Netflix points out “Install Microsoft Silverlight” which puts in your mind the brand of Microsoft. This way when the installer shows up it isn’t a surprise it isn’t from Netflix. Perhaps adding the Silverlight brand/logo in a subtle way wouldn’t be a bad touch here to have some visual recognition and continuity from this screen to the installer.
Summary
Creating these experiences is an important step in managing first impressions. It isn’t difficult to do either. We provide some tools and support scripts (Silverlight.js) for you to understand the different scenarios. Over time as more and more get Silverlight installed this will be less of an issue, but still shouldn’t be ignored. I’ve seen many Flash sites that use the default “Get Adobe Flash” small icon and wish they would concentrate just as much on the experience as well.
I mentioned that the Silverlight.js file can help aid in detection/installation of Silverlight. I’m curious your thoughts on it. If you have a few minutes to spare, I’d love for you to take this very quick survey of your impressions of this technique and using the Silverlight.js script. No personal information is required.
Bravo to the Netflix team…very well done. Oh, and the experience isn’t that bad either ;-) -- Seriously though the player and bandwidth/quality detection is great. Overall Netflix has won me back as a customer for sure!