So you want to read an RSS/Atom feed on the interwebs and saw the SyndicationFeed class you could use in Silverlight to give a nice RIA display of the syndicated data.  Great, no problem right, just wire up an WebClient, point it to the RSS feed on something like http://silverlight.net or something and boom, done.  Wait, what’s this 404 Not Found error?  In most cases this is going to be a result of a cross-domain issue.  If you haven’t started working with services yet, Silverlight requires a cross-domain policy file to be in place to access remote data not on the same site-of-origin of the Silverlight application.

If you want to learn more about this in further detail you can read this and view this.

Crap.  So now what do you do?  You don’t have a server that would enable you to write a proxy service and you don’t really have the time to do that.  Aha, enter some free services for you!

Popfly

First, depending on what you are trying to do with the data, give Popfly a look.  Popfly contains several templates for importing syndicated information and displaying it in different visualizations.  For instance in about 4 clicks I can import an RSS feed, connect it to a visualizer and have this:

Popfly is no longer available as a service from Microsoft.

Feedburner and Yahoo! Pipes

Pipes is similar to Popfly but doesn’t really provide a breadth of possibilities of visualizations and ease of mashup of way different types of sources, but for this purpose I think it works well.  In Pipes, you can create an input feed and map it to an output, even merging various sources together.  The end result can be a new RSS feed for you.  And Yahoo Pipes already has a cross-domain policy file in place for Flash (which Silverlight supports).  You have to change your endpoint URI a little bit and it wasn’t clear until I searched, but for example, here is a RSS feed URL you could use for combining my blog and the Silverlight community blogs in one.

Feedburner is a syndication service that does a lot of statistics of your feed, helps you manage subscriber data and can save you some bandwidth as well.   It does RSS really well (and enclosure support, etc).  Best of all, it also supports cross-domain policies via the Flash format (again, which Silverlight supports). 

So if you find a feed that is on a site without cross-domain policy support, you can create a new Feedburner feed, Yahoo Pipe or Popfly mashup and be good to go!

A subtle workaround for getting data from sites that aren’t providing the policy files :-)

Hope this helps!


This work is licensed under a Creative Commons Attribution By license.

I’ve seen this issue a few times with people using the Manage Videos portion of Silverlight Streaming to directly upload a video file to be hosted.  Now with direct endpoints to the WMV files I’m seeing it a bit more.  Let me see if I can shed some light on this situation.

First, there is a distinction between uploading an application to Silverlight Streaming versus just a video.  What I’m going to discuss here is working with video only uploads.  If you didn’t know, you can directly upload just a video and Silverlight Streaming will host that file and create a Silverlight player experience for you as well (if you want it).

Okay, now on to the issue.  It is important to note that there are specific size limitations of videos with Silverlight Streaming services.  If you are trying to go beyond those size limitations your issue could be that right away.  The video file size must be smaller than 105MB.  Moving on…

Some of you may have attempted to upload a video and then directed to the page that shows the video processing and seen a “Video cannot be processed” message. 

Your issue could be related to what I’ll explain here.  It’s a bug.  We released the Silverlight Streaming transcoding (upload video turnkey only) service when Expression Encoder 2 was not yet released.  When Encoder 2 shipped, we realized that it wasn’t playing nice (the outputs rather) with the transcoding service.  We have to fix this and are working on it.  If you are taking a video source, running it through Expression Encoder 2 and then trying to upload that resulting video, you may be hitting this issue.

One thing to note, is that the “upload video” is a transcoding service.  So if you already have a VC-1 (or Silverlight capable) media format WMV, there really is no need to use the upload video portion.  You already have a high-quality encoded format and don’t need to transcode that again.  So how do you get it up there if this issue exists?  A few ways.

Option 1 – Upload an Application with a manifest

You can package the video file up with an application and use the Manage Applications functionality to upload that content.  You can use one of the Encoder templates if you’d like as well.  Even though you may not need the extra files, that is okay, because you can still have an endpoint to your WMV if that is what you want.  Since we don’t have the Silverlght Streaming Publish plug-in for Expression Encoder 2 complete yet (it is coming), here is a workaround on how to create those packages.

Option 2 – Upload the file direct with the API

While maybe not flexible for some, you can upload the file as an application directly using the API which doesn’t require a ZIP format for this purpose.  More information on the methods and API you would need can be found here.  The API is a WebDAV-based API for managing applications.

Option 3 – Name your WMV file to ‘video.wmv’ and upload as an application

Before you do any operation rename your file to ‘video.wmv’ and then go to the Manage Applications area of Silverlight Streaming.  Create a new application and give it a name, then in the next screen upload the ‘video.wmv’ file you just renamed.  After completion you can go to the Manage Videos section of the administration site and see your video.

We understand this may be a problem for some of you and are doing our best to address it as soon as possible.  Please note this is only an issue for Expression Encoder 2 file outputs that are attempting to be uploaded via the Silverlight Streaming transcoding service (aka Manage Videos) section.

Hope this helps!

Hot off the press, a new drop of Windows Live Writer was just released.  Get it here.  This is one of my favorite tools from Microsoft and the update brings a few new changes.

First, I’m happy to report that Flickr4Writer and S3Browser still work fine and require no adjustments.  The other thing announced today from the Writer team is an updated SDK.  This new SDK includes a new type of plugin which enable plug-in activity for pre- and post-publish events.  Some of you following me on Twitter may have noticed something every so often that said “blogging: blah blah” and a link to the post.  This is done automatically for me from Writer using a plug-in.  It actually is one of the ones included in the updated SDK (along with another example for adding a Digg badget to your post).

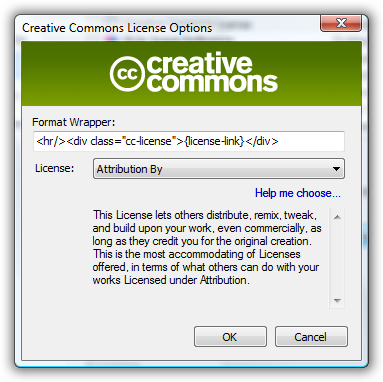
Recently there’s been some discussion of people re-aggregating/posting blog content to other sites.  Even though I had a Creative Commons license on my blog’s footer, etc, it wasn’t in my content so when someone re-posted my stuff automatically, it wasn’t visible.  Using the new Writer SDK, I created a quick little plug-in that would add a notation about the Creative Commons license I was using to every post.  Again, automatically now and I don’t have to write anything.  I’m making this one available for free/test and you can get it here.  These plug-ins are accessed in the same way through the Tools…Options menu in Writer.  Here’s the configuration for mine:

If you click the Preview tab (a new feature in Writer preview – tabs instead of menu options to switch between Edit, Preview, Source), it will show you what it will look like as well.  These types of plugins can also be enabled per weblog so if you have more than one weblog defined for Writer, you can choose which one you want these post- and pre-publish event plug-ins to be turned on for. 

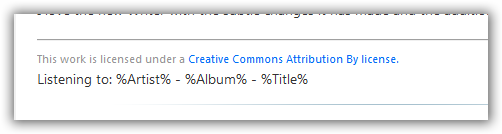
For some existing plugins out there, this is a more natural fit.  When I heard about this new model, I joined up with Alexander Groß who wrote the Now Playing plug-in which is awesome and flexible (he’s also involved in a great Graffiti template for user groups).  But it seemed a more natural fit to use this model of automatically appending the information instead of having the user remember to click the button to insert the information.  I’ve submitted my changes to Alexander and hope they make it into his next build of Now Playing.  It looks the same in config and here it is in preview mode in Writer:

I love the new Writer with the subtle changes it has made and the additional plug-in model.  Get your update today!

I'm Speaking at Mix Essentials - La Esencia de la Web - 5 de junio, 2008, México, D.F. This week I’ll be traveling to Mexico City to meet developers and designers at the local MIX Essentials (English translation here – funny that RIA gets translated to LAUGHS) event.  I’ll be presenting two sessions there this week.  I was fortunate enough to be asked to kick-off the conference talking about building RIAs with Silverlight 2.  I’m particularly excited about this as I have some things to show that haven’t really been shown broadly yet.  I will also be speaking on working with data in Silverlight 2 later in the day.  This session will cover working with services, servers, sockets and LINQ as a part of Silverlight development.

I hope that all those near Mexico City and around will be able to join us at this event.  If you are planning on being there, I look forward to meeting you and getting feedback on Silverlight as well as seeing what really interesting things are being developed in Mexico.  See you soon!

I searched and didn’t immediately find anything, so I’m partly doing this for my own mental archive but also for others who might want this feature.

First, I use two tools for snapshot capturing.  When I want a quick snapshot with no annotation, I use WinSnap, which rocks the hizzouse.  For when I need annotation (arrows, highlighting, etc.) I use SnagIt from the makers of Camtasia (Betsy Weber rocks).  Both of these tools are incredible and I’ve purchases full licenses for both and haven’t regretted it at all.

In WinSnap, there is a feature that allows you to specify a tool you can run on the image that was just captured.  I’ve customized this using PNGOut based on recommendations and feedback.  Most programs create PNG files that can still be compressed by stripping out interlacing or whatever.  You can read all about image formats from Coding Horror here.  Jeff’s tips on bandwidth savings for web sites are invaluable.  It is helpful and works well in WinSnap.  One thing I can’t figure out is that WinSnap never saves my custom commands…that is quite frustrating, but I get over it…I don’t reboot often so I deal with it.

When using SnagIt though I didn’t use PNGOut.  Partly because I didn’t think it had that capability…alas but it does!  here’s how I customized it.  First, get PNGOut and put it somewhere.  For consistency with other programs I put mine in C:\Program Files\PNGOut\pngout.exe.  Yes I know there are GUIs for the tool, but I like the command-line as it integrates with this workflow.  Okay, now in SnagIt set up a new capture profile using the Add Profile wizard (I couldn’t figure out how to use SnagIt to take a capture of the SnagIt box :-) or I’d show it here).

Decide your settings for steps 1 and 2.  When you get to 3, do this:

    • Click the Properties button
    • Click the Program tab
    • Click Add and then point to where you have PNGOut.exe and save that setting
    • Under the File name area, I don’t like automatic naming so I change that to ask me for a file name
    • Click OK
    • Make sure that in the Step 3 wizard that Program is now selected (and if not select it)
    • Choose your other settings and then finish the wizard

Boom, now when you capture a screenshot with this newly created profile you can annotate or do whatever you want with the capture in SnagIt and then when you click finish (after giving the file a name), PNGOut will automatically run:

This will save the image immediately, run PNGOut on it and keep it in the same place…saving you time, size and bandwidth (assuming you are uploading the image to a browser).  This works nicely with my workflow.  I think I’m going to hack together another output program that enables an immediate upload to Amazon S3 so that I can capture, annotate, compress and upload in one click (well, 2).

Anyhow, hope this helps!