Well today was the public release of Visual Studio 2010 Beta 1.  It is the first time developers will have the chance to take it for a spin and kick the tires.  I wanted to share some information specific for Silverlight developers with regard to Visual Studio 2010 Beta 1.

Visual Studio 2010 is the first IDE that will support two key features for Silverlight developers: multi-targeted Silverlight development and editable design surface for Silverlight.  The second point also comes with things you might expect (like data binding wizards and dialogs as well – I’m lumping all of that in to ‘editable design surface’).  To get started there are a few things you should know.

First, if you are installing from a “clean” environment (perhaps a virtual machine, etc.) and want the multi-target support, here’s what you’ll do:

  1. Install Visual Studio 2010 Beta 1
  2. Install Silverlight 2 SDK (if you attempt to run the Silverlight 2 tools installer it will fail with an error message…just install the SDK).
  3. Install Silverlight 3 Beta SDK (again, don’t attempt the tools installer as it will fail)
  4. Install Silverlight 3 Beta Developer Runtime

Once you have done this, you now have a Silverlight 2 and 3 development machine for Visual Studio 2010 Beta 1.  Congratulations!

Hey, where’s my multi-targeting?!

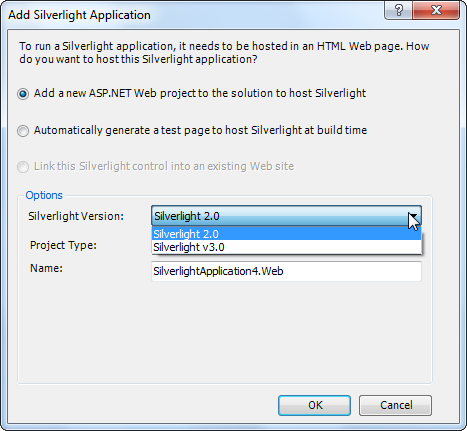
Be patient.  When you create a new project you’ll see just the standard Silverlight application templates.  Select that first and then you will see the multi-target option in the next dialog:

Visual Studio 2010 Silverlight multi-targeting

Once you select this option you will be starting development using that runtime version.  So remember, it is after you select a Silverlight project type.  If you want to change the target version runtime after you’ve created a project, just right-click on the Silverlight project, choose the properties and you’ll see Target Silverlight Version and can change it there.

What about the editable design surface?

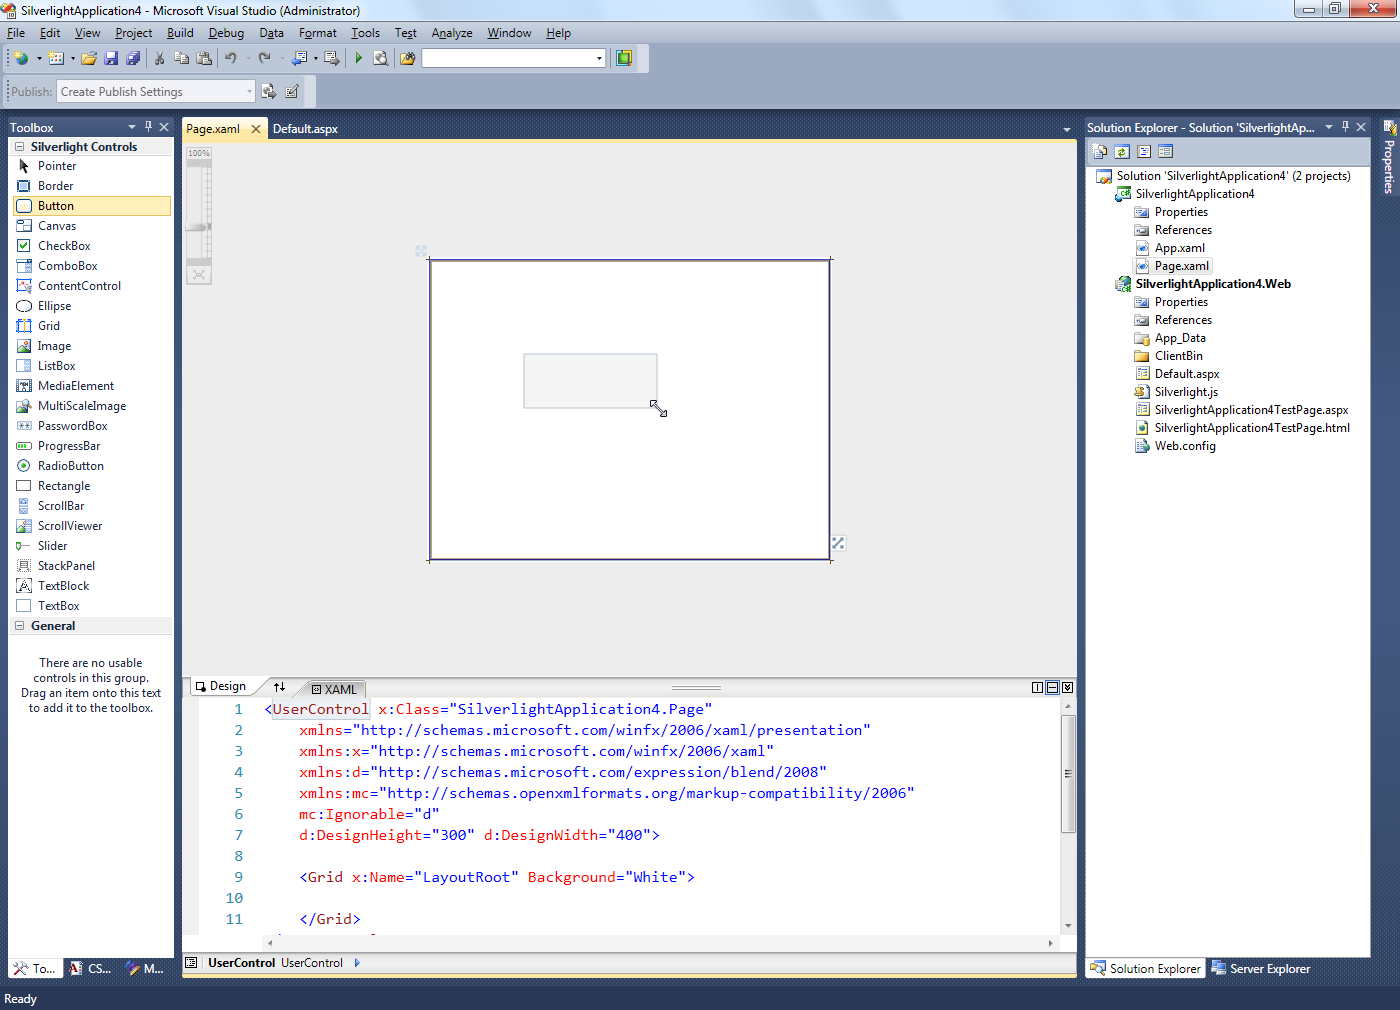
Once you have a Silverlight project ready, you can use the design surface for editing and dragging/dropping UI elements, arranging layout, etc.:

You can also now select items on the design surface and manipulate binding or other properties in the ‘normal’ Visual Studio way (property panes, dialogs).

Hey, what happened to my Silverlight Templates…and what about .NET RIA Services?!

For right now in Visual Studio 2010 Beta 1, the Silverlight Navigation Application template is not available as a part of the SDK installer (it’s actually a part of the tools installer…which you can’t run for VS2010 Beta 1).  If you want that template, just export one from Visual Studio 2008 and import it into this environment.  It will then show up under the My Templates section.

.NET RIA Services also will not install for VS2010 Beta 1 right now.  So if you want to play around with those bits, stick to VS2008 SP1.

Both of these are known and will be resolved in the future.  Hopefully you understand that the products are in varying beta stages (VS2010, Silverlight 3 and RIA Services) and are not in sync right now.  Kind of a pain, but it’s the sting of early adoption I suppose.

My Recommendation

So what should you do?  Well I do think you should try Visual Studio 2010 and play around with it.  If you need RIA Services development, then stick with Visual Studio 2008.  If you have the ability to run a second machine or a virtual machine, I recommend putting Visual Studio 2010 in that environment.  For Silverlight 3 we will be targeting VS2008 SP1 for release.  Obviously the team is working on supporting VS2010, but for beta 1, we just couldn’t get it in time.  So I’d personally recommend sticking with VS2008 as your primary dev environment for all Silverlight 3 goodness…and run VS2010 in a separate space to play around with. 

Hope this helps!

I’ve not hidden my love affair for Netflix both as a consumer and as a Silverlight developer and how they’ve implemented the technology.  Long before the instant watch came to the desktop and the XBOX, there were a lot of folks wanting the Netflix experience on their Windows Media Center boxes and extenders.  One such person was Anthony Park (who is now with Netflix as of this writing), who picked up a the MyNetflix media center plugin a while back.

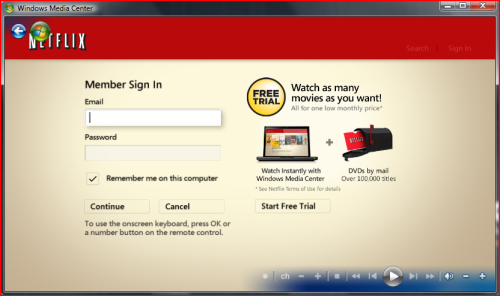
Well, today Netflix officially has a Media Center solution for their customers.  I just got done firing my media center machine up and started the process of getting Netflix on the box.  It showed up under the Program Library and I followed the minimal instructions to get it working…restarted Media Center (not the machine) and boom, done.  I love how the branded experience of their application matches their online app as well as their overall brand identity very well:

Netflix Media Center Login

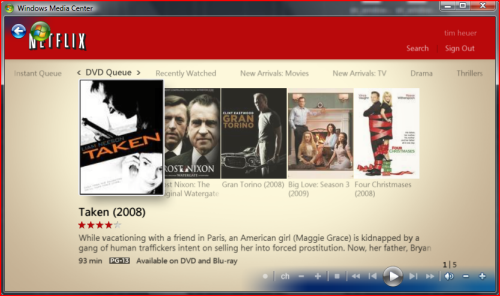
After logging in, I’m able to view my Instant Queue, DVD Queue, genre’s and new releases. 

Netflix Media Center DVD Queue

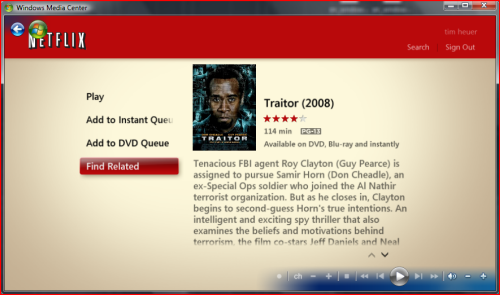
Once I find a movie from one of the categories not in my queues, I can even add it at that point!  Nice!

Netflix Media Center Add to Queue

Once you choose to watch a movie through the experience, you’ll notice something familiar – yep, that’s Silverlight powering the playback of the Netflix Instant Watch feature in Media Center.  Nice.  This is a great continuum story for the platform and for Netflix to be able to re-use their platform and their custom implementations in various areas: online (browser), XBOX, and Media Center.  Very cool to see this.  I still think the coolest feature of Instant Watch is how all the experiences are synchronized…I can pause anywhere and pick up another medium (XBOX) and start where I left off – awesome.

NOTE: It looks like at this time it is Media Center for Vista only and Windows 7 RC machines are not enabled.  Additionally, I am guessing that the same licensing rules apply for the media content, so probably only US customers. 

Kudos to the Netflix team for enabling this feature and extending their reach to where (and how) people want to view their media.  If you want to figure out how to enable it on your media center machine, you can watch this video (just try to disregard the creepy mitten-wearing hands…odd): Get Netflix on your Media Center.

For things that aren’t a part of the Visual Studio tools (yet) and things that help me move faster in my development, I like to take advantage of the power of Visual Studio’s templates and snippets capabilities.  I’ve created a few and modified a few of others that I use regularly.  I’ve shown them in a few presentations and thought I’d package them up in a single bundle for your convenience if you choose to use them.  I was going to package Robby’s snippets up as well, but didn’t think he’d appreciate that…you should get his Silverlight snippets as well (and he’s packaged them in a VS community installer also).

Here’s the ones that I have in my package right now:

  • FloatableWindow item template – this is from my adaptation of ChildWindow.  You’ll of course need the binary for this to make any sense as well.
  • Silverlight Pixel Shader item template – adapted from the WPF template, with making the minor adjustments needed by default to make it work in one shot.
  • ResourceDictionary item template – using Nick Kramer’s base for adding stand alone ResourceDictionary files to your project (to take advantage of the merged resource feature in Silverlight 3).
  • Cross-domain policy file item template – rapidly add one just like you would web.config.  You still have to set the desired security – I chose not to imply one for you :-)
  • Cross-domain policy code snippet – this actually goes along with the policy file (or replacement) which is a VS code snippet template if you want to just use that instead

I’m sure I’ll add more over time and package it in this update but for now this is what I could pull together.  Sorry the package isn’t signed as a verified publisher…if I could figure out how to do that I would have tried :-).  You can download them here: SilverlightVSHelpers_1.vsi.  Oh and yes, they are for Visual Basic and C#.

Hope this helps!


This work is licensed under a Creative Commons Attribution By license.

We’ve update the .NET RIA Services build for May 2009.  The updated May preview can be downloaded here: .NET RIA Services May 2009.  You may have to uninstall your previous version before installing this one. 

What is .NET RIA Services?
Microsoft .NET RIA Services simplifies the traditional n-tier application pattern by bringing together the ASP.NET and Silverlight platforms. The RIA Services provides a pattern to write application logic that runs on the mid-tier and controls access to data for queries, changes and custom operations. It also provides end-to-end support for common tasks such as data validation, authentication and roles by integrating with Silverlight components on the client and ASP.NET on the mid-tier.

This update incorporates a bunch of fixes that have been reported in the RIA Services forum.  This is a good place to report issues and communicate with the dev team.  Most fixes came from the forum.  In addition, DomainService base classes now infer some data access metadata based on the model (length, required for example).  There are a few other samples that were added to this as well to note:

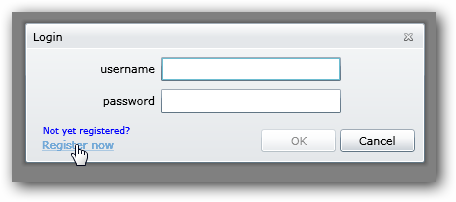
Also upon installing you’ll see a new project type called the Business Application Template.  Right now it looks and feels exactly like the navigation template with the Silverlight tools, but has a few defaults added, namely authentication.  You’ll see in the ASP.NET project there with a Services folder and three new files: AuthenticationService, UserInformation, UserRegistrationService.  These are all services to expose authentication and membership integration.  Running the template by default will give you a new “login” link in the upper right and clicking on that implements a new ChildWindow for login:

Biz App Login Template

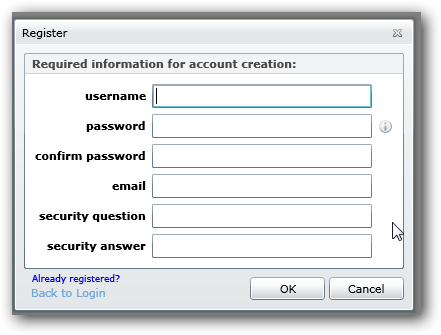
Notice the "Register now” link which then uses another ChildWindow control for registration:

Biz App Register Template

Registering a new user uses the UserRegistrationService to add a new user to the system.  If you look at the UserRegistrationService you’ll see that it uses the ASP.NET Membership APIs:

   1: namespace BusinessApplication2.Web
<pre style="border-bottom-style: none; text-align: left; padding-bottom: 0px; line-height: 12pt; border-right-style: none; background-color: #f4f4f4; margin: 0em; padding-left: 0px; width: 100%; padding-right: 0px; font-family: 'Courier New', courier, monospace; direction: ltr; border-top-style: none; color: black; font-size: 8pt; border-left-style: none; overflow: visible; padding-top: 0px"><span style="color: #606060" id="lnum2">   2:</span> {</pre>
<pre style="border-bottom-style: none; text-align: left; padding-bottom: 0px; line-height: 12pt; border-right-style: none; background-color: #f4f4f4; margin: 0em; padding-left: 0px; width: 100%; padding-right: 0px; font-family: 'Courier New', courier, monospace; direction: ltr; border-top-style: none; color: black; font-size: 8pt; border-left-style: none; overflow: visible; padding-top: 0px"><span style="color: #606060" id="lnum3">   3:</span>     [EnableClientAccess]</pre>
<pre style="border-bottom-style: none; text-align: left; padding-bottom: 0px; line-height: 12pt; border-right-style: none; background-color: #f4f4f4; margin: 0em; padding-left: 0px; width: 100%; padding-right: 0px; font-family: 'Courier New', courier, monospace; direction: ltr; border-top-style: none; color: black; font-size: 8pt; border-left-style: none; overflow: visible; padding-top: 0px"><span style="color: #606060" id="lnum4">   4:</span>     <span style="color: #0000ff">public</span> <span style="color: #0000ff">class</span> UserRegistrationService : DomainService</pre>
<pre style="border-bottom-style: none; text-align: left; padding-bottom: 0px; line-height: 12pt; border-right-style: none; background-color: #f4f4f4; margin: 0em; padding-left: 0px; width: 100%; padding-right: 0px; font-family: 'Courier New', courier, monospace; direction: ltr; border-top-style: none; color: black; font-size: 8pt; border-left-style: none; overflow: visible; padding-top: 0px"><span style="color: #606060" id="lnum5">   5:</span>     {</pre>
<pre style="border-bottom-style: none; text-align: left; padding-bottom: 0px; line-height: 12pt; border-right-style: none; background-color: #f4f4f4; margin: 0em; padding-left: 0px; width: 100%; padding-right: 0px; font-family: 'Courier New', courier, monospace; direction: ltr; border-top-style: none; color: black; font-size: 8pt; border-left-style: none; overflow: visible; padding-top: 0px"><span style="color: #606060" id="lnum6">   6:</span>         <span style="color: #008000">// NOTE: This is a sample code to get your application started. In the production code you would </span></pre>
<pre style="border-bottom-style: none; text-align: left; padding-bottom: 0px; line-height: 12pt; border-right-style: none; background-color: #f4f4f4; margin: 0em; padding-left: 0px; width: 100%; padding-right: 0px; font-family: 'Courier New', courier, monospace; direction: ltr; border-top-style: none; color: black; font-size: 8pt; border-left-style: none; overflow: visible; padding-top: 0px"><span style="color: #606060" id="lnum7">   7:</span>         <span style="color: #008000">// want to provide a mitigation against a denial of service attack by providing CAPTCHA </span></pre>
<pre style="border-bottom-style: none; text-align: left; padding-bottom: 0px; line-height: 12pt; border-right-style: none; background-color: #f4f4f4; margin: 0em; padding-left: 0px; width: 100%; padding-right: 0px; font-family: 'Courier New', courier, monospace; direction: ltr; border-top-style: none; color: black; font-size: 8pt; border-left-style: none; overflow: visible; padding-top: 0px"><span style="color: #606060" id="lnum8">   8:</span>         <span style="color: #008000">// control functionality or verifying user's email address.</span></pre>
<pre style="border-bottom-style: none; text-align: left; padding-bottom: 0px; line-height: 12pt; border-right-style: none; background-color: #f4f4f4; margin: 0em; padding-left: 0px; width: 100%; padding-right: 0px; font-family: 'Courier New', courier, monospace; direction: ltr; border-top-style: none; color: black; font-size: 8pt; border-left-style: none; overflow: visible; padding-top: 0px"><span style="color: #606060" id="lnum9">   9:</span>  </pre>
<pre style="border-bottom-style: none; text-align: left; padding-bottom: 0px; line-height: 12pt; border-right-style: none; background-color: #f4f4f4; margin: 0em; padding-left: 0px; width: 100%; padding-right: 0px; font-family: 'Courier New', courier, monospace; direction: ltr; border-top-style: none; color: black; font-size: 8pt; border-left-style: none; overflow: visible; padding-top: 0px"><span style="color: #606060" id="lnum10">  10:</span>         <span style="color: #0000ff">public</span> <span style="color: #0000ff">void</span> AddUser(UserInformation user)</pre>
<pre style="border-bottom-style: none; text-align: left; padding-bottom: 0px; line-height: 12pt; border-right-style: none; background-color: #f4f4f4; margin: 0em; padding-left: 0px; width: 100%; padding-right: 0px; font-family: 'Courier New', courier, monospace; direction: ltr; border-top-style: none; color: black; font-size: 8pt; border-left-style: none; overflow: visible; padding-top: 0px"><span style="color: #606060" id="lnum11">  11:</span>         {</pre>
<pre style="border-bottom-style: none; text-align: left; padding-bottom: 0px; line-height: 12pt; border-right-style: none; background-color: #f4f4f4; margin: 0em; padding-left: 0px; width: 100%; padding-right: 0px; font-family: 'Courier New', courier, monospace; direction: ltr; border-top-style: none; color: black; font-size: 8pt; border-left-style: none; overflow: visible; padding-top: 0px"><span style="color: #606060" id="lnum12">  12:</span>             MembershipCreateStatus createStatus;</pre>
<pre style="border-bottom-style: none; text-align: left; padding-bottom: 0px; line-height: 12pt; border-right-style: none; background-color: #f4f4f4; margin: 0em; padding-left: 0px; width: 100%; padding-right: 0px; font-family: 'Courier New', courier, monospace; direction: ltr; border-top-style: none; color: black; font-size: 8pt; border-left-style: none; overflow: visible; padding-top: 0px"><span style="color: #606060" id="lnum13">  13:</span>  </pre>
<pre style="border-bottom-style: none; text-align: left; padding-bottom: 0px; line-height: 12pt; border-right-style: none; background-color: #f4f4f4; margin: 0em; padding-left: 0px; width: 100%; padding-right: 0px; font-family: 'Courier New', courier, monospace; direction: ltr; border-top-style: none; color: black; font-size: 8pt; border-left-style: none; overflow: visible; padding-top: 0px"><span style="color: #606060" id="lnum14">  14:</span>             <span style="color: #008000">// NOTE: ASP.NET by default uses SQL Server Express to create the user database. </span></pre>
<pre style="border-bottom-style: none; text-align: left; padding-bottom: 0px; line-height: 12pt; border-right-style: none; background-color: #f4f4f4; margin: 0em; padding-left: 0px; width: 100%; padding-right: 0px; font-family: 'Courier New', courier, monospace; direction: ltr; border-top-style: none; color: black; font-size: 8pt; border-left-style: none; overflow: visible; padding-top: 0px"><span style="color: #606060" id="lnum15">  15:</span>             <span style="color: #008000">// CreateUser will fail if you do not have SQL Server Express installed.</span></pre>
<pre style="border-bottom-style: none; text-align: left; padding-bottom: 0px; line-height: 12pt; border-right-style: none; background-color: #f4f4f4; margin: 0em; padding-left: 0px; width: 100%; padding-right: 0px; font-family: 'Courier New', courier, monospace; direction: ltr; border-top-style: none; color: black; font-size: 8pt; border-left-style: none; overflow: visible; padding-top: 0px"><span style="color: #606060" id="lnum16">  16:</span>  </pre>
<pre style="border-bottom-style: none; text-align: left; padding-bottom: 0px; line-height: 12pt; border-right-style: none; background-color: #f4f4f4; margin: 0em; padding-left: 0px; width: 100%; padding-right: 0px; font-family: 'Courier New', courier, monospace; direction: ltr; border-top-style: none; color: black; font-size: 8pt; border-left-style: none; overflow: visible; padding-top: 0px"><span style="color: #606060" id="lnum17">  17:</span>             Membership.CreateUser(user.UserName, user.Password, user.Email, user.Question, user.Answer, <span style="color: #0000ff">true</span>, <span style="color: #0000ff">null</span>, <span style="color: #0000ff">out</span> createStatus);</pre>
<pre style="border-bottom-style: none; text-align: left; padding-bottom: 0px; line-height: 12pt; border-right-style: none; background-color: #f4f4f4; margin: 0em; padding-left: 0px; width: 100%; padding-right: 0px; font-family: 'Courier New', courier, monospace; direction: ltr; border-top-style: none; color: black; font-size: 8pt; border-left-style: none; overflow: visible; padding-top: 0px"><span style="color: #606060" id="lnum18">  18:</span>             <span style="color: #0000ff">if</span> (createStatus != MembershipCreateStatus.Success)</pre>
<pre style="border-bottom-style: none; text-align: left; padding-bottom: 0px; line-height: 12pt; border-right-style: none; background-color: #f4f4f4; margin: 0em; padding-left: 0px; width: 100%; padding-right: 0px; font-family: 'Courier New', courier, monospace; direction: ltr; border-top-style: none; color: black; font-size: 8pt; border-left-style: none; overflow: visible; padding-top: 0px"><span style="color: #606060" id="lnum19">  19:</span>             {</pre>
<pre style="border-bottom-style: none; text-align: left; padding-bottom: 0px; line-height: 12pt; border-right-style: none; background-color: #f4f4f4; margin: 0em; padding-left: 0px; width: 100%; padding-right: 0px; font-family: 'Courier New', courier, monospace; direction: ltr; border-top-style: none; color: black; font-size: 8pt; border-left-style: none; overflow: visible; padding-top: 0px"><span style="color: #606060" id="lnum20">  20:</span>                 <span style="color: #0000ff">throw</span> <span style="color: #0000ff">new</span> DomainServiceException(ErrorCodeToString(createStatus));</pre>
<pre style="border-bottom-style: none; text-align: left; padding-bottom: 0px; line-height: 12pt; border-right-style: none; background-color: #f4f4f4; margin: 0em; padding-left: 0px; width: 100%; padding-right: 0px; font-family: 'Courier New', courier, monospace; direction: ltr; border-top-style: none; color: black; font-size: 8pt; border-left-style: none; overflow: visible; padding-top: 0px"><span style="color: #606060" id="lnum21">  21:</span>             }</pre>
<pre style="border-bottom-style: none; text-align: left; padding-bottom: 0px; line-height: 12pt; border-right-style: none; background-color: #f4f4f4; margin: 0em; padding-left: 0px; width: 100%; padding-right: 0px; font-family: 'Courier New', courier, monospace; direction: ltr; border-top-style: none; color: black; font-size: 8pt; border-left-style: none; overflow: visible; padding-top: 0px"><span style="color: #606060" id="lnum22">  22:</span>         }</pre>
<pre style="border-bottom-style: none; text-align: left; padding-bottom: 0px; line-height: 12pt; border-right-style: none; background-color: #f4f4f4; margin: 0em; padding-left: 0px; width: 100%; padding-right: 0px; font-family: 'Courier New', courier, monospace; direction: ltr; border-top-style: none; color: black; font-size: 8pt; border-left-style: none; overflow: visible; padding-top: 0px"><span style="color: #606060" id="lnum23">  23:</span>         </pre>
<pre style="border-bottom-style: none; text-align: left; padding-bottom: 0px; line-height: 12pt; border-right-style: none; background-color: #f4f4f4; margin: 0em; padding-left: 0px; width: 100%; padding-right: 0px; font-family: 'Courier New', courier, monospace; direction: ltr; border-top-style: none; color: black; font-size: 8pt; border-left-style: none; overflow: visible; padding-top: 0px"><span style="color: #606060" id="lnum24">  24:</span>         <span style="color: #008000">// other methods exist here</span></pre>
<pre style="border-bottom-style: none; text-align: left; padding-bottom: 0px; line-height: 12pt; border-right-style: none; background-color: #f4f4f4; margin: 0em; padding-left: 0px; width: 100%; padding-right: 0px; font-family: 'Courier New', courier, monospace; direction: ltr; border-top-style: none; color: black; font-size: 8pt; border-left-style: none; overflow: visible; padding-top: 0px"><span style="color: #606060" id="lnum25">  25:</span>         <span style="color: #008000">// ...</span></pre>
<pre style="border-bottom-style: none; text-align: left; padding-bottom: 0px; line-height: 12pt; border-right-style: none; background-color: #f4f4f4; margin: 0em; padding-left: 0px; width: 100%; padding-right: 0px; font-family: 'Courier New', courier, monospace; direction: ltr; border-top-style: none; color: black; font-size: 8pt; border-left-style: none; overflow: visible; padding-top: 0px"><span style="color: #606060" id="lnum26">  26:</span>     }</pre>
<pre style="border-bottom-style: none; text-align: left; padding-bottom: 0px; line-height: 12pt; border-right-style: none; background-color: #f4f4f4; margin: 0em; padding-left: 0px; width: 100%; padding-right: 0px; font-family: 'Courier New', courier, monospace; direction: ltr; border-top-style: none; color: black; font-size: 8pt; border-left-style: none; overflow: visible; padding-top: 0px"><span style="color: #606060" id="lnum27">  27:</span> }</pre>
Because the membership APIs are provider-based, you can leverage whatever you want for your membership model and still use those APIs.  The example uses the default mechanism in ASP.NET.

Download the updated RIA Services bits today and take a look at the new template for integrating with the various ASP.NET providers.  Thanks for the continued feedback and keep it coming!

Back in December, I wrote about my attempt at diversifying my hobbies.  In October 2008 I started taking guitar lessons because I had a Fender ‘laying around’ that was getting unused.  Since then I’ve really enjoyed it and picked up an acoustic (which I actually enjoy playing more).  I’ve also picked up some computer equipment (M-Audio Black Box) so that I can mess around with software like GarageBand and actually record some of my practices.

I’ve moved quite a long way from my happy birthday recording in that blog post :-) but I’ve still got a long way to go.  Traveling certainly puts a dent in practicing for something like a musical instrument – especially when you don’t travel with it.  I’ve pretty much been gone from mid-April until mid-May which means I haven’t practiced much at all.  I’ve thought about getting something like the Martin Backpacker guitar, but just haven’t picked one up yet.

I have found some great online resources that have made learning the guitar a lot more fun for me as a geek.  Turns out there is a bunch of great info out there for self learning.  Of course, I don’t think anything can fully match 1-on-1 instruction from someone in person, but for in-between lessons, here’s some things I’ve found fun and useful.

  • iLife 09 music lessons – I had big hope for these and it is turning out that they just aren’t that exciting once compared to other free (and more frequently updated) offerings are out there.  I still have the basics (the celebrity lessons are lame in my opinion) which do a decent job covering things like the 12-bar blues, etc.  The production quality, as expected from Apple, is of the highest quality…just wish the content was updated and more appealing.
  • JustinGuitar.com – A UK guy who uses YouTube to deliver free lessons on basics as well as some fun/modern guitar riffs.  He’s got a great personality and goes at a pace a beginner like myself can understand.
  • Ultimate-Guitar.com – one of my favorites.  Once you learn how to read guitar TAB notation, this site is fun to check out.  It is user-contributed content, so reader beware, but most of what I’ve found is pretty good.  When I hear a song I might want to check out, I search this site and learn.  I learned how to play a Bob Marley tune completely in a few hours by just what I found here.
  • James from Handsome Alvin – James uses YouTube puts up some great  videos walking through popular songs with strumming patterns and at a pace perfect for me as a beginner.  I’m frequently more of his videos a lot because I like how he puts up the strumming patterns and chord progressions.
  • Marty Schwartz from GuitarJamz.com – A new resource I just found that, like others, uses YouTube to deliver.  Marty has a great personality about him and slows things down for beginners.  And he takes requests via Twitter.

My private instructor is great as well and like I said, nothing can replace that.  Having these things in-between lessons at my own pace moves me beyond lesson exercises to learning things that catch my ear and have fun doing it.  I’m still having a blast, even though it is immensely challenging for me technically – as well as finding the time to practice!

Happy hobbying!