Quick Steps to displaying data using PivotViewer and Silverlight
Last week or so the PivotViewer control was released, which is from the Microsoft LiveLabs team. It’s a Silverlight control that enables you to visualize data information in a DeepZoom type experience. Be sure to check out the PivotViewer learning section for some initial information if you haven’t seen any demonstrations.
I received an email a few days back hoping for a more quick “how to” on using this control. After all, it is a control for Silverlight and requires some implementation. Honestly, I hadn’t even used it myself until I got that note. I thought I’d jot down my notes in creating and consuming the simplest form of data and display using PivotViewer. I say “simple” because you can get much more complex, but I wanted to simply show the quick steps.
Understand first that Pivot collections are a combinations of imagery and metadata that describe that imagery. If you’ve ever seen the Hard Rock Memorabilia site that was done in early Silverlight days, this is the similar concept.
Step 1 – Get PivotViewer
The first thing you need to do is get the bits. I’m going to assume you already have Visual Studio 2010 and Silverlight 4 Tools installed. You can get the PivotViewer SDK at the PivotViewer learning section of the Silverlight community site. Once you run the installer, the SDK will be installed to %ProgramFiles%\Microsoft SDKs\Silverlight\v4.0\PivotViewer\<RELEASE>. There is a sample folder with source for an implementation as well if you want to look at it, but it has custom actions and things that you may not need. My steps below are the “PivotViewer 101” steps to get a simple collection. The sample provides more sample code to do other things with PivotViewer.
Step 2 – Get Pivot collection building tools
In order to use the control, you must have a Pivot collection source. This is a specific data format in XML that the PivotViewer (and Pivot full client) use to understand the data. The XML schema is documented here: PivotViewer Collection XML Schema. As you can see it is fairly simple. You could certainly build this by hand, but why would you when there are a few tools to help you!
There are 3 primary methods to create collection sources the way I see it: command-line, code library, and Excel. The first two are most likely what any dynamic collection source will want to use. These would be code-based approaches to looking at various types of data sources, appending metadata, and creating dynamically created collection sources or JIT-created ones as well.
The latter, using Excel, is the simplest. The LiveLabs team created an Excel add-in to create the collection data using a familiar interface without having to really wrestle with the collection schema. Once installed you have a new tab in Excel:
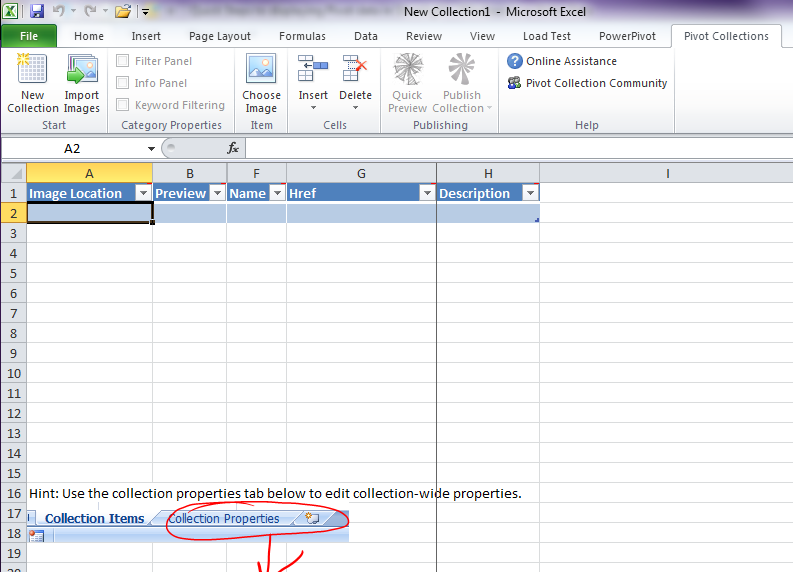
When you click the New Collection button on this tab, you’ll get a simple spreadsheet to start building your collection source.
Step 3 – Begin to build your collection data
For my sample, I’m going to use Bing’s wallpaper images from their last “Bing’s Best” Windows 7 themes. Having my Excel sheet opened and already clicking on the New Collection function, I can now use the Import Images function to do this in bulk. Now I don’t have to do this. In fact, I can do one-by-one using the Choose Image function and select individual items.
I then wanted to provide a category column to enable my user to filter based on categories. I used the Insert Column feature and gave it the title of Category. These columns translate to Facets and if you see the schema definition diagram you will see that those visually translate to filters in the control.
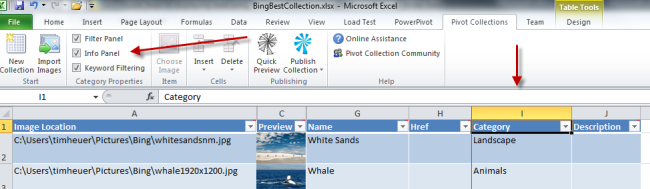
Add your data until you are satisfied that you have all your data and metadata represented in this spreadsheet. I only added one column but you could add more. I am now complete and can choose to Publish my collection.
The result of the Publish function is that it will produce a file (CXML) and a folder of your DeepZoom-sliced images. Remember this location of your data.
Step 4 – Build a Silverlight application implementing PivotViewer
Assuming you have the SDK installed, start a new Silverlight project in Visual Studio. After that here were my simple steps:
Add reference to System.Windows.Pivot – add a reference to this assembly as this is where the PivotViewer control resides.
In my MainPage.xaml I then add an XMLNS declaration for the namespace and implement the control:
1: <UserControl x:Class="SilverlightApplication164.MainPage"
<pre class="alteven"><span id="lnum2" class="lnum"> 2:</span> <span class="attr">xmlns</span><span class="kwrd">="http://schemas.microsoft.com/winfx/2006/xaml/presentation"</span></pre><pre class="alteven"><span id="lnum3" class="lnum"> 3:</span> <span class="attr">xmlns:x</span><span class="kwrd">="http://schemas.microsoft.com/winfx/2006/xaml"</span></pre><pre class="alteven"><span id="lnum4" class="lnum"> 4:</span> <span class="attr">xmlns:d</span><span class="kwrd">="http://schemas.microsoft.com/expression/blend/2008"</span></pre><pre class="alteven"><span id="lnum5" class="lnum"> 5:</span> <span class="attr">xmlns:mc</span><span class="kwrd">="http://schemas.openxmlformats.org/markup-compatibility/2006"</span></pre><pre class="alteven"><span id="lnum6" class="lnum"> 6:</span> <span class="attr">xmlns:pivot</span><span class="kwrd">="clr-namespace:System.Windows.Pivot;assembly=System.Windows.Pivot"</span></pre><pre class="alteven"><span id="lnum7" class="lnum"> 7:</span> <span class="attr">mc:Ignorable</span><span class="kwrd">="d"</span></pre><pre class="alteven"><span id="lnum8" class="lnum"> 8:</span> <span class="attr">d:DesignHeight</span><span class="kwrd">="300"</span> <span class="attr">d:DesignWidth</span><span class="kwrd">="400"</span><span class="kwrd">></span></pre><pre class="alteven"><span id="lnum9" class="lnum"> 9:</span> </pre><pre class="alteven"><span id="lnum10" class="lnum"> 10:</span> <span class="kwrd"><</span><span class="html">Grid</span> <span class="attr">x:Name</span><span class="kwrd">="LayoutRoot"</span> <span class="attr">Background</span><span class="kwrd">="White"</span><span class="kwrd">></span></pre><pre class="alteven"><span id="lnum11" class="lnum"> 11:</span> <span class="kwrd"><</span><span class="html">pivot:PivotViewer</span> <span class="attr">x:Name</span><span class="kwrd">="MainPivotViewer"</span> <span class="kwrd">/></span></pre><pre class="alteven"><span id="lnum12" class="lnum"> 12:</span> <span class="kwrd"></</span><span class="html">Grid</span><span class="kwrd">></span></pre><pre class="alteven"><span id="lnum13" class="lnum"> 13:</span> <span class="kwrd"></</span><span class="html">UserControl</span><span class="kwrd">></span></pre>That’s it for my simple scenario on the UI front. I’m taking the approach that my app *is* the entire PivotViewer experience.
The next thing I wanted to do was make my simple viewer dynamic. I wanted this same XAP to be used for any collection. In my MainPage.xaml.cs code in the Loaded event I use the PivotViewer API and call the LoadCollection function:
1: public MainPage()
<pre class="alteven"><span id="lnum2" class="lnum"> 2:</span> {</pre><pre class="alteven"><span id="lnum3" class="lnum"> 3:</span> InitializeComponent();</pre><pre class="alteven"><span id="lnum4" class="lnum"> 4:</span> Loaded += <span class="kwrd">new</span> RoutedEventHandler(MainPage_Loaded);</pre><pre class="alteven"><span id="lnum5" class="lnum"> 5:</span> }</pre><pre class="alteven"><span id="lnum6" class="lnum"> 6:</span> </pre><pre class="alteven"><span id="lnum7" class="lnum"> 7:</span> <span class="kwrd">void</span> MainPage_Loaded(<span class="kwrd">object</span> sender, RoutedEventArgs e)</pre><pre class="alteven"><span id="lnum8" class="lnum"> 8:</span> {</pre><pre class="alteven"><span id="lnum9" class="lnum"> 9:</span> <span class="kwrd">string</span> collection = App.Current.Host.InitParams[<span class="str">"collection"</span>].ToString();</pre><pre class="alteven"><span id="lnum10" class="lnum"> 10:</span> </pre><pre class="alteven"><span id="lnum11" class="lnum"> 11:</span> MainPivotViewer.LoadCollection(collection, <span class="kwrd">string</span>.Empty);</pre><pre class="alteven"><span id="lnum12" class="lnum"> 12:</span> }</pre>You’ll notice that I’m getting a value from Silverlight’s InitParams model. This enables me to send in the URL of the collection dynamically in my HTML hosting page:
1: <object data="data:application/x-silverlight-2," type="application/x-silverlight-2" width="100%" height="100%">
<pre class="alteven"><span id="lnum2" class="lnum"> 2:</span> <span class="kwrd"><</span><span class="html">param</span> <span class="attr">name</span><span class="kwrd">="source"</span> <span class="attr">value</span><span class="kwrd">="ClientBin/SilverlightApplication164.xap"</span><span class="kwrd">/></span></pre><pre class="alteven"><span id="lnum3" class="lnum"> 3:</span> <span class="kwrd"><</span><span class="html">param</span> <span class="attr">name</span><span class="kwrd">="onError"</span> <span class="attr">value</span><span class="kwrd">="onSilverlightError"</span> <span class="kwrd">/></span></pre><pre class="alteven"><span id="lnum4" class="lnum"> 4:</span> <span class="kwrd"><</span><span class="html">param</span> <span class="attr">name</span><span class="kwrd">="background"</span> <span class="attr">value</span><span class="kwrd">="white"</span> <span class="kwrd">/></span></pre><pre class="alteven"><span id="lnum5" class="lnum"> 5:</span> <span class="kwrd"><</span><span class="html">param</span> <span class="attr">name</span><span class="kwrd">="minRuntimeVersion"</span> <span class="attr">value</span><span class="kwrd">="4.0.50424.0"</span> <span class="kwrd">/></span></pre><pre class="alteven"><span id="lnum6" class="lnum"> 6:</span> <span class="kwrd"><</span><span class="html">param</span> <span class="attr">name</span><span class="kwrd">="autoUpgrade"</span> <span class="attr">value</span><span class="kwrd">="true"</span> <span class="kwrd">/></span></pre><pre class="alteven"><span id="lnum7" class="lnum"> 7:</span> <span class="kwrd"><</span><span class="html">param</span> <span class="attr">name</span><span class="kwrd">="initParams"</span> <span class="attr">value</span><span class="kwrd">="collection=URL_TO_CXML"</span> <span class="kwrd">/></span></pre><pre class="alteven"><span id="lnum8" class="lnum"> 8:</span> <span class="kwrd"><</span><span class="html">a</span> <span class="attr">href</span><span class="kwrd">="http://go.microsoft.com/fwlink/?LinkID=149156&v=4.0.50424.0"</span> <span class="attr">style</span><span class="kwrd">="text-decoration:none"</span><span class="kwrd">></span></pre><pre class="alteven"><span id="lnum9" class="lnum"> 9:</span> <span class="kwrd"><</span><span class="html">img</span> <span class="attr">src</span><span class="kwrd">="http://go.microsoft.com/fwlink/?LinkId=161376"</span> <span class="attr">alt</span><span class="kwrd">="Get Microsoft Silverlight"</span> <span class="attr">style</span><span class="kwrd">="border-style:none"</span><span class="kwrd">/></span></pre><pre class="alteven"><span id="lnum10" class="lnum"> 10:</span> <span class="kwrd"></</span><span class="html">a</span><span class="kwrd">></span></pre><pre class="alteven"><span id="lnum11" class="lnum"> 11:</span> <span class="kwrd"></</span><span class="html">object</span><span class="kwrd">></span></pre>So I can re-use this XAP in many places and just change the initParams value in the <object> tag. I build the XAP and now I can place it anywhere.
Step 5- Publish the result
The final step is to publish everything. Remember the CXML file and the folder of images? They need to reside somewhere. Here are two critical things to note:
- If they (collection CXML file and images) are not residing in the same location as the XAP implementing the PivotViewer control, it must have cross-domain policies (clientaccesspolicy.xml) in place persuant to the rules of Silverlight and cross-domain. Otherwise it won’t work. PivotViewer makes network requests and this policy is required by Silverlight in cross-domain situations.
- You may need to add a MIME type mapping on your server in order to serve the CXML file. I did (on Windows 2003). I simply added a MIME type mapping for .cxml and gave it the content type of text/xml and it worked.
Once I have all that published, I can deploy my HTML page hosting the XAP and pointing to my collection source. As an example, here is my final result for this: Bing’s Best Pivot Collection. Notice how the Category column now shows as a filter source on the left. Had I made more columns, there would be more filter options. I also could have made more metadata and populated the HREF attribute of the data to actually link to something.
The cool thing as well is that any collection that works with the Pivot schema works. You can find some samples at the GetPivot Developer site:
- http://content.getpivot.com/Collections/dogbreeds/dogbreeds.cxml
- http://content.getpivot.com/Collections/sportsillustrated/sportsillustrated.cxml
- http://content.getpivot.com/Collections/2009nflteams/2009nflteams.cxml
Using the project the way I created it, I can just input these URLs in my initParams to change the collection I want it to view. I was also able to use the Microsoft Organization Pivot Collection that LiveSide created directly in this without modification as well: MSFT Organization Pivot in Silverlight.
Summary
After spending a few minutes with the control, the simplest display scenario is very simple. In fact, creating the collection source I think will be the most challenging…to determine what is the appropriate metadata that you need and want to display to your users to interact with in your application.
You can download my sample project here: PivotViewerSimpleSample.zip
Hope this helps!